
![]()
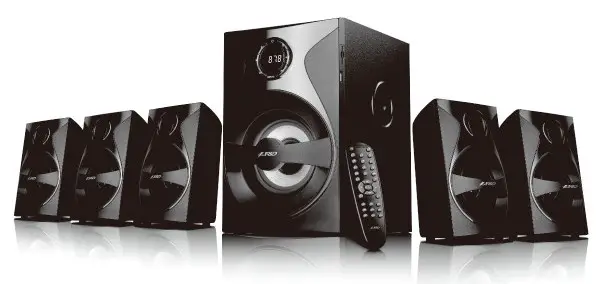
F3800X1.5 Computer Multimedia Speaker
User Manual
Caution
- Do not place system in high temperatures or humid environments, keep the system dry and handle with care to avoid damage.
- In order to avoid electric shock and other accidents, do not open the back panel cover for repair without professional guidance.
- In case fragments or other liquids are accidentally sprinkled inside the cabinet, please switch off the power immediately.
- In case of repair,please come to F&D’s professional maintenance for help.
- Switch off the power and unplug from the power jack when the system is not on work.
- Keep the cabinet vent far from the wall by 20mm at least and the air vent should not be blocked.
Packaging content
| 1 | Speaker | 1unit |
| 2 | RCA to RCA cable | 3pcs |
| 3 | RCA to 3.5mm cable | 1pc |
| 4 | Remote control | 1pc |
| 5 | Manual & warranty card | 1pc |
Front panel keys
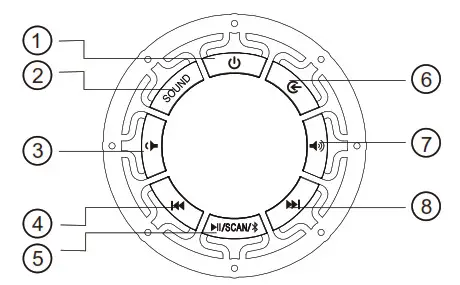
| 1. Standby2. Sound3. Decrease volume4. Previous | 5. Play/Pause/Scan/BT Pair6. Source7. Increase volume8. Next |
- Turn on/off the unit.
- Sound:Switch between Normal & Prologic sound effects.
- /7. Decrease or Increase the volume level.
- Previous:a. USB/SD mode: Short press to select previous song and long press to select previous folder.b. FM mode: Short press to select previous stored station, FM LED dispaly flash once. When it reaches to 1st stored station/channel, short press of this key does not change the channel & LED dispaly remains bright.c. Bluetooth mode: short press to select previous song.
- Play/Pause/Scan/BT Pair:a. USB/SD Mode: Short press for play/pause the music playback.b. FM Mode: Short press to start Auto Search & this will store the found frequencies (channels) automatically.c. Bluetooth mode:short press to play/pause music. long press will enter in to pairing mode, blue LED dispaly will flash fast.
- Source:Switch between BT,DVD, AUX, USB/SD, and FM mode. LED dispaly on subwoofer panel will be bright to indicate related source mode.
- Next:a. USB/SD mode: Short press to select next song and long press to select next folder.b. FM mode: Short press to select next stored station, FM LED dispaly flash once. When it reaches to last stored station/channel, short press of this key does not change the channel & LED dispaly remains bright.c. Bluetooth mode: short press to select next song.
Remote control
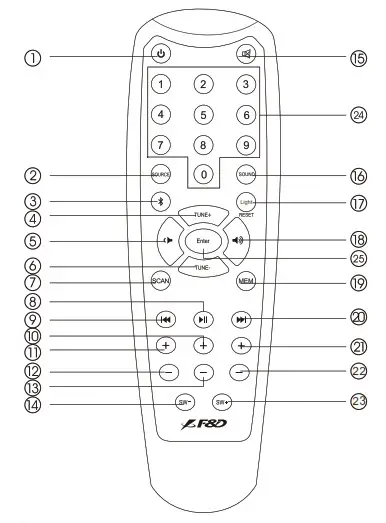
| 1. Standby ON/OFF2. Source button3. Bluetooth pairing button4.Tune + button5. Volume decrease6. Tune – button7. FM auto scan button8. Play/Pause button9. Previous button10. Center volume increase button11. Front volume increase button12. Front volume decrease button13. Center volume decrease button | 14. Bass decrease button15. Press to mute or unmute the sound16. Sound button17. Light/Reset button18. Volume increase button19. FM station Memory button20. Next button21. Rear volume increase button22. Rear volume decrease button23. Bass increase button24. Numeric keys25. Enter key |
Remote control keys function
1. ![]() : Turn on/off unit.2. Source: Switch betweenBT, DVD, AUX, USB/SD and FM mode.3.
: Turn on/off unit.2. Source: Switch betweenBT, DVD, AUX, USB/SD and FM mode.3. ![]() :short press to enter in to Bluetooth mode & long press will enter in to Pairing mode.,blue LED dispaly will flash fast.4/6. Tune+/-: FM mode:Fine Tuning: Short press to increase or decrease one step (100Khz), FM LED dispaly flash once. LED dispaly stop flashing once it reaches to Minimum or Maximum frequency.Manual Tuning: Long press of this key works for Manual tuning, It finds the next available frequency.5/18.
:short press to enter in to Bluetooth mode & long press will enter in to Pairing mode.,blue LED dispaly will flash fast.4/6. Tune+/-: FM mode:Fine Tuning: Short press to increase or decrease one step (100Khz), FM LED dispaly flash once. LED dispaly stop flashing once it reaches to Minimum or Maximum frequency.Manual Tuning: Long press of this key works for Manual tuning, It finds the next available frequency.5/18. ![]() : Decrease or increase the master volume.7. Scan: FM mode: Short press to start Auto Search & this will store the found frequencies (channels) automatically.8.
: Decrease or increase the master volume.7. Scan: FM mode: Short press to start Auto Search & this will store the found frequencies (channels) automatically.8. ![]() :Play/Pause:a. USB/SD Mode: Short press for play/pause the music playback.b. Bluetooth mode:short press to play/pause music.9.
:Play/Pause:a. USB/SD Mode: Short press for play/pause the music playback.b. Bluetooth mode:short press to play/pause music.9. ![]() :Previousa. USB/SD mode: Short press to select previous song and long press to select previous folder.b. FM mode: Short press to select previous stored station, FM LED dispaly flash once. When it reaches to 1st stored station/channel, short press of this key does not change the channel & LED dispaly remains bright.c.Bluetooth mode: short press to select previous song.10/13. Center+/-: Increase or decrease volume of center speaker.11/12. Front+/-: Increase or decrease the volume of front speakers.14/23. SW+/-: Increase or decrease the volume of subwoofer.15.
:Previousa. USB/SD mode: Short press to select previous song and long press to select previous folder.b. FM mode: Short press to select previous stored station, FM LED dispaly flash once. When it reaches to 1st stored station/channel, short press of this key does not change the channel & LED dispaly remains bright.c.Bluetooth mode: short press to select previous song.10/13. Center+/-: Increase or decrease volume of center speaker.11/12. Front+/-: Increase or decrease the volume of front speakers.14/23. SW+/-: Increase or decrease the volume of subwoofer.15. ![]() : Press it to mute or unmute the sound.16. Sound: switch between Normal & Prologic sound effects.17. Light/Reset: short press to turn on/off light.long press to go to default settings.19. MEM: Short press of this key work to store tuned station through Fine or Manual tuning. FM LED dispaly flash once to indicate store/save operation.(max. 100 stations).20.
: Press it to mute or unmute the sound.16. Sound: switch between Normal & Prologic sound effects.17. Light/Reset: short press to turn on/off light.long press to go to default settings.19. MEM: Short press of this key work to store tuned station through Fine or Manual tuning. FM LED dispaly flash once to indicate store/save operation.(max. 100 stations).20. ![]() :Nexta.USB/SD mode: Short press to select next song and long press to select next folder.b.FM mode: Short press to select next stored station, FM LED dispaly flash once. When it reaches to last stored station/channel, short press of this key does not change the channel & LED dispaly remains bright.c.Bluetooth mode: short press to select next song21/22. Rear+/-: Increase or decrease volume of rear speakers.24. (0-9 ) Numeric Keysa. USB/SD Mode: directly press numeric keys through remote to select your favorite song if you know the song number in the folder. One folder limits to 999 songs and press “9 9 9” within short time to select 999th song. The system will automatically play the last song of the folder if you press number excess of song numbers of that folder.b. FM Mode: directly press numeric keys through remote to select your favorite station if you know the station number (1~100).Or press 3 or 4 digits of frequency to play that station, for example, 1026 for 102.6 MHz station. If station not found, the unit will state at current station only.25. Enter key: Confirm setting.
:Nexta.USB/SD mode: Short press to select next song and long press to select next folder.b.FM mode: Short press to select next stored station, FM LED dispaly flash once. When it reaches to last stored station/channel, short press of this key does not change the channel & LED dispaly remains bright.c.Bluetooth mode: short press to select next song21/22. Rear+/-: Increase or decrease volume of rear speakers.24. (0-9 ) Numeric Keysa. USB/SD Mode: directly press numeric keys through remote to select your favorite song if you know the song number in the folder. One folder limits to 999 songs and press “9 9 9” within short time to select 999th song. The system will automatically play the last song of the folder if you press number excess of song numbers of that folder.b. FM Mode: directly press numeric keys through remote to select your favorite station if you know the station number (1~100).Or press 3 or 4 digits of frequency to play that station, for example, 1026 for 102.6 MHz station. If station not found, the unit will state at current station only.25. Enter key: Confirm setting.
Bluetooth pairingSwitch to Bluetooth mode, F3800X will automatically search the Bluetooth device. If the device paired before, F3800X will connect automatically. If can’t find paired device, F3800X will enter pairing mode automatically, Bluetooth LED dispaly under pairing button flashes quickly.
- Active “Bluetooth” function on your device and search for “F3800X”. Enter “0000” if your device asks for the PIN code.
- After pairing successfully, bluetooth LED dispaly will be bright, and ready for playing music. Recommend to adjust suitable volume before playing music.Tips: To make sure your PC or notebook is working well with our Bluetooth speakers, it is recommended that you check with your PC or notebook vendor first. Make sure the correct Bluetooth driver software is installed
Prologic function
A. Using SOUND key you can convert 5.1 channel into 5.0CH/PROLOGIC effect through AUX Input.B. To get the real 5.1 effect, connect 5.1CH output of your DVD to the input of F3800X & select “PROLOGIC” through sound key of remote control.
System connection
![]()
Instruction of rear board
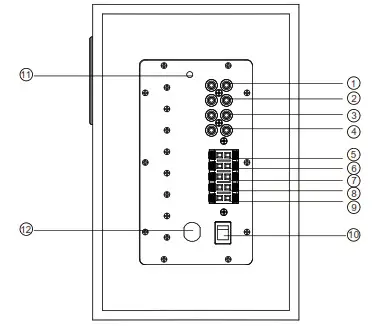
| 1. AUX L/R input2. DVD F.R/F.L input3. DVD S.R/S.L input4. DVD SW/Center input5. Speaker front right output6. Speaker front left output | 7. Speaker center output8. Speaker rear right output9. Speaker rear left output10. Power switch11. FM antenna12. Power cable |
Specifications
Output Power(RMS): 30W+10WX5Speaker Unit:Satellites: 3″Subwoofer: 5.25″Frequency Response:Satellites: 40Hz-125HzSubwoofer: 120Hz-20KHzS/N Ratio70dBSeparation40dBPower:220V-240V AC 50/60Hz 0.32AUnit size:Satellites: W115XD104XH176mmSubwoofer: W193XD282XH298mm
![]() WARRANTY CARD
WARRANTY CARD
WARRANTY REGISTRATION CERTIFICATE*************************************************Mr./Mrs/Ms First Name. _______________________________________Last Name: __________________________________________________Address: ____________________________________________________Contact No: _________________________________________________Product Name: _______________________________________________Model No: __________________________________________________Serial No: ___________________________________________________Date Purchased: ______________________________________________Invoice No.: _________________________________________________Retail Outlet: ________________________________________________Where Purchase: ______________________________________________(Please pant Me name 8 address)SECTION 1
WARRANTY TERMS & CONDITIONS*****************************************The warranty will be effective only if the warranty card is completed and returned to the company within 14 days from the date of purchase.We guarantee the provision of free services of ![]() product within the warranty period, from its date of purchase from our Authorised Dealer. The period and conditions of our warranty service are as follow:
product within the warranty period, from its date of purchase from our Authorised Dealer. The period and conditions of our warranty service are as follow:
- The warranty covers services by our
 Authorised Dealer. This warranty card together with the receipt must be presented when servicing is required. This warranty card is irreplaceable in the event of loss.
 - Repair services will be provided for defects arising from normal usage for the following period, commencing from the date of purchase from our, Authorised Dealer. (Parts would be replaced when necessary)A. Parts. 1 yearB. Technical service free 1 year
- Under the following circumstances, service and parts will be chargeable even within the warranty period:A. Failure to present the warranty card and receipt when servicing is required.Full particulars not clearly shown or alterations made against the actual information.For e.g.: Alteration of the date of purchase, serial numbers-altered or removed.B. This unit being tampered with, altered in any way by any unauthorized technicians, or which has been subjected to misuse, negligence, or accident. This guarantee does not cover damage occurring in transit by or from the customer.C. The defect is caused by the attack of household pests, fire, lightning, natural disasters, pollution, abnormal voltage or the usage of generator.
Shenzhen Fenda Technology Co., Ltd.Add: Fenda Hi-Tech Park, Zhoushi Road, Shiyan, Baoan, Shenzhen, ChinaP.C. : 518108 http://www.fenda.com
![]() WARRANTY CARD
WARRANTY CARD
DISTRIBUTOR’S COPY WARRANTY REGISTRATION CERTIFICATE***************************************************************************Mr./Mrs/Ms First Name. _______________________________________Last Name. __________________________________________________Address: ____________________________________________________Contact No.: _________________________________________________Product Name. _______________________________________________Model No: __________________________________________________Serial No: ___________________________________________________Date Purchased: ______________________________________________Invoice No: __________________________________________________Retail Outlet Where Purchased: ___________________________________(Please print the name & address)SECTION 2
WARRANTY TERMS & CONDITIONS******************************************The warranty will be effective only if the warranty card is completed and returned to the company within 14 days from the date of purchase.We guarantee the provision of free services of ![]() product within the warranty period, from its date of purchase from our Authorised Dealer. The period and conditions of our warranty service are as follow:
product within the warranty period, from its date of purchase from our Authorised Dealer. The period and conditions of our warranty service are as follow:
- The warranty covers services by our ),C no Authorised Dealer. This warranty card together with the receipt must be presented when servicing is required. This warranty card is irreplaceable in the event of loss.
- Repair services will be provided for defects arising from normal usage for the following period, commencing from the date of purchase from our Authorised Dealer. (Parts would be replaced when necessary)A. Parts. 1 yearB. Technical service free 1 year
- Under the following circumstances, service and parts will be chargeable even within the warranty period:A. Failure to present the warranty card and receipt when servicing is required.Full particulars not clearly shown or alterations made against the actual information.For e.g.: Alteration of the date of purchase, serial numbers-altered or removed.B. This unit being tampered with, altered in any way by any unauthorised technicians or which has been subjected to misuse, negligence or accident. This guarantee does not cover damage occuring in transit by or from the customer.C. The defect is caused by the attack of household pests, fire , lighting , natural disasters, pollution,abnormal voltage or the usage of generator.
 report this ad
Shenzhen Fenda Technology Co., Ltd.Add: Fenda Hi-Tech Park, Zhoushi Road, Shiyan, Baoan, Shenzhen, ChinaP.C. : 518108 http://www.fenda.com
 SHENZHEN FENDA TECHNOLOGY CO.,LTD,GUANGDONG,PRCADD: Fenda Hi-Tech Park, Zhoushi Road, Shiyan, Baoan, Shenzhen, Guangdong, PRCTel: +86-755-27486668 (800 line) Fax: +86-755-27353777 P.C.: 518108
[xyz-ips snippet=”download-snippet”]