

FAKRO Loft Ladder
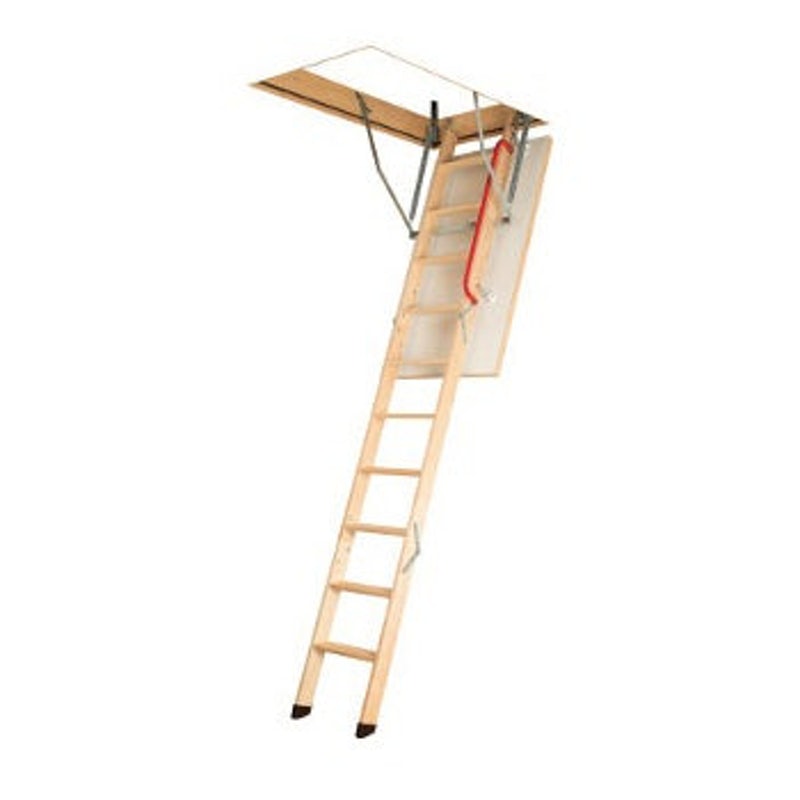
SAFETY & OPERATION
IMPORTANT! Please read all these installation instructions before starting to install your loft ladder.
The ladder should be high enough to allow you to climb up into the loft without exceeding the maximum permitted safe working height. The ladder must bear a load corresponding to the weight of the fitter plus the weight of the loft ladder.
Do not use the ladder as an access passage during building or renovation work. Do not use the ladder if the ceiling height exceeds the maximum ceiling height stated in the installation instructions or on the product label. For safety, always face the ladder when climbing up and down and grip at least one string of the ladder. The ladder must be used only by one person at a time.
Do not use the ladder if it is faulty or damaged. The springs are very taut. Take care when adjusting springs. Only adjust the spring mechanism when the ladder is folded (i.e. the springs are under least tension). Great care should be taken when removing springs. If the ladder is delivered unassembled, read the assembly instructions carefully before assembling and installing the ladder.
The ladder is tested to 150kg (maximum load). A load in excess of 150kg may cause damage to the ladder and constitutes a risk of personal injury.
NB! Lubricate all moving metal parts with oil immediately after assembly. Parts must subsequently be lubricated at least once a year.
Pre-Use and periodic checks:
- Check stiles and treads are not split, warped, bowed, loose, rotten or otherwise damaged.
- Check all screws, bolts and nuts are secure and tight (do not overtighten).
- Check trapdoor locks into position correctly.
- Check metal parts are not corroded or otherwise damaged.
- Check all hinges operate smoothly (lubricate periodically – see label on trapdoor).
- Check ladder sections operate smoothly when opened.
- Check ladder sections are straight when fully opened.
- Check ladder feet rest firmly on the floor.
- Check ladder sections are flat and correctly positioned once folded.
USE
- Never use this loft ladder for purposes for which it has not been designed, such as trade or building work.
- Never use this product unless it has been fully, and correctly, installed.
- Fully open trapdoor before unfolding the ladder.
- Ensure the springs and connecting wires have not become trapped or snagged.
- Ensure the springs and connecting wires are correctly positioned and are secure.
- Fully unfold ladder before use.
- Ensure both ladder feet rest firmly on the floor before climbing the ladder.
- Inspect the ladder before climbing (see above) – do not use if damaged.
- Only wear suitable footwear whenever ascending or descending the ladder.
- Maintain 3 points of contact by gripping the handrail or ladder stiles when ascending or descending.
- Do not overload the ladder by carrying heavy objects.
- Take care when carrying awkward shaped objects up and down the ladder.
- Keep a firm grip on anything being carried to prevent the object falling.
- Only ascend and descend the ladder by facing the treads.
- Never exit the ladder by stepping away from the treads.
- Ensure the trapdoor is securely locked after use.
SAFETY WARNING
- Beware of finger trap hazards
- Assembled springs are under tension and could cause the trapdoor to close without warning
- DO NOT climb or descend ladder until fully installed and trimmed to correct length
- Power tools should ONLY be used to secure the casing to the rafters.
- Ensure rafters are sound, secure and capable of supporting the weight of the ladder.
INSTALLATION REQUIREMENTS
Two persons are required to install this product.
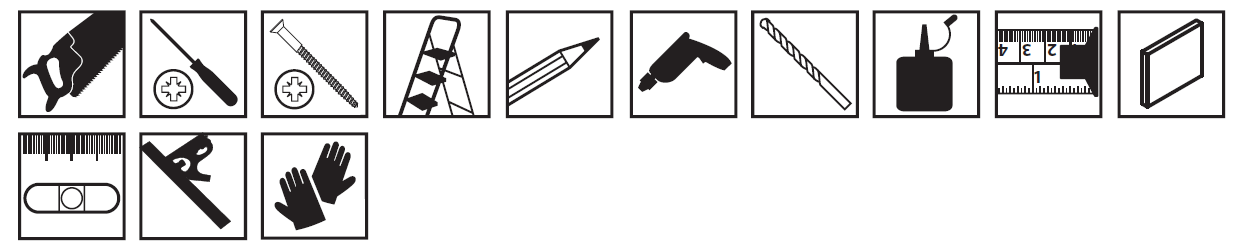
Tools Required:
Additional Components Required:

To temporarily support the ladder during installation, we recommend the use of two suitable timber battens.Each supporting batten should be able to be fitted securely across the full width of the loft opening and capable of supporting the full weight of the assembled ladder.
Additional screws are required to fix the casing frame to the loft floor.Please see diagram on page 6 (step 10) to calculate minimum size.
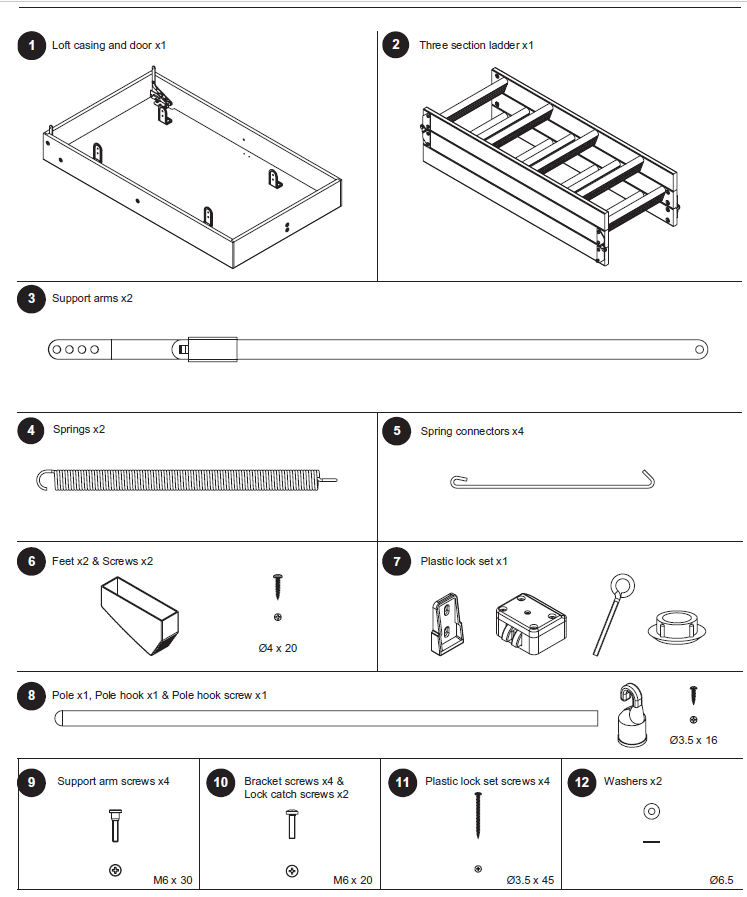
PRODUCT CONTENTS
PRE-INSTALLATION
Hatch Opening Adjustments (if required).Minimum / recommended hatch opening size:
1.15 x 0.57 (m)We recommend that you wear goggles and a mask for protection from falling dust and other particles from the loft. Remove all items of furniture from the work area. Cover the floor. Frame and cut the opening through plaster/other ceiling material (see table 1). This allows space for spacer blocks and ensures that the loft ladder is fitted perpendicularly. If the loft ladder cannot be fitted in the normal way, i.e. parallel with the ceiling joists, contact a qualified craftsman for advice. Figures 1, 2 and 3 show how to frame the ceiling opening. If you fit the loft ladder parallel to the existing ceiling joints, only single ceiling joists and single transverse joists are required.
If you fit the loft ladder at right angles to the joists, you will need to make double transverse joists of the same size as the existing ceiling joists.
WARNING: If the ceiling joists are made in a material other than timber, e.g. steel, contact a qualified craftsman. Never cut through a load-bearing joist without advice from a qualified craftsman. Take great care when cutting ceiling joists. For safety’s sake, if there is no loft flooring, lay planks across the ceiling joists to allow safe passage in the loft during installation.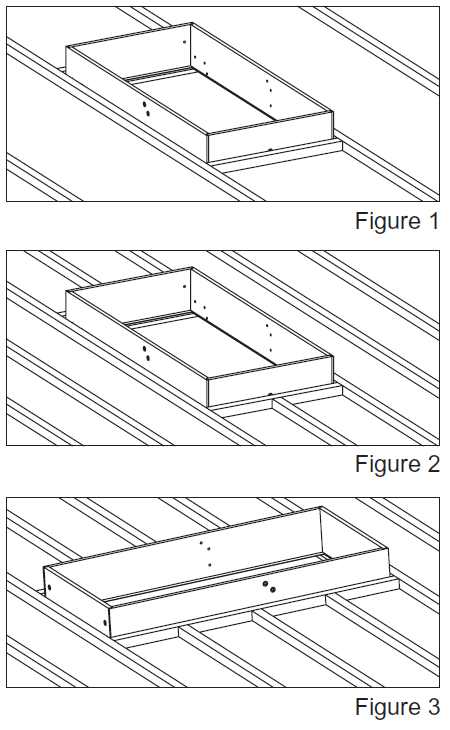
INSTALLATION
STEP 1
Place the ladder inside the surround and between the ‘L’ support brackets. Open the casing surround fully. To avoid injury, ensure the casing is lifted fully to prevent it from falling.Lift and align ladder with the top predrilled hole of the ‘L’ support brackets to fit. Repeat on the other side.

STEP 2
A) Calculate the floor to ceiling height using the below table.
B) Use the position calculations to fit the support arms onto the loft casing.

C) Remove the lower screw from the upper ladder section hinge and fit the support arm to the ladder section hinge NB – DO NOT overtighten.
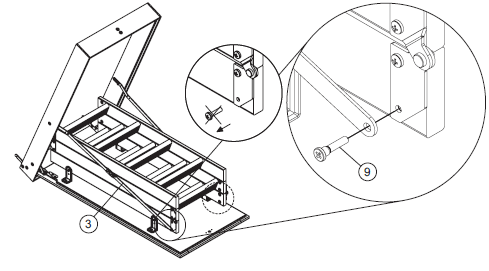
STEP 3
Fit the catch lock to the trapdoor. 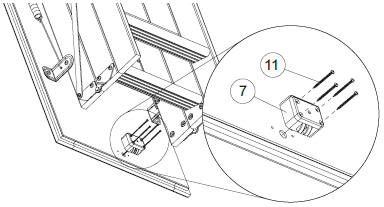
STEP 4
A) Mount the spring hook on the lower hole of the ‘L’ support bracket and connect the other side to the spring.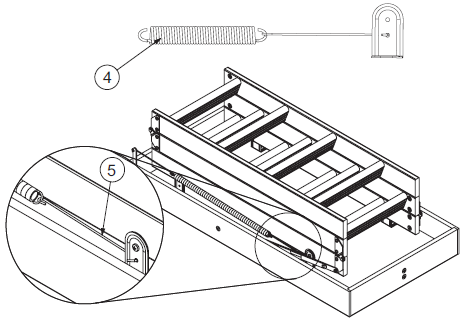
B) Add another spring hook to the opposite side of the spring.

STEP 5
Lower the casing surround and hook spring hooks to the top of the hinge mechanism.BEWARE – Trap hazard.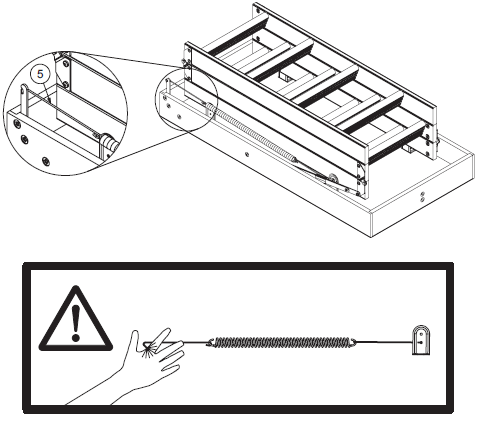
STEP 6
Lift the ladder into the loft. 
STEP 7
Fit the support battens to the short side of the hatch opening.NB – Overhang to allow loft ladder to rest on battens but enable the hatch door to open.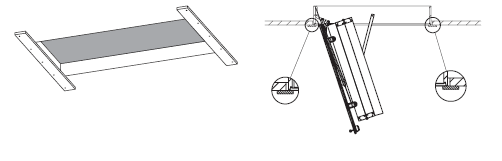
STEP 8
Lower the loft ladder into the hatch recess from the loft and allow it to rest on the support battens.Ensure the battens can support the weight of the loft ladder.
STEP 9
Fully open the trapdoor. Fit the locking catch bracket.
STEP 10
Calculate the type of fixings required to fit the casing surround to the hatch opening. 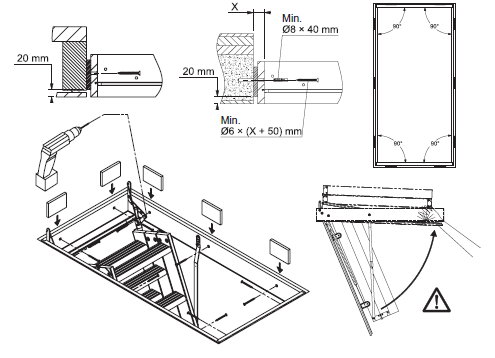
Fit the casing surround to the hatch opening. Ensure the ladder is flat, level and square before fixing.NB – Use packing pieces between the casing and opening if required.
Cut the loft ladder to the length required (if needed). If the ladder does not need trimming, please go to step 14.
STEP 11
A) Rest the ladder on a suitable support before trimming.
B) Using a support batten (or a suitable alternative), mark the angled (not vertical) distance from the bottom of the middle section to the floor.

Measure the ladder section length required and mark this on both sides of the bottom section of the ladder.
STEP 12
Cut the section to the required length. Repeat process for the other side. 
STEP 13
Fit the feet to the ends of the bottom ladder section.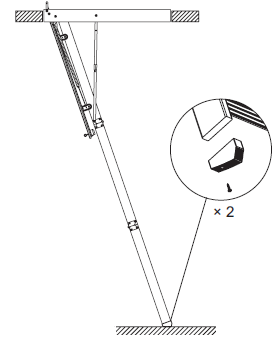
Fully extend the ladder. Ensure the ladder feet rest firmly on the floor and that the treads are horizontal.
STEP 14
Click the catch operator fixture into place and install the eye hook into the lock by turning clockwise until the lock claws starts pulling into the lock – then one turn counter-clockwise 
STEP 15
Fold and close the loft ladder using the operating pole. If required, unscrew and adjust the locking catch bracket to ensure the trapdoor closes correctly with no air gaps. 
CARE & MAINTENANCE
- Repairs and maintenance shall be carried out by a competent person and be in accordance with these instructions. NOTE: A competent person is someone who has the skills to carry out repairs or maintenance, e.g. trained by the manufacturer.
- For repair and replacement of parts, e.g. feet, springs and hooks, contact Werner UK Sales & distribution Ltd. on 01621 745 900 or email: [email protected]
- Ladders shall always be operated in accordance with the producer’s instructions.
- Timber loft ladder stiles and treads should not be painted or varnished.
- Periodically lubricate all moving parts with light oil.
- Periodically clean all timber parts to prevent the build-up of dirt, grease and other contaminants.
[xyz-ips snippet=”download-snippet”]