
FJ36378 Weather StationFJ3378-WWVB Manual
1. WEATHER STATION FEATURES:1.1 Main Station
- The weather forecasting function
- WWVB radio controlled time function ( ON or OFF)
- Date and weekday display;
- Time in optional 12/24 hour format
- Daily Alarm Function
- Automatic snooze function
- Moon phase display
- USB Charger Output Socket
- 5 Levels brightness backlight with power adapter
- Comfort display
- The trend display of Temperature, Humidity and Barometric
- Temperature:— Temperature alternatively in °C or °F.— Indoor temperature measurement ranges: 15°F (-9.9°C) to 122°F (50°C)— Outdoor temperature measurement ranges: -4°F (-20°C) to 140°F (60°C)— Outdoor thermometer and frost alert
- Humidity: Indoor & Outdoor measurable range: 20%RH ~ 95%RH
- Barometric pressure:— Barometric pressure measurement ranges: 17.72 inHg (600 hPa/mb) to 32.50 inHg(1100 hPa/mb)— Pressure alternatively in inHg or mb/ hPa
- Minimum/Maximum display for humidity and temperature
- 3 Remote Sensor can be connected (only 1 included)
1.2 Remote Sensor
- Wireless Outdoor Sensor:— Wall Mount or Table Stand— 433.92MHz RF transmitting frequency— 200 feet transmission range in an open area
1.3 Power Supply:
- Weather Station: Battery: 2 x AA (Not included) or Power Adapter (Included)
- Wireless Outdoor Sensor: Battery:2 x AA (Not included)
1.4 Weather Station Appearance
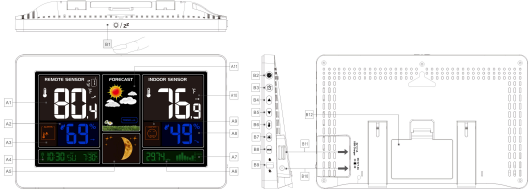
Part A Weather Station Front
A1: Remote TemperatureA2: Remote HumidityA3: Remote Temperature AlertA4: Time/Calendar or Alarm timeA5: Moon Phase A6: Barometric pressureA7: Histogram shows the atmospheric pressureA8: Indoor HumidityA9: Indoor comfortA10: Indoor TemperatureA11: Weather Forecasting
Part B Weather Station Back
B1: “![]() ” touch fieldB2: “
” touch fieldB2: “![]() ” buttonB3: “
” buttonB3: “![]() ” buttonB4: “▲” buttonB5: “▼” buttonB6: “
” buttonB4: “▲” buttonB5: “▼” buttonB6: “![]() ” buttonB7: “
” buttonB7: “![]() ” buttonB8: “MEM” buttonB9: Alarm on/off shift switchB10: Power supply socketB11: USB charger output socketB12: Battery compartment
” buttonB8: “MEM” buttonB9: Alarm on/off shift switchB10: Power supply socketB11: USB charger output socketB12: Battery compartment

Part C Wireless Outdoor Sensor:
 report this ad
C1: LCD display TemperatureC2: LCD display HumidityC3: Transmit signal LEDC4: “°C/°F” switch buttonC5: “TX” reset button C6: Battery compartment C7: 3 channel select
2 INITIAL OPERATION AND NOTES2.1 Initial Operation
- Open the weather station battery compartment, insert 2 x AA batteries observing polarity [ “+” and ” ” marks]
- Remove the battery compartment on the Wireless Remote Sensor, insert 2 x AA batteries observing the correct polarity (+ and – marks) and close the battery compartment.
- When the power is connected all the icons on the LCD display will light up for 3 seconds, you will hear a beep tone and the weather station will start to detect the indoor temperature and humidity
- The weather station will start to make a connection to the outdoor remote sensor. This operation takes about 3 minutes and is displayed by a flashing reception RF icon “
 ” in the “Remote Sensor” display area on the receiver.
 - Once the weather station has created a connection to the outdoor sensor the clock will start automatically searching for the WWVB Signal to set the time and date. The radio mast icon “” will flash showing it is searching for signal, it may take up to 7 minutes to search.
2.2 Notes for Customer before Use
} During the WWVB signal search mode only the “![]() ” and “▲” button will function, all other buttons havenofunction. And backlight will not keep lighting during this moment even if the adapter plug in. Press the“▲” buttonitcan cancel the WWVB signal search and all buttons and backlight will function.
” and “▲” button will function, all other buttons havenofunction. And backlight will not keep lighting during this moment even if the adapter plug in. Press the“▲” buttonitcan cancel the WWVB signal search and all buttons and backlight will function.
} If weather station failed to receive transmission from outdoor sensor (“– –”display on the main stationLCD), pressandhold “▼” button for 3 seconds to receive transmission![]() manually. RF icon “ ” flashes on the LCDandtheweatherstation to re-receive the data from outdoor sensor. Or open the sensor battery compartment, press theTXbuttonto
manually. RF icon “ ” flashes on the LCDandtheweatherstation to re-receive the data from outdoor sensor. Or open the sensor battery compartment, press theTXbuttonto
FJ3378-WWVB Manual
connect the sensor and station again.3 TIME, TIME ZONE AND CALENDAR SETTING 3.1 Manual Time Setting
} Press once “![]() ” button, can switch the display calendar or second} Pressand hold down the “
” button, can switch the display calendar or second} Pressand hold down the “![]() ” button for 3 seconds, the 12/24 hour mode display starts to flash. Nowuse“▲” and“▼”buttons to set the correct 12/24 hour mode.}Press “
” button for 3 seconds, the 12/24 hour mode display starts to flash. Nowuse“▲” and“▼”buttons to set the correct 12/24 hour mode.}Press “![]() ” to confirm your setting, the Time Zones starts to flash. Now use “▲” and “▼” buttons set acorrecttimezone ( P, M, C, E ).}
” to confirm your setting, the Time Zones starts to flash. Now use “▲” and “▼” buttons set acorrecttimezone ( P, M, C, E ).}![]() Press “ ” to confirm your setting, the DSF display starts to flash. Now use “▲” and “▼” buttons toset theONorOFF}
Press “ ” to confirm your setting, the DSF display starts to flash. Now use “▲” and “▼” buttons toset theONorOFF} Press “
![]() ” to confirm your setting, the Hour display starts to flash. Now use “▲” and “▼” buttons toset thecorrecthour.}
” to confirm your setting, the Hour display starts to flash. Now use “▲” and “▼” buttons toset thecorrecthour.} Press “
![]() ” to confirm your setting, the Minute displays starts to flash. Now use“▲” and “▼” buttons toset thecorrectminute.}
” to confirm your setting, the Minute displays starts to flash. Now use“▲” and “▼” buttons toset thecorrectminute.} Press “
![]() ” button to confirm your setting, the Month and Date icon display starts to flash. Nowuse“▲” and“▼”buttons to set the date display on Month/Date or Date/Month.}
” button to confirm your setting, the Month and Date icon display starts to flash. Nowuse“▲” and“▼”buttons to set the date display on Month/Date or Date/Month.} Press “
![]() ” button to confirm your setting, the Year display starts to flash. Now use “▲” and “▼” buttonstosetthecorrect year.}
” button to confirm your setting, the Year display starts to flash. Now use “▲” and “▼” buttonstosetthecorrect year.} Press “
![]() ” button to confirm your setting, the Month display starts to flash. Now use “▲” and “▼” buttonstosetthecorrect month.}
” button to confirm your setting, the Month display starts to flash. Now use “▲” and “▼” buttonstosetthecorrect month.} Press “
![]() ” button to confirm your setting, the Date display starts to flash. Now use “▲” and “▼” buttonstosetthecorrect date.}
” button to confirm your setting, the Date display starts to flash. Now use “▲” and “▼” buttonstosetthecorrect date.} Press “
![]() ” to confirm your setting and to end the setting procedures.
” to confirm your setting and to end the setting procedures.
F.Y.I.:
} After 20 seconds without pressing any button, the clock switches automatically from Set Mode to Normal TimeMode.} The time zone must be set correctly according to the weather station area, or when the time signal isreceived,thetime will be incorrect
3.2 Automatic Time Setting
} The Weather Station automatically starts the WWVB Signal search up to 7 minutes of any restart or changeof batteries. Or press and hold down the“▲” button for 2 seconds to manually start the WWVB signal search.} The radio mast icon “
![]() ” will flash showing it is searching for signal. Once the signal is found the TimeandDatewillbe automatically set. If no signal is found within 7 minutes the radio mast icon will disappear and it will automaticallystart searching again in 1 hour.
” will flash showing it is searching for signal. Once the signal is found the TimeandDatewillbe automatically set. If no signal is found within 7 minutes the radio mast icon will disappear and it will automaticallystart searching again in 1 hour.
} At 1:00 / 2:00 / 3:00am the Weather Station automatically carries out a synchronization procedure withtheWWVBsignal to correct any deviations to the exact time. If this synchronization attempt is unsuccessful (Theradiomast symbol disappears from the display), the system will automatically attempt another synchronization at thenext full hour. This procedure is repeated automatically up to 5 times.
F.Y.I.:
} A flashing radio mast icon indicates that the WWVB signal reception has started } A continuously displayed radio mast icon indicates that the WWVB signal was received successfully} We recommend a minimum distance of 8 feet to all sources of interference, such as televisions or computer monitors} Radio reception is weaker in rooms with concrete walls (e.g.: in cellars) and in offices. Insuchextremecircumstances, place the system close to the window.} During the RC receive mode, only the“
![]() ” and “▲” button function, other button operation havenofunctionandbacklight will not lighting. If you want to carry out other functions of operation, please press “▲” buttontoexittheRCC receiving mode.
” and “▲” button function, other button operation havenofunctionandbacklight will not lighting. If you want to carry out other functions of operation, please press “▲” buttontoexittheRCC receiving mode.
4 DAILY ALARM AND SNOOZE FUNCTION SETTING4.1 Setting the Daily Alarm
} Press once “
![]() ” button, can switch the display calendar or alarm.} Press
” button, can switch the display calendar or alarm.} Press and hold down “
![]() ” button for 2 seconds until Alarm Time hour display starts to flash. Use the“▲” and“▼”buttons to set the required hour.}
” button for 2 seconds until Alarm Time hour display starts to flash. Use the“▲” and“▼”buttons to set the required hour.} Press “
![]() ” button to confirm your setting, the Minute display starts to flash. Use the “▲” and “▼” buttonstosettherequired minute.}
” button to confirm your setting, the Minute display starts to flash. Use the “▲” and “▼” buttonstosettherequired minute.} Press “
![]() ” button to confirm your setting and to end the setting procedure
” button to confirm your setting and to end the setting procedure
F.Y.I.:
} After 20 seconds without pressing any button the clock switches automatically from setting modetoNormal clockmode.
4.2 Switching ON/OFF the alarm signal
} The alarm shift switch is pushed in the “
![]() ” position, LCD
” position, LCD display the “
![]() ” icon next to the date, thealarmfunctionisopen} Press back of the alarm
” icon next to the date, thealarmfunctionisopen} Press back of the alarm shift switch is pushed in the
“
![]() ” position, the “
” position, the “![]() ” icon disappears, the alarmfunctionisclose} When alarm is ring, press any
” icon disappears, the alarmfunctionisclose} When alarm is ring, press any button except the “ ” button to stop the alarm signal. It is not necessarytoreactivate the alarm. It switches itself automatically to the alarm time which has already been set.
4.3 Snooze Function:
} Touch the “
![]() ” field
” field or press the “
![]() ” button the alarm signal sounds to get to SNOOZEmode. Thealarmsignal sounds again after approx. 5 minutes.
” button the alarm signal sounds to get to SNOOZEmode. Thealarmsignal sounds again after approx. 5 minutes.
5 WEATHER FORECAST AND BAROMETRIC5.1 Weather Forecast
} The weather station calculates a weather forecast for about the next 8 hours based on the barometric pressuretrend.Of course this forecast can‘t compare to that of professional weather services supported by satellitesandhighperformance computers, but merely provides an approximate indication of current developments. Pleasetaketheweather forecast from your local weather forecasting service into account as well as the forecast fromyour weatherstation. If there are discrepancies between the information from your device and from the local weather forecastingservice, please take the advice of the latter as authoritative.
} The weather station displays the following weather icon for next 8 hours weather forecast not current weather:
|
|
|
|
|
|
|
|
sunny |
slightly cloudy |
cloudy |
rainy |
Heavy |
rainy Snowy |


5.2 Barometric Pressure Display
} The current barometric pressure is automatically shown on the Weather Station once it starts receivingreadings.} Press and hold the “
![]() ” button for 2 seconds to enter the air pressure unit and weather settings, thepressureunits will be flashing display, Use the “▲” and “▼” button to set the pressure unit to display in the “hPa/mb” or “inHg”.} If the barometric pressure reading is below the minimum range, then LLLL will be displayed. If the barometricpressure reading is above the maximum range, then HHHH will be displayed.
” button for 2 seconds to enter the air pressure unit and weather settings, thepressureunits will be flashing display, Use the “▲” and “▼” button to set the pressure unit to display in the “hPa/mb” or “inHg”.} If the barometric pressure reading is below the minimum range, then LLLL will be displayed. If the barometricpressure reading is above the maximum range, then HHHH will be displayed.
5.3 Barometric Trend Display
} The weather station can display the barometric pressure trend.} You may see the following displays next to the weather forecast icon:
 The barometric pressure will rise.
The barometric pressure will remain constant.The barometric pressure will fall.
6. LUNAR PHASES AND TIDE INDICATOR:
} The Moon icon and tide indicator of the Weather Station will also display 12 different Moon phase and3kindsoftidephases according to the set calendar.
|
|
|
|
|
|
|
|
|
|
New moon |
Waxing halfmoon |
Halfmoon |
Waxing moon |
full Fullmoon |
Waning moon |
full Halfmoon |
Waning halfmoon |


7. TEMPERATURE, HUMIDITY AND COMFORT DISPLAY 7.1 °C or °F temperature display
} The temperature is displayed either in °C or °F. Briefly pressing the “▲” button allows you to switchbetweentheindividual modes.
7.2 Current Temperature and Temperature Trend Display } After you insert the batteries, the weather station measures the current temperature. The trend displayshowsaneutral temperature course . The further course of the trend display is determined as follows:
} If, after an hour, the temperature is more than 1°C higher than the value measured first, then a positive course is displayed .
} If, after an hour, the temperature is more than 1°C lower than the value measured first, then a negative course isdisplayed .
} If the temperature does not change within an hour, then the upward or downward pointing arrowbecomesahorizontal arrow. The measured temperature is then taken as the neutral value from which further prognoses are made.
7.3 Outdoor Temperature & Frost Alert Settings
} Press and hold down the “
![]() ” button for 2 seconds until the icon for the Temperature Alert” starts to flash} The icon of Upper limit of the Temperature alarm starts to flash. Use the “▲” and “▼” buttons toset therequiredmaximum
” button for 2 seconds until the icon for the Temperature Alert” starts to flash} The icon of Upper limit of the Temperature alarm starts to flash. Use the “▲” and “▼” buttons toset therequiredmaximum temperature. Press “
![]() ” to confirm your setting.
” to confirm your setting.
} The icon of the Lower limit of the Temperature alarm starts to flash. Use the “▲” and “▼” buttons toset therequiredminimum temperature. Press “
![]() ” button to confirm your setting and to end the setting procedure
” button to confirm your setting and to end the setting procedure
F.Y.I.:
} Before entering the setup, you must select the remote channel, different channels can set different temperaturealarm range
7.4 Activating and Deactivating Temperature & Frost Alert } Press “
![]() ” button to activate or deactivate the remote temperature alert, When the remote temperaturealarmisactivated, the temperature alarm icon is displayed in the remote sensor bar
” button to activate or deactivate the remote temperature alert, When the remote temperaturealarmisactivated, the temperature alarm icon is displayed in the remote sensor bar
} When the remote channel temperature value exceeds the set temperature range, will activate the alarm, theweatherstation will every minute continuous alarm 5 times, at the same time, temperature alarmin alarmicon”
![]() “flashes,If the alarm activates the temperature that is currently displayed on the channel, its temperature value and alar mupper
“flashes,If the alarm activates the temperature that is currently displayed on the channel, its temperature value and alar mupper limit icon
“
![]() “or lower limit icon”
“or lower limit icon”![]() ” also flashes
” also flashes
} When the temperature of REMOTE SENSOR is +30°F to + 37°F or –1°C to + 3°C, the frost alarm will be activated,symbol “
![]() ” flashing.
” flashing.
F.Y.I.:
} When the temperature is higher than the upper limit of the alarm temperature setting, the activation of the upper limit alarm, symbol ” ” flashing,
} When the temperature is lower than the lower limit of the alarm temperature, the lower limit alarmisactivated, and the symbol ” ” flashes
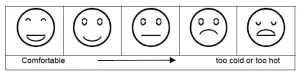
7.5 Comfort display
} Indoor comfort level is calculated according to the indoor temperature and humidity, a total of 5 levels.
7.6 Current Humidity and Humidity Trend Display
} After you insert the batteries, the weather station measures the current relative humidity. The trend displayshowsaneutral relative humidity course . The further course of the trend display is determined as follows: } If, after an hour, the relative humidity is more than 5% higher than the value measured first, thenapositivecourse
is displayed .
} If, after an hour, the relative humidity is more than 5% lower than the value measured first, thenanegativecourse is displayed .
} If the relative humidity does not change within an hour, the upward or downward pointing arrowbecomesahorizontal arrow. The measured relative humidity is then taken as the neutral value from which further prognosesaremade.
7.7 Maximum/Minimum Temperature and Humidity
} To view indoor/outdoor maximum, minimum temperature and humidity data, press the “MEM” button: Once to show the maximum temperature and humidity values.
Twice to sow the minimum temperature and humidity values
Three times to return to the current temperature and humidity levels
} To reset the maximum and minimum temperature and humidity, press and hold down the “MEM” buttonabout2seconds. This will reset all minimum and maximum data recorded to the current displayed values.
F.Y.I.:
} If the temperature reading is below ranges, the LL.L will be displayed. If the temperature readingisaboveranges, the HH.H will be displayed.
7.8 Remote Sensor Transmission:
} The weather station automatically starts receiving transmission from outdoor thermo sensor for outdoor temperature& humidity after batteries inserted.
} The outdoor sensor will automatically transmit temperature and humidity signal to the Weather Stationafter batteriesinserted.
} The weather station can connect up to 3 channel wireless sensor registration, the use of multiple wirelesssensor,thewireless sensor channel cannot choose the same channel at the same time (a total of 1, 2, 3 channel canchoose)
FJ3378-WWVB Manual
} Press the “▼” key can switch the display of different channels of remote temperature and humidity, whendisplayingthe symbol “
![]() “, will display the channel every 5 seconds automatically switch a channel
“, will display the channel every 5 seconds automatically switch a channel
} If Weather Station failed to receive transmission from outdoor sensor (“– –”display on the LCD), pressandhold“▼”button for 3 seconds to receive transmission manually. RF icon “
![]() ” flashes on the LCD,The Weather Stationtoreceive the outdoor sensor.
” flashes on the LCD,The Weather Stationtoreceive the outdoor sensor.
F.Y.I.:
} When the wireless sensor set up different channels, the weather station “REMOTE SENSOR” also want toswitchtothe same channel. When there is no wireless sensor signal transmission on the channel, “–” will bedisplayedinthechannel of the weather station} There is only 1 remote sensor included, please make weather station is stay in the same channel withremotesensor.
8. BACKLIGHT
} If the product is powered by batteries, touch the ” ” field. Backlight lit 15 seconds. } When the power supply of the product is inserted into the power supply adapter, the battery will automaticallydisconnect the power supply, and the backlight will always be
bright. Press the “ ” button to adjust thebrightnessofthe backlight, you can adjust the 5 state: 4 different brightness backlight and close the backlight. Userscanchooseaccording to the personal preferences of different brightness backlight or turn off the backlight. Turn off backlight whenyou
can touch the ” ” field to light the backlight 15 second.
9. USB Charger
} When you use USB charger to charging the electronic device, please make sure weather station is poweredbymainadapter, DO NOT use batteries only.
10.LOW BATTERY:
} If the battery icon “
![]() ” appears the batteries in the outdoor sensor should be replaced as soon as possible.
” appears the batteries in the outdoor sensor should be replaced as soon as possible.
[xyz-ips snippet=”download-snippet”]