Fanvil PA3

Port Definition
- Line in port: audio signal input, used to connect external audio input.
- Speaker port: according to the device input voltage adaptive output maximum power.4Ω speaker, POE/10W, 12V/10W, 18V/20W, 24V/30W.The greater the horn impedance, the smaller the output power.Suggested wire diameter: 18AWG or larger diameter.
- Line out port: audio signal output, for external headset or active speakers.
- Microphone port: the proposed use of electret condenser microphone, sensitivity: -38dB, bias voltage 2.2V. Microphone signal cable it is recommended to use a shielded cable and connect the shield cable to the grounding screw, improve anti-interference.
- Volume decrease key: adjust ring volume / call volume / broadcast volume. Long press the volume down key to broadcast the IP address by voice.
- Volume increase key: adjust ring volume / call volume / broadcast volume.
- Network / Registration LED: indicates network status, call status, registration status. Fast flashing: network anomaly or SIP account exception. Slow flashing: during a call. Always bright: successful registration.
- Ethernet port: WAN port, standard RJ45 port, 10 / 100M adaptive, support PoE input. It is recommended to use five or super five network cable.
- Power input port: 12V ~ 24V 2A input, according to the input voltage to determine the maximum output power amplifier.
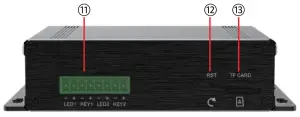
- USB port: connect the USB peripherals, such as USB flash disk, USB adapter, etc
- Function button port: connection the function button, you can make an emergency call through this button.
- Reset key: press and hold for 3S, and the indicator light will turn off, and the device will restart and restore the factory settings.
- TF card port: connection the TF card, used to store local audio files or records.
Installation
The first step: the device with metal strips (user-owned) fixed in the installation location.The second step: connect the function key, speaker, microphone and other peripheral devices to the corresponding port.The third step: plug the network cable and power, the device light flashes on behalf of the power connection is normal.
Searching device
Method 1:Download address: http://download.fanvil.com/tool/iDoorPhoneNetworkScanner.exe Open the iDoorPhone Network Scanner. Press the Refresh button to search the device and find the IP address.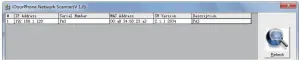
Method 2:Connect the speaker, by pressing the volume down key for 3 seconds(after 30 seconds after power on),the device automatically voice broadcast the machine’s IP address.
Method 3:Long press the volume up key for 3 seconds, the speaker issued a rapid beep, and then quickly press the Volume up key three times, beep stopped. Wait 10 seconds, successfully switch to dynamic IP after the system automatically voice broadcast IP address. Switching again will become a fixed IP address.
|
Default Setting |
|||
| Default DHCP Client | Enabled by default | Static IP address | 192.168.1.128 |
| Voice broadcast IP address | Hold the volume down key for 3 seconds | Default Web port | 80 |
Fast settings
Step 1: Log in to the device pageUse the web browser input IP (for example: http://192.168.1.128) access.The default user and password are admin.
Step 2: Set SIP accountSet SIP server address, port, user name, password and SIP user with assigned SIP account parameters. Select “Activate”, and then click [Apply] to save this setting.
Step 3: Set the volume (if not connected can skip)Intercom settings => Media Settings => Media SettingsSet the device volume size, as shown below, click [Apply].Hands-free speakerphone volume setting: normal call speaker volume size.Hands-free Mic Gain: microphone volume size.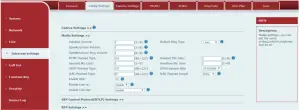
Step 4: Set function key (if not connected can skip)Set the function key as shown below for a quick start, click [Apply] to save this settings.Type: Memory keyNumber 1 (Value): the function key will dial to this number 1Number 2 (Value 2): if number 1 is unavailable, it will be forwarded to number 2.Subtype: speed dialLine: working line
Step 5: Set speaker (Default Panel speaker mode)Intercom settings => Media Settings => Speaker SettingsDefault Panel speaker mode, It is the intercom panel terminal with shell, in order to ensure the speech effect and avoid damaging the speaker, the output power is limited to 10W.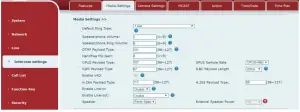
If you need a high-power speaker for broadcasting, you can adjust it to the external speaker mode:
![]()
The 10W / 20W / 30W can be selected according to the power of the external horn. But it is necessary to match the corresponding power adapter.
| Power adapter | Output Power | Speaker spec |
| PoE | 10W | 10W/4Ω |
| 12V/2A DC | 10W | 10W/4Ω |
| 18V/2A DC | 20W | 20W/4Ω |
| 24V/2A DC | 30W | 30W/4Ω |
 report this ad
Information on this document is subject to change without notice. Fanvil makes no warranties with Respect to this document, due to misuse this document is caused by indirect or incidental damages, Fanvil does not assume any responsibility. For more product information, please visit www.fanvil.com


References
[xyz-ips snippet=”download-snippet”]