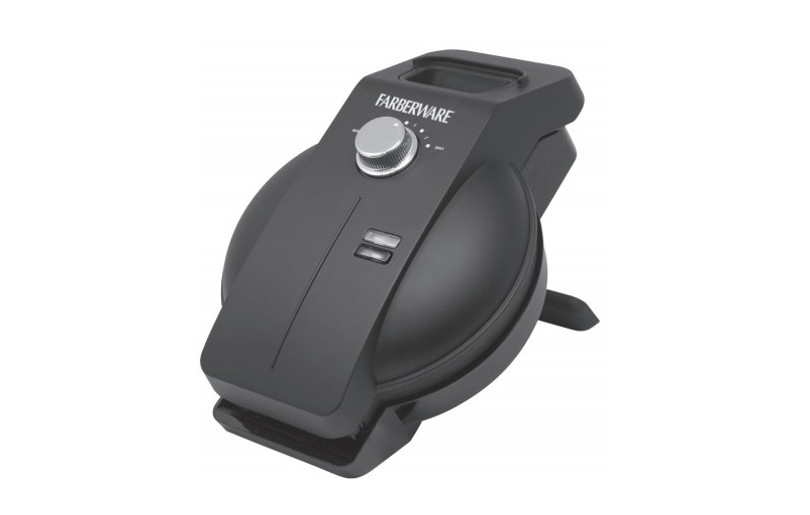

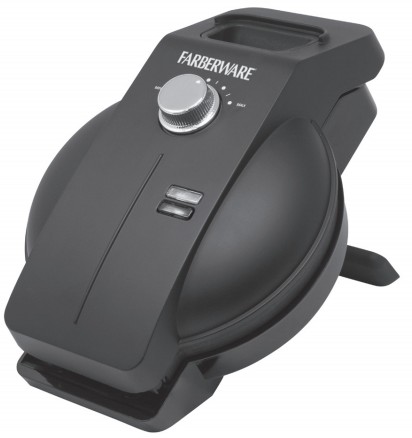
EASY POUR WAFFLE MAKER
Model Number: WM 43981UPC: 848052005143Customer Assistance1-855-451-2897 (US)
Please consider the option to recycle the packaging material.
IMPORTANT SAFEGUARDS
When using electrical appliances, basic safety precautions should always be followed, including the following:
- Read all instructions before use.
- Do not touch hot surfaces. Use handles or knobs.
- WARNING – to protect against electric shock, fire, and personal injury:– do not immerse cord, plug, or appliance in water or other liquids;– do not immerse the appliance or any electrical components in water or any other liquids;– always switch off and unplug the appliance before cleaning.
- Close supervision is necessary when any appliance is used by or near children.
- Unplug from wall outlet when not in use and before cleaning. Allow cooling before putting on or taking off parts, and before cleaning the appliance.
- Do not operate any appliance with a damaged cord or plug, or after the appliance malfunctions or has been damaged in any manner. Call our toll-free customer assistance number for information on examination, repair, or adjustment.
- The use of accessory attachments not recommended by the appliance manufacturer may result in fire, electric shock or injuries to persons.
- Do not use outdoors or in a damp area.
- Do not place the appliance close to the edge of the countertop.
- Do not let the power cord hang over the edge of the table or counter, or touch hot surfaces.
- Do not place on or near a hot gas or electric burner or in a heated oven.
- Extreme caution must be used when moving an appliance containing hot oil or other hot liquids. A fire may occur if the appliance is covered or touches flammable material, including curtains, draperies, walls, and the like, when in operation. Do not store any item on top of the appliance when in operation.
- When using this appliance, provide 6 – 8 inches of air space above, behind and on both sides for air circulation.
- It is recommended that you use a heat-resistant mat underneath the appliance to avoid any heat damage to your counter or furniture.
- Do not use the appliance with open waffle plates.
- To disconnect, turn the control knob (3) to MIN and then remove the plug from the wall outlet.
SAVE THESE INSTRUCTIONS!
IMPORTANT SAFEGUARDS
- Never pull on the power cord to disconnect the appliance from the wall outlet; instead, grasp the plug and pull on the plug.
- Do not use appliances other than intended use.
- Do not clean with metal scouring pads. Pieces can break off the pad and touch electrical parts involving a risk of electric shock.
- Let the appliance cool completely before putting away or storing.
- Never leave the appliance unattended during use.
ADDITIONAL SAFEGUARDS
This appliance is for HOUSEHOLD USE ONLY.WARNING:– DO NOT OPERATE THIS APPLIANCE, IF THE POWER CORD SHOWS DAMAGE OR IF THE APPLIANCE WORKS INTERMITTENTLY OR STOPS WORKING ENTIRELY.
- A short power supply cord is provided to reduce the risk resulting from becoming entangled in or tripping over a longer cord.
- Longer extension cords are available and may be used if care is exercised in their use.
- If an extension cord is used:– The marked electrical rating of the extension cord should be at least as great as the electrical rating of the appliance.– The longer cord should be arranged so that it does not drape over the countertop or table top where it can be pulled on by children or tripped over unintentionally.
Polarized plug
- This appliance has a polarized plug (one blade is wider than the other). To reduce the risk of electric shock, this plug is intended to fit into a polarized outlet only one way. If the plug does not fit fully in the outlet, reverse the plug. If it still does not fit, contact a qualified electrician. Do not attempt to modify the plugin anyway.
- Do not let children handle or put the electrical cord into their mouths.
SAVE THESE INSTRUCTIONS!
PARTS
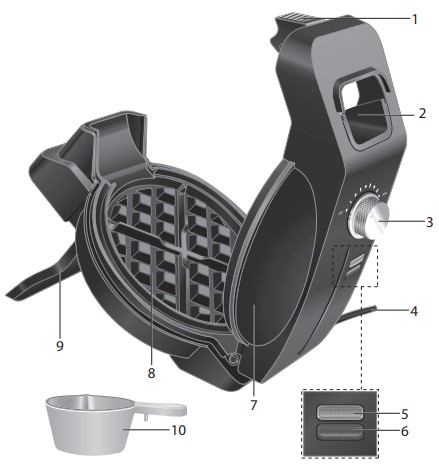
- Locking latch
- Pour spout
- Control knob (browning level:MIN (light) to MAX (dark))
- Power cord with plug
- Power indicator (blue)
- Ready indicator (green)
- Lid
- Waffle plate
- Stand
- Measuring cup
ILLUSTRATIONS
WARNING:– Always use an oven mitt to protect your hand when handling the appliance. Escaping steam can burn and the appliance housing is hot.
Before first use
- Remove all packaging materials and/or other transportation means.
- Check package content to verify it is complete and undamaged. Do not operate the appliance if the content is incomplete or appears damaged. Return it immediately to Walmart.
The danger of suffocation!– Packaging materials are not toys. Always keep plastic bags, foils, and foam parts away from babies and children. Packaging material could block airways and Prevent breathing.
NOTE:– The appliance may produce an odor and/or emit smoke when switched on for the first time, as residues from the production process are eliminated. This is normal and does not indicate a defect or hazard.
- Clean your appliance and all accessories thoroughly before using for the first time ( Cleaning and Maintenance).
- When using the appliance for the first time, it is recommended to operate it for at least 10 minutes without any foodstuff on the waffle plates ( Using the Appliance), until no odor or smoke is present. During use, ensure ample ventilation.
- Let the appliance cool completely.
- Clean the appliance ( Cleaning and Maintenance).
USING THE APPLIANCE
This appliance is designed for making waffles and is not intended for any other use.
NOTE:– The appliance has a rated power of 800W. Before plugging it into the wall outlet, ensure that the electrical circuit is not overloaded with other appliances. This appliance should always be operated on a separate 120V ~ 60Hz wall outlet.– Make sure the lid (7) is closed and the locking latch (1) is locked in place before connecting the appliance into the wall outlet.– Do not operate the appliance in the horizontal position.
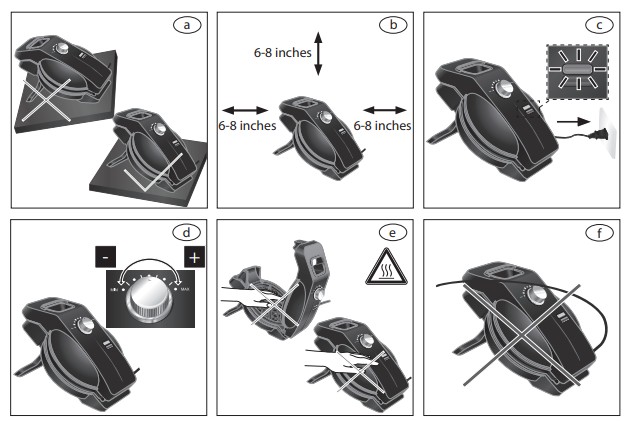
- Fully unfold the stand (9) and place the appliance on a clean, flat, and heat-resistant surface (ill. a ).
- Ensure a minimum distance around the appliance of at least 6 – 8 inches to other objects, cupboards, and walls (ill. b ).
- Connect the plug (4) into a wall outlet (ill. c ). The blue power indicator (5) will turn on.
- Turn the control knob (3) to the desired browning level (ill. d), between MIN and MAX. The appliance will heat up to an operating temperature of the set browning level.
- Once the operating temperature has been reached, the green ready indicator (6) will turn on. The heat-up time will take about 3 – 5 minutes.
NOTE:– Leave the lid (1) closed to reduce heat-up time.
The danger of burns!– Do not touch the waffle plates (8) and/or the lid surface (ill. e ).
WARNING:– Never let the power cord (4) come in contact with the lid (7) during use (ill.
BAKING WAFFLES
Danger of burns!– Always use an oven mitt to protect your hand when handling the appliance. Escaping steam can burn and the appliance housing is hot.– Do not touch the waffle plates (8) and/or the lid surface.
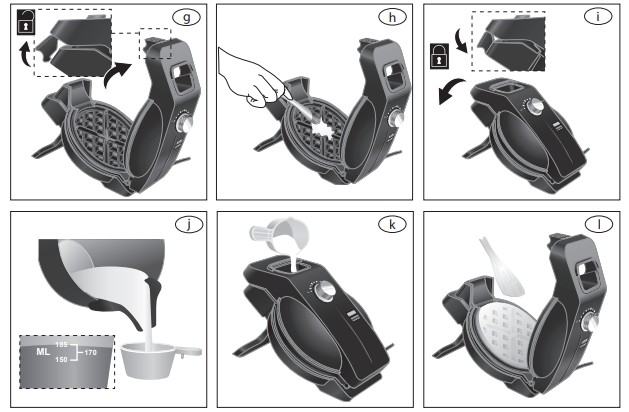
- Disengage the locking latch (1) and carefully open the lid (7) (ill. ).
- Apply cooking spray or spray butter on the waffle plates (8) (ill. h ).
- Close the lid (7) and engage the locking latch (1) (ill. i ).
- Pour the batter into the measuring cup (10) until 185 ml (ill. j ).
- Hold the measuring cup 3 – 5 inches above the pour spout (2) and pour the batter slowly and steadily into the pour spout (ill. k ).
NOTE:– Turn the control knob (3) to adjust the browning level if necessary.– Use a thinner waffle batter rather than a thick one for best results.– During the cooking process, the green ready indicator (6) will turn on and off several times to ensure a constant temperature.– Waffles take about 3 – 6 minutes, depending on the recipe, or once no more steam is being emitted.– Do not open the lid (7) within the first few minutes, as this may cause the waffle to tears.
- Disengage the locking latch (1), open the lid (7), and remove the waffles using a plastic or wooden utensil (ill. l ).
NOTE:– Never use metal utensils, as these will damage the non-stick coating.– You may need to adapt the cooking time based on the result of your first batches of waffles.
- After removing the waffles, keep the lid (7) closed.
- Wait for the green ready indicator (6) to light up again, indicating the operating temperature of the set browning level has been reached, before repeating the previous steps to baking more waffles.
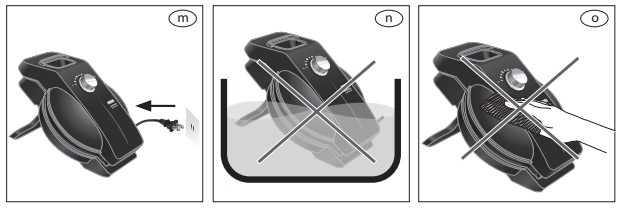
- Once you have finished using the appliance, turn the control knob (3) to MIN and disconnect the plug (4) from the wall outlet (ill. m ). Both indicators will switch off.
- Allow the appliance to cool down completely before handling again.
RECIPES
Golden waffles
| 1 ¾ c | all-purpose flour |
| 2 tsp | baking powder |
| 1 tsp | baking soda |
| ½ tsp | salt |
| 1/3 c | bakers sugar |
| 1 c | milk |
| 1 c | water |
| 3 | eggs |
| 1 tbsp | vanilla extract |
| ½ tsp | almond extract |
| ½ c | vegetable oil |
- Start with all ingredients at room temperature.
- Sift together flour, baking powder, baking soda, salt, and sugar.
- In a separate bowl whisk together milk, water, eggs, vanilla extract, almond extract, and oil.
- Add wet ingredients to dry and whisk until the batter is smooth. Allow batter to rest for 5 minutes, stir again. Use the measuring cup to pour batter into the pour spout when green ready light is illuminated.
- Pour batter slowly and steadily holding the measuring cup 3 – 5 inches above the pour spout. This helps to prevent clogging of the pour spout. Cook for 4 minutes with the control knob on MAX level.
- Serves 6. Serve with fresh berries and powdered sugar.
RECIPES
Pumpkin waffle
| 2 c | all-purpose flour |
| 2 tsp | baking powder |
| 1 tsp | baking soda |
| 1 tsp | salt |
| 1 ½ c | milk |
| ½ c | water |
| ½ c | pureed pumpkin |
| ½ c | vegetable oil |
| 3 | eggs |
| 1/3 c | brown sugar |
| 1 tbsp | maple syrup |
| 1 tsp | vanilla extract |
| 1 ½ tsp | cinnamon |
| 1 tsp | ground ginger |
| ½ tsp | nutmeg |
| ¼ tsp | ground clove |
- Sift together flour, baking powder, baking soda, and salt.
- In a separate bowl beat together milk, water, pumpkin, oil, eggs, brown sugar, maple syrup, vanilla extract, cinnamon, ginger, nutmeg, and clove.
- Add wet ingredients to dry ingredients and blend together until the batter is smooth. Allow to rest for 5 minutes, stir again. Use the measuring cup to pour batter into the pour spout when green ready light is illuminated.
- Pour batter slowly and steadily holding the measuring cup 3 – 5 inches above the pour spout. This helps prevent clogging of the pour spout. Cook for 4 minutes with the control knob on MAX level.
- Serves 6. Serve with whipped cream and cinnamon sugar sprinkles.
Cinnamon waffle with mascarpone maple honey icing
| 2 c | all-purpose flour |
| 2 tsp | baking powder |
| 1 tsp | baking soda |
| 1 tsp | salt |
| 1 tsp | cinnamon |
| 2 c | buttermilk |
| ½ c | vegetable oil |
| ½ c | water |
| 2 | eggs |
| 1/3 c | brown sugar packed firm |
| 1 tsp | vanilla extract |
- Start with buttermilk, eggs, and water at room temperature.
- Sift together flour, baking powder, baking soda, salt, and cinnamon.
- In a separate bowl blend together with a hand mixer buttermilk, vegetable oil, water, eggs, brown sugar and vanilla extract.
- Add wet ingredients to dry and blend until the batter is smooth. Allow batter to rest for 5 minutes, blend again. Use the measuring cup to pour batter into the pour spout when green ready light is illuminated.
- Pour batter slowly and steadily holding the measuring cup 3 – 5 inches above the pour spout. This helps prevent clogging of the pour spout. Cook for 3 – 4 minutes with the control knob on MAX level.
- Serves 6. Serve with: 1 cup mascarpone, 1/3 cup maple syrup, and 1 tbsp. honey blended together, drizzle icing.
Peanut butter waffle
| 1 ¾ c | all-purpose flour |
| 2 tsp | baking powder |
| 1 tsp | baking soda |
| 1 tsp | salt |
| 1/3 c | bakers sugar |
| 1 c | milk |
| 1 c | water |
| 3 | eggs |
| 1 tbsp | vanilla extract |
| ½ c | creamy peanut butter |
| ½ c | vegetable oil |
- Sift together flour, baking powder, baking soda, salt, and sugar.
- In a separate bowl whisk together milk, water, eggs, and vanilla extract.
- In separate bowl blend peanut butter and oil, with a hand mixer or blender. Add to milk mixture and blend until smooth.
- Add wet ingredients to dry and blend until the batter is smooth. Allow resting for 5 minutes, stir again. Use the measuring cup to pour batter into the waffle maker when green ready light is illuminated.
- Pour batter slowly and steadily holding the measuring cup 3 – 5 inches above the pour spout. This helps prevent clogging of the pour spout. Cook for 3 – 4 minutes with the control knob on MAX level.
- Serves 6. Serve with jelly or with bacon and banana.
Cheddar jack cheese & chive waffle
| 1 ¾ c | all-purpose flour |
| 2 tsp | baking powder |
| 1 tsp | baking soda |
| 1 tsp | salt |
| ¼ c | bakers sugar |
| 1 tsp | herbs de Provence |
| ½ tsp | granulated garlic |
| ½ tsp | granulated onion |
| 2 c | water |
| 3 | eggs |
| ½ tsp | vanilla extract |
| ½ c | vegetable oil |
| 2 tbsp | finely chopped fresh chive |
| 1/3 c | fancy shredded cheddar & Monterey Jack cheeses |
| ¼ c | fancy shredded Parmesan cheese |
HING AND MAINTAIN
- The appliance is designed to create a delicious Belgium-style waffle without holes, empty spaces or messy overflow. The waffle plates channel the batter down on a 45% angle to produce a complete waffle with a crisp finish and a tender center.The batter expands during the cooking process and the overflow is contained in the pour spout.
- Use the recipes or, if using a boxed waffle mix, follow the instructions and then thin the waffle mix with water (2 tbsp. to 2/3 cup depending on batch size) for a smooth pourable batter. Use the measuring cup (10) to pour batter into the pourspout when the green ready indicator is illuminated.
- Pour batter slowly and steadily holding the measuring cup 3 – 5 inches above the pour spout. This helps to prevent clogging of the pour spout. Cook for 4 minutes with the control knob on MAX level. Disengage the latch, open the lid and remove the waffle to serve. We recommend using tongs or a fork specially designed for Belgian Waffles.
- Most waffle batter can be poured directly onto the non-stick waffle plates (8). Use a cooking spray for dessert waffles or any recipe with a lot of sugar. If your waffles start to stick, the waffle plates (8) may need to be scrubbed with a nylon brush to remove any cooked-on food particles.
- Most waffles can be made ahead of time and kept warm in a 200°F (90°C) oven.
- To store waffles, let them cool, and then pack into an airtight container. Store in a refrigerator or freezer. Waffles can be reheated in a microwave oven or regular oven.
- Most waffles are done in about 3 – 6 minutes. Recipes made from scratch may take longer. Check if waffles are done after 3 – 6 minutes or once no more steam is being emitted. If the appliance does not open easily, allow waffles to cook for another minute before checking again.
- It is recommended to clean all accessories after each use.
CLEANING AND MAINTENANCE
Proper maintenance will ensure many years of service from your appliance. Clean the appliance after every use. The appliance contains no user-serviceable parts and requires little maintenance. Leave any servicing or repairs to qualified personnel.
WARNING:– Always disconnect the plug (4) from the wall outlet before cleaning. Allow all parts of the appliance to cool down completely.
NOTE:– Do not immerse the power cord with plug (4) or appliance into water or any other liquids (ill. n ).– Do not use abrasive cleaners, steel wool, or scouring pads (ill. o ). Dry all parts thoroughly after cleaning, before using or storing the appliance. Ensure that no water enters the appliance housing.
- Wipe the appliance housing, lid (7), and waffle plates (8) with a damp cloth. Rinse the cloth and wipe all parts again.
NOTE:– Dry all parts and surfaces thoroughly before use. Make sure that all parts and surfaces are completely dry before connecting the appliance to a wall outlet.
Storage
- Before storage, always make sure the appliance is completely cool, clean, and dry.
- It is recommended to store the appliance in a dry place.
- Store the appliance on a stable shelf or in a cupboard. To avoid accidents, ensure that both the appliance and its power cord are beyond the reach of children or pets.
TROUBLESHOOTING
| Problem | Cause | Solution |
| The appliance is not working | Appliance not plugged in Wall outlet not energized Malfunctioning appliance Overheated appliance | Insert the plug into the wall outlet Check fuses and circuit breaker Disconnect the appliance from the wall outlet and contact qualified personnel to check and repair the appliance Disconnect the appliance from the wall outlet and allow to cool down before using it again |
| The blue power indicator is on but the appliance does not heat up | Preheat time too short Malfunctioning appliance | Let the appliance preheat for a longer time Disconnect the appliance from the wall outlet and contact qualified personnel to check and repair the appliance |
| The appliance heats up but the blue power indicator is off | Malfunctioning appliance | Disconnect the appliance from the wall outlet and contact qualified personnel to check and repair the appliance |
| Batter is spilling over | Waffle plates overfilled Waffle batter too liquid | Reduce the amount of batter used per serving Add some flour to the batter |
| Waffle is not fully cooked | Cooking time too short | Allow waffle to cook for longer |
If additional assistance is needed, please contact our Customer Assistance at 1-855-451-2897 (US).
TECHNICAL DATA
| Rated voltage: | 120V ~ 60Hz |
| Rated current: | 6.7A |
| Rated power input: | 800W |
CUSTOMER ASSISTANCE
If you have a claim under this warranty, please call our Customer Assistance Number. For faster service, please have the model number and product name ready for the operator to assist you. This number can be found on the bottom of your appliance and on the front page of this manual.Model Number: __________________ Product Name: __________________Customer Assistance Number 1-855-451-2897Keep these numbers for future reference!
Two-year limited warrantyWhat does your warranty cover?
- Any defect in material or workmanship.For how long after the original purchase?
- Two years.What will we do?
- Provide you with a new one.
- For those items still under warranty but no longer available, WAL-MART reserves the right to replace with a similar FARBERWARE branded product of equal or greater value.How do you make a warranty claim?
- Save your receipt.
- Properly pack your unit. We recommend using the original carton and packing materials.
- Return the product to your nearest Walmart store or call Customer Assistance at 1-855-451-2897.What does your warranty not cover?
- Parts subject to wear, including, without limitation, glass parts, glass containers, cutter/strainer, blades, seals, gaskets, clutches, motor brushes, and/or agitators, etc.
- Commercial use or any other use, not found in printed directions.
- Damage from misuse, abuse, or neglect, including failure to clean product regularly in accordance with manufacturer’sinstructions.
How does state law relate to this warranty?
- This warranty gives you specific legal rights, and you may also have other rights which vary from state to state or provinceto province.
- This warranty is in lieu of any other warranty or condition, whether express or implied, written or oral, including, withoutlimitation, any statutory warranty or condition of merchantability or fitness for a particular purpose.
- WAL-MART, FARBERWARE, and the product manufacturer expressly disclaim all responsibility for special, incidental, and consequential damages or losses caused by the use of this appliance. Any liability is expressly limited to an amount equal to the purchase price paid whether a claim, however, instituted, is based on contract, indemnity, warranty, tort (including negligence), strict liability, or otherwise. Some states or provinces do not allow this exclusion or limitation of incidental or consequential losses, so the foregoing disclaimer may not apply to you.What if you encounter a problem with this product while using it outside the country of purchase?
- The warranty is valid only in the country of purchase and if you follow the warranty claim procedure as noted.
![]()
© 2018 Farberware Licensing Company, LLC. All Rights Reserved. Copyrights and Trademarks of Farberware Licensing Company, LLC, including FARBERWARE®, are used under license from Farberware Licensing Company, LLC.
[xyz-ips snippet=”download-snippet”]