
ScoutMODEL FSV1132USER MANUAL

Revision D 05/21/2019For more product information, please visit: www.fatshark.comAll Rights Reserved
Introduction
Congratulations on purchasing the Fat Shark Scout FPV Headset. The Scout is a goggle packed with the latest technology including a built-in diversity receiver, a 60 FPS DVR, and everything necessary for amazing flights. To ensure your get the most out of your experience, please take the time to read through this operating manual thoroughly before using.
Product Compatibility
The Scout has been designed and tested to work with a wide variety of currently available NTSC and PAL analog transmitters as well as display video directly from an audio visual or auxiliary source. Due to the high number of different manufacturers and potential variation in quality it’s impossible to for us to have tested with every product combination of transmitter and camera and some troubleshooting may be required if mixing components.
Product Contents
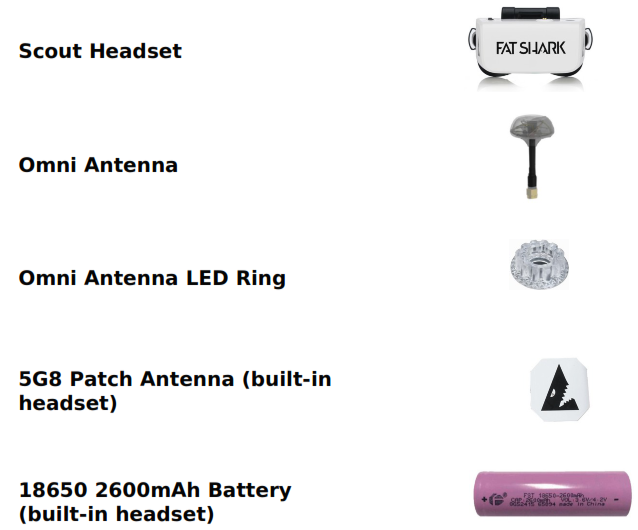
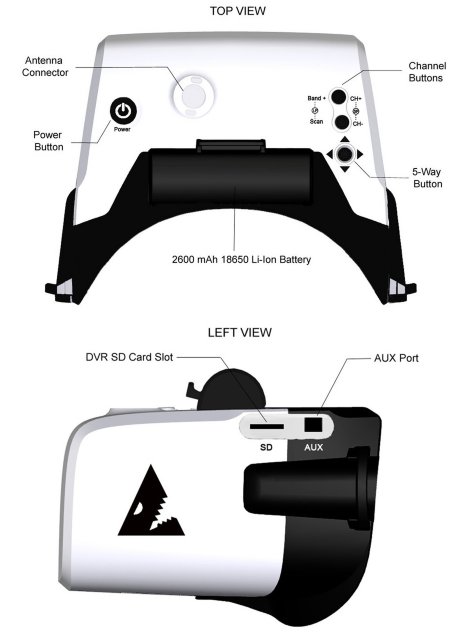
Scout Headset Overview

Modes
Scout is a multi-function device and has multiple different modes depending on what the user is trying to accomplish. The modes are powered off, RF input, the options menu, AV/Aux input, and DVR playback.
Powered Off:
The device is off. This allows the user to leave the Scout without draining the battery. While the device is off, the user is also able to change the battery or recharge the headset via the USB port. To turn on the headset, press and hold the power button. You should hear a beep and the LED indicator should turn red for 3 seconds.
RX Input:
When the device is initially powered on, it will enter RX input mode and will default to the last channel selected by the user. The screen will turn on and the configurable start-up display will show the Band, the Chanel, the battery life. The antenna LED will also display your channel color if in the Race Band mode. You are ready to fly!
The Scout has a wide array of adjustable options and deeper features that are accessed through the menu system. To enter the options menu, press and hold the center of the 5-way button. The high-level menu will come up on the screen. The arrows are used to navigate through the options. To exit the menu, press and hold the center again.
AV/Aux Input:
There are times, like races, when you might want to use the AV or auxiliary video inputs rather than an RX input. To get into auxiliary input mode, you enter the menu and select source -> the input source you want to use. In order to go back to RX input, go back into the menu and select RX as the source.
DVR:
One of the new features in the Scout is the 60FPS DVR. The DVR records on an SD card and can be accessed in the options menu. The DVR allows playback right in the Scout headset allowing for a review of a great flight or quick recovery of a lost quad.
Detailed Inputs
There are several user inputs on the device, the power button, the band and channel buttons, and the rocker switch.
Short Press (less than 0.5 seconds) Cause the LED to indicate currently battery life when the headset is turned off
- Long Press (hold for 2 seconds or more)
- Turn on when the unit is powered off
- Turn off when the unit is powered on
Short Press (less than 0.5 seconds)
- Increments the current RX channel by 1 and will go back to channel 1 if currently on channel 8Long Press (hold for 2 seconds or more)
- Cycles through the RX Bands (FS, Race, Band E, Band B, Band A)
Short Press (less than 0.5 seconds)
- Decrements the current RX channel by 1 and will go back to channel 8 if currently on channel 1Long Press (hold for 2 seconds or more)
- Does an automatic channel scan in the current band and will automatically select the channel with the strongest RX signal
Short Press on the Center (Enter button)
- Starts and stops the DVR recording when in manual DVR modeLong Press on the Center
- Enter and exit the options menuUp/Down on the joystick:
- Adjust display brightness up or down in 10% incrementsLeft/Right on the joystick:
- Adjust display contrast ratio up or down in 10% increments
Short Press on the Center
- Select the highlighted optionLong Press on the Center
- Exit the options menuUp/Down
- Navigate the options in the sub-menusLeft/Right
- Switch between the high-level menu options
Long Press center joystick
- Exit file list interface or player interfaceShort Press Enter Key
- Play back recorded video by the unitUp/Down on the joystick:
- Select any file in turnLeft/Right on the joystick:
- Page down or page up directly
Detailed Operation
Power Management
The Scout uses a single of lithium ion 2600 mAh 18650 battery cell as the primary battery for the device. A fully charged battery should provide more than 2 hours of operation without needing replacement or recharging.WARNING: USING NON-CERTIFIED 18650 CELLS OR CAN CAUSE SERIOUS RISKS OF FIRE OR OTHERE HAZARDS AND VOIDS THE DEVICES WARRANTYWhen off, the battery level can be quickly checked with a short press of the power button. The LED ring with flash and display a color indicating the battery power based on the following:

During operation, the battery indicator is shown as part of the OSD. The following table shows the different indicator states.

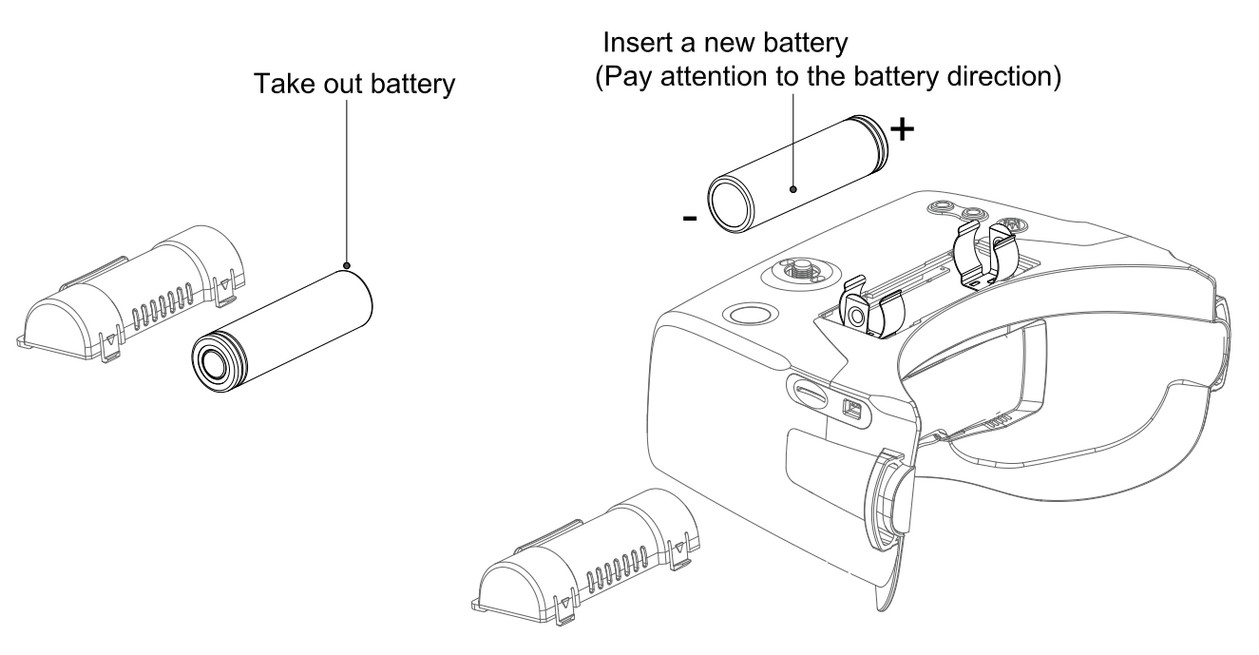
The device already has a balancing circuit is already built inside so the only thing necessary to recharge the device is to plug it into a 5V USB source.The Scout headset will only recharge while the device is turned off. If the Scout is out of power, it can be run directly from the USB cable. The battery cell can also be swapped out for another battery pack to extend the use time for those long days. The battery is accessed by removing the top cover. To validate a successfully changed battery, short press the power button to see the new charge level as the LED ring flashes. If that battery is changed and the device does not turn on, verify that the battery was inserted correctly.
![]()
General Lithium Polymer safety and handling instructions:
- NEVER balance charge this battery.
- NEVER leave a LiPo battery unattended while being charged or discharged
- ALWAYS monitor the battery and charger during the entire charging process.
- ALWAYS charge LiPo batteries in a fireproof location.
- ALWAYS have a lithium approved “class D type” fire extinguisher available.
- NEVER charge LiPo batteries at currents greater than the “1C” rating of the battery (“C” equals the rated capacity of the battery).
- NEVER continue to charge LiPo batteries if the charger fails to recognize full charge. Overheating or swelling of the LiPo cells is an indication of a problem and the battery should be disconnected from the charger immediately and placed in a fireproof location
- ALWAYS discontinue charging or discharging a LiPo immediately if at any time you see smoke or the battery starting to swell up and leave it in a safe fireproof location for approximately 30 minutes.
Flight OSD and Controls
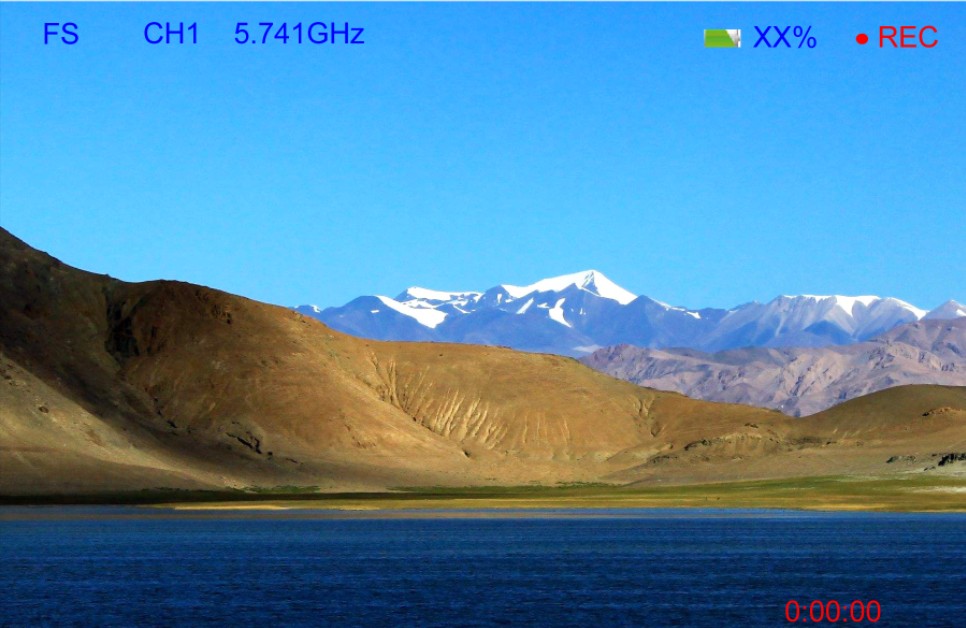
The OSD:

Band: The abbreviation for the radio frequency band that the headset is currently on.
We’ve set up a special set of “BAND L” that you can turn on in the menu if you want for experimental purposes.CH1:5362 CH2:5399 CH3:5436 CH4:5473 CH5:5510 CH6:5474 CH7:5584 CH8:5621Channel: The current channel the headset is on (both the number and the actual radio frequency).Battery: Current battery life as an icon and a %
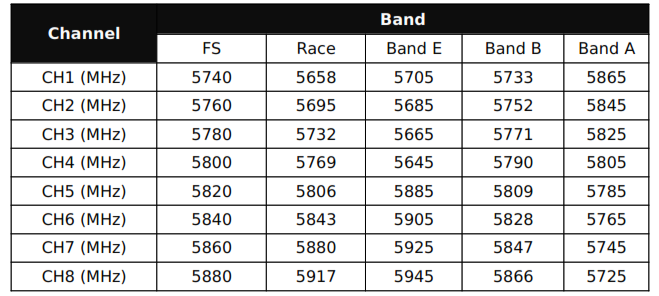
Changing Bands and RX Channels:
The Band (CH+) and Channel (CH-) buttons are used to go through the different RX options to find the wireless video channel that you want to view. A short press on CH+/CH- will cycle through the 8 channels of the current band that you are on. As you cycle through the channels, the OSD will show the new channel. (Has removed the type of video signal)Additionally, the LED on top of the Scout will light up with a color that corresponds to your current channel if you are using Race Band. This allows for a very quick indicator that can be used when trying to get your transmitter and headset on the same channel. It is also helpful when flying with others as they can quickly look around and determine which channels are taken.

A long press on the Band button will cycle through the different RX bands in the following default order. Fat Shark to Race Band to Band E to Band B to Band A and then back to Fat Shark Band. The selectable bands can be adjusted by the user in the Options Menu.A long press on the Channel button will enter RF MAX scan mode and the Scout will automatically search for the strongest signal in the current band. The OSD will display RF MAX Scan in the center of the screen and the Scout will change to the channel with the highest RSSI value. This allows you to quickly tune into a transmitter after you turn it on even if you don’t know what channel it is broadcasting on.
Adjusting Brightness and Contrast:
During flight, brightness and contrast of the displayed image can be adjusted using the 5-way button. Pressing up will increase brightness in increments of 10% and pressing down with decrease brightness by 10%. As well as seeing the brightness or contrast actually change, the OSD will display the updated brightness (or contrast) level in the center of the image for 3 seconds.
Using an AV or Aux input:
The Scout supports both AV and Auxiliary inputs. In order to use the AV or Auxiliary input, plug the source into the appropriate port on the Scout headset. Use the 5-way button to enter the options menu, go to the source sub-menu, and select AV or AUX. The image on the screen should show the input from the source. In order to leave AV / AUX input, return to the options menu and select the new desired source. It should be noted that if you shut off the Scout while in AV or AUX mode it will restart in RX mode and you will need to change back to AV / AUX if you want to continue to use those inputs.
DVR Operation
1. SD card MUST be formatted with a FAT32 file system before use to ensure stable recording.2. DVR is able to record from the selected input only and supports standard formats.3. Do not place alternative files that you want to keep into the DVR. The DVR may not recognize the file space and write over your files. Use dedicated SD card.
Basic DVR functions
Prior to recording, be sure a properly formatted (FAT32) microSD card is inserted into the SD card slot. The Scout supports SD cards up to 64 GB in size. Also verify that there is a video source displaying inside the Scout headset. This source can either be an RX signal or an Aux/AV input.The default mode of the DVR is to manually start and stop recording with a short press of the center of the 5-way button. When you press the button to start recording, you should see a recording symbol in the upper right corner of the display as well as the duration of the recording on the OSD, support record DVR audio
Video Format
The DVR will create .MOV files as it records. The files will be named with the following format: MOVYYMMDD-HHMMSS-#F.MOV. For example:
![]()
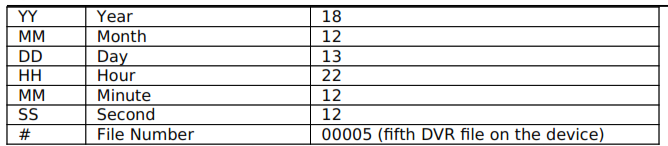
If the DVR is unable to record, it will display an error message that corresponds to the problem.
Supported Formats
The Scout DVR supports both NTSC and PAL and is designed to support the *.MOV video formats
Playback
DVR Playback is accessed by selecting Playback from DVR in the options menu. Once playback mode is selected, the DVR playback submenu is opened. This submenu contains a list of all video files currently on the device. Pressing up/down on the 5-way switch will navigate between files. Pressing left/right buttons fast turn the page when you have multiple pages. A short press on the enter button will start playback of the movie. An overview of the file selection screen shows the different elements that are visible when selecting the file. The files are listed with the most recent recording being the first file shown in the list.
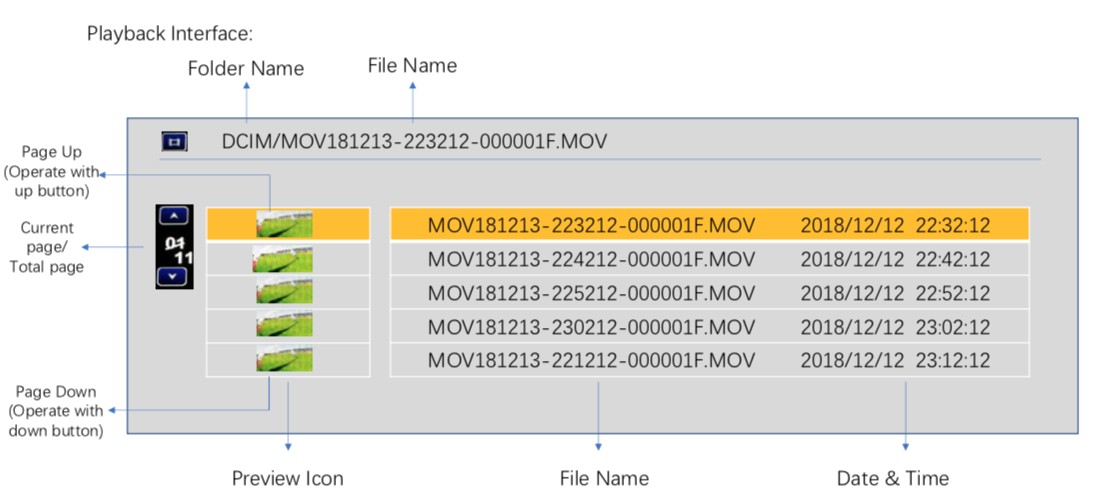
Once the desired file is selected, the screen will go into a video playback screen. The Playback OSD will indicate the playback status (playing, paused, fast forward, or fast rewind). It will also show the current file number, the name of the movie file, and the date / timestamp of the file.During playback, the 5-way button can be used for greater control. A short press on the enter button will pause / unpause playback. The Up button will enter fast forward mode and the down button will enter fast reverse mode. Long press on the center button will return the to file selection, long press on the center button again will return user to RX mode.
Advanced Features
The DVR menu has two additional sub-menus that enable more advances features; Record and Format SD. The record sub-menu allows you to change the method that the DVR uses to record. The default mode is “Manual” in which recording is started and paused using a short press on the 5-way button. Manual Loop mode behaves the same way as manual mode except that it records videos in 10-min increments and if the memory card is full, it will begin to overwrite the oldest file. This will prevent the user from ever getting a “memory full” error. Auto and Auto Loop modes will automatically start the DVR when the device is powered on – but otherwise functions exactly like Manual and Manual Loop modes respectively.Format SD Card will allow you to format an inserted SD card with a Fat32 file system so it can then record vidoes. Once Format SD Card is selected, it will bring up a confirmation screen where the user needs to select “Yes” to continue. While formatting, do not remove the battery or SD card. Once the disk is formatted, “Formatting Is Completed!” will be displayed.
The Scout has a variety of different features that can be accessed or controlled through the menu screen. To access the menu screen, press and hold on the center of the 5-way button. To leave the menu at any time, also press and hold the center of the 5-way button. To navigate the menu, use the arrow buttons and short press the center of the 5-way button to select the highlighted item.This is brief overview of the menu structure and what each function controlsDVR: Access DVR features Playback: Enters the DVR Playback menu Record: Allows the user to adjust DVR recording parameters Format SD: Formats an inserted SD card with a FAT32 file systemSource: changes between inputsRX: uses the embedded diversity receiver for inputAV: selects the audio-visual cable as the input sourceAUX: selects the auxiliary cable as the inputBand: allows the user to add/remove bands from the selection interfaceFS: adds / removes the Fat Shark band from the RX input optionsRace: adds / removes Race Band from the RX input optionsBand E: adds / removes Band E from the RX input optionsBand B: adds / removes Band B from the RX input optionsBand A: adds / removes Band A from the RX input optionsBand L: adds / removes Band L from the RX input optionsDisplay: changes what is shown on the OSD (either on, off, or 5 seconds)Band Info: information about the RX bandChannel Info: information about the channel number and frequencyBATT Info: the battery indicator and remaining percentage
Device: adjusts other configuration parameters of the ScoutBeep: the system will either beep or not make any soundsFan: turns on or off the fan for defoggingAuto Power Off: the Scout will shut off after 5 minutes of inactivityCalibrate: RX calibration
General: Changes basic elementsClock Setup: update the system timeAudio Volume: changes the volume output on the headphone portReset: resets the device to factory defaultsFirmware Version: shows the current firmware installed
Specifications
Optics:FOV (field of view):50 degrees diagonalType: Plastic opticsDisplay: 4.0 inchResolution 1136 X 640 NTCS/PAL auto selectingAudio: StereoUser Controls: Channel SelectionBand SelectionDisplay ControlVolume ControlBeep ControlRX setFan ControlClock setMode Selection (RX/AV/AUX)DVR Control
Electrical:Power Supply: Standard 18650 Li-ion batteryRF Modules: Infinite channel support on multiple bandsAnalog DVR:MicroSD support to 64 GBRecord Rate: 6Mbps (MJPG compression, 60 fps,MOV)File playback (native recording, no codec support)Upgradeable via SD cardBattery: 3.7V, 2600mAh (18650 cell)Interface: 3.5mm AV in port3.5mm 3p earphone portMicroSDUSB-CAUX portMechanical: Ergonomic molded headset w/ adjustable headbandDimensions: 170 x 120 x 95 mmWeight: 336.5 gPackage size: 517g, 189x 133 x 100mm
Operational Advice
- For best performance, select a channel that has the least amount of interference. While the transmitter is turned OFF, turn on the video headset and look at the screen as you check each channel. Clear channels will have a consistent static background. Channels with interference will have horizontal static lines.
- Always perform a range test before flying. This includes AV and RC controls. Some RC receivers can be affected by the proximity of other electronic devices particularly the AV TX.
- Try to space out your components as much as possible to avoid interference to your RC control range (keep stuff away from RX)
- Until experienced, practice flying in a familiar area to avoid becoming disorientated.
- Due to antenna characteristics, there is a “null” in line with antenna direction. You may experience excessive video breakup when flying overhead
- 5.8GHz signal strength drops off very fast so stay safely within solid AV range.
- For maximum distance it is very important that a clear line of sight exists between the transmitter and the video headset. Two of the worst causes of interference are human bodies and reinforced concrete.
- Place your TX antenna in open area in a vertical orientation
- Multipathing (reflections off buildings/ tall objects) causes signal cancellation and result in broken video. Fly in open areas away from buildings or other tall structures (i.e. barns, hills).
- Even if you don’t require any license to operate this device, you are still legally responsible for operating in a responsible manner.
Technical Support
Documentation/ troubleshooting: http://fatshark.helpscoutdocs.com/Support:Note support should be attempted in the following manner. Initial enquiries to Fat Shark support will expect you to have exhausted the online and retailer resources:1) Research Fat Shark helpdocs.2) Contact retailer for support.3) email Fat Shark support.
Warranty
The system can be exchanged for a new unit within 7 days for any manufacturing defects if returned in new condition. The device will be warranted for repair for 2 years if no signs of excessive use. Buyer will be responsible for shipping costs. If beyond the warranty period, we will provide repair services.
Fat Shark FSV1132 Scout FPV Headset User Manual – Fat Shark FSV1132 Scout FPV Headset User Manual –
[xyz-ips snippet=”download-snippet”]