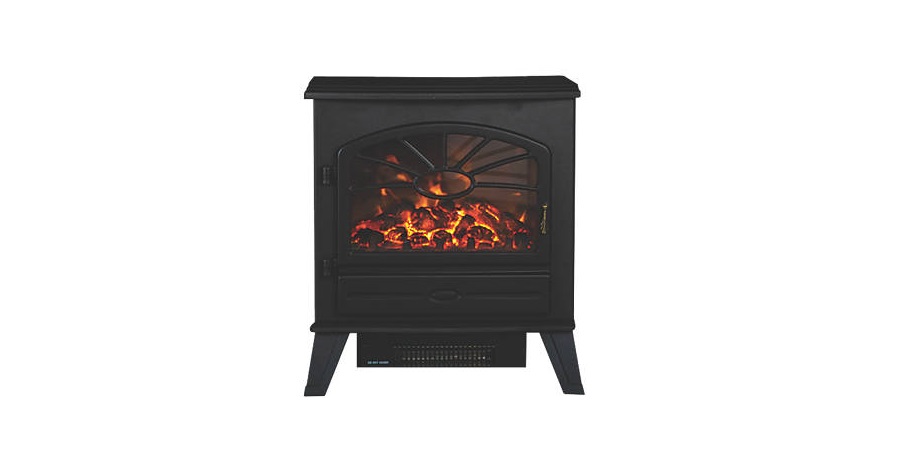
FCALPOINT Electric Stove ES3000 Instruction Manual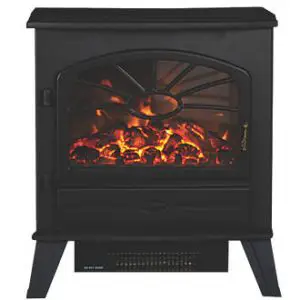
This product is only suitable for well insulated spaces or occasional use.Please note: Except where otherwise stated, all rights, including copyright in the text, images and layout of this booklet is owned by Focal Point Fires Ltd. You are notper-mitted to copy or adapt any of the content without the prior written permission of Focal Point Fires Ltd.
IMPORTANT NOTES
IMPORTANT – THESE INSTRUCTIONS SHOULD BE READ CAREFULLY AND RETAINED FOR FUTURE REFERENCE
When using this electrical appliance, basic precautions should be followed to reduce the risk of fire, electric shock and injury to person, including the following:
- This heater must be used on an AC supply only and the voltage marked on the heater’s rating label must correspond to the supply voltage.
- DO NOT switch the appliance on until it is properly installed as described in this manual.
- This appliance can be used by children aged from 8 years and above and persons with reduced physical, sensory or mental capabilities or lack of experience and knowledge if they have been given supervision or instruction concerning use of the appliance in a safe way and understand the hazards involved. Children shall not play with the appliance. Cleaning and user maintenance shall not be made by children without supervision.
- Children of less than 3 years should be kept away unless continuously supervised.Children aged from 3 years and less than 8 years shall only switch on/off the appliance provided that it has been placed or installed in its intended normal operating position and they have been given supervision or instruction concerning use of the appliance in a safe way and understand the hazards involved. Children aged from 3 years and less than 8 years shall not plug in, regulate and clean the appliance or perform user maintenance.
- CAUTION: Some parts of this product can become very hot and cause burns. Particular attention has to be given where children and vulnerable people are present.
- If the supply cord is damaged, it must be replaced by the manufacturer, its service agent or similarly qualified persons in order to avoid a hazard.
- The heater must not be located immediately below a socket-outlet.
- DO NOT use this heater in the immediate surroundings of a bath, a shower or a swimming pool.
 WARNING: In order to avoid overheating, do not cover the heater
- CAUTION: In order to avoid a hazard due to inadvertent resetting of the thermal cutout, this appliance must not be supplied through an external switching device, such as a timer, or connected to a circuit that is regularly switched on and off by the utility.
- Keep furniture, curtains and other fabric material away from the appliance.
- DO NOT leave the appliance unattended during use.
- From time to time, check the cord for damage. Never use the appliance if the cord or any part of the appliance shows signs of damage.
- DO NOT run the mains cable under carpets, rugs etc.
- DO NOT cover or obstruct the heater in any way. Overheating will result if it is accidentally covered.
- Never immerse the product in water or any other liquids.
- DO NOT use the appliance outdoors.
- Before cleaning the appliance, ensure it is unplugged from the power and that it is completely cool.
- DO NOT clean the appliance with abrasive chemicals.
- Never use accessories that are not recommended or supplied by the manufacturer. It could cause danger to the user or damage to the appliance.
- DO NOT insert or allow foreign objects to enter the inlet or outlet vents as this may result in electric shock, fire or damage to the appliance.
- DO NOT install the fire using an extension cord.
- Unplug from the mains supply if the appliance is not to be used for long periods.
- This product is only suitable for well insulated spaces or occasional use
INSTALLATION REQUIREMENTS
The appliance is supplied with a pre-wired three pin BS1363 plug (13Amp fuse rated) and 1.6 meters of electrical flex. It is therefore necessary for a suitable electrical socket to be located within this distance of the appliance and be easily accessible. The stove may be installed on a combustible or non-combustible floor, however the heater outlet is underneath the stove and certain types of floor covering may be affected by the heat produced by the stove. The ability of the floor covering to withstand the heat produced by the stove should be ascertained before proceeding with the installation of the stove. If in doubt then the stove should be mounted on a non-combustible hearth or plinth which extends for at least 150mm in front of the stove. This appliance should be positioned on a firm level sur-face. If the stove is to be sited in a fire surround then the suitability of the surround for use with electrical heaters should be established with the fire surround manufacturer. If fitted into an open draught fireplace, it is advisable to block off the chimney to reduce the risk of draught through the stove which may cause the safety cut out system in the fan heater to operate. If you are placing the heater in an alcove, make sure that there is at least 150mm of space on all sides to ensure good air circulation.
APPLIANCE DATA
- Supply Voltage and rating power : 220-240V AC ~50Hz, 1800W
- Heating Elements : 2 x 900W
- Location : Indoor use only
- Fuse Rating : 13Amp
- Lighting : LED’s
- Supply plug/cord : BS1363/1.6 metres length
| Model | ND-181MLR | ||||
| Item | Symbol | Value | Unit | Item | Unit |
| Heat output | Types of heat input, for electric storage local space heaters only | ||||
| Nominal
heat output |
Pnom | 1.8 | KW | Manual heat charge control with
integrated thermostat |
N/A |
| Minimum heat output
(indicative) |
Pmin | 0.9 | KW | Manual heat charge control with room and/or outdoor temperature
feedback |
N/A |
| Maximum
continuous heat output |
Pmax, c | 1.8 | KW | Electronic heat charge control with
room and/or outdoor temperature feedback |
N/A |
| Auxiliary electricity consumption | Fan assisted heat output | N/A | |||
| At nominal
heat output |
elmax | 0.013 (fan motor) | KW | Type of heat output/room temperature control | |
| At minimum
heat output |
elmin | 0.013 (fan motor) | KW | Single stage heat output and no
room temperature control |
No |
| In standby mode | elSB | 0.35 | W | Two or more manual stages no tem-
perature control |
No |
| With mechanical thermostat room temperature control | Yes | ||||
| With electronic room temperature control | No | ||||
| Electronic room temperature control plus day timer | No | ||||
| Electronic room temperature control plus week timer | No |
UNPACKING THE APPLIANCE
Read all the instructions before continuing to unpack or install this appliance. Carefully lift the appliance from the carton. Check that the contents correlate with the component checklist below. Please dispose of all packaging with care at your local recycling centre.
COMPONENT CHECKLIST
| QUANTITY | DESCRIPTION |
| 1 | Stove and heater assembly |
| 1 | User instruction booklet |
| 1 | Remote control |
OPERATING THE APPLIANCE
CONTROLS
Never cover the heater or obstruct the opening at the base of the heater, this could cause overheating
INSTRUCTIONS FOR USE
- The heater can be operated either by the switches located behind the front door of the appliance or by the supplied remote control.
- This heater has a standby switch located behind the front door of appliance. This switch must be in the “ON” position for the heater to operate.
MANUAL OPERATION
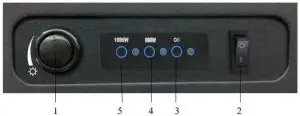
- The switches are located behind the front door of the appliance. The standby switch (2) must be switched on.
- Press the O/I button (3) once to turn the heater and flame effect on. A red indicator light will appear to indicate that thefunction is ON. Press the O/I button for 3 seconds this will operate the dimmer mode to adjust the desired flamebrightness setting.
- Press the 900W button (4) once for the low heat settings; press twice to switch the heat setting off.
- Press the 1800W button (5) once for the high heat settings; press twice to switch the heat setting off.
- Rotate the thermostat control knob (1) clockwise or anti-clockwise to increase or decrease desired room temperature setting.
- NOTICE: The heater will only work if the standby switch (2) and the O/I switch (3) is ON and the thermostat (1) is set above the current room temperature.
REMOTE CONTROL
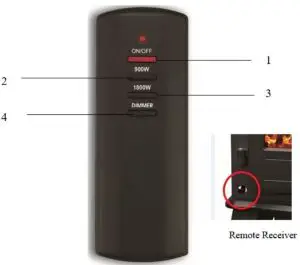
- The standby switch (2) located behind the front door of appliance must be switched on.
- There might be a slight delay for the receiver to respond to the transmitter. Do not PRESS the buttons more than once within two seconds for the correct operation.
- Press the ON/OFF button (1) once on the remote control, this turns the heater and the flame effect ON/OFF.
- Press the 900W button (2) once for the low heat settings; press twice to switch off the heat setting.
- Press the 1800W button (3) once for the high heat settings; press twice to switch off the heat setting.
- Press the DIMMER button (4) for operate the dimmer mode to adjust the desired flame intensity.
- NOTICE: The heater will only work if the standby switch (2) and the O/I switch (3) is ON and the thermostat (1) on the control panel is set above the current room temperature.
SAFETY CUTOUT SYSTEM
This product has one non-self-resetting overheat protection device (thermal cut-out) which will activate if the air inlets or outlets are obstructed. For safety reasons the fire will NOT switch on again automatically, the following procedure must be carried out before the fire can be operated.
NOTE: The visual effect will remain operational if the cutout is activated, only the fan heater is prevented from working.Switch OFF the appliance at the wall socket or outlet. Leave the fire OFF for a period of no less than 10 minutes, ensuring all obstructions are removed. Switch the appliance ON at the wall. Ensure the appliance is turned ON at the control switches. If the fire fails to operate correctly, repeat the above procedure. If an attempt to switch on the appliance is made before the safety cutout has reset, the appliance may cutout for a further period of time. If the sequence has been followed correctly and the appliance still fails to function, check the fuse in the wall outlet. If this is not the cause, call an electrician or maintenance engineer.
MAINTENANCE
ALWAYS DISCONNECT THE APPLIANCE FROM THE MAINS SUPPLY BEFORE UNDERTAKING ANY MAINTENANCE.
Excluding lamps and fuses, use only genuine spare parts available from your supplier. Replacement lamps must be of the same wattage and specification as those stated in Section 3.0 Appliance Data.
BULB REPLACEMENT
This appliance does not use a standard bulb for its flame effect. The appliance uses an electronically controlled LED system to create the flame effect therefore no parts need to be replaced.
CLEANING
- Before cleaning, always remove the plug from the electrical socket. Ensure that the unit is cool enough to work on.
- Do not use harsh chemicals or solvents to clean this product and avoid using abrasive cleaning agents.
- The heater and glass parts need only to be wiped clean with a dry, soft cloth; do not use polishes or abrasive materials.
- Do not immerse in water or any liquid when you clean it.
- Use a slightly damp, lint-free cloth to clean this appliance.
SPARES
Refer to Section 3.0 Appliance Data for lamp and fuse specification. Excluding lamps and fuses, use only genuine manufacturers spare parts available from your supplier
SERVICING
There are no internal user serviceable parts.Check regularly for security of wall fixings as appropriate. Also check security of supply cable and connections. If the supply cable becomes damaged, it must be replaced by a service agent or competent person, such as a qualified electrician.
This appliance is supplied with a BS1363 3 pin plug fitted with a 13Amp fuse. Should the fuse require replacing, it must be replaced with a fuse rated at 13Amp and approved to BS1362. In the event of the mains plug being removed/ replaced for any reason, please note : IMPORTANT: The wires in the mains lead are coloured in accordance with the following code:Blue – Neutral, Brown – Live, Green/ Yellow – Earth
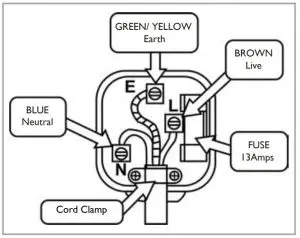
As the colours of the wires in the mains lead of this appliance may not correspond with the colour markings identifying the terminals in your plug, proceed as follows.The blue wire must be connected to the terminal marked with an N or coloured black. The brown wire must be connected to the terminal marked with an L or coloured red. The green/yellow wire must be connected to the earth terminal which is marked with an E or with the earth symbol. WARNING: Never connect live or neutral wires to the earth terminal of the plug.NOTE: If a moulded plug is fitted and has to be removed take great care in disposing of the plug and severed cable, it must be destroyed to prevent engaging into a socket.
TROUBLESHOOTING GUIDE
| Fire is not switching on | Ensure the mains switch is on Replace the fuse in the plug |
| Fire is not emitting any heat | The fire is fitted with an energy saving thermostat. If the temperature in the room is higher than the temperature selected on the fire, then the thermostat will stop the heater from turning on. |
| Fire shuts off after a period of time | Check that the temperature is not set onto the lower settings. If the room is warm enough the thermostat will stop the fire switching the heat on. Check that the chimney/ flue is blocked off. |
| Fire seems noisy | There is a level of noise when the flame effect is in use, caused by a motor that helps generate the effect. This noise will be heard when there is not other background noise.There is a higher level of noise associated with the heater motor, this is due to the air flow required when the heat is selected. |
| Remote is not operating | Before the remote will operate the plastic insulating sheet needs to be removed. Check or replace batteries. |
GUARANTEE – TERMS AND CONDITIONS
Registration is not required.
The 3 year guarantee commences from the date of purchase, provided that the following terms and conditions are adhered to:For any claim to be made within the 3rd year from the date of purchase you will be required to provide and supply us with your proof of purchase.
Please note all consumable items such as any ceramics including coals, pebbles, matrix, front strips, panels and bulbs are not covered by the 3 year guarantee.
We reserve the right to reject any claim or make a charge for any visit where the cause of the defect is due to noncompliance with the installation and/or servicing instructions or misuse of the appliance.
If a repair is chargeable during the warranty period, we will inform you and where possible, provide a quote or price guide before starting work. We cannot always give a firm cost until we commence the repair as it is not always possible to identifywhich components have been damaged.
Repaired or replaced products are covered only for the remainder of the original guarantee period and the guarantee period will not be extended even if we repair or replace any product or part.
If we replace any component or product, the component or product removed will become our property
We will not accept or reimburse the cost(s) of any third party who undertakes any work carried out on the product or fits parts, unless we have approved such work in advance of it being carried out.
The Manufacturer’s guarantee does not apply to:
- Damaged caused by faulty installation, theft, tampering, neglect, misuse, normal wear and tear, accident, fire, flood, explosion, lightning, storms, frost or other bad weather conditions.
- Damage caused by the non-observance of the Manufacturer’s Installation Instructions.
- Any unauthorised adjustments made to the product by a third party.
- Servicing and its associated costs.
- Self-maintenance tasks such as cleaning.
Making a claim is easy.
If you wish to make a claim under our 3 year guarantee, and all of the terms and conditions for your product have been met then please submit the following information for the attention of the 3G Service Department to [email protected]Alternatively, you can fax to 01202 499326 or post to Focal Point Fires Ltd, 3G Service Department, Reid Street, Christchurch, Dorset, BH23 2BT. Please note that this does not affect your statutory rights
Details required:
- Name, full address (including post code) and contact telephone numbers.
- Receipt of purchase or credit card statement.
This product complies with conformity requirements of the applicable European Regulations or Directives.
![]() This product complies with conformity requirements of the applicable UK Regulations.
This product complies with conformity requirements of the applicable UK Regulations.
 Waste electrical products should not be disposed of with household waste. Please recycle where facilities exist. Check with your local authority or retailer for recycling advice.
![]() As our policy is one of continuous improvement and development, we therefore hope that you will understand we must retain the right to amend details and/or specifications without prior notice.
As our policy is one of continuous improvement and development, we therefore hope that you will understand we must retain the right to amend details and/or specifications without prior notice.
Contact us
Focal Point Fires Ltd FoChristchurch, Dorset BH23 2BTTel: 01202 49933499330Fax: 01202 499326www.focalpointfires.co.uke : [email protected]Focal Point Fires LtdRBK House, Irishtown, Athlone,Co. Westmeath, N37 XP52,Ireland Tel: 01202 499330Fax: 01202 499326www.focalpointfires.co.uke: [email protected]
References
[xyz-ips snippet=”download-snippet”]