

USER MANUALHN-DPF7000Before connecting, operating, or adjusting this product, please read this user’s manualcarefully and completely.

1. POWERAfter connecting power adapter, please press and hold power button for approximately 5 seconds (until screen turns on).When it is on, press and hold power button for approximately 3 seconds to access reboot or power off menu. Short press on power button will turn off/onscreen (but leave the photo frame in on position).2. USBCan import photos from USB flash driver to photo frame, can’t copy photos from photo frame to USB flash driver, can’t play photos from USB flash driver directly.3. RESETUse a needle or paper clip to reset unit.4. Micro SDLoad external micro SD memory cards here. (Can import photos from micro SD card to photo frame, can’t copy photos from photo frame to micro SD card, can’t play photos from micro SD card directly).5. DCConnect DC adapter to power on the device.
Getting started
Thank you for purchasing your very own Feelcare Social Photo Frame.First, to set up your frame follow the ‘Quick start guide’ included in the package. If you are new to using Feelcare then start by following the frameo quick setup on-page or follow the on-screen guide when powering it on for the first time. Once you have set up your Feelcare frame, start connecting it to your friends and family.
Frameo appTo send photos to your frame, use the frameo app for iOS or Android
 Find the frameo app on:
 https://play.google.com/store/apps/details?id=net.frameo.appGoogle play by searching for “frameo” or scan this QR code
 https://itunes.apple.com/WebObjects/MZStore.woa/wa/viewSoftware?id=1179744119&mt=8App Store by searching for frameo or scan this QR code
Feelcare quick setup
When starting your frame for the first time, you will need to setup the frame.
- First you start by selecting a language. This will be the language used throughout frameo.
- Connect your frame to the internet by connecting it to a Wi-Fi. If a newer version of the frameo software is available, then you will be prompted with an update dialog. It is recommended to update your frame immediately if prompted.
- Enter your name, and the location where you have placed your frame e.g. “Living room”, “Kitchen” or “Office” and finally set the timezone if not correct.
Start using Feelcare
Start by connecting with your friends and family by providing them with a unique code from your frame.
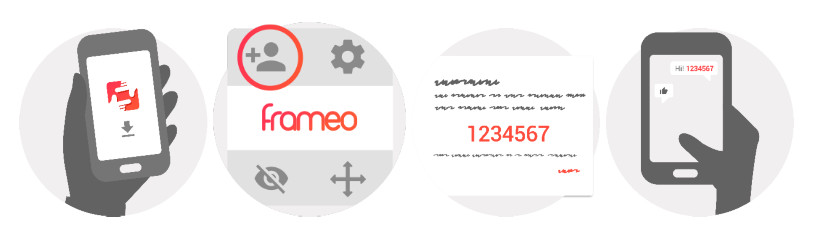
If you want to be able to send photos to the frame yourself, start by downloading the app for iOS or Android on Ago Store or Google Play. Then use the code to connect your frame and app as described below.Connecting a new friend:
- Make sure that your friend has downloaded and installed the frameo app
- Click the add friend icon on your frame
 . A dialog will appear showing a unique code which is valid for 12 hours.
 - Now share this code in whatever fashion you prefer e.g. SMS, E-Mail, IM, phone call, to your friend.
- Once your friends have added the code in their frameo app, they will automatically appear on your frame and be able to send you photos.
You interact with your frame through its touchscreen.Swipe left or right to go through your photos.To access the menu bar, simply tap once on the screen, this will show the menu. In the menu you will find quick access to the add friends dialog ![]() and the settings menu
and the settings menu ![]() . From the menu it is also possible to hide the currently shown photo and to adjust the positioning of the photo.
. From the menu it is also possible to hide the currently shown photo and to adjust the positioning of the photo.
Settings
Through settings, you can personalize your frame to your needs.My frameFrame name:Changes the name of your frame. This is also the name the connected friends and family will see in their list of connected frames.Frame location:Changes the location of your frame. This is the location displayed on your friends’ and family’s list of connected frames which can help to distinguish frames from each other.Set language:Sets the language throughout your frame.Set time zoneSets the timezone that should be used on your frame.Sleep mode:Feelcare offers a sleep mode which turns off the screen to reduce power consumption while you e.g. are sleeping. Its default setting is to turn off the screen at 23:00 and turn on the screen again at 07:00. To change this just set the sleep mode start/end time.Your frame is not powered down or in standby, so you will still be able to receive photos during sleep mode.
Manage photosShow/hide photos: Select which photos to hide by tapping the particular photos you wish to hide. Hidden photos will NOT be deleted from your frame, you can always select them to be shown again.Use![]() to hide or show all photos.
to hide or show all photos.
Delete photos:Select photos that you want to permanently delete from your frame by tapping the photo.Use ![]() to select or deselect all and
to select or deselect all and ![]() to delete the selected photos.Import photos:Allows you to import photos from an external SD card.Before you try to import photos from a SD card, make sure you have a SD card with photos on inserted into your frame.Start by selecting the photos that you want to import onto your frame. Once selected tap the import button
to delete the selected photos.Import photos:Allows you to import photos from an external SD card.Before you try to import photos from a SD card, make sure you have a SD card with photos on inserted into your frame.Start by selecting the photos that you want to import onto your frame. Once selected tap the import button ![]() to start the import process.It is currently not possible to add a caption or define the most important part of the photo when using the import function. Alternatively, add yourself to your friend list and send them using the app.My FriendsThis list contains all the people that are allowed to send photos to your frame.Remove personTo remove a person from this list, thereby removing their permission to send you photos, tap the delete icon ×. You will then be asked to confirm the removal and if you would like to remove all photos received from this person.Add personTo allow a new person to send you photos, simply tap the add friend button +1 and share the presented code in whatever way you prefer.
to start the import process.It is currently not possible to add a caption or define the most important part of the photo when using the import function. Alternatively, add yourself to your friend list and send them using the app.My FriendsThis list contains all the people that are allowed to send photos to your frame.Remove personTo remove a person from this list, thereby removing their permission to send you photos, tap the delete icon ×. You will then be asked to confirm the removal and if you would like to remove all photos received from this person.Add personTo allow a new person to send you photos, simply tap the add friend button +1 and share the presented code in whatever way you prefer.
Display and slideshowTimerDefine the duration a photo should be displayed.Show captionSets whether or not to display the captions that your friends have sent with the photo. Check to display captions. Uncheck to hide captions.Brightness levelAdjust the brightness level of the screen.Wi-FiSet which Wi-Fi the frame should be connected to. If you are connecting to a network with a captive portal a web browser icon should appear in top right corner of the screen. Use this to open a browser where you can enter credentials to access the network.Backup and RestoreBackup frame to SD cardTap to make a backup of your photos, friends, and settings. The time of latest successful backup will be displayed.Any existing backup on the SD card will be overridden!Automatic backupIf checked, your frame will automatically take a backup within 30 hours of you receiving new photos or making changes on your frame.Restore from backupBefore you attempt to restore your frame, start by confirming that your backup is up-to-date.To restore from a backup, you must first reset the frame. It is important to note that you cannot restore to a new Frameo frame and keep the old frame operational at the same time.Reset frameRemoves all data from your frame. This will permanently remove all your photos, friends/connections, and settings.
AboutCheck for updateCheck if an update is available for your frame.Share anonymous analytics dataSharing anonymous analytics data helps us tremendously with improving the frameo software. We understand if you do not wish to share this data with us. Set checked if you wish to help us improve frameo. Set unchecked to deny the sharing of anonymous analytics data.GuideOpens the quick start guide, that was shown when you first started the frame.
Warranty, Compliance, Support and Safety information
For more information regarding warranty, hardware compliances, support, and safety please refer to the material included in the package.
Electric and electronic equipment contains materials, components and substances that can be hazardous to your health and the environment if the waste material (discarded electric and electronic equipment) is not handled correctly.
Electric and electronic equipment is marked with the crossed out trash can symbol, seen below. This symbol signifies that electric and electronic equipment should not be disposed of with other household waste, but should be disposed of separately.
All cities have established collection points, where electric and electronic equipment can either be submitted free of charge at recycling stations and other collection sites, or be collected from the households. Additional information is available at the technical department of your city.
NOTE: FCC StatementChanges or modifications not expressly approved by the party responsible for compliance could void the user’s authority to operate the equipment. This equipment has been tested and found to comply with the limits for a Class B digital device, pursuant to Part 15 of the FCC Rules. These limits are designed to provide reasonable protection against harmful interference in a residential installation. This equipment generates, uses and can radiate radio frequency energy and, if not installed and used in accordance with the instructions, may cause harmful interference to radio communications. However, there is no guarantee that interference will not occur in a particular installation. If this equipment does cause harmful interference to radio or television reception, which can be determined by turning the equipment off and on, the user is encouraged to try to correct the interference by one or more of the following measures:Reorient or relocate the receiving antenna.Increase the separation between the equipment and receiver.Connect the equipment into an outlet on a circuit different from that to which the receiver is connected.Consult the dealer or an experienced radio/TV technician for help.
This device complies with Part 15 of the FCC Rules. Operation is subject to the following two conditions :(1) this device may not cause harmful interference, and(2) this device must accept any interference received, including interference that may cause undesired operation.This equipment complies with FCC radiation exposure limits set forth for an uncontrolled environment. This equipment should be installed and operated with minimum distance 20cm between the radiator & your body
![]()

![]()
Feelcare Photo Frame Manual and Troubleshooting – Feelcare Photo Frame Manual and Troubleshooting –
[xyz-ips snippet=”download-snippet”]