5.5″ Touchscreen MonitorF970 Install and Power KitUser Manual

Product Overview
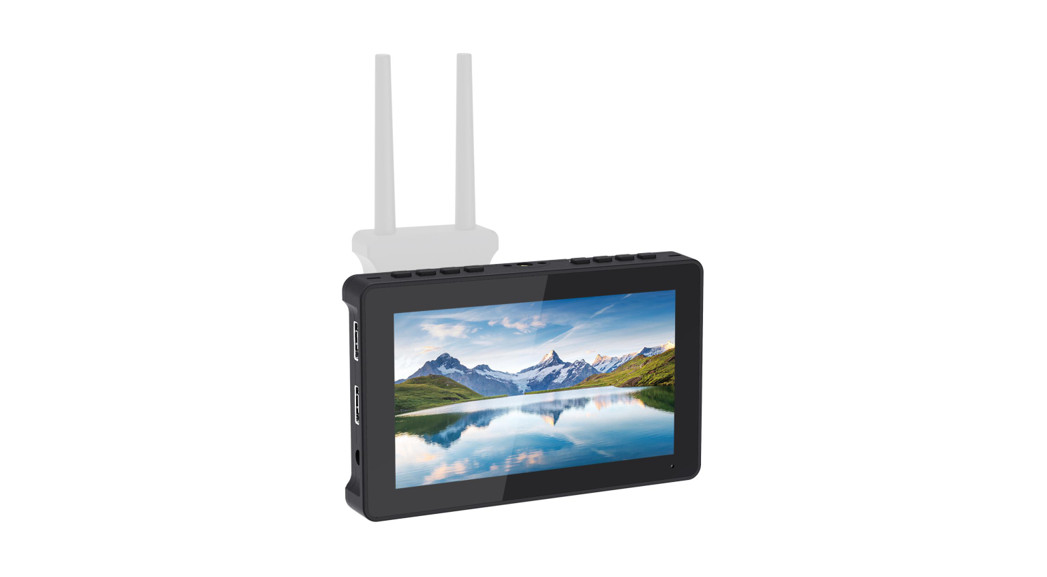
Thank you for purchasing our 5.5 inches Full HD touch screen monitor. This monitor has HDMI input and output, auxiliary power output, touch screen menu operation, support user 3D LUT upload, etc. It has a small size, simple operation, portable convenience and wide application range. Advanced features include Histogram, Embedded Audio, Focus Assist, False Colors, Over Exposure, Center Marker, Safe Frames, Ratio Marker, Check Field, Image Freeze, Zoom, Anamorphic etc. It is an ideal, portable and lightweight viewfinder and video monitor.A Sony F970 external install and power kit design is added to the back of the monitor. The external kit can be used to install and install the external equipment, like wireless transmitter, LED light, video converter and others which can be powered by Sony F970 battery. The monitor is equipped with a battery plate; you can use the power adapter supply or use the external battery for the power supply.
 To ensure the best use of the unit, please read the user’s manual carefully
CAUTION
- Please avoid the heavy impact and drop onto the ground when moving the product.
- The screen of this product is made of glass. Please do not drop the screen towards the ground. Keep away from injury if the screen is broken.
- Keep the product away from the heat source, and avoid prolonged exposures to the sun as the LCD screen will be damaged.
- To avoid damaging the product, please do not take apart or repair the unit by yourself without the adjustable components in the unit.
- In order to better maintain the LCD screen and protect the cover, please follow the following ways to avoid damages.
- Please refrain from using hard objects to hit the screen.
- Please do not force to wipe the screen.
- Please do not use the chemical solutions to clean the screen.
- Please do not spray any detergent on the screen.
- Please do not write on the screen directly.
- Please do not stick on the screen.
- Please simply wipe with a clean soft cloth and make sure no water on the screen.
Features
- Touch screen menu operation
- IPS Full HD 1920×1080 LCD panel
- Support 4K HDMI input and output
- User custom 3D LUT import by Type-C to USB
- The histogram is a quantitative tool to inspect the image brightness, to guide the exposure control
- Focus Assist (Focus edge can be Red, Green, Blue)
- Embedded Audio
- Zebra and False Color function, convenient to guide the using light when shooting and the post-production
- Check Field (Red, Green, Blue, Mono)
- Image Zoom-in function
- Anamorphic Mode
- Image Flip (H, V, H/V)
- Image Freeze
- Image Nine Grid, zoom one of the images to realize the full screen
- Pixel to Pixel
- Ratio Marker, Safe Frames, and Center Marker
- Brightness, Contrast, Sharpness, Tint, Saturation, and Color Temp Adjustment.
- 3.5mm earphone output
- DC 8.4V power out to power your DSLR camera or mirrorless camera
- External sunshade, sunlight-readable
Product Description
Front Panel

Back Panel

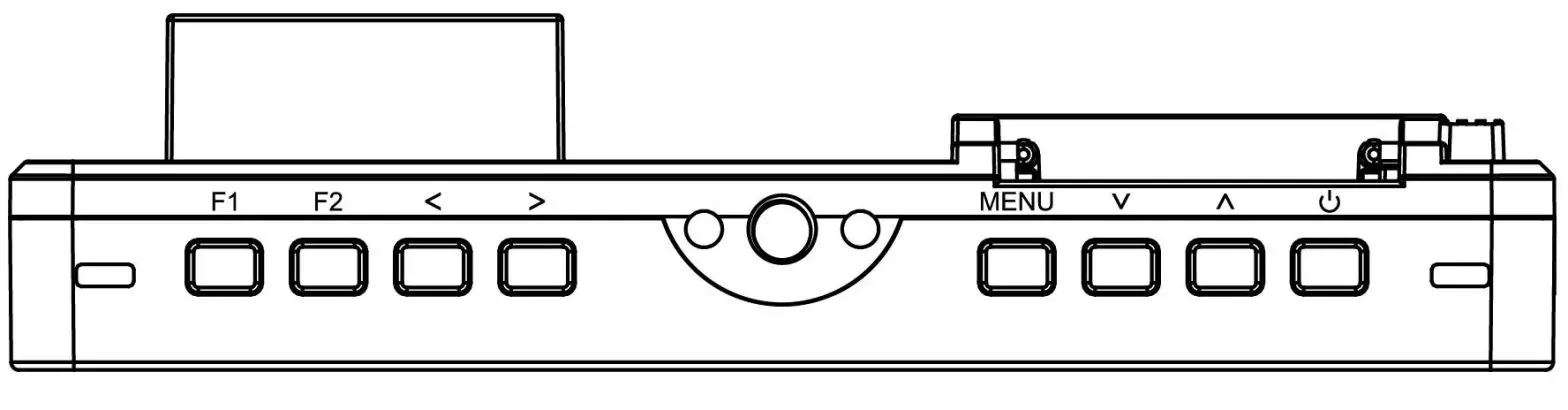
| Button | Function when OSD is not displayed | Function when OSD is displayed |
| Fl | Custom button Fl | / |
| F2 | Custom button F2 | / |
| < | Decrease the volume or backlight | Decrease or adjust the value of the selected parameter |
| > | Increase the volume or backlight | Increase or adjust the value of the selected parameter |
| MENU | Display OSD Main menu | Return to previous OSD menu |
| ∨ | / | Select next menu item |
| ∧ | / | Select previous menu item |
| Power On/Off button |
Port Instruction (Bottom)

DC OUT 8.4V: DC power output interface, polarity as the output power ![]() Barrel output for powering your camera with a separately available DC coupler via an adaptor (NP-FW50 Sony & LP-E6 Canon&DMW-BLF19 Panasonic). More adapters coming soon.
Barrel output for powering your camera with a separately available DC coupler via an adaptor (NP-FW50 Sony & LP-E6 Canon&DMW-BLF19 Panasonic). More adapters coming soon.![]() : 3.5mm earphone port output IN 5V (Type-C): Type-C power input. It is recommended to be used for local power supply only. It is not recommended to connect other devices to provide loop-out power.
: 3.5mm earphone port output IN 5V (Type-C): Type-C power input. It is recommended to be used for local power supply only. It is not recommended to connect other devices to provide loop-out power.
Port Instruction (Left)

HDMI IN: V1.4, HDMI signal input, up to HDMI OUT: V1.4, HDMI signal output, up to DC IN 12V: DC power input, polarity as the input power![]()
Power Supply Way
- The rear cover of the monitor is equipped with an F970 battery plate, which is applicable to the F970 series of batteries.● Sony F970 battery plate for a battery of Sony DV:Sony F970 F960 F950 F930 F770 F750 F730 F570 F550 F530 QM91D QM91 QM90D QM90 QM71D QM71 QM70D QM70 QM51D QM51 FM71 FM70 seriesWhen using a battery power supply: two power output interfaces (DC OUT 8.4V interface and external install and power kit) can be connected to another device. When powering another device, it is recommended to choose a battery with a larger capacity, so the longer the use time. Remark: Please take off the battery from the monitor if you don’t use the monitor in a long time.
- The left side of the monitor has a DC 12V input power port (5.5mm outer, 2.1mm inner) and supports 7 ~ 24V wide voltage. The DC power adapter needs to be purchased separately. When using external adapter input: two power output interfaces (DC OUT 8.4V interface and external install and power kit) can be connected to other devices. When powering other equipment, it is recommended to equip at least 3A power adapter.
- The bottom of the monitor has a Type-C 5V input power port. This port can be connected to the power bank for power supply and is not used for data transmission; it is recommended to be used only for local power supply, and it is not recommended to connect other devices to provide loop-out power.
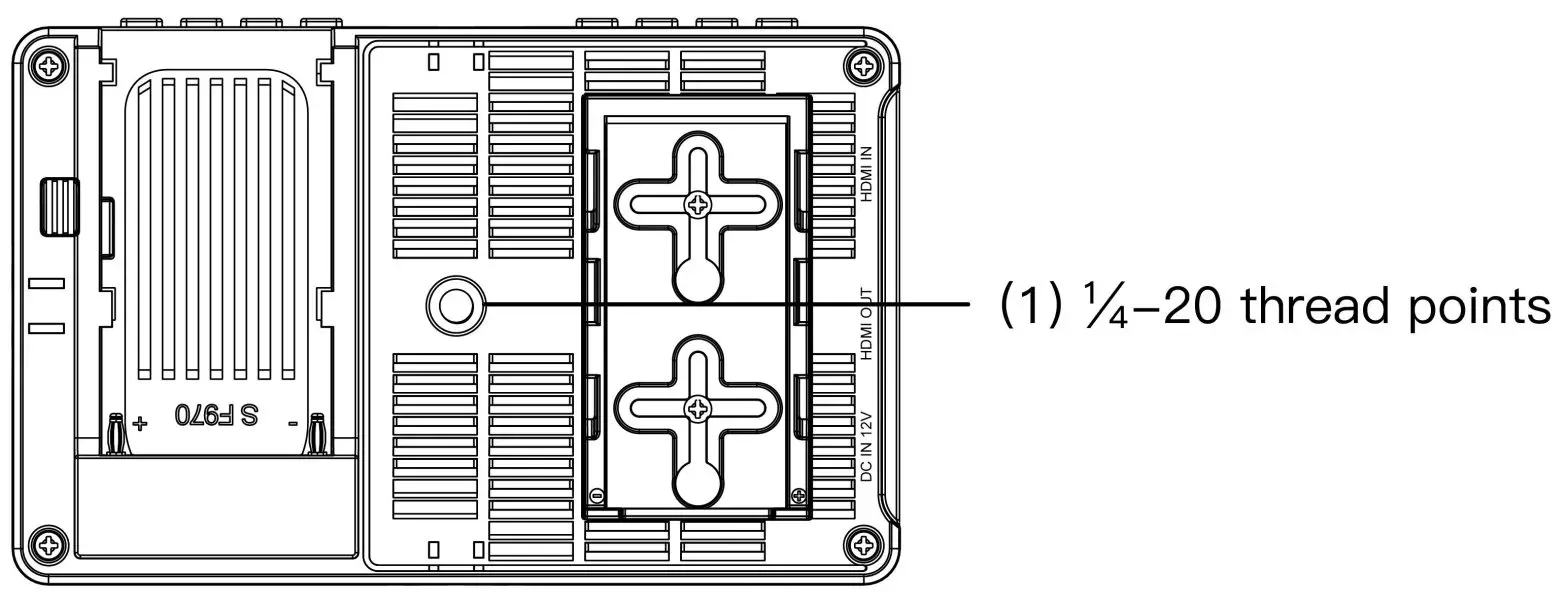
Sony F970 Install and Power Kit
A Sony F970 external install and power kit design is added to the back of the monitor. The external kit can be used to install and install the external equipment, like wireless transmitter, LED light, video converter, and others which can be powered by a Sony F970 battery. The kit has two cross grooves, you can adjust the position of the external device by loosening 2 screws up and down / left or right, or install the kit upside down. When you don’t need the kit, you can loosen the screws and remove the kit.Note: Before disassembling the kit, make sure that the monitor is turned off, and then remove the battery or power adapter.
- Just move the kit: Loosen 2 screws, and then adjust up / down / left/right.
- Remove the external device: After the plug-in device is installed on the kit, if your plug-in device has a locking button, and it is more difficult to press it to remove it by hand, then you can use our assisting tool to disassemble.

- Steps to remove the kit:①. Loosen the 2 screws.②. Use both hands to move the kit up.③. Move the round holes to the corresponding 2 screws.(You can also install the kit upside down.)④. Then gently lift the kit upwards and carefully disassemble the 2P power cord.⑤. Then remove the 2 screws.
- Install back to the kit: first screw the 2 screws back to the screw hole used to install the kit on the back of the monitor, install the 2P power cable to the cutout, then align the round hole of the kit with the screw, and then push the kit to the screw at the center of the kit cross, then tighten the screws.


 ④. Then gently lift the kit upwards and carefully disassemble the 2P power cord.⑤. Then remove the 2 screws.
Mount Points
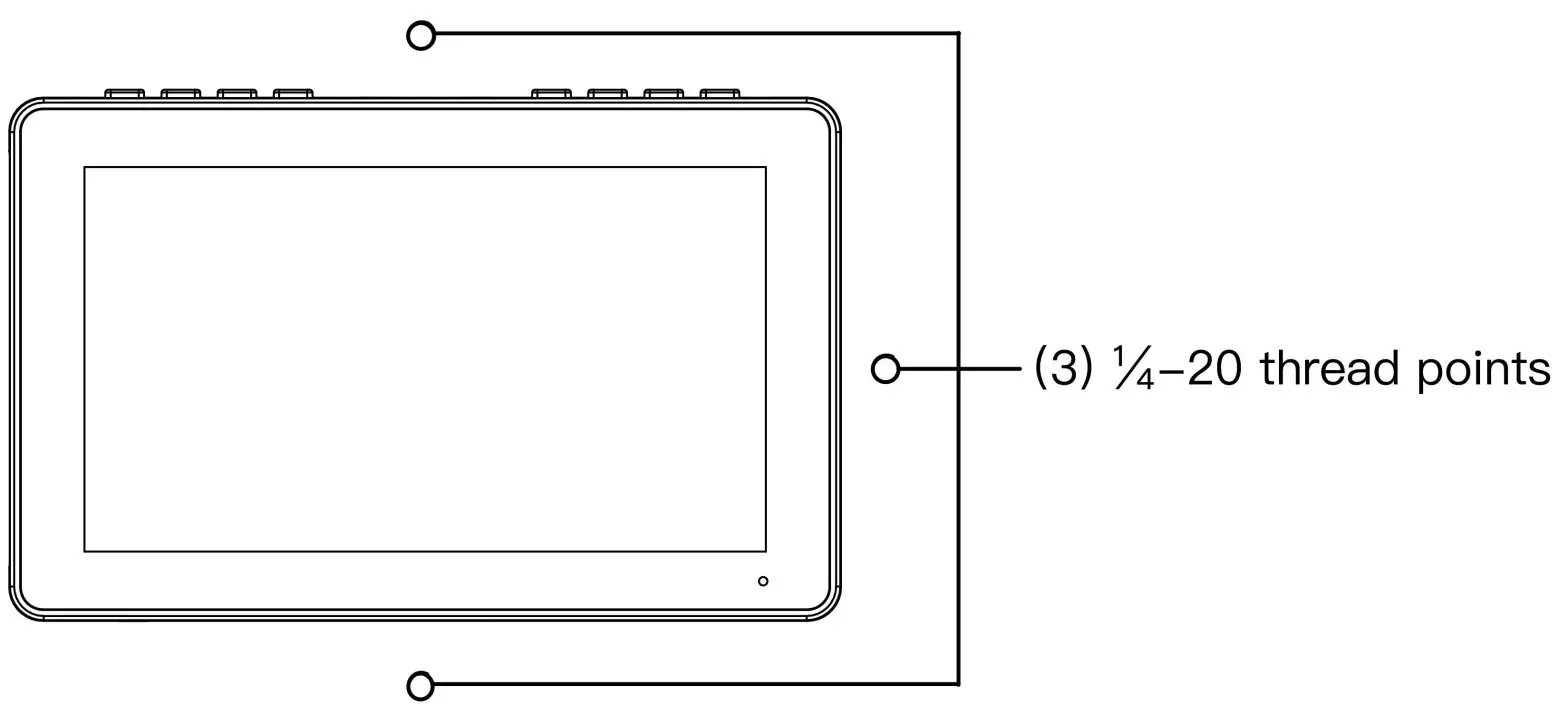
- ¼-20 Thread PointsThere are (4) ¼-20 thread points (top, bottom, right side & Back center) can be easily connected to the hot shoe mount, tripod fixed installation.
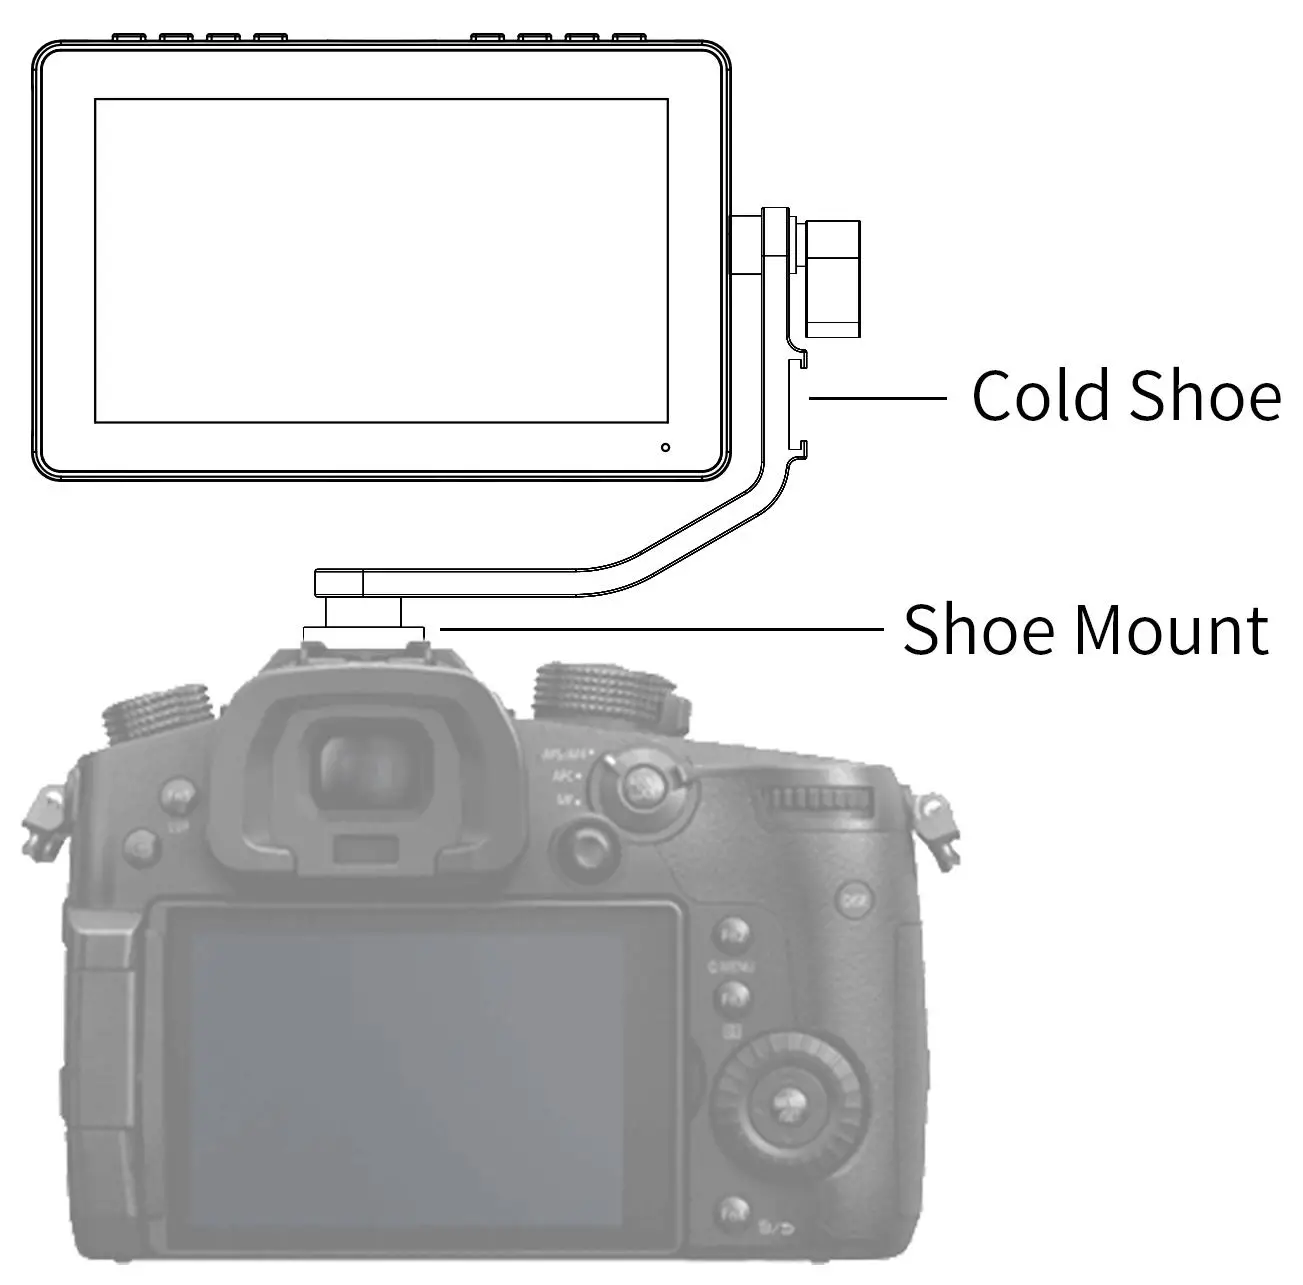
- Tilt Arm MountingThe monitor secures to your camera using the included Tilt Arm via shoe mount or 1/4″-20 thread. The Tilt Arm enables 180° of tilt for convenient monitoring at nearly any angle. A cold shoe on the Tilt Arm lets you secure equipment (like a microphone, LED light, or wireless receiver) that would otherwise be displaced from the camera’s accessory shoe.
Sunshade
 First, lock the Sunshade Frame ②with the monitor tight ③. Open the sunshade ①, and match the sticker on the sunshade inside to the marked part of the sunshade frame ②, smooth and press 3 sides on the sunshade, and then complete the sunshade installation ④.
After the monitor is correctly connected to the power supply, the indicator light is on (red), long press![]() (manual power-on mode), turn on the monitor, the indicator light turns yellow, and after the HDMI signal is input, the indicator light turns green. (The default is the auto power-on mode, no need to long-press
(manual power-on mode), turn on the monitor, the indicator light turns yellow, and after the HDMI signal is input, the indicator light turns green. (The default is the auto power-on mode, no need to long-press![]() buttons.)
buttons.)
1. Touch screen menu operation (default touch screen is on)
- Double-click on the screen to open the main menu (on the left side of the screen) and click on the orresponding menu to display the secondary menu. You can enter the corresponding function option to select or set with the “<” or “>” key of the option. To exit the menu, click outside the menu to exit.
- Swipe up from the bottom of the screen to open the shortcut menu and click on the corresponding menu to open or set the corresponding function. Double-click the shortcut menu function and select the function set with the “<” or “>” key.
- On the left side of the screen (1/2 split-screen), you can directly adjust the brightness of the screen backlight; on the right side of the screen (1/2 split-screen), you can directly adjust the volume.

2. Button Menu Operation
- When the menu is not displayed, directly press the “<” or “>” button to adjust the volume or backlight. You can set the left and right buttons in the menu Left Right Key Set to set the volume or backlight.
- Press the “MENU” button to open the main menu (on the left side of the screen), press “∨” or “∧” to select the secondary menu, press “>” to enter the secondary menu, and then press “∨” or “∧” to select the secondary menu Menu options. After selecting the secondary menu option, press “<” or “>” to adjust the parameter value. After adjusting to the preset parameters, press the “∨” or “∧” button to enter the next adjustment. After adjustment, press “MENU” to exit.
- After booting, you can choose to turn on or off the screen touch function in the Touch Switch in the (the touch screen is turned on by default).In the closed state, you need to select the Touch Switch option according to the ② step of the Button Menu Operation, and then press the “<” or “>” button to turn on the touch function.

| Histogram | Off, On |
| Focus Assist | Off, On |
| Peaking Color | Red, Green, Blue |
| Embedded Audio | Off, On |
| Over Exposure | Off, On |
| Exposure Level | IRE10∼1RE100 |
| Check Field | Off, Mono, Red, Green, Blue |
| False Colors | Off, On |

| Nine Grid | Off, On |
| Safe Frames | Off, 80%, 85%, 90%, 93%, 96%, 2.35:1 |
| Center Marker | Off, On |
| Ratio Marker | Off, 4:3, 13:9, 14:9, 15:9, 16:9, 1.85:1, 2.35:1 |
| Mark Color | Red, Green, Blue, Black, White |
| Mark Width | 1∼7 |
| Modified Mark | 0∼5 |

| Scan Mode | Under Scan, Over Scan |
| Aspect Ratio | Auto., 4:3, 16:9, Just Scan, Panorama, P2P |
| Anamorphic | Off, 1.3X, 2.0X, 2.0X MAG, UserUnder the User, the Anamorphic nX can be customized. |
| Anamorphic X | 1.20X-2.00X |
| Nine Grid Zoom | Off, On
Open the Nine Grid function in the |
| Zoom | Off, 4X, 9X, 16X |
| Image Flip | Off, H Flip, V Flip, H_V Flip |
| OSD Flip | Off, On |
| Zoom Mode | Off, Model, Mode2The Zoom All, UR Zoom, and U/D Zoom can be customized. |
| Zoom All | 0∼100 |
| UR Zoom | 0∼100 |
| U/D Zoom | 0∼100 |
| Image Freeze | Off∼ On |

| Lut Switch | OFF, ONAfter the LUT Switch is turned on, you can use the Lut (SLOG2, SLOG3, LOGC, VLOG). |
| Lut Table | Show the 4 built-in Lut and the custom load Lut |
| Lut Import (type C) | After copying the 3D LUT file to the U disk and inserting it into the TYPE-C to USB Connector, you can click the “<” or “>” key in the Lut Import(type C) to import the 3D LUT file. |
| Color Temp. | 6500, 9300, UserUnder the User, the red, green and blue of the image can be adjusted. |
| Red | 0∼255 |
| Green | 0∼255 |
| Blue | 0∼255 |
| Backlight | 0∼100 |
| Pic. Mode | Standard, Mild, User, DynamicUnder the User, you can adjust the image Brightness, Contrast, Saturation, and Sharpness. |
| Brightness | 0∼100 |
| Contrast | 10∼100 |
| Saturation | 0∼100 |
| Sharpness | 0∼100 |
| Tint | 0∼100 |

| Left Right Key Set | Volume, BacklightYou can set the Left-Right Key Set as shortcut keys for volume or backlight adjustment. After setting, when the menu is not displayed, you can directly press the “<” or “>” key for quick adjustment. |
| Language | English, |
| OSD Trans. | Off, Low, Middle, High |
| OSD Time | Off, 10Sec, 20Sec, 30Sec |
| No Signal | Blue Screen, Red Screen, Green Screen, Gray Screen, Black Screen, White Screen |
| Volume | 0∼100 |
| Touch Switch | On, OffWhen the touch screen is closed, you need to select the Touch Switch option according to step ® of the Button Menu Operation, and then press the “<” or “>” key to turn on the touch function. |
| Power On | Auto., ManualWhen Auto is selected, the monitor will automatically power on after power on; when Manual is selected, it will enter standby mode after power on, and press the key ( |
| USB Upgrade | Copy the file to the U disk, insert the Type-C to USB female adapter, and then connect to the Type-C interface of the monitor, press the n>” button to confirm the upgrade. After the upgrade is complete, the monitor will automatically restart. |
Reset Press “>” button to confirm, back to the original setting.

F1/F2Safe Frames, Check Field, Focus Assist, Aspect Ratio, Image Flip, Image Freeze, Histogram, False Colors, Over Exposure, Embedded Audio, Nine Grid, Zoom, Anamorphic, Center Marker
Technical Parameters
| Panel Size | 5.5″ touch screen |
| Resolution | 1920 x 1080 pixels |
| Dot Pitch | 0.0639 (H) x 0.0213 (W) mm |
| Pixel Density | 400PPI |
| Aspect Ratio | 16:09 |
| Brightness | 500cd/m2 |
| Contrast | 1000:1 |
| Viewing Angle | 801801UR) 80°/80°(U/D) |
| Backlight | LED |
| Adjustable Backlight | Yes |
| Input | HDMI V1.4 |
| Output | HDMI V1.4, 3.5mm stereo headphone jack |
| Power In | DC IN 12V, Barrel (5.5mm outer, 2.1mm inner) |
| Power Out | DC OUT 8.4V, Barrel (5.5mm outer, 2.1mm inner) |
| HDMI Input) OutputSupport Format | 4801/57611480p/576p720p (60/59.94/50/30/29.97/25/24/23.98) 1080i (60/59.94/50)1080p (60/59.94/50/30/29.97/25/24/23.98)3840x2160p (30/29.97/25/24/23.98) 4096x2160p (24Hz) |
| Power Input Voltage | 7-24V |
| Power Consumption | ≤9W |
| Unit Size (mm) | 148Lx93Hx20D (mm) |
| Unit Weight | 245g (with F970 install and power kit) |
| Mount Points | 1/4-20 thread points |
| Working Temperature | -20°C∼50r |
| Storage Temperature | -30t ∼60-C |
Trouble Shooting
- Only black and white or monochrome pictures:① please check saturation, brightness & contrast adjustment.② Please check “Check Field” is in the black, white or monochrome image or other condition.
- NO Image after put on the power ① Check if the signal cable connecting is in good condition.② Check signal cable connecting, and make sure to use the standard adapter to connect the monitor. If power is supplied by a battery, please check if the battery is fully charged.
- Earphone No sound ① Check if Volume control do not open, press the volume button, and try to increase the volume.
 report this ad
■ If there are still other problems, please contact with our related technologists.★ As we are improving product features and product performance, so if there is any change on the specification without prior notice.
[xyz-ips snippet=”download-snippet”]