
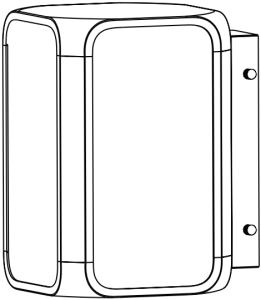
MODEL: LAN9SQBZ60 ITM. / ART. 1494750
9 IN. LED OUTDOOR LANTERN
WITH DUSK TO DAWN PHOTOCONTROL SENSOR
IMPORTANT, RETAIN FOR FUTURE REFERENCE: READ CAREFULLY
 Tools Required (not included)
 Phillips head screwdriver
Supplier’s Declaration of Conformity:47 CFR § 2.1077 Compliance InformationResponsible Party:Feit Electric Company4901 Gregg Road;Pico Rivera, CA 90660, USA562-463-2852Unique Identifier:LAN9SQBZ60, ITM. / ART. 1494750
CAUTION
WARNING: Risk of fire. Use only on 120 volt 60Hz circuits. Before installing your lighting fixture, thoroughly review enclosed installation manual. If you do not have sufficient electrical wiring experience, please refer to a do-it-yourself wiring handbook or have your fixture installed by a qualified licensed electrician. All electrical connections must be in accordance with Local and National Electrical Code (NEC) Standards.CONSULT A QUALIFIED ELECTRICIAN TO ENSURE CORRECT BRANCH CIRCUIT CONDUCTOR.
| PARTS INCLUDED | QUANTITY |
| 1 | |
 Wire Connectors Wire Connectors |
3 |
 Fixture mounting screws Fixture mounting screws |
2 |
 Outlet box mounting screws Outlet box mounting screws |
2 |
| 2 | |
| 2 |
 WARNING:This product may represent a possible shock or fire hazard if improperly installed or attached in any way. Product should be installed in accordance with the owner’s manual, current electrical codes and/or the current National Electric Code (NEC).
RISK OF ELECTRIC SHOCK:TURN OFF THE MAIN POWER AT THE CIRCUIT BREAKER BEFORE INSTALLING.
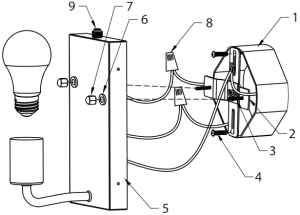
- Outlet box (not included)
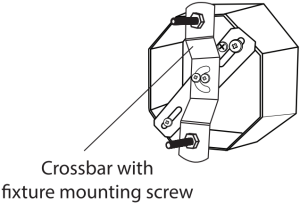
- Cross bar
- Fixture mounting screws
- Outlet box mounting screws
- Fixture body
- Rubber Washers
- Decorative nuts
- Wire connectors
- Photocontrol
- Access nuts
- Glass Housing
IMPORTANT WIRING INFORMATION
Always follow the recommended wire strip lengths and wiring combinations when connecting wires.
Hold stripped ends next to each other and align frayed strands (do not twist wires).
Push wires firmly into wire nut. Using your fingers, twist wire nut clockwise until tight. Check for tightness by pulling wires.
INSTALLATION INSTRUCTIONS
[1] TURN POWER OFFTurn power off at circuit breaker or remove the correct fuse.
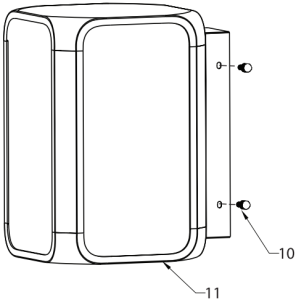
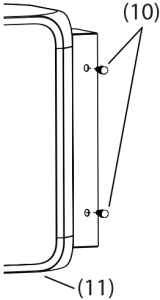
[2] REMOVE GLASS HOUSINGUsing your hands, remove the four access nuts (10). There are two access nuts per side. Gently slide down the Glass Housing (11).
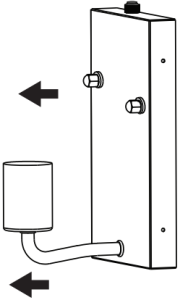
[3] PREPARE THE PRE-INSTALLED CROSSBARUnscrew the decorative nuts (7), remove the washers (6) and keep them for later. Remove the crossbar (2).
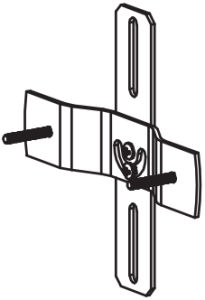
[4] MOUNT CROSS BARMount cross bar (2) to outlet box (1) by inserting the two outlet box mounting screws (4) through slots in cross bar.
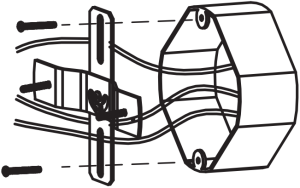
[5] ADJUST CROSS BARPosition the Crossbar with fixture mounting screws to horizontal position. Tighten both middle screws on crossbar to hold the crossbar in place.

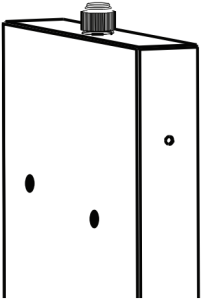
[6] ADJUST MOUNTING SCREW LENGTHLift the fixture and slide over mounting screws (3). The screws should protrude about 1/4 inch from the fixture body. Adjust the screw length in the bracket as necessary.

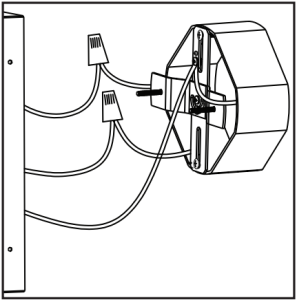
[7] CONNECT WIRESLift the fixture to the outlet box. Connect the green wire or bare copper ground (house) wire to the ground screw on the cross bar (2). Connect the fixture ground wire directly to the same ground screw on the cross bar. Use the wire nuts provided to connect the white fixture wire to the neutral supply wire and connect the black fixture wire to the live wire.
[8] MOUNT FIXTURE BODYInsert fixture mounting screws (3) through holes on the back plate and secure to cross bar by tightening decorative nuts (7). NOTE: Hand tighten decorative nuts. Do not use any tools as over tightening may occur causing damage to back plate.
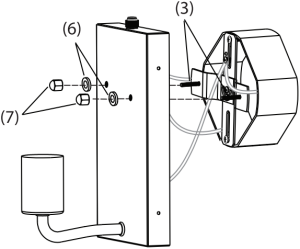
[9] SEAL THE FIXTURE BODYCaulk between the fixture back plate (5) and the wall surface to prevent water penetration. Use a silicone sealant (Not included).

[10] INSTALL BULB AND GLASS HOUSINGScrew in provided LED light bulb.Gently bring up Glass Housing (11) towards fixture body and tighten Access nuts (10). Make sure you’re firmly holding the housing while you do this.


[11] TURN POWER ONTurn power on at circuit breaker or replace the fuse.
SAVE THESE INSTRUCTIONS

FEIT ELECTRIC COMPANY I PICO RIVERA, CA, USA(800) 543-3348 | FAX (562) 908-6360 | www.feit.comHOURS OF OPERATION: MONDAY – FRIDAY, 8:00 AM – 5:00 PM (PST),LANGUAGES SPOKEN: ENGLISH, FRENCH AND SPANISH
Made in Vietnam
 Dusk to Dawn
 Dusk to Dawn
- The light will turn on at dusk.
- The light will remain on through the night until dawn. At dawn, the light will turn off.
- The light will remain off through the day until dusk.
NOTE: To make sure this function works properly, always keep the wall switch in the “ON” position (including daytime).
LIMITED WARRANTY
This product is warrantied to be free from defects in workmanship and materials for up to three years from date of purchase. If the product fails within the warranty period, please contact Feit Electric at [email protected], visit feit.com/contact-us or call 1-866-326-BULB (2852) for instructions on replacement or refund. REPLACEMENT OR REFUND IS YOUR SOLE REMEDY. EXCEPT TO THE EXTENT PROHIBITED BY APPLICABLE LAW, ANY IMPLIED WARRANTIES ARE LIMITED IN DURATION TO THE DURATION OF THIS WARRANTY. LIABILITY FOR INCIDENTAL OR CONSEQUENTIAL DAMAGES IS HEREBY EXPRESSLY EXCLUDED. Some states and provinces do not allow the exclusion of incidental or consequential damages, so the above limitation or exclusion may not apply to you. This warranty gives you specific legal rights, and you may also have other rights which vary from state to state or province to province.
This device complies with part 15 of the FCC Rules. Operation is subject to the following two conditions: (1) This device may not cause harmful interference, and (2) this device must accept any interference received, including interference that may cause undesired operation. Note: This equipment has been tested and found to comply with the limits for a Class B digital device, pursuant to part 15 of the FCC Rules. These limits are designed to provide reasonable protection against harmful interference in a residential installation. This equipment generates, uses and can radiate radio frequency energy and, if not installed and used in accordance with the instructions, may cause harmful interference to radio communications. However, there is no guarantee that interference will not occur in a particular installation. If this equipment does cause harmful interference to radio or television reception, which can be determined by turning the equipment off and on, the user is encouraged to try to correct the interference by one or more of the following measures: Reorient or relocate the receiving antenna. Increase the separation between the equipment and receiver. Connect the equipment into an outlet on a circuit different from that to which the receiver is connected. Consult the dealer or an experienced radio/TV technician for help. Any changes or modifications not expressly approved by the manufacturer could void the user’s authority to operate the equipment. Feit Electric Company, 4901 Gregg Road, Pico Rivera, CA 90660. www.feit.com. CAN ICES-005 (B)
TROUBLE SHOOTING GUIDE
If this fixture fails to operate properly, use the guide below to diagnose and correct the problem:
- Verify that power is turned on at switch and breaker.
- Verify that fixture is wired properly.
- Verify that line voltage is correct.
- Test if photocontrol works properly.

The photocontrol in this fixture is designed to turn on fixture at low light levels.
If light does not come on or stays on:
- Cover photocontrol – light should come on.
- Shine a flashlight into photocontrol – light should go off.
 report this ad
If fixture cycles on and off:Light reflecting back off any surrounding surfaces enters the photocontrol.To correct problem, reposition the fixture or eliminate reflective surface.
[xyz-ips snippet=”download-snippet”]