
![]()
MODEL 73719
Dual Head Motion Security Flood Light
IMPORTANT SAFETY INSTRUCTIONS AND INSTALLATION GUIDE
READ BEFORE INSTALLATION
SAVE THESE INSTRUCTIONS
 WARNING: This product may represent a possible shock or fire hazard if improperly installed or attached in any way. Product should be installed in accordance with the owners manual, current electrical codes and/or the current National Electric Code (NEC).
RISK OF ELECTRIC SHOCK: TURN OFF THE MAIN POWER AT THE CIRCUIT BREAKER BEFORE INSTALLING.
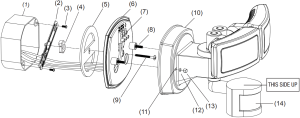
EXTERNAL J-BOX INSTALLATION
FLUSH J-BOX INSTALLATION
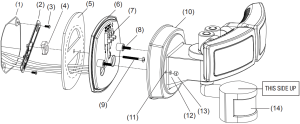
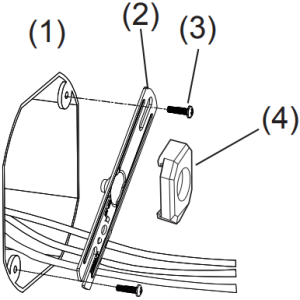
- J-box (not included)
- Mounting bar
- J-box screws (2 pieces)
- Spacers (2 pieces)
- Mounting gasket
- Mounting plate
- Terminal block
- Mounting plate screws (2 pieces)
- Mounting bar screw (1 piece)
- Fixture body
- Mounting holes
- Decorative washers (2 pieces)
- Decorative nuts (2 pieces)
- Motion and photocell sensor
HARDWARE IN THE BOX
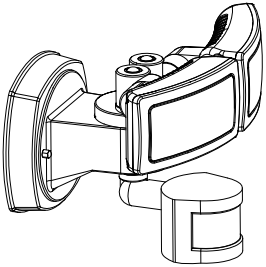

1 Pc Dual-Head Security Flood Light 1 Pc Mounting Plate
![]() 2 Pc Mounting Plate Screws
2 Pc Mounting Plate Screws  2 Pc Decorative Nuts
![]() 2 Pc Decorative Washers
2 Pc Decorative Washers
PARTS IN THE BAG

![]()
1 Pc Mounting Gasket 2 Pc Spacers 1 Pc Mounting Bar
![]()
![]()
1 Pc Mounting Bar Screw 2 Pc J-Box Screws
TOOLS REQUIRED (NOT INCLUDED)


![]()
| EXTERNAL J-BOX INSTALLATION | FLUSH J-BOX INSTALLATION |
| 1. Turn the main power off at circuit breaker or fuse box. | 1. Turn the main power off at circuit breaker or fuse box. |
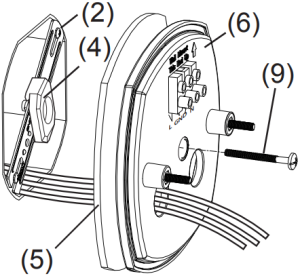
| 2. Install the mounting bar (2) to an external j-box (1) using j-box screws (3). If needed, add one of the spacers (4) provided to eliminate gap between mounting bar and mounting plate.
|
2. Install the mounting bar (2) to a j-box (1) using j-box screws (3). If needed, add one of the spacers (4) provided to eliminate gap between mounting bar and mounting plate.
|
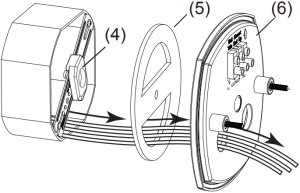
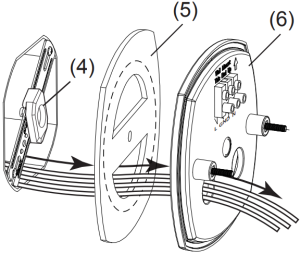
| 3. Extend and feed the j-box wires through the openings on the mounting gasket (5) and the mounting plate (6).
NOTE:Tear away at perforation on mounting gasket (5) |
3. Extend and feed the j-box wiresthrough the openings on the mounting gasket (5) and the mounting plate (6).
NOTE:Do not tear away at perforation on mounting gasket (5) |
| 4. Secure the mounting gasket (5) and the mounting plate (6) to the mounting bar (2) using the mounting bar screw (9). Do not over tighten.
|
4. Secure the mounting gasket (5) and the mounting plate (6) to the mounting bar (2) using the mounting bar screw (9). Do not over tighten.
|
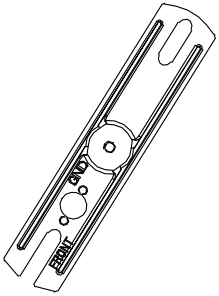
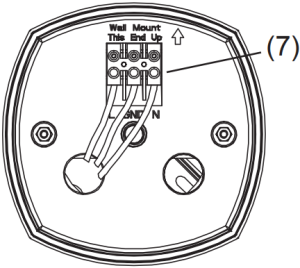
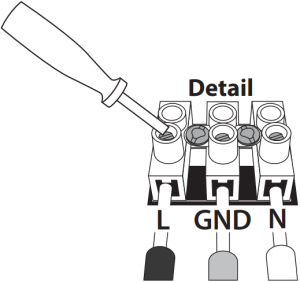
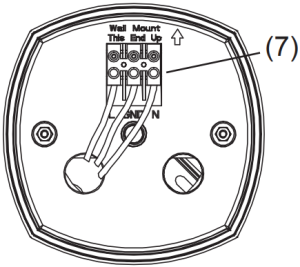
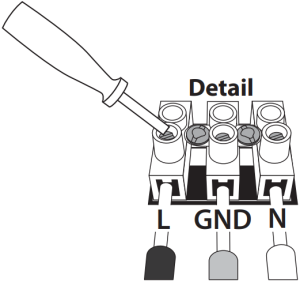
| 5. Connect the power supply wires directly to the terminal block (7). Secure the wires to the terminal block by using a small screwdriver.
Connect: Black wire to “L” input.Ground wire to “GND” input.White wire to “N” input. |
5. Connect the power supply wires directly to the terminal block (7). Secure the wires to the terminal block by using a small screwdriver.
Connect: Black wire to “L” input.Ground wire to “GND” input.White wire to “N” input. |
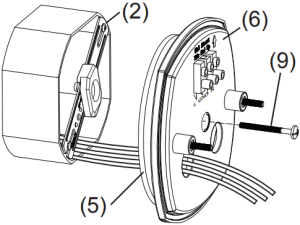
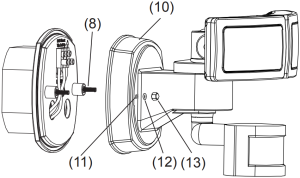
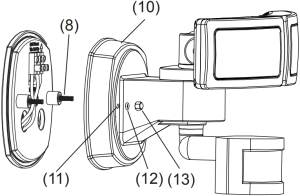
| 6. Position and align the mounting holes (11) on the fixture body (10) to the mounting plate screws (8). Secure the fixture body to the mounting plate using rubber washers (12) and decorative nuts (13).
|
6. Position and align the mounting holes (11) on the fixture body (10) to the mounting plate screws (8). Secure the fixture body to the mounting plate using rubber washers (12) and decorative nuts (13).
|
| 7. Once the fixture is tightly secured to the j-box, apply a silicone sealant around the base of the fixture to prevent moisture from reaching the connections. | 7. Once the fixture is tightly secured to the j-box, apply a silicone sealant around the base of the fixture to prevent moisture from reaching the connections. |
| 8. Turn the power on at circuit breaker or fuse box. | 8. Turn the power on at circuit breaker or fuse box. |

DUSK TO DAWN AND MOTION SENSOR
The motion sensor on this fixture has a built in Dusk-to-Dawn sensor that automatically disables the Motion sensor during D2D option.
OPERATING INSTRUCTIONS
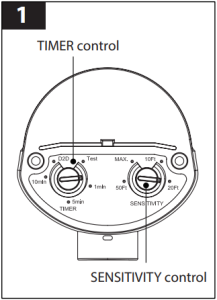 The motion sensor’s SENSITIVITY must be adjusted before setting the Timer. Begin by turning the rotary control knob to the “Test” option that is located on the TIMER control knob on the underside of the sensor head. To adjust the fixture, switch the wall switch that controls power to the fixture to the ON position. During “Test” option mode, the lights will come on for 5 seconds, when motion is detected regardless of the time of day. Leave the rotary control knob in the “Test” option and test the sensitivity by crossing in the path of the sensor between 10 ft. and MAX. The light will come on only if it senses movement. It may be necessary to adjust the “SENSITIVITY” rotary control knob several times until the desired distance setting is achieved. Once sensitivity has been achieved the adjustment is now complete.
NOTE: The higher sensitivity level increases the likelihood of a false activation being triggered. For Maximum range performance, allow the fixture to operate in any setting (with power) for at least 48 hours. The 180-degree coverage of the motion sensor is measured side to side. Therefore, the sensor will better detect motion across the field of view (side-to-side), rather than motion coming straight at the sensor (in-and-out). Adjust the motion sensor head so that it detects motion moving across the cover range area. The position of the sensor head should not exceed 45 degrees from horizontal. Do not aim the Motion sensor at a body of water, bushes or plants that may move in the wind, pedestrian traffic, moving cars, Etc., as this will trigger the motion sensor.
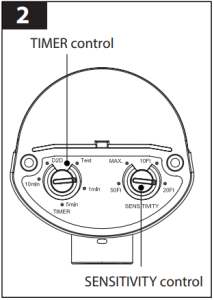 Once the fixture has been tested for proper Sensitivity, rotate the TIMER rotary control knob into the Timer settings. The timer settings indicate how long the light stays on after the PIR senses motion at night only.• Rotating this knob clockwise raises the stay on time of the motion sensor for up to 10 minutes.• Rotating the knob counterclockwise shortens the stay on time to as close as 1 minute. It may be necessary to adjust the TIMER rotary knob several times until the desired-ON time is achieved.
If Dusk to Dawn is desired, rotate the TIMER rotary control knob to the “D2D” position, the light turns on at dusk and off at dawn automatically, regardless of the presence of motion. The “D2D” setting ensures lights are non-operational in daylight and only function at night.
NOTE: If the Sensor’s arm becomes loose, it will not hold the sensor’s head. Tighten the joint screw on the sensor’s arm.
MANUAL OVERRIDE OF THE MOTION FUNCTION:• Override must be done at night or in a dark setting.• Position Dial on the Timer setting. (1 min, 5min, 10min).• When power is on, the PIR sensor enters a “warm-up” period for about 30 seconds, then automatically switches into AUTO MODE.• During AUTO MODE, by switching the main switch OFF for about 1 second then ON, the PIR sensor will automatically change into MANUAL MODE from AUTO MODE. In MANUAL MODE, the lights will remain ON and will NOT be controlled by time duration. The MANUAL MODE will change to AUTO MODE in 8 hours automatically.• During MANUAL MODE, by switching the main switch OFF over 30 seconds then back ON again, the PIR sensor will reset to the “warm-up” period.
LIGHT OPERATION
| MODE | CONTROL KNOB | WALL SWITCH | SENSITIVITY KNOB |
| Test Mode |
Test position |
ON |
Any setting |
| Dusk to Dawn Mode |
D2D position |
ON |
Any setting |
| Timer Mode |
Between 1 Min-10 Min |
ON |
Any setting |
CARE AND MAINTENANCE
- IMPORTANT: This fixture uses LEDs (light emitting diodes) to provide light. LEDs do not burn out like traditional light bulbs and will last for 30 years or more (based on 3 hours of usage per day).
- Periodically clean the fixture and diffuser using a mild, non-abrasive cleaner and soft cloth. When cleaning the fixture, make sure the power is turned off. Do not spray cleaner directly onto any part of the fixture or LEDs.
TROUBLESHOOTING
Extreme hot or cold weather could affect the performance of the built-in sensors that detect body heat.Certain winter clothing can shield a person’s body heat from the sensor during extreme cold weather.During extreme hot weather, the sensor may not be able to distinguish the difference between normal body temperatures and the surrounding high temperatures. The sensor will begin working normally once weatherconditions return to normal.
|
PROBLEM |
POSSIBLE CAUSE |
CORRECTIVE ACTION |
| Light does not come on at night when Motion detected. | 1. No power is being delivered to the fixture.
2. Another light source is causing the security light to think it is daylight. 3. Wiring inside electrical box came loose. |
1. Check that circuit breaker and/or wall switch power is on.
2. Turn off surrounding lights and/or re-aim the sensor head. 3. AFTER turning power off to the fixture, reconnect any loose wiring. |
| Security light comes on during the day. | 1. Dusk-to-Dawn sensor is in a shaded area and is fooled into thinking it is nighttime.
2. Dusk-to-Dawn sensor is faulty. |
1. Shine a flashlight onto the light sensor. If the security light turns off then the fixture is mounted in an area that does not allow enough light to enter the sensor. Relocate security light.
2. If under warranty, contact Customer Service. |
| Security light cycles ON and OFF continuously | 1. Dusk-to-Dawn sensor is sensing reflected light from the security light. | 1. Change the position of the light head, aim light away from the reflecting surfaces.
2. Put a small piece of black electrical tape over the Dusk-to-Dawn sensor. 3. Relocate the security light to a different location where it no longer causes reflected light. |
| Security light comes on for no apparent reason at night. | 1. Light is sensing motion in the detection zone. | 1. Make sure the sensor is not picking up moving objects such as bushes, trees, traffic, water, etc.
2.Test the motion sensor by covering up the front curved lens with cardboard to block the view. If the light turns off then something in the detection zone is triggering the sensor. Reposition the motion sensor or change the sensitivity (distance) of the sensor. |
CAUTIONWARNING: Risk of fire. Use only on 120 volt 60Hz circuits. Suitable for wet locations. Do not use with dimmers. Before installing your lighting fixture, thoroughly review enclosed installation manual. If you do not have sufficient electrical wiring experience, please refer to a do-it-yourself wiring handbook or have your fixture installed by a qualified licensed electrician. All electrical connections must be in accordance with Local and National Electrical Code (NEC) Standards. Reliable operating temperature is 0°F –120°F. For more information visit www.feit.com or call our toll free number 1-866-326-BULB.
LIMITED WARRANTYThis product is warranted to be free from defects in workmanship and materials for up to 5 years from date of purchase. If it fails to do so, please contact Feit Electric at [email protected] or call 1-866-326-BULB (2852) for instructions on replacement. This replacement is the sole remedy available and liability for incidental or consequential damage is expressly excluded. Do not return the product to the store. For comments please contact: Feit Electric Customer Service
 report this ad
FEIT ELECTRIC COMPANY | PICO RIVERA, CA, USA | (800) 543-3348 | FAX (562) 908-6360 | www.feit.com
References
[xyz-ips snippet=”download-snippet”]