
MODEL FP1X2/4WY/NK
LED FLAT PANEL FIXTURE INSTRUCTIONS
 CAUTIONTURN OFF THE MAIN POWER AT THE CIRCUIT BREAKER BEFORE INSTALLING THE FIXTURE, IN ORDER TO PREVENT POSSIBLE SHOCK.
GENERAL
- All electrical connections must be in accordance with local and National Electrical Code (N.E.C.) If you are unfamiliar with proper electrical wiring connections obtain the services of a qualified electrician.
- Remove the fixture and the mounting package from the box and make sure that no parts are missing by referencing the illustrations on the instruction.
THIS PRODUCT MUST BE INSTALLED IN ACCORDANCE WITH THE APPLICABLE INSTALLATION CODE BYA PERSON FAMILIAR WITH THE CONSTRUCTION AND OPERATION OF THE PRODUCT AND THE HAZARDS INVOLVED.
READ IMPORTANT SAFETY INFORMATION FIRST 0N THE REVERSE SIDE OF THIS SHEET
MOUNTING INSTRUCTIONS
Steps 1
- Turn OFF the main power at the circuit breaker before installing the fixture.
- Following tools will be needed to complete this job:”1. Philips Head Screw Driver2. Drill3. 1/2 Drill Bit4. Safety Glasses
Steps 2
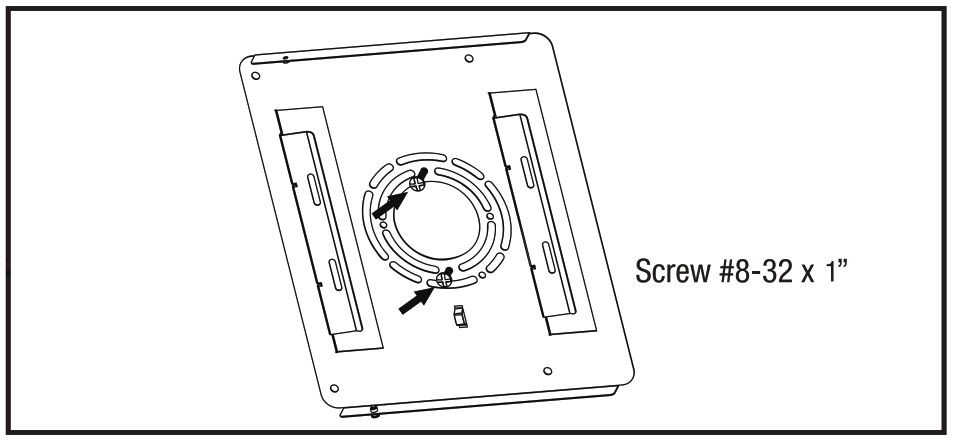
- Install the mounting plate (1) to the junction box using the Mo #8-32 × 1 in screws (4).
- Align the mounting plate in the direction you want the fixture to be aligned.
NOTE: Once the toggle bolts are installed, you cannot change the orientation of the LED Flat Panel. Take care to align the mounting plate properly in this step.
Steps 3
- Using the mounting plate as a guide, mark the position of the 4 holes on the ceiling or wall where the toggle bolts will be placed.
 Steps 4
- Remove the mounting plate (1) from the junction box.
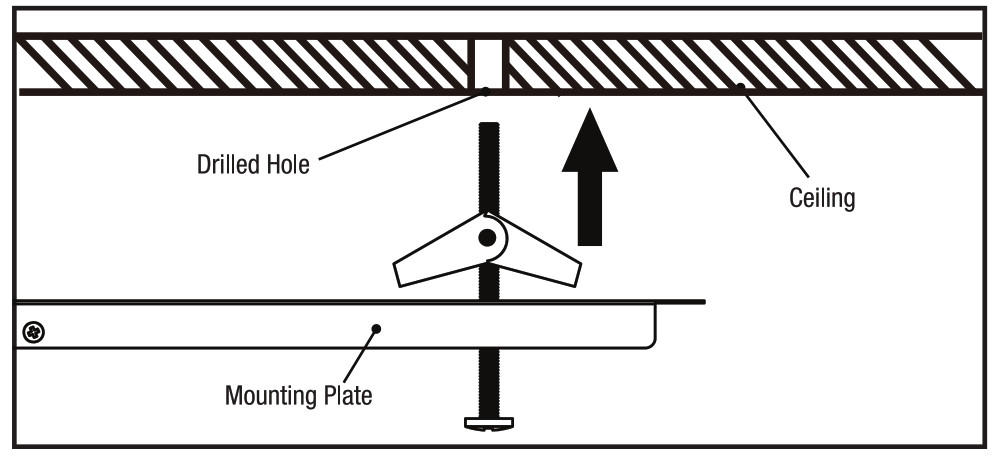
- Drill the marked holes using a 1/2 drill bit.
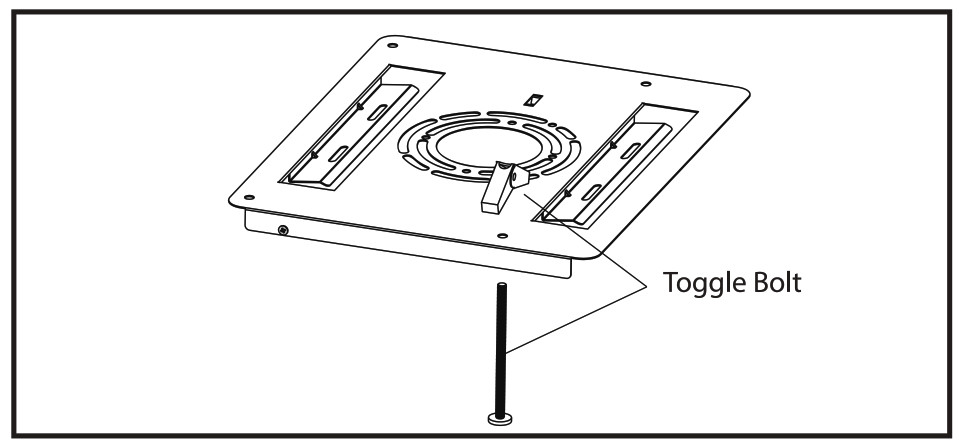
- Remove the wings from the 3/16 toggle bolts (2).
- Insert screw (2) through front of the mounting plate (1) and then reattach the wing to the screw, do this for all toggle bolts.

Steps 5
- Feed the Junction bo ires through the center of the mounting bracket plate hole.
- Re-install the mounting plate onto the ceiling in the same orientation as in Step 3 by inserting the toggle bolts into the drilled holes.
- Once the wings are through the drywall and have expanded, pull the screw down to engage the wing on the backside of the Once engaged, secure into place by tightening the screws.
Steps 6
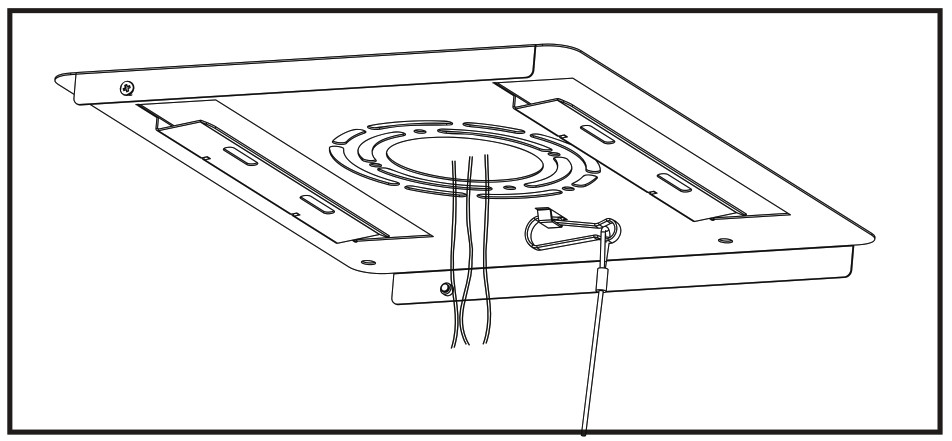
Connecting the LED Flat Panel
- Hook the support wire from the fixture on the mounting bracket plate, as shown.
Steps 7
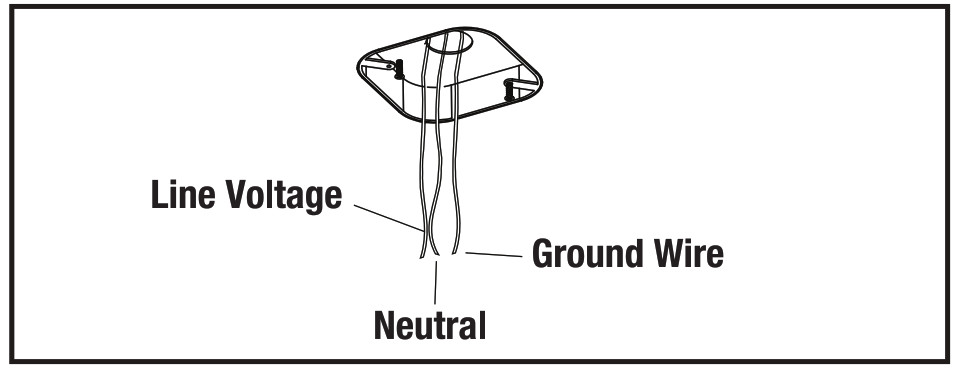
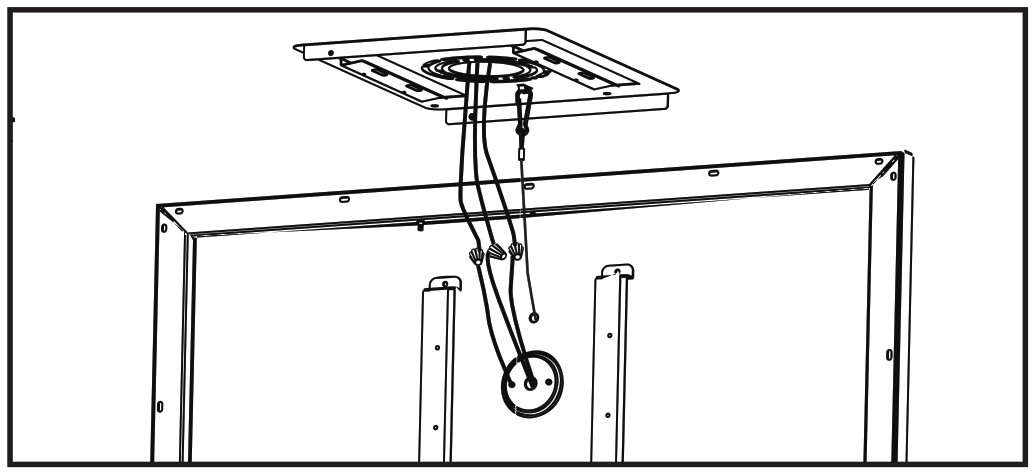
- Connect the 3 wires coming from the fixture to the Junction box wires (black – line voltage, white – neutral and green – ground).
NOTE: Please select the preferred color temperature by using the switch behind the fixture. Refer to the “Changing Color Settings” instructions on the next page.
Steps 8
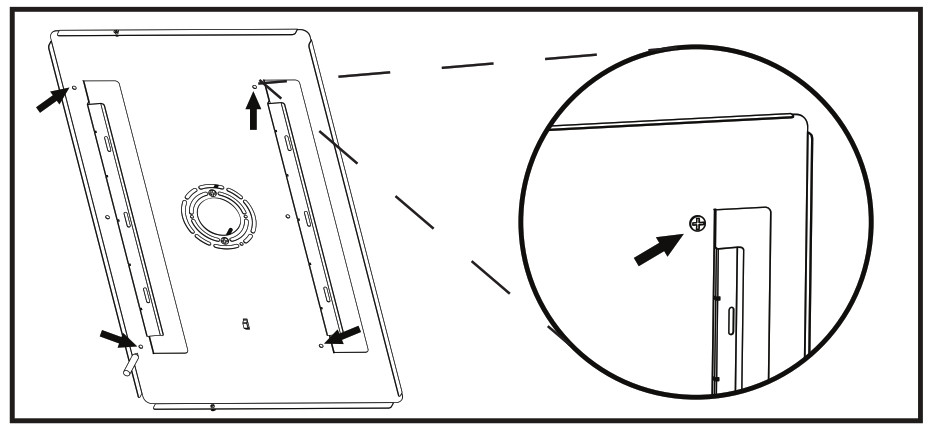
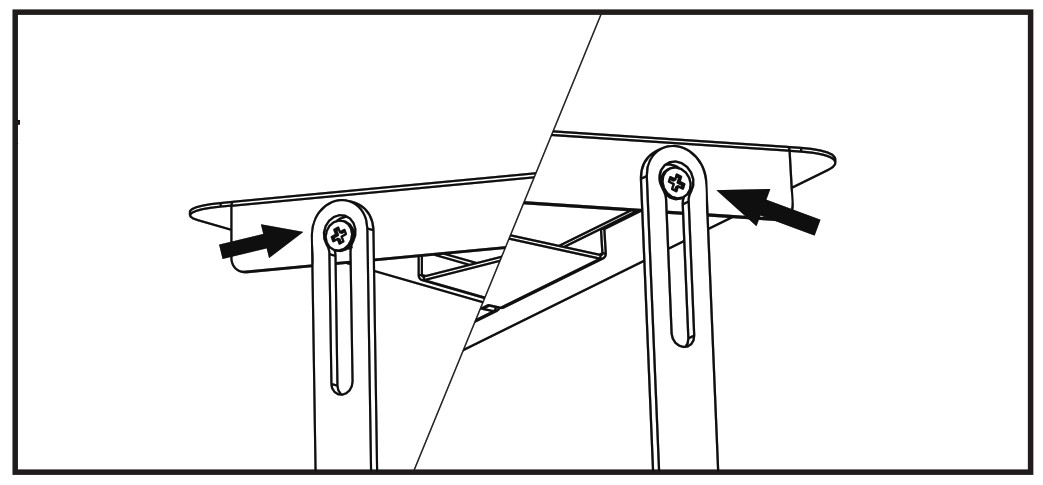
- Insert swing arm’s keyhole slot into the mounting bracket plate’s hanging screw, as shown.
MODEL FP1X2/4W/NK
Steps 9
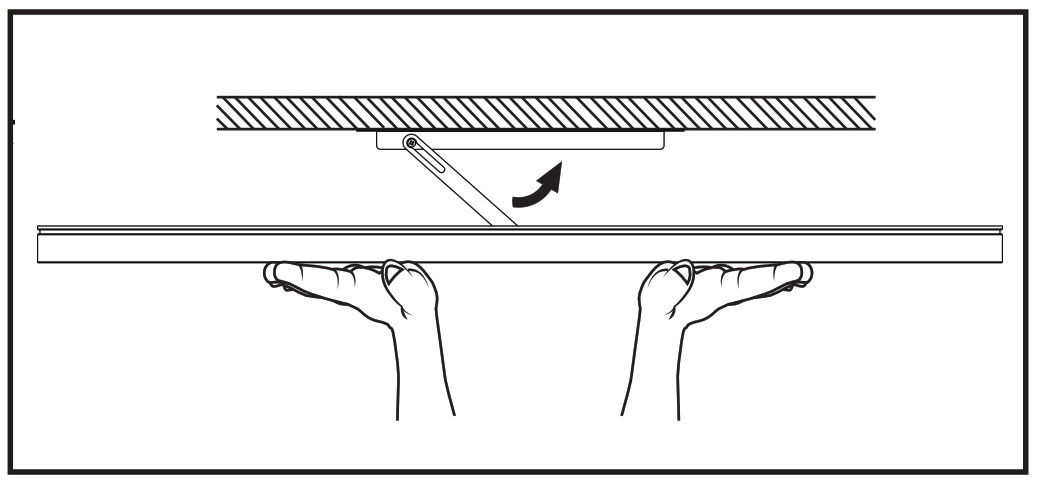
- Feed the junction box and fixture wires through the mounting bracket plate’s center hole into the junction box.
- Raise the Fixture to the direction of the arrow on the swingarm.
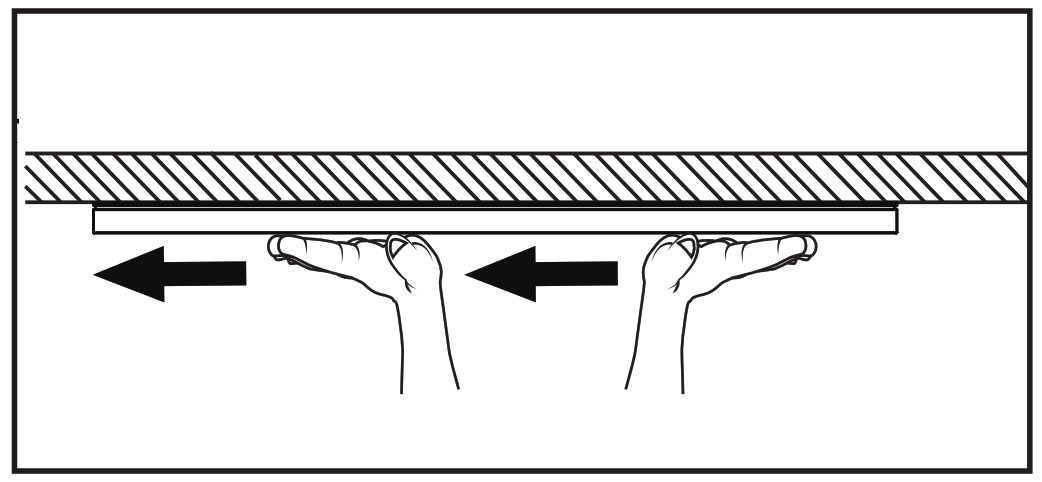
Steps 10Once the fixture has been raised and is flush to the ceiling as shown, lock the Fixture by moving it towards the opposite direction it was raised.
CHANGING COLOR SETTINGS
- You can lock in one color temperature, change among multiple color temperatures, dim from 10%-1009’», memorize the last color temperature, and reset
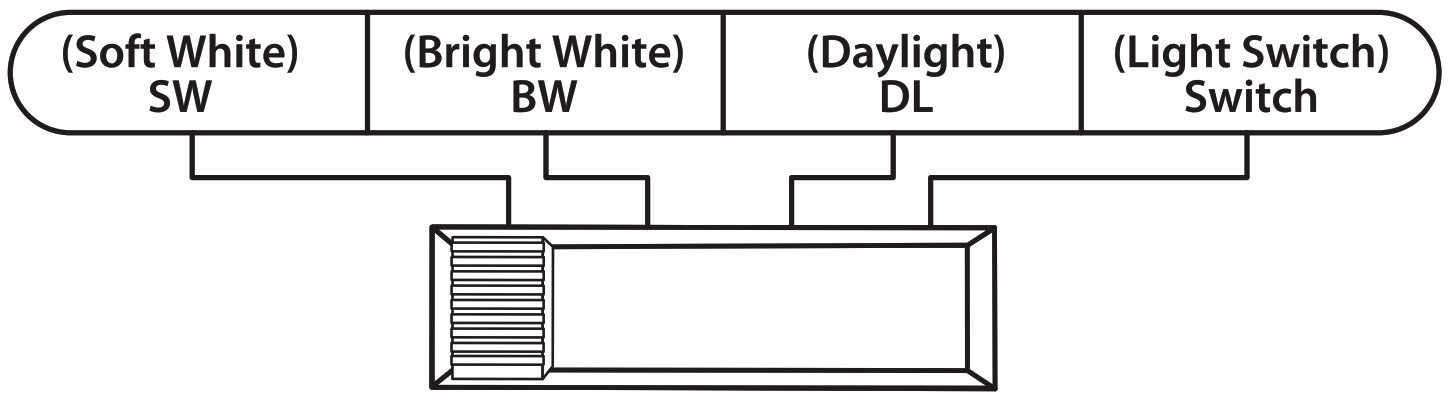
- Soft White – Bright White – Daylight – Light Switch Marks on the fixture: SW-BW-DL-Switch
- When the slide switch is set to SW (Soft White), the color temperature fixes at
- When the slide switch is set to BW (Bright White), the color temperature fixes at
- When the slide switch is set to DL (Daylight), the color temperature fixes at
- When the slide switch is set to SWITCH, the color temperature can be changed from SW-BW-DL with your existing light
- To change color temperatures using your existing light switch:A. Set the slide switch on back of the fixture to “SWITCH”B. Toggle your light switch 0N and OFF within 5-3 seconds to cycle through the three different color temperatures.C. If the fixture is left 0N for over 20 seconds then turned OFF, the fixture will remember the last color temperature selected and will display that color when turned on
- The reset function is used when using multiple Color Selectable lighting products operating from the same light In the event multiple fixtures are not displaying the same color at the same time, fixtures must be RESET using your existing light switch. Simply toggle the wall switch 0N and OFF 7times within J 0 seconds. (ex: Fixture in the 0N position, toggle the wall switch 0N and OFF in about J to J.5 seconds. Repeat 7 times.)
IMPORTANT SAFETY INFORMATION
- WARNING: RISK OF SHOCK House electric current can cause painful shock or serious injury unless handled For your safety, always remember to:A. Turn off the power supply at the fuse or circuit breaker box before you install the fixture.B. Ground the fixture to avoid potential electric shocks and to ensure reliable Starting.C. Double-check all connections to be sure they are tight and correct.D. Wear rubber-soled shoes and work on a sturdy wooden ladder.
- This fixture is designed for use in a circuit protected by a fuse or circuit It is also designed to be installed in accordance with local electrical codes. If you are unsure about your wiring, COFISMIt a qualified electrician or local electrical inspector and check your local electrical code.
- WARNING: RISK OF CUTS Some metal parts in the fixture may have sharp To prevent cuts and scrapes, wear gloves when handling the parts.
- Account for small parts and destroy packing material, as these may be hazardous to children.
CAUTION
WARNING: Risk of fire. Use only on 120-volt 60Hz circuits. Suitable for damp locations. Before installing your lighting fixture, thoroughly review the enclosed installation manual. If you do not have sufficient electrical wiring experience, please refer to a do-it-yourself wiring handbook or have your fixture installed by a qualified licensed electrician. All electrical connections must be in accordance with Local and National Electrical Code (NEC) Standards. Reliable operating temperature is 0°F —100°F. If flickering occurs in low-level dimming, increase light level. Compatible with most dimmers including Leviton 6681-IW, Lutron S600-P, and Lutron DVCL-153PL. Dimmable to 10% with ITI05t dimmers. For more information including dimmer compatibility visit www.feit.com or call our toll-free number 1-866-326-BULB.
This device complies with part 15 of the FCC Rules. Operation is subject to the following two conditions: (1) This device may not cause harmful interference, and (2) this device must accept any interference received, including interference that may cause undesired operation. Note: This equipment has been tested and found to comply with the limits for a Class B digital device, pursuant to part 15 of the FCC Rules. These limits are designed to provide reasonable protection against harmful interference in a residential installation. This equipment generates, uses, and can radiate radio fr8qMency energy and, if not installed and used in accordance with the instructions, may cause harmful interference to radio communications. However, there is no guarantee that interference will not occur in a particular installation. If this equipment does cause harmful interference to radio or television reception, which can be determined by turning the equipment off and on, the user is encouraged to try to correct the interference by one or more of the following measures: Reorient or relocate the receiving antenna. Increase the separation between the equipment and receiver. Connect the equipment into an outlet on a circuit different from that to which the receiver is connected. Consult the dealer or an experienced radio/T\/technician for help. Any changes or modifications not expressly approved by the manufacture could void the user’s authority to operate the equipment.
LIMITED WARRANTY
This product is warranted to be free from defects in workmanship and materials for up to 5 years from date of purchase. If it fails to do so, please contact Feit Electric at feit.com or call 1-866 326-BULB (2852) for instructions on replacement. Do not return the product to the store.
For comments please write to:FEIT ELECTRICCustomer Service Department4901 Gregg Road, Pico Rivera, CA 90660
SAFE THESE INSTRUCTIONSFEIT ELECTRIC COMPANY I PIC0 RIVERA, CAI (800) 543-3348 I FAX (562) 908-6360 I www.feit.com
[xyz-ips snippet=”download-snippet”]