![]()
Model: MOT/DOOR/WIFI/BATSMART DOOR & WINDOW SENSORIMPORTANT SAFETY INSTRUCTIONSAND INSTALLATION GUIDE
![]() watts with 181 Felt Electric app
watts with 181 Felt Electric app![]() Only supports 2.461.1zWl-Fl Networks
Only supports 2.461.1zWl-Fl Networks

READ BEFORE INSTALLATION SAVE THESE INSTRUCTIONSQuestions, problems, missing parts? Before returning to the store, call Feit Electric Customer Service 8 a.m. – 5 p.m., PST, Monday – Friday1-866-326-BULB (2852)FEIT.COM
We appreciate the trust and confidence you have placed in Feit Electric through the purchase of this Smart Door & Window Sensor. We strive to continually create quality products designed to enhance your home. Visit us online to see our full line of products available for your home improvement needs. REV006 Thank you for choosing Feit Electric.
Safety Information 1
SAVE THESE INSTRUCTIONSIMPORTANT SAFEGUARDS: ALWAYS FOLLOW BASIC SAFETY PRECAUTIONS WHEN USING ELECTRICAL PRODUCTS, ESPECIALLY WHEN CHILDREN ARE PRESENT.![]() CAUTION: Please read all information carefully before installation.
CAUTION: Please read all information carefully before installation.![]() CAUTION: Intended for Indoor use.
CAUTION: Intended for Indoor use.![]() CAUTION: This product Is NOT a toy.
CAUTION: This product Is NOT a toy.![]() CAUTION: Do not install directly on or near any metal objects that can interfere with the magnet or may weaken the Wi-Fi signal strength.
CAUTION: Do not install directly on or near any metal objects that can interfere with the magnet or may weaken the Wi-Fi signal strength.
Limited Warranty
This product is warranted to be free from defects in workmanship and materials for up to 1 year from the date of purchase. If the product fails within the warranty period, please contact Feit Electric [email protected], visit feit.com/contact-us or call or call 1-866-326-BULB (2852) for instructions on replacement or refund. REPLACEMENT OR REFUND IS YOUR SOLE REMEDY. EXCEPT TO THE EXTENT PROHIBITED BY APPLICABLE LAW, ANY IMPLIED WARRANTIES ARE LIMITED IN DURATION TO THE DURATION OF THIS WARRANTY. LIABILITY FOR INCIDENTAL OR CONSEQUENTIAL DAMAGES IS HEREBY EXPRESSLY EXCLUDED. Some states and provinces do not allow the exclusion of incidental or consequential damages, so the above limitation or exclusion may not apply to you. This warranty gives you specific legal rights, and you may also have other rights which vary from stale to state or province to province.
FCC STATEMENT
This device couples with part 15 of the FCC Ades. Operations sailed to the flaming two conditions (1I This device may not cause harmful interference, ad (2) this device must accept any interferers* (arrived, inck)ng intolerance that may cause undesired operation. file: This equipment has been tested and found to comply with the limit for Class ft digital device, pursuant to pad 15 of the FCC Rules. These limits are designed to provide reasonable protection against Mogul reference in a residential installation. This embodiment generates. uses and can radiate rase frequency energy aid, if not installed and used in accordance with the instructions, may cause harmful interference to radio communicates, However, Mere is no guarantee that interference will not oath in a predictor installation U this equipment does cause harmful Intolerance to read or television reception, which can be determined by turning the equine off and on, the user is encouraged to by to correct be irtederence by one or more of the following measures: Reorient or relocate the receiving antenna. Increase the separation between the eqrAxnent and receiver. Corned the equipment ‘Moan outlet on a &cult different from that to which the receiver is connected. Const the dealer cc an expo erred radio/TV technician or help. Any changes or modifications not expressly approved by the manufacturer could void the user’s authority to operate the °ailment tflanrtrig Changes Or modifications to this unit, not times* approved by the party responsible for compliance could void the weft authority to oxide the eQuiPmen7Suppler’s Declaration of Conformity: 47 CFR § 2.1077 Compliance Information Responsible Party: Felt Electric Company 4901 Gregg Road, Pico Rivera, CA 90660, USA 562-463-2852 Unique Identifier MOT/DOORAVIFI/BAT
Warning: Changes or modifications to this unit not expressly approved by the party responsible for compliance could void the user’s authority to operate the equipment.The device has been evaluated to meet general RF exposure requirements. The device can be used in portable exposure conditions without restriction. The device can be used in mobile (min 7.87 in.) exposure conditions without restriction.
Pre-Installation
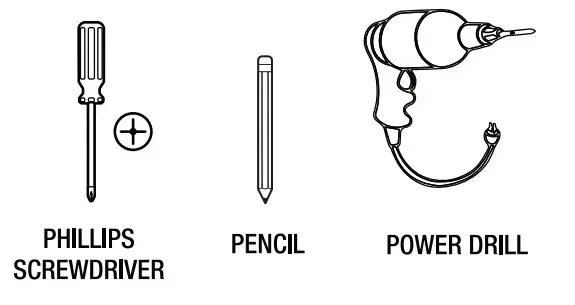
TOOLS REQUIRED TO MOUNT SENSOR
HARDWARE INCLUDED
 NOTE Hardware not shown to actual size.

| Part | Description | Quantity |
| AA | Door/Window Sensor | 1 |
| BB | Magnet | 1 |
| CC | Double-Sided Tape for the Sensor | 1 |
| DD | Double-Sided Tape for the Magnet | 1 |
| EE | 1.5V AAA Alkaline Batteries | 2 |
| FF | Mounting Screws | 4 |
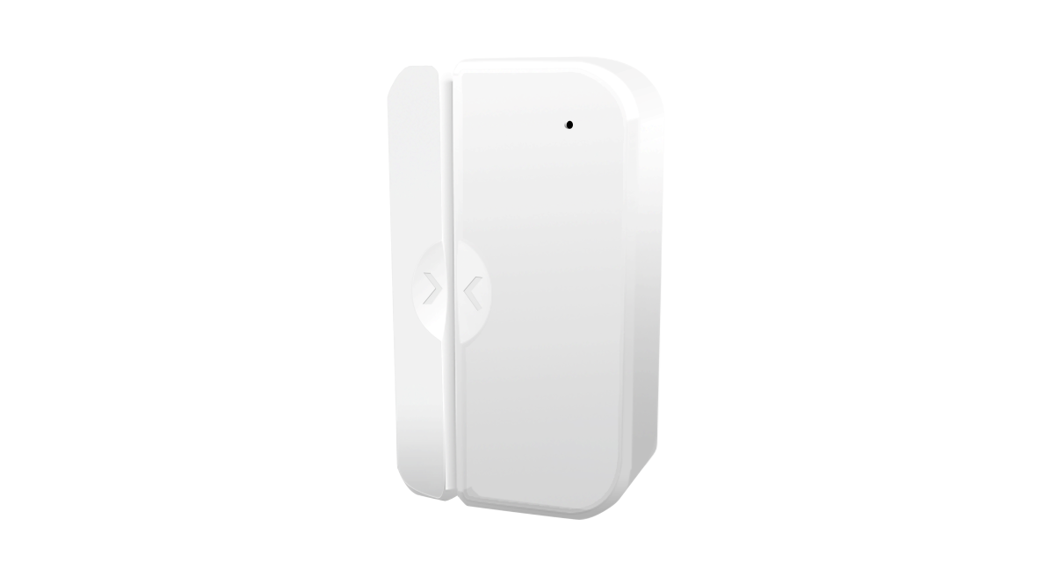
Description

| ITEM DESCRIPTION | |
| Latch Button | Press to release the lock |
| Status Light |
|
| Tamper Switch | Sends a notification in-app when the sensor is being tampered. |
| Reset Button | Press and hold for 5 seconds to reset the sensor. |
Screw Installation
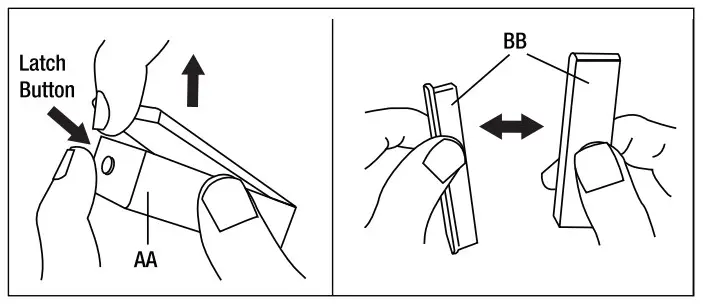
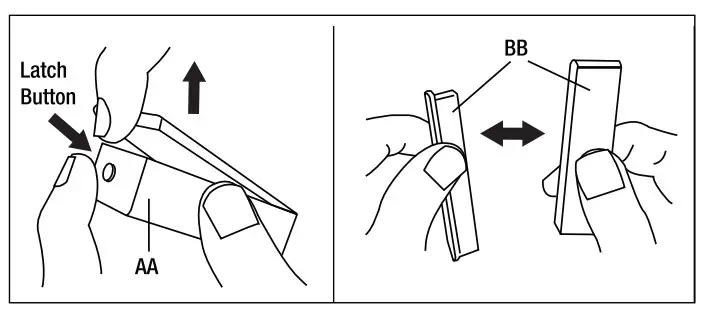
- Remove Backplate• Remove the backplate from the Door/Window Sensor (AA) by pressing the latch button on top and gently pulling the backplate until it releases.• Remove the backplate from the Magnet (BB) by grasping it from the middle and gently pulling the backplate until it releases.

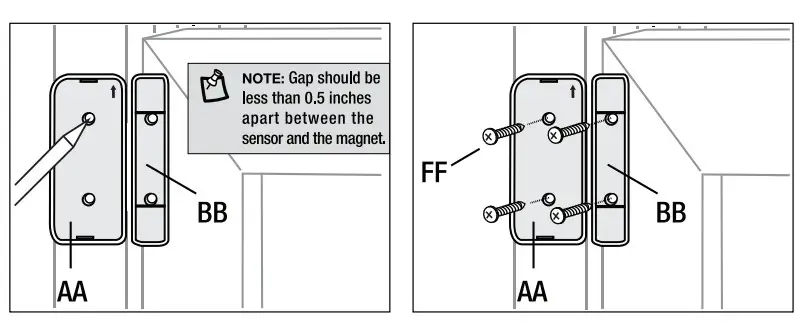
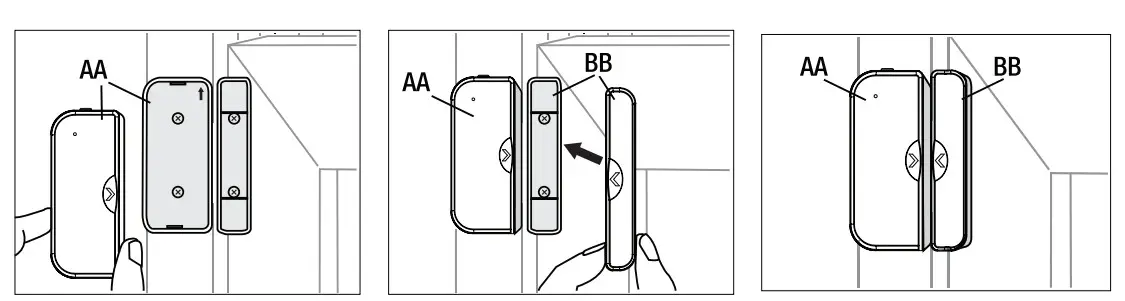
- Install Backplates with Screws• Mark screw positions using the Door/Window Sensor (AA) backplate on your door frame or window frame and Magnet (BB) backplate on your door or window, or vice versa.• Use the Mounting Screws (FF) to attach the backplates to the wall.
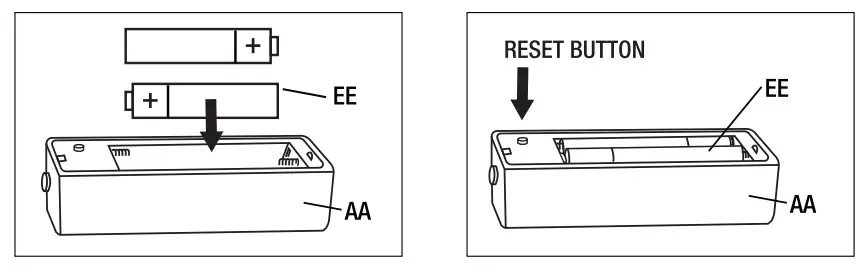
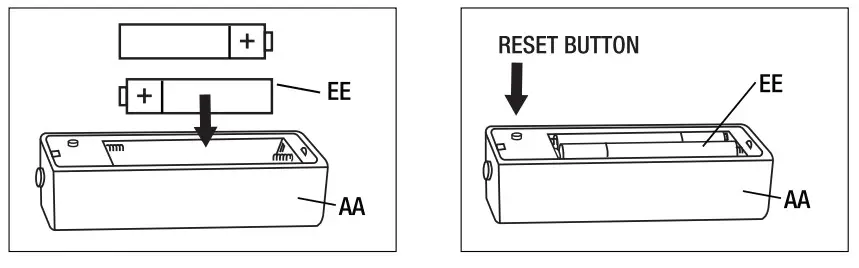
- Insert Batteries or Remove Tag• Insert two 1.5V MA Alkaline Batteries (EE) or remove the tag if batteries are already present in the open Door/Window Sensor (M).• Turn on the Door/Window Sensor (M) by pushing on the RESET button. Follow the steps in the APP Setup on page 6.
- Attach Door/Window Sensor and Magnet to Backplates• Attach the Door/Window Sensor (M) and Magnet (BB) to the appropriate Backplates until they lock in place.• Door/Window Sensor (AA) and Magnet (BB) Arrows should align.
Adhesive Installation
- Remove Backplate• Remove the backplate from the Door/Window Sensor (AA) by pressing the latch button on top and gently pulling the backplate until it releases.• Remove the backplate from the Magnet (BB) by grasping it from the middle and gently pulling the backplate until it releases.
- Install Backplates with Double-Sided Tape• Clean the mounting area thoroughly (surface must be free of dust, dirt, or grease).• Stick Double-Sided Tape for the Sensor (CC) to the backside of the Door/Window Sensor (AA) backplate. Stick Double-Sided Tape for the Magnet (DD) to the backside of the Magnet (BB) backplate.• Peel the Double-Sided Tape (CC) (DD) and place the Door/Window Sensor (AA) backplate on your door frame or window frame and Magnet (BB) backplate on your door or window, or vice versa.
- Insert Batteries or Remove Tag• Insert two 1.5V MA Alkaline Batteries (EE) or remove tag if batteries are already present in the open Door/Window Sensor (M).• Turn on the Door/Window Sensor (AA) by pushing on the RESET button. Follow the steps in the APP Setup on page 6.
- Attach Door/Window Sensor and Magnet to Backplates• Attach the Door/Window Sensor (AA) and Magnet (BB) to the appropriate Backplates until they lock in place.• Door/Window Sensor (AA) and Magnet (BB) Arrows should align.


APP Setup
Download and install the Feit Electric app
- Search for the Feit ElOCITiC app in the App Store or Google Play Store.
- Download and install the Feit Electric app on your smart device. AppSet up the Smart Door & Window Sensor using the Feit Electric appCheck to be sure the Sensor is in pairing mode. The BLUE indicator light must be blinking rapidly to con. If not 41r44dY blinking. press and hold the Reset button for five seconds. Use the Fed FJectile app to complete the setup.
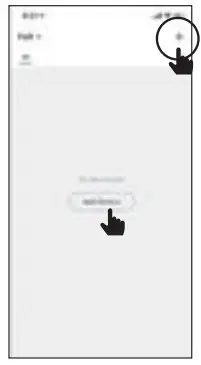
- Tap Add Device or the + sign, then select Sensor and confirm. You will be prompted to enter your Wi-Fi network and password.Felt Electric app
Be sure to connect to a 2.4 GHz Wi-Fi network that covers your installation location.
Need Help?FAQs and the latest versions of user guides can be found at feit.com/help and feit.com/smart To reach customer support please visit feit.com/contact-us
Troubleshooting Tips
 report this ad
If you are having difficulty connecting:
- Make sure the Wi-Fi network is a 2.4 GHz network. Smart Door and Window Sensor will not connect to a 5 GHz network.
- Test your Wi-Fi network with other devices such as your phone to make sure it is operating properly.
- The Wi-Fi connection may not have good coverage during setup. Try moving the Smart Door and Window Sensor closer to your Wi-Fi router.
- Your Wi-Fi network password is case sensitive, make sure you are entering it correctly.Please also check the App User Guide for more information.
WWW.FEIT.COMPlease contact 1-866-326-BULB (2852) for further assistance.
[xyz-ips snippet=”download-snippet”]