
![]() MODEL: TAPE192/BW/AGColor Changing – 16ft.Smart LED Strip LightQuick Install Guide
MODEL: TAPE192/BW/AGColor Changing – 16ft.Smart LED Strip LightQuick Install Guide

 Only supports 2.4GHz Wi-Fi networks
ELECTRICAL RATINGS:INPUT: 120-240VAC,50/60HZ, 0.45A MAXOUTPUT: 24VDC,1A, 24W MAXIndoor / Outdoor RaintightSupplier’s Declaration of Conformity: 47 CFR § 2.1077 Compliance InformationResponsible Party: Feit Electric Company 4901 Gregg Road; Pico Rivera, CA 90660, USA 562-463-2852Unique Identifier: TAPE192/RGBW/AGThis device complies with Part 15 of the FCC Rules. Operation is subject to the following two conditions: (1) This device may not cause harmful interference, and (2) this device must accept any interference received, including interference that may cause undesired operation.Note: This equipment has been tested and found to comply with the limits for a Class B digital device, pursuant to part 15 of the FCC Rules. These limits are designed to provide reasonable protection against harmful interference in a residential installation. This equipment generates, uses, and can radiate radio frequency energy and, if not installed and used in accordance with the instructions, may cause harmful interference to radio communications. However, there is no guarantee that interference will not occur in a particular installation. If this equipment does cause harmful interference to radio or television reception, which can be determined by turning the equipment off and on, the user is encouraged to try to correct the interference by one or more of the following measures:– Reorient or relocate the receiving antenna.– Increase the separation between the equipment and receiver.– Connect the equipment into an outlet on a circuit different from that to which the receiver is connected.– Consult the dealer or an experienced radio/TV technician for help.
IMPORTANT SAFETY INSTRUCTIONS
When using electrical products, basic precautions should always be practiced including the following:
- READ AND FOLLOW ALL SAFETY INSTRUCTIONS
- Read and follow at instructions on the product or provided with the product.
- Unplug from outlet before cutting or installing.
- Do not use an extension cord.
- Do not use within 10 feet of a pool.
- Do not use In a bathroom.
- This product is NOT a toy.
- To avoid damage, use only with the power supply provided.
- Do not open the product. Use only as intended.
- Do not roll up the product when using. Spread out to fa length before connecting the power supply.
- Do not operate if any component is damaged.
WARNING: Risk of Electric Shock. When used outdoors, install only a covered Class A CFCS protected receptacle that Is weatherproof with the power unit connected to the receptacle. II one Is not provided, contact a qualified electrician for proper installation. Ensure that the power unit and cord do not Interfere with completely closing the receptacle cover.WARNING: Risk of Electric Shock. Mount the unit at a height greater than 1 foot from the ground surface.
SAVE THESE INSTRUCTIONS
This manual contains Important safety and operating instructions for power unitsBATTERY WARNING:Risk of fire, explosion, and burns. Do not disassemble, crush, heat above 100° C / 212°F, or incinerate. REPLACE ONLY WITH one CR2032 battery. DISPOSE OF USED BATTERY PROMPTLY. KEEP AWAY FROM CHILDREN. DO NOT DISASSEMBLE AND DO NOT DISPOSE OF WARE. When replacing the battery, ensure the new battery is Installed correctly with regard to polarity (+ and -) as shown on the remote.CAUTION: Dispose of used batteries promptly according to local recycling or waste regulations. Clean battery contacts and also device contacts prior to installing the battery. Ensure the battery is installed correctly with regard to polarity (+ and —). Remove the battery from the remote when not being used for an extended period of time. Remove used battery promptly. The LEDs in this strip light are not replaceable.
WARNING.
– WARNING – KEEP BATTERIES OUT OF REACH OF CHILDREN– Swallowing may lead to serious injury in as little as 2 hours or death, due to chemical bums and potential perforation of the esophagus.– II you suspect your child has swallowed or inserted a button battery, immediately seek urgent medical assistance.– Examine devices and make sure the battery compartment Is correctly secured, e.g. that the screw or other mechanical fastener is tightened. Do not use d compartment is not secure.– Dispose of used button battery immediately and safely. A flat battery can still be dangerous.This product contains a button battery. If swallowed. it could cause severe injury or death in just 2 hours. Seek medical attention immediately.
– Single dick – On/Off– Press and hold when lights are on– adjusts dimming. – Press and hold for 3 seconds when lights are off– enter pairing mode or reset.
RF Remote Control:
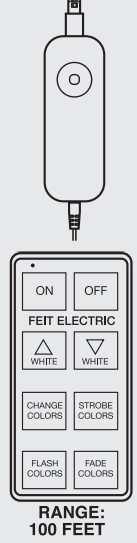
ON: Toms On the Strip LightOFF: Tums OR the Strip LightUP ARROW: Increases brightness of write lightDOWN ARROW: Decreases brightness of white lightCHANGE COLORS: Changes solid colorsSTROBE COLORS: Turns ship on and off as It rotates through colorsFLASH COLORS: Rapidly rotates through colasRANGE: FADE COLORS: Smoothy transitions through colorsOne remote can control multiple Felt Electric Smart Strip Lights. The remote comes pre-paired to your strip light To re-pair a remote with a strip light or to control multiple strip lights with one remote, first plug in the strip light you want to control. As soon as the strip is plugged in, press the remote controls On button then Off button. Repeat this every second for up to 30 seconds. When the strip light is paired to the remote, you will see the strip turning on and on with your button presses. You will then be able to control the strip light.While one remote can control multiple strip lights, a strip light can pair with only one remote at a time. When you connect a new remote, the previous remote will no longer control the strip light.LIMITED WARRANTY. This product is warranted to be free from defects in workmanship and materials for up to 1 year from the date of purchase. If the product fails within the warranty period, please visit feit.conm/help for instructions on repbcementkefund or call 866.326.BULB.replacement OR REFUND IS YOUR SOLE REMEDY, EXCEPT TO THE EXTENT PROHIBITED BY APPLICABLE JAW, ANY IMPLIED WARRANTIES ARE LIMITED IN DURATION TO THE DURATION OF THIS WARRANTY. LIABILITY FOR INCIDENTAL OR CONSEQUENTIAL DAMAGES IS HEREBY EXPRESSLY EXCLUDED. Some states and provinces do not allow the exclusion of incidental or consequential damages, so the above limitation or exclusion may not apply to you. This warranty gives you specific legal rights, and you may also have other rights which vary from state to state or province to province.
Getting Started:
WARNING:These products may represent a possible shock or fire hazard if improperly installed or attached in any way. Products should be installed In accordance with this install guide, current electrical codes, and/or the current National Electric Code (NEC).1. Download the Feit Electric app on your smart device
 2. Pre-Installing
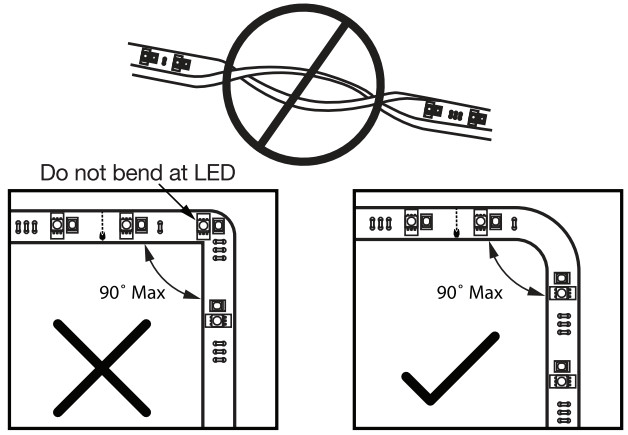
– Measure the desired length before installation.– Clean the mounting area thoroughly (surface must be free of dust, dirt or grease).– Avoid bending the strip light which may damage the LEDs.– Avoid removing and relaying the Strip Light multiple times as the adhesive may wear off.
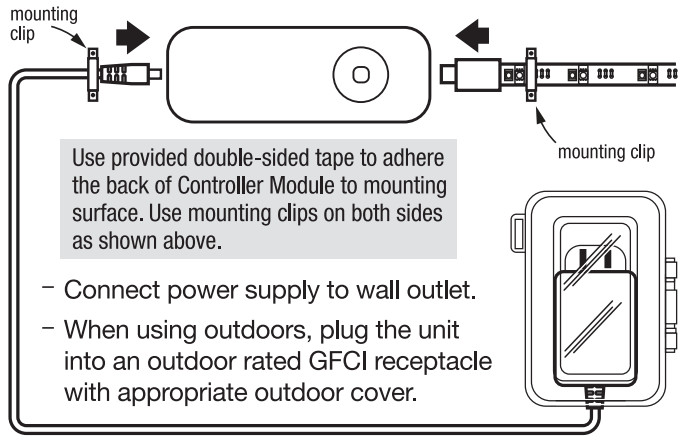
3. Mounting the Strip LightUnroll the strip light and place it near a mounting location. Ensure the power supply and the controller can reach the start of the strip light. Do not connect to power yet. – Peel adhesive tape from the back of Strip Light and apply to the mounting surface. – Screw-in mounting clips for outdoor locations or hard-to-stick-to surfaces. Save two clips to use for installing the Controller Module (step 4).

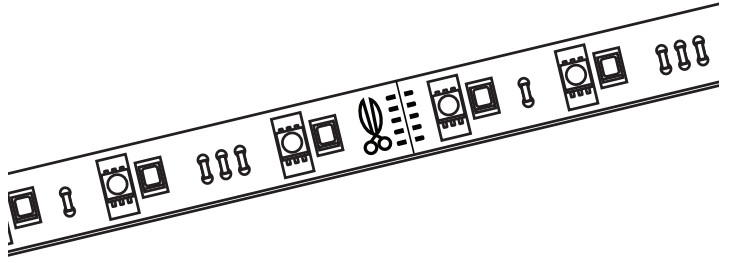
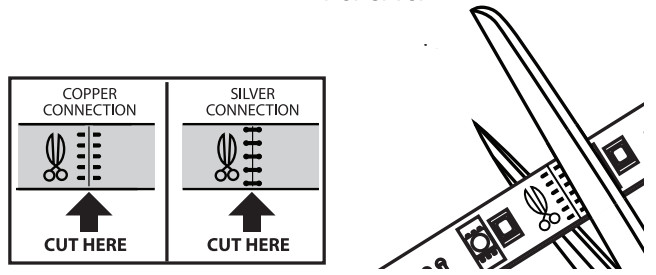
– Ensure the power supply is not plugged in at the wall outlet when mounting Or cutting.– Cut to length ONLY on the line or solder pads NEXT to the scissor markings on strip light, where the copper or silver metal is visible. Cutting at any other area will permanently damage the strip.
 – Optional – Add another Feit Electric Smart LED Strip Light (sold separately) to extend up to 32 feet.
 4. Connect Controller ModuleConnect the Strip Light to the controller module then connect the plug as shown in the image below.
You are now ready to use the Strip Light via RF Remote Controller. See the “RF Remote Control” section for details. To activate smart features proceed to steps 5 & 6. When in Smart Wi-Fi pairing mode, the strip light will blink. Note: The unit will stop blinking after 3 minutes or when controlled with the RF remote.5. Launch and use the Felt Electric app to complete the setupTap Add Device or the + sign. then select “Lighting Device” and confirm. You will be prompted to enter your Wi-Fi network & password.
The unit must be rapidly blinking to connect. If not already blinking, press and hold the button on the controller for three seconds when the Strip Light is Ott to enter pairing mode.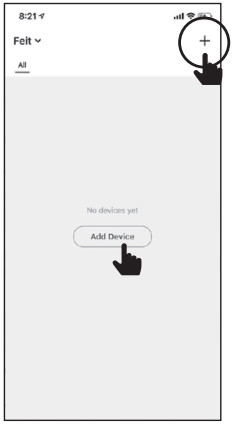 Be sure to connect to a 2.4 GHz Wi-Fi network that covers your installation location.6. (Optional) Connect to Google Assistant or Alexa using the in-App guide
 TROUBLESHOOTING TIPS CONNECTING TO WI-FI
 TROUBLESHOOTING TIPS CONNECTING TO WI-FI
If you are having difficulty connecting:
- Make sure the Wi-Fi network is a 2.4 GHz network. Smart Strip Light will not connect to a 5 GHz network.
- Test your Wi-Fi network with other devices such as your phone to make sure it is operating properly.
- The Wi-Fi connection may not have good coverage during setup. Try moving the Smart Strip Light closer to your Wi-Fi router.
For more information, check the App User Guide and visit www.feit.corn/helpWe’d love to hear from you. Questions, comments, or feedback?
Need Help?Thank you for your purchase. Visit feit.com/help for support or connect with us:O 0 OFekeectlic eFeitElectricInc feitelectriclighting
Need Help?
Thank you for your purchase.Questions, comments or feedback?We’d love to hear from you.I Visit feit.com/help for support or connect with us: @FeitElectric
 @FeitElectriclnc
 feitelectriclighting
 report this ad
FOR DETAILED INSTRUCTIONS ON SMART FEATURES SEE THE APP USER GUIDE.
[xyz-ips snippet=”download-snippet”]