![]()
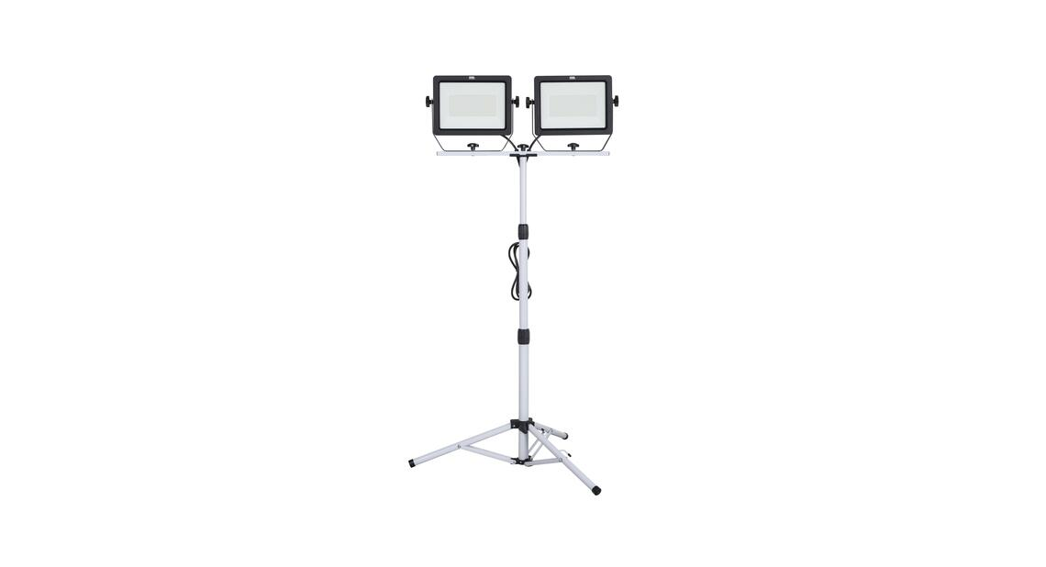
MODEL: WORK20000ITM. / ART. 1528768IMPORTANT SAFETY INSTRUCTIONS AND INSTALLATION GUIDE20,000 Lumens Dual-Head LED Worklight with Heavy Duty Tripod
IMPORTANT, RETAIN FOR FUTURE REFERENCE: READ CAREFULLY
![]()
SAVE THESE INSTRUCTIONS
FEIT ELECTRIC COMPANY I PICO RIVERA, CA, USA(800) 543-3348 I FAX (562) 908-6360 I www.feit.comHOURS OF OPERATION: MONDAY – FRIDAY, 8:00 AM – 5:00 PM (PST),LANGUAGES SPOKEN: ENGLISH, FRENCH AND SPANISH
Important Safety Information
READ ALL INSTRUCTIONS
- All Safety and Operating instructions in this manual must be followed before using this product.
- Follow all safeguards stated in the manual, in addition to normal safety precautions in working with electrical devices. Always follow basic safety precautions to reduce the risk of fire, electric shock and personal injury.
- Ground Fault Circuit interrupter (GFCI) protection is to be provided on the circuit(s) or for the wet location portable luminaire. Receptacles are available having built-in GFCI protection and are able to be used for this measure of safety.
- Use only with an extension cord for outdoor use, such as an extension cord of cord type SEW, SEOW, SEOOW, SOW, SOOW, STW, STOW, STOOW, SJEW, SJEOW, SJEOQOW, SJW, SJOW, SJOOW, SJTW, SJTOW, or SUTOOW.
- To disconnect, turn off the switch, then remove the plug from the outlet.Do not turn off by pulling on the cord.
- To reduce the risk of fire, keep away from combustible materials while in operation.
- To reduce the risk of injury, close supervision is necessary when this product is used near children.
- Do not touch front or back of the worklight head for long periods of time.
- Do not stick fingers in between heat-sink blades.
- When operating on, do not have the lamp heads face down.
- Suitable for Wet Locations
- Do not submerge.
SAVE THESE INSTRUCTIONS
![]() WARNING RISK OF SHOCK. House eclectic current can cause painful shock or serious injury unless handled properly.
WARNING RISK OF SHOCK. House eclectic current can cause painful shock or serious injury unless handled properly.![]() WARNING: When using outdoor use portable luminaires, basic safety precautions should always be followed to reduce the risk of fire, electric shock, and personal injury.
WARNING: When using outdoor use portable luminaires, basic safety precautions should always be followed to reduce the risk of fire, electric shock, and personal injury.![]() CAUTION: High Wattage item. This item draws 200 W of power at max brightness. Be sure that your line has enough power.
CAUTION: High Wattage item. This item draws 200 W of power at max brightness. Be sure that your line has enough power. ![]() WARNING: Use only three-wire extension cords that have three-prong grounding plugs and grounding receptacles that accept the appliance’s plug. Do not use an extension cord near water or in areas where water may accumulate. Keep away from pools or spas. Keep plugs dry.
WARNING: Use only three-wire extension cords that have three-prong grounding plugs and grounding receptacles that accept the appliance’s plug. Do not use an extension cord near water or in areas where water may accumulate. Keep away from pools or spas. Keep plugs dry.![]() WARNING: HOT SURFACE.
WARNING: HOT SURFACE.
Maintenance and Care
Maintenance of this worklight is very minimal. Regularly clean the lens with a non-abrasive cleaning cloth. The same care should be provided for the stand.
Supplier’s Declaration of Conformity: 47 CFR § 2.1077 Compliance InformationResponsible Party: Feit Electric Company, 4901 Gregg Road, Pico Rivera, CA 90660, USA, 562-463-2852Unique Identifier: WORK20000, ITM./ART. 1528768
This device complies with part 15 of the FCC Rules. Operation is subject to the following two conditions: (1) This device may not cause harmful interference, and (2) this device must accept any interference received, including interference that may cause undesired operation. Note: This equipment has been tested and found to comply with the limits for a Class B digital device, pursuant to part 15 of the FCC Rules. These limits are designed to provide reasonable protection against harmful interference in a residential installation. This equipment generates, uses and can radiate radio frequency energy and, if not installed and used in accordance with the instructions, may cause harmful interference to radio communications. However, there is no guarantee that interference will not occur in a particular installation. If this equipment does cause harmful interference to radio or television reception, which can be determined by tuming the equipment off and on, the user is encouraged to try to correct the interference by one or more of the following measures: Reorient or relocate the receiving antenna. Increase the separation between the equipment and receiver. Connect the equipment into an outlet on a circuit different from that to which the receiver is connected. Consult the dealer or an experienced radio/TV technician for help. Any changes or modifications not expressly approved by the manufacturer could void the user’s authority to operate the equipment. CAN ICES-005 (B)
Limited Warranty
This product is warrantied to be free from defects in workmanship and materials for up to 1 year from date of purchase. If the product fails within the warranty period, please contact Feit Electric at [email protected], visit feit.com/contact-us or call 1-866-326-BULB (2852) for instructions on replacement or refund.REPLACEMENT OR REFUND IS YOUR SOLE REMEDY. EXCEPT TO THE EXTENT PROHIBITED BY APPLICABLE LAW, ANY IMPLIED WARRANTIES ARE LIMITED IN DURATION TO THE DURATION OF THIS WARRANTY. LIABILITY FOR INCIDENTAL OR CONSEQUENTIAL DAMAGES IS HEREBY EXPRESSLY EXCLUDED. Some states andprovinces do not allow the exclusion of incidental or consequential damages, so the above limitation or exclusion may not apply to you. This warranty gives you specific legal rights, and you may also have other rights which vary from state to state or province to province.
Pre-Assembly
PARTS INCLUDED
| Part | Description | Quantity |
| A | LED Head Light | 2 |
| B | Portable Stand | 2 |
| C | Tripod | 1 |
| D | Lamp Mounting Bar | 1 |
| E | Locking Knobs | 6 |
| F | Split Lock Washers | 8 |
| G | Washers for portable stand Pre-installed (1/4 x 1/2 in) | 4 |
| H | Washers for carrying Pre-installed handle and locking knob (1/4 x 5/8 in) | 6 |
| I | Carrying Handle | 1 |
| J | Hex Key | 1 |
| K | Handle Locking Knob | 1 |
| L | Hex Screws for portable stand Pre-installed (M6x18) | 4 |
| M | Hex Screws for Carrying handle pre-installed (M6x22) | 2 |
| N | Tripod Locking Knob | 1 |
| O | Plug Housing Box | 1 |
NOTE: Parts not shown to actual size.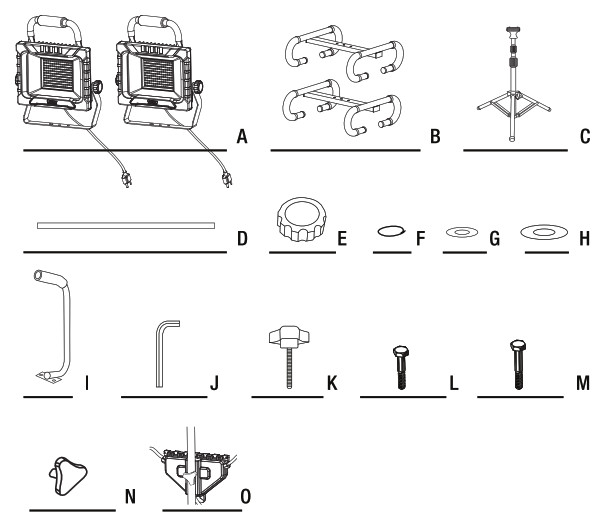
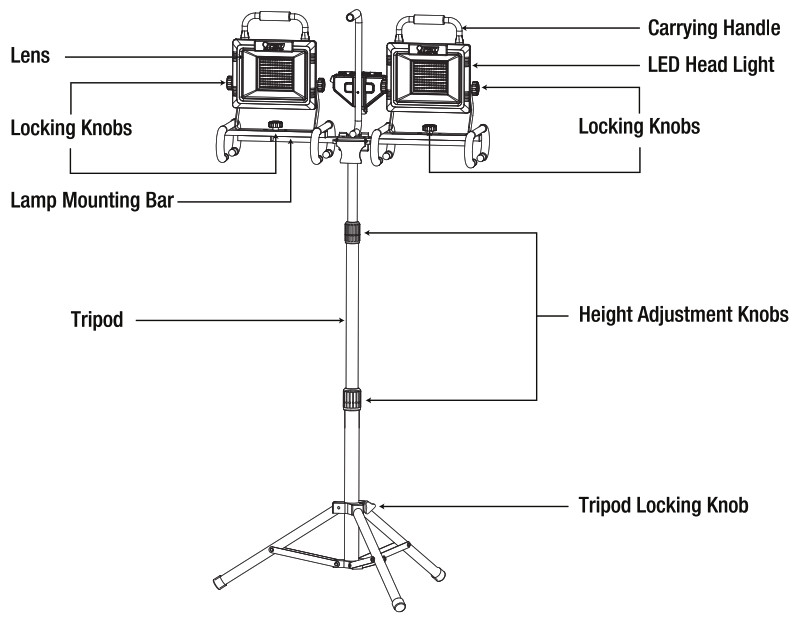
PARTS OF THE DUAL HEAD WORKLIGHT
Assembly
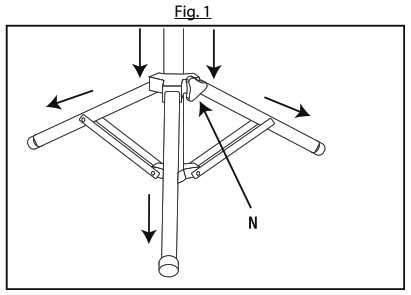
- Extending the TripodLoosen the Tripod Locking Knob (N) and move the three legs out and down, then tighten the Tripod Locking Knob (N) (See Fig. 1).

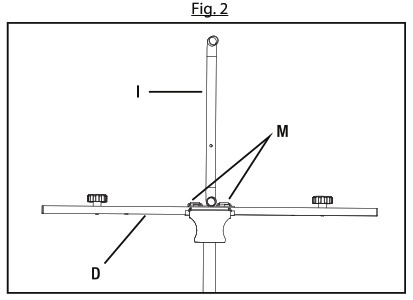
- Installing the Lamp Mounting BarUse the included Hex Key (J) to remove the Hex Screws (M) from the Lamp Mounting Bar (D). Place the Carrying Handle (I) on the Lamp Mounting Bar (D) and align it with the screw hole. Place the Hex Screws (M) back and tighten them to hold the handle in place (see Fig. 2).
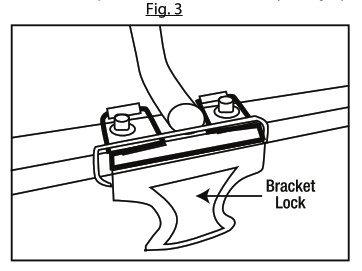
- Securing the Lamp Mounting BarPlace the Lamp Mounting Bar (D) onto the Tripod (C) and secure it into place with the bracket lock (see Fig. 3).
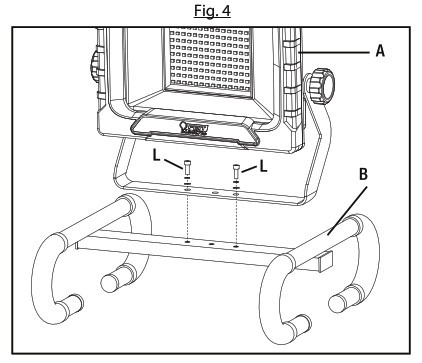
- Installing the Portable StandsUnscrew the Hex Screws (L) from the Portable Stand (B). Attach the LED Head Light (A) to the Portable Stand (B) by inserting the Hex Screws (L) and tightening it using the included Hex Key (J).
- Installing the LED Head Lights to Lamp Mounting BarAttach the already assembled LED Head Light (A) from step 4 to the Lamp Mounting Bar (D) through the 1/4 in x 5/8 in. Washer(H). Tighten using the Locking Knob (E). NOTE: The washer should be in between the Lamp Mounting Bar (D) and Portable Stand (B) to reduce abrasions between the two surfaces. NOTE: The Locking Knobs (E) must be loosened first when placing the LED Head Lights (A) on the Lamp Mounting Bar (D). Re-tighten the same Locking Knob (E) to hold it into position and repeat for the other side.
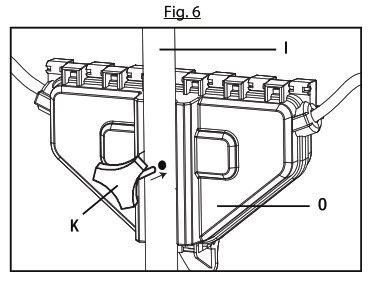
- Mounting the Plug Housing BoxInsert the Handle Locking Knob (K) through the Carrying Handle (I) and turn clockwise to lock and hold the Plug Housing Box (0).
- Locking & Unlocking the Plug housing BoxOpen the Plug Housing Box (0) by pressing the unlock side of the clamp. Once plugs are secured in press the lock side of the clamp.
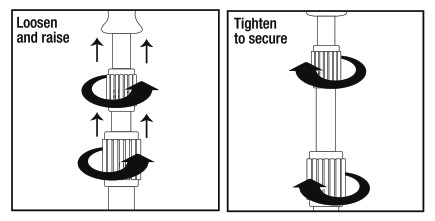
- Adjusting the Tripod HeightRotate the Height Adjustment Knobs counter-clockwise to loosen them and pull up the Tripod to the desired height. Rotate the Height Adjustment Knobs clockwise to secure the Tripod in place.
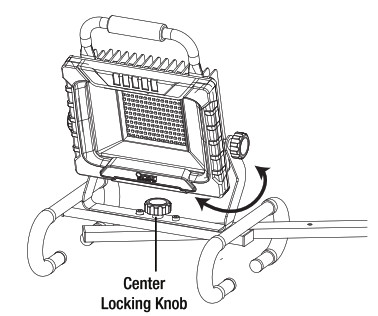
- Once the LED Head Light (A) has been attached to the Tripod (C), the LED Worklight can pivot vertically and horizontally into the desired position.Horizontal PivotingTo pivot horizontally loosen the center Locking Knob then adjust to your preferred position. Once set to your desired position, re-tighten the center Locking Knob to lock it into place.NOTE: Use handle to turn.Vertical PivotingTo pivot vertically loosen the two Locking Knobs found on each side and adjust to your preferred position. Once set to your desired position re-tighten both Locking Knobs (E) to lock it into place. NOTE: Use handle to turn.FEIT ELECTRIC COMPANY PICO RIVERA, CA. USA www.feit.com

 Vertical PivotingTo pivot vertically loosen the two Locking Knobs found on each side and adjust to your preferred position. Once set to your desired position re-tighten both Locking Knobs (E) to lock it into place.
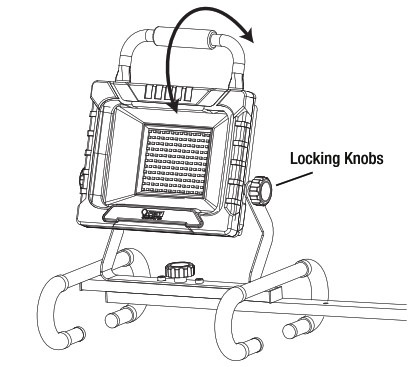 FEIT ELECTRIC COMPANY PICO RIVERA, CA. USA
 [xyz-ips snippet=”download-snippet”]