Fellow Ode Brew Grinder Instructions
READ ALL INSTRUCTIONS.DO NOT THROW AWAY THIS SAFETY GUIDE.
WARNING!Shock Hazard: This appliance has a grounded, three-pronged plug. To ensure protection against risk of electric shock or fire, connect to properly grounded outlets only. The plug fits only one way into an outlet. Do not defeat the safety purpose of the plug by modifying the plug in any way or using an adapter. Do not plug this appliance into an outlet with a voltage other than specified on the bottom of this appliance.
Do not use an adapter with this appliance.
A short power supply cord is provided to reduce the risk of becoming entangled in or tripping over a longer cord. If a longer cord is necessary, an approved extension cord may be used. The electrical rating of the extensioncord must be equal to or greater than the rating of this appliance. Take care to arrange the extension cord to not drape over the countertop or tabletop where it can be pulled on by children or tripped over. To avoid an electrical circuit overload, do not use any high wattage appliance on the same circuit with this appliance.
IMPORTANT SAFEGUARDS
Before use, please read these safety warnings carefully and use the grinder properly. These safety warnings are indicated for the safe and proper use of this product to prevent danger to the user or others and damage to property. When using electrical appliances, basic safety precautions should always be followed, including the following:
After unpacking the grinder, dispose carefully of the plastic bags and other packaging so that children and others cannot reach them.
This appliance has a grounded, three-pronged plug and must be grounded with a three-pronged outlet when in use. To ensure protection against risk of electric shock or fire, connect to properly grounded outlets only.
Do not immerse cord, plug, or any other part of the grinder in water or other liquid. To protect against risk of electrical shock.
The use of attachments not recommended or sold by the manufacturer may cause fire, electric shock or injury.
Use only with AC current and the correct voltage. Ensure that your main supplyvoltage is the same as that marked on the underside of your grinder. To avoidan electrical overload, do not operate another high-wattage appliance on the same circuit.
Never leave the grinder unattended when in use. Close supervision is necessary when any appliance is used by or near children. Do not use within a child’s reach.
This appliance is not intended for use by persons (including children) with reduced physical, sensory, or mental capabilities, or lack of experience and knowledge, unless they are closely supervised and instructed concerning use of the appliance by a person responsible for their safety. Close supervision is necessary when any appliance is used by or near children. Children should be supervised to ensure that they do not play with the appliance.
Grinder must be operated on a dry, flat surface away from the edge of the counter to prevent accidental tipping. Vibration during operation may cause the grinder to move.
Do not place where the grinder could touch any other source of heat. For example, on or near a hot gas burner or electric burner, in a heated oven, or in a microwave.
Avoid contact with moving parts of the grinder.
Do not tamper with the finger guard covering the electrically grounded chute.
Never move the grinder while the unit is in use.
Check the load bin for any foreign objects that are not coffee beans before using.
Do not put any substances other than coffee beans and grinder cleaner into the grinder.
Use only whole bean coffee in the grinder. Do not put coffee that has already been ground into the grinder. Re-grinding coffee that has already been ground can cause your grinder to wear out faster and will void the warranty.
Turn the appliance OFF, then unplug from the outlet when not in use, before assembling or disassembling parts and before cleaning. Allow parts to stop moving before cleaning the grinder. Do not use the grinder without lid properly placed on load bin.
Only clean the outside of the grinder with a damp cloth.
Take care to not tip grinder, this could damage the knocker and internal components.
To unplug, grasp plug and remove from the outlet. Never pull on the cord.
Do not let cord hang over the edge of a table or counter.
Do not operate the grinder with a damaged cord or plug, if the grinder malfunctions, or is dropped or damaged in any manner. Return the appliance to the nearest authorized service facility for examination, repair, or adjustment.
Disassemble your grinder only as directed in the “Cleaning and Storage” sectionof this manual. If you’re having trouble with jamming or any other issues, check help.fellowproducts.com and visit our FAQ page.
Do not use for any purpose other than grinding whole bean coffee.
This appliance is intended for household use only. Use for anything other tha intended use will void the one-year warranty.
Do not use outdoors.
Do not place any utensils into the grinder or grind chute.
This product contains neodynium magnets. Children should NEVER be allowed to play with NEODYMIUM magnets. Even relatively small magnets can cause serious injury if swallowed. Always keep all neodymium magnets out of the reach of children.
Always keep a safe distance (at least 10cm) between magnets and all objects that can be damaged by magnetism and remember, neodymium magnets are ten times stronger than ‘ordinary’ magnets! Items such as mechanical watches, heart pacemakers, CRT monitors and televisions, credit cards, diskettes and other magnetically stored media such as video tapes are all affected by powerful magnets.
Do not use the magnetic catch on top of an electronic scale. The magnetic catch may interfere with the accuracy of or even damage an electronic scale. It is not recommended to use the magnetic catch on top of an electronic scale.
To reduce the risk of fire or electric shock, do not remove bottom cover from base or disassemble base of the grinder in any way. There are no user-serviceable parts inside. Repair should be done by authorized service personnel only. Opening base of the grinder will result in a void of the one-year warranty.
Do not operate in the presence of explosive and/or flammable fumes.
For proper use, operate this appliance for less than 90 seconds per time with a minimum of 90 seconds rest time maintained between a continuous two cycles.
The grinder can not work for 6 minutes continuously within 10 minutes, and it must rest for 30 minutes if the working time exceeds 6 minutes.
SAVE THESE INSTRUCTIONS
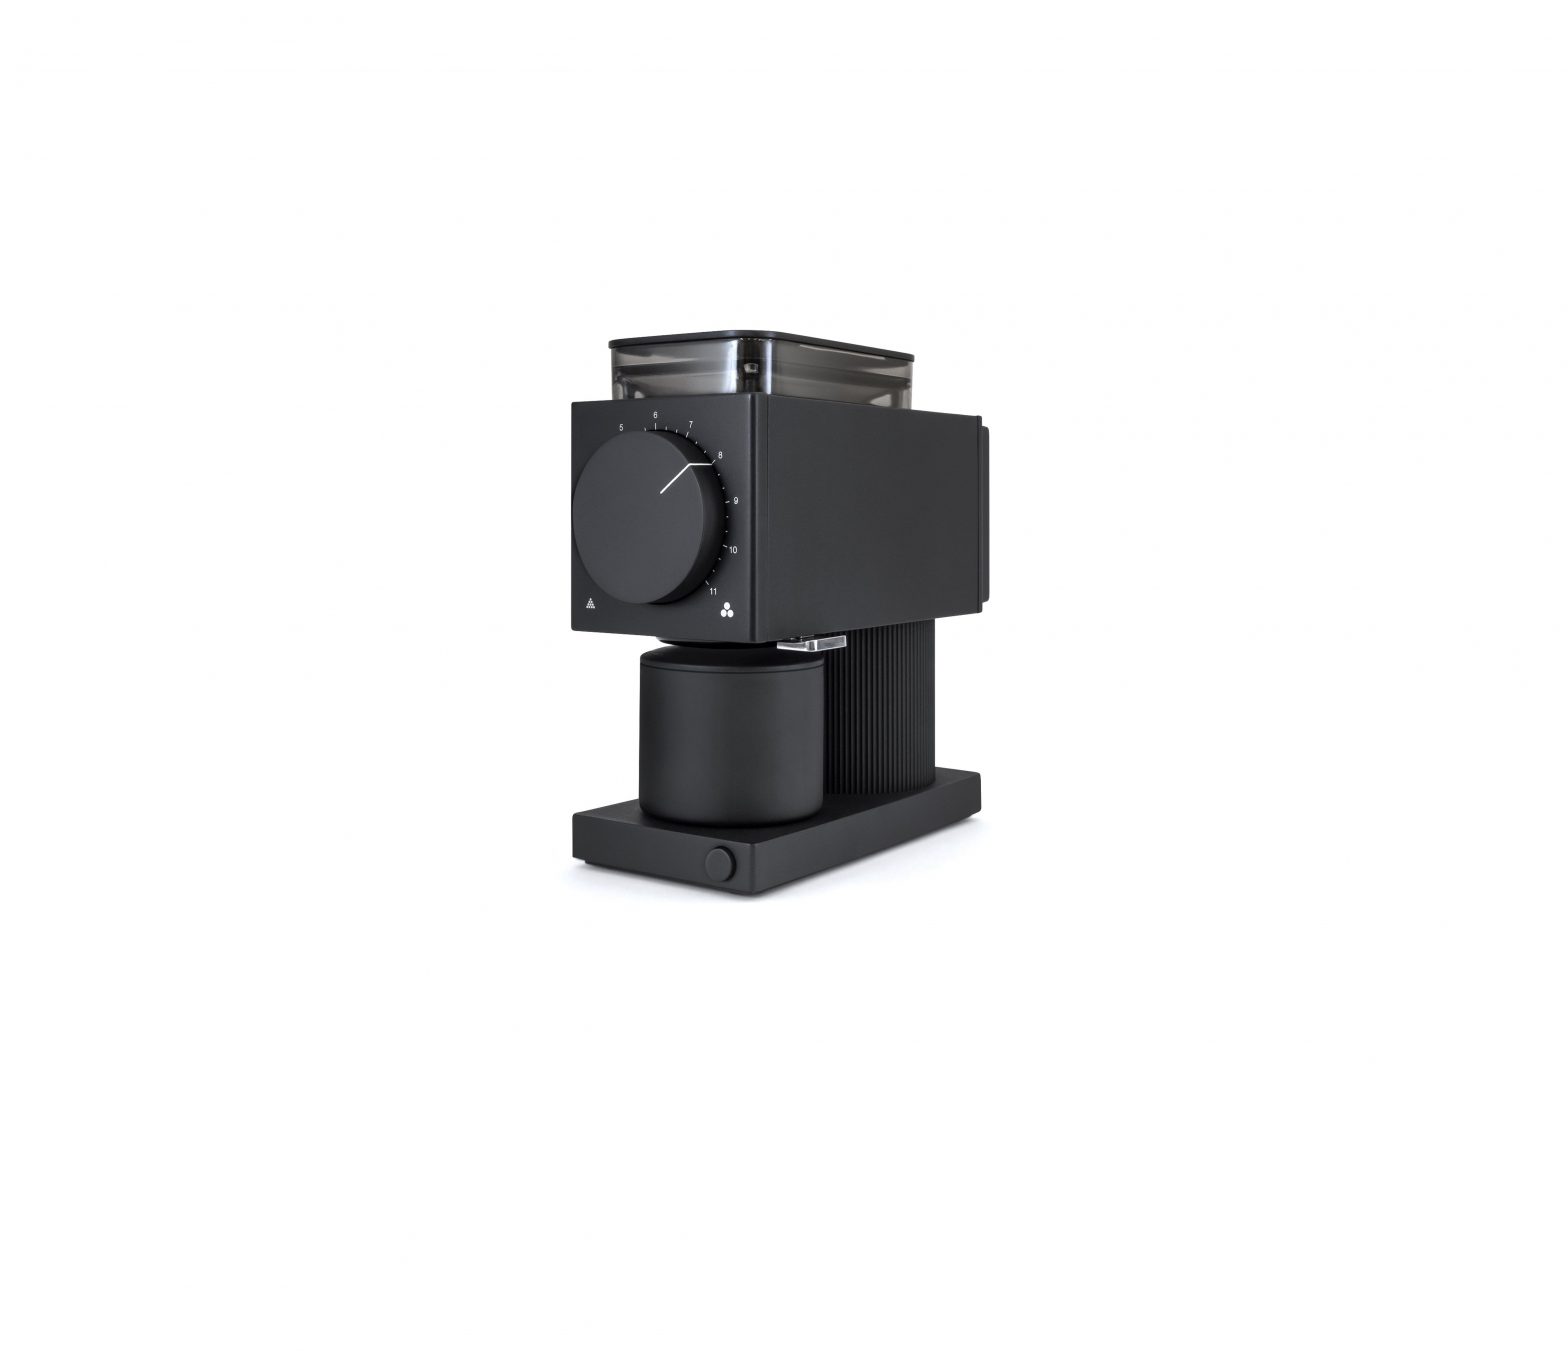
CLEANING AND USEDiagram A: Product Overview
CAUTION!Please read all use instructions fully before turning on and using your grinder.
Do not use abrasive pads, harsh chemicals, or spray cleaner chemicals to clean. These may damage the surface of the appliance.
Do not put any part of your grinder in the dishwasher.
Before UseRemove and recycle or discard all stickers, descriptive labels, cable ties and packing materials, including static stickers and hang tags with ties.
Before cleaning, we recommend running the grinder for 10 seconds without coffee beans to help clear beans/grounds from the burrs and grinds chute.
Always unplug power cord from power outlet before cleaning.
Wipe body of the grinder with a soft, damp cloth. Wipe down magnetically aligned catch and catch lid and dry thoroughly.
Place grinder on a level surface and plug into a correct voltage.
Diagram B: Grind Guide
How To Use
- Select grind size by twisting the grinds dial to the left or right (1 = fine, 11 = coarse). See our Grind Guide (Diagram B) to help make your selection.Please do not use setting 1 for your first 10 lbs of coffee as the burrs will “chirp” and hit each other. Your grinder arrives calibrated with its “zero point” (the setting where burrs touch) at setting 1. As the burrs are seasoned, the burrs touch setting will drift slightly which is normal and as such you should expect the settings to shift slightly coarser. (For more information on burrs touching/zero point.
- Remove the lid from the single dose load bin by lifting off.
- Pour the desired quantity of roasted whole coffee beans into the load bin up to a maximum of 80g / 2.8oz. Replace the lid. Ensure the catch is fully beneath the chute and is empty.Do not grind more than 80g of coffee without emptying the catch. Allowingthe catch to overfill can jam the grinder.
- Press power button. The grinder will start grinding and stop automatically once your beans are done grinding. OR press and hold the power button for more than 1.5 seconds. The grinder will grind until the button is released.
General Cleaning
If the grinder is used daily, the burrs should be cleaned at least every three months using tablets (see below for Automatic Cleaning) or with a stiff brush.
To clean burrs, remove the burrs following the instructions in the “Removing and Replacing Burrs” section.
Do not immerse the grinder in water. Do NOT wash the burrs with water.
Never place fingers into the grind chute while product is plugged in.
Using the provided brush, gently brush coffee dust off of the burrs and replace burrs following the instructions in the “Removing and Replacing Burrs” section.To wash the catch, wipe gently with a soft cloth and warm soapy water.Dry with a dry cloth after cleaning.
Wipe grinder exterior and load bin with a soft, damp cloth.
Automatic Cleaning
A fast way to clean your grinder is using grinder cleaning tablets like Urnex GrindzTM grinder cleaning tablets. These are designed to prevent clogging by freeing coffee particles stuck to the burrs and absorbing/removing odors and coffee oil residue.
To use cleaning tablets, make sure all beans are run through your grinder by running it for 10-20 seconds. Use the cleaning tablet instructions to place appropriate amount into grinder. Adjust the grind setting to 11 and press the power button to run the grinder. Grind all of the tablets into the catch. Once complete, we recommend grinding approximately 30g coffee to remove any tablet residue. Discard the ground tablets/coffee from the catch and clean.
MAINTENANCE
Any other servicing should be performed by an authorized service representative.
Clearing a Jammed Grinder
On occasion, Ode Brew Grinder may become jammed and stop grinding. When this occurs, the grinder will stop grinding before it has finished all the coffee in the hopper and beep “SOS” (save our ship).
Minor jams can be cleared as follows:
- Check that the catch is empty. Turn the grinds dial to setting 11.
- Tap the grinder firmly on the side several times and shake.
- Press the power button and continue to firmly tap the side of the grinder for several seconds. If grinding resumes, the jam is cleared. If not, proceed to the instructions for clearing a major jam.
Major jams can be cleared as follows:
- Unplug the grinder.
- Remove the burrs as instructed in the “Removing and Replacing Burrs” section of this manual.
- Clear coffee from the grinds chamber and discard.
- Inspect burrs for coffee beans or foreign materials (rocks, sticks, unroasted coffee bean, etc.) that may be stuck. Remove stuck coffee beans and clean burrs as instructed in the “Cleaning” section of this manual.
- Reinstall burrs. Run grinder without coffee for 5 seconds to check that it operates as expected. The grinder should spin quietly and at an even speed. If the grinder is making an unexpected noise, repeat this process and carefully inspect to ensure that all coffee particles have been cleared out. If the problem persists, please contact Fellow customer service.For more help, visit fellowproducts.com/odemanual.
Diagram C: Exploded View
Removing and Replacing The Grinding BurrsCAUTION: The Grinding Burrs are sharp, please handle carefully!
- Unplug your grinder and empty it of coffee.
- Start by removing the faceplate of the grinder. The faceplate simply snaps on and off. Pull gently on the faceplate for it to snap off.
- Using a Phillips-head screwdriver, unscrew the four larger size screws that have arrows pointing to them. See Diagram D for reference.Diagram D

- Pull on grind dial to remove the grinds dial assembly.
- Carefully remove the rotational burr/auger (the burr closest to you), auger key, and spring from the grinds chamber by pressing in. Take care not to lose any pieces as you remove. See Diagram E and F for reference.Diagram EDiagram FIf you are just cleaning, do not disassemble the burrs further. Using the provided brush, gently brush coffee dust off of the burrs and replace burrs.
If you are replacing the burrs, continue onto the next steps.
- The stationary burr is attached to the grinds chamber. To remove the stationary burr, start by using a Phillips-head screwdriver to remove the three screws that hold it in place. If there is ground coffee in these screws that interferes with their removal, use a small brush to clear the ground coffee before attempting to remove the screws.Carefully remove the stationary burr. Diagram GDiagram G
- The rotational burr is attached to the auger. To remove the rotational burr, start by using a Phillips-head screwdriver to remove the three screws that hold it in place. If there is ground coffee in these screws that interferes with their removal, use a small brush to clear the ground coffee before attempting to remove the screws. Diagram H and I
- Carefully lift the rotational burr away from the auger.
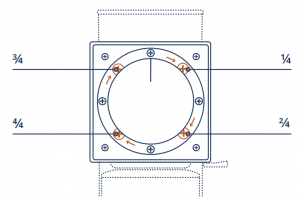
 Diagram F
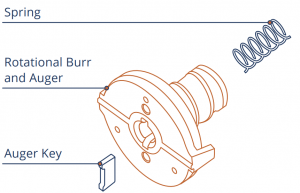 If you are just cleaning, do not disassemble the burrs further. Using the provided brush, gently brush coffee dust off of the burrs and replace burrs.
To replace the burrs, repeat these steps in reverse order.Make sure that the rotational burr is reattached to the auger and that the stationary burr is reattached to the grinds chamber.
Diagram H
Diagram I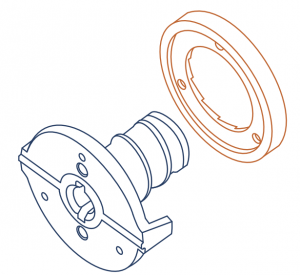
Calibrating your Ode Brew Grinder
Ode Brew Grinder is designed for brewing coffee and cannot grind fine enough for most espresso-machines. However, if you like to grind finely for AeroPress® Coffee Maker, Prismo, Hario V60, or other brewing methods, you may want to make sure that the where the burrs touch, or “zero point”, of your grinder is correctly calibrated to better achieve this range.
Your grinder arrives calibrated with its burrs touching at setting 1. As the burrs are seasoned, the burrs touch setting will drift slightly which is normal and as such you should expect the settings to shift slightly coarser. Please do not use setting 1 for your first 10 lbs of coffee as the burrs will “chirp” and hit each other.
Upon arrival, the burrs chirping at setting 1 indicates your grinder is calibrated.Calibrated grinders match grinds output across all settings. This helps keep the grinding performance consistent over the life of your grinder. If you can’t hear the burrs chirping at setting 1 when your grinder first arrives, then your grind size will be coarser than a calibrated grinder at the same setting.
To watch videos on how to calibrate, please go to Fellowproducts.com/odemanual
WARRANTY
For service, repair, or any questions regarding your Ode Brew Grinder, please visit help.fellowproducts.com and submit a request. Do NOT mail the product back to the manufacturer or bring it to a service center without first talking to a Fellow customer service representative.
One-year limited warrantyFellow warrants this product against any defects that are due to faulty material or workmanship for a one-year period after the original date of consumer purchase.
This warranty is valid only for:
The original consumer.
When the grinder is purchased through authorized retailers.
With the original sales receipt for proof of purchase to make your warranty claim.
This warranty does not include damage to the product resulting from:
Accident, misuse, or repairs performed by unauthorized personnel.
Operation with the wrong type of current or voltage.
Failure to follow cleaning instructions for the grinder.
Failure to comply with any safeguards listed in the warnings and instructions of this document.
Grinding anything other than whole roasted coffee beans.
If the product should become defective within the warranty period, or you have questions regarding warranty or service, visit us at help.fellowproducts.com and submit a request.
Expresso broyeur Ode
Fellow Industries Inc.Fellowproducts.comEmail: [email protected]San Francisco, CA 94110Nom du produit : Ode Expresso broyeur Ode | Brevets en cours
 Find more information at:Fellowproducts.com/odemanual
References
[xyz-ips snippet=”download-snippet”]