fender Acoustic SFX II Guitar Amplifier Owner’s Manual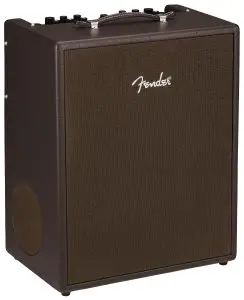
INTRODUCTION
Fender’s Acoustic Junior, Acoustic Junior Go and Acoustic SFX II amplifiers deliver full, natural tone for acoustic-electric guitar and microphone, with specially tuned wood cabinets. All three amplifiers feature Bluetooth wireless streaming, studio-quality stereo effects, auxiliary input and headphone output, configurable XLR line outputs, USB jack for audio recording, and more.
The perfect portable systems for solo performances, the Acoustic Junior and Acoustic Junior Go amps feature two channels, each with a variety of studio-quality stereo effects. Acoustic Junior Go features convenient and environmentally friendly rechargeable battery operation with five hours f full volume from a single charge. With 100 watts of power, a single 8” speaker, compression tweeter, convenient tilt-back kickstand, and light weight, both amps are ideal for terrific guitar-and-vocals rehearsals and performances in a variety of venues.
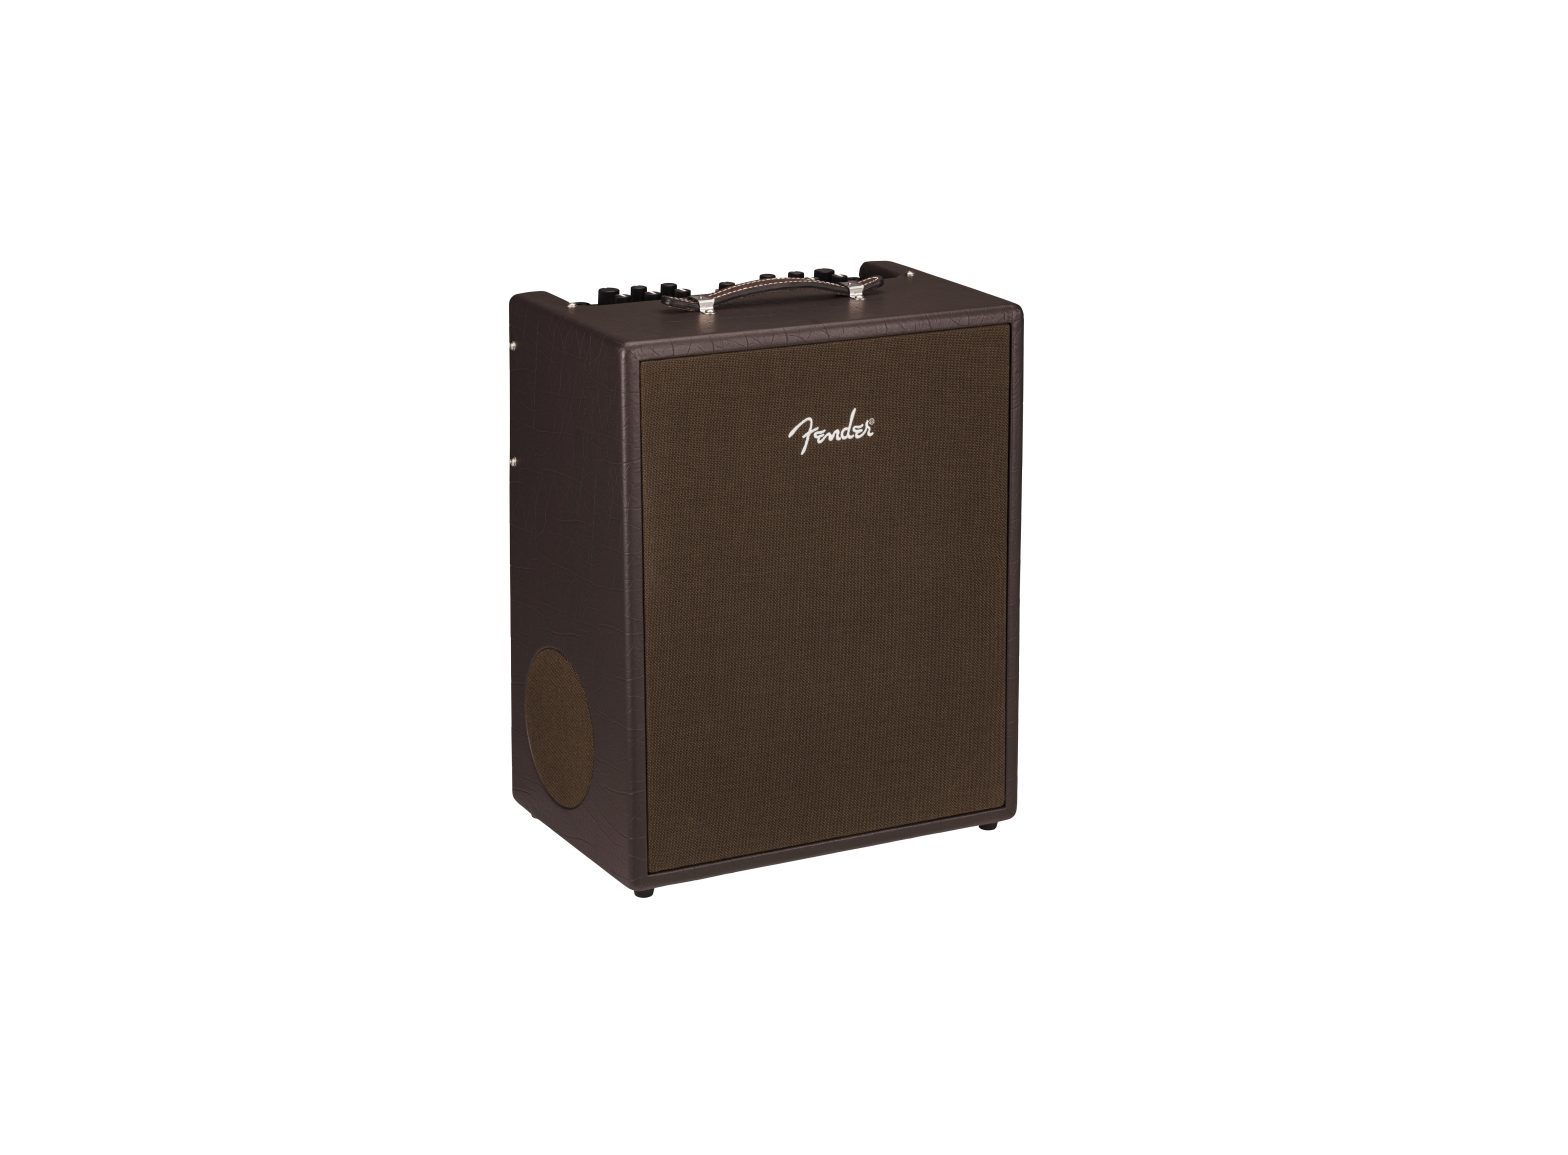
For solo performances or onstage with a band, the Acoustic SFX II amp also has a dual-channel design with studio-quality stereo effects and stunning Stereo Field Expansion (SFX) technology, which goes beyond stereo for room-filling tonal imagery that envelops the listener in a rich acoustic experience. It ups the strength to 200 watts for perfect guitar-and-vocals power and performance.
Acoustic Junior (left), Acoustic SFX II (center), Acoustic Junior Go (right).
CONTROL PANEL
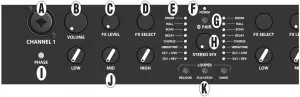
- A:CHANNEL INPUT: Combination jack accepts XLR and high-impedance ¼” inputs. Plug in instrument or microphone here; XLR input provides phantom power for mics that require it (do not use ribbon mics, which can be damaged by phantom power).
- B:VOLUME: Adjusts overall volume level (including headphones and USB/line outputs).
- C:FX LEVEL: Determines intensity of effect chosen using FX SELECT control.
- D:FX SELECT: Choose among effects including room and hall reverb, echo, delay, chorus, Vibratone, delay plus chorus, and delay plus reverb, as indicated by EFFECTS DISPLAY. No effect is selected in fully clockwise and fully counterclockwise positions. Optional footswitch enables tap-tempo delay time control for echo, delay, delay plus chorus and delayplus reverb effects.
- E:EFFECTS DISPLAY: LEDs illuminate to show effects setting in use for each channel
- F:POWER INDICATOR: For Acoustic Junior and Acoustic SFX II, indicator illuminates green when amplifier is on.For Acoustic Junior Go model only, indicator illuminates green to indicate sufficient battery charge; illuminates yellow to indicate low battery charge; and illuminates red to indicate insufficient charge for operation or a faulty battery. When Acoustic Junior Go is connected to AC power, indicator flashes during battery charging and illuminates solid green when charging is complete; illuminates at lower intensity when power switch is set to “off” and charging is in progress.
- G:PAIR: Bluetooth pairing button; see “Bluetooth” section.
- H:STEREO SFX (ACOUSTIC SFX II MODEL ONLY): Determines extent of Stereo Field Expansion (SFX) effect, which creates a 360-degree stereo image using the onboard effects and side-mounted speaker. Note that for SFX to be heard, an effect must be selected using the FX SELECT control (D), with FX LEVEL (C) set above minimum. Note: Delay effect will pan in stereo through PHONES output (N) and BALANCED LINE OUTPUTS (P) only if this control knob is set above minimum.
- I:PHASE: To help reduce feedback, press to reverse channel polarity to speaker (including headphones and USB/line outputs)
- J:LOW, MID AND HIGH: Adjusts bass, midrange and treble tone respectively.
- K:LOOPERBUTTONS(REC/DUB, PLAY/STOP, UNDO): Recording/overdubbing,
Indicates identical channel two feature on opposite side of control panel.
NOTE: See “Footswitch” section for other features not found on control panel, including remote effects on/off, tap-tempo control for delay times and built-in tuner.
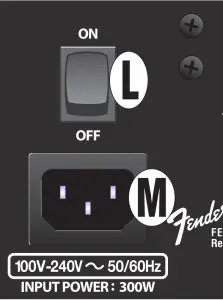
REAR PANEL
- L:POWER: Turns amplifier on and off..
- M:IEC POWER INLET: IEC power cord connects to amplifier here. For Acoustic Junior Go only, must connect to AC power to charge battery.
- N:PHONES: 1/8” stereo headphone output automatically mutes speaker output.
- O:AUX IN: 1/8” stereo input. Connect external audio player; use external device’s volume control to set accompaniment volume level.

- P:BALANCED LINE OUTPUTS: Balanced line-level XLR output jacks for connection toexternal sound reinforcement and recording devices. Changes to control panel settings affect balanced line output signal (includes aux input and Bluetooth signals).
- Q:MONO/STEREO:“Out” position is for normal left/right stereo effects output, with channels one and two added together (“summed”). “In” position configures both outputs to mono; use with MONO CONFIGURE button (S).
- R:GROUND LIFT: “Out” position is for normal (grounded) operation. “In” position can help alleviate unwanted line noise
- S:MONO CONFIGURE: When MONO/STEREO button (Q) is engaged, “Out” position delivers channels one and two summed at both output jacks (CH2 + CH1); useful for small-PA applications with minimal inputs. “In” position delivers separate outputs for channels one and two (CH2 or CH1); useful for separating instrument/vocal mix for recording or performance.
- T:USB PORT: The amp’s control panel features a USB port for audio recording. Using a micro USB cable (not included), connect a computer with recording software to this port; the computer’s audio control panel will display “Fender Acoustic” as an audio recording device. For assistance with configuring and using USB recording, visit the “Connected Amps” section at https://support.fender.com. Stereo USB output contains channels one and two summed (includes aux input and Bluetooth signals).
- U:RECOVER: For use by Fender service personnel only.
- V:FIRMWARE UPDATE: If a firmware update is recommended, instructions will be published at https://support.fender.com.
- W:FOOT SWITCH: 1/4” input jack for connecting optional MGT-4 four-button footswitch; see “Footswitch” section.
FOOTSWITCH
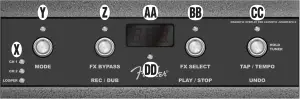
NOTE: THE MAGNETIC OVERLAY LABEL INCLUDED IN THE AMPLIFIER’S PACKAGING SHOULD BE APPLIED TO THE OPTIONAL MGT-4 FOUR-BUTTON FOOTSWITCH IN ORDER FOR THE FOOTSWITCH TO BE USED WITH THESE AMPLIFIERS. SIMPLY PLACE THE MAGNETIC LABEL ON TOP OF THE FOOTSWITCH (OVERLAY SHOWN IN PLACE ABOVE).
- X:MODE LEDS: Indicate whether channel 1, channel 2 or looper mode is selected using MODE BUTTON (Y).
- Y:MODE BUTTON/LED: Press repeatedly to select among channel 1, channel 2 or looper, as indicated by MODE LEDS (X). In tuner mode, illumination of this red LED indicates a greater degree of flattened pitch.
- Z:FUNCTION BUTTON/LED 1: Press for “FX BYPASS” function that disables effect in active channel. In tuner mode, illumination of this red LED indicates flattened pitch closer to correct pitch. See “Looper” section for looper “REC/DUB” function of this button/LED.
- AA:DISPLAY WINDOW: Displays selected mode and function information
- BB:FUNCTION BUTTON/LED 2: Press repeatedly for “FX SELECT” function that scrolls through effects—from top to bottom of control panel EFFECTS DISPLAY (E)—in active channel (repeats at end of list). In tuner mode, illumination of this red LED indicates sharpened pitch closer to correct pitch. See “Looper” section for looper “PLAY/STOP” function of this button/LED.
- CC:FUNCTION BUTTON/LED 3: Controls time-based effect tempos (echo, delay, delay plus chorus, delay plus reverb) for both channels. Tap at least twice at desired rate to set delay time for active effect(s); red LED above button will flash in time accordingly. TAP TEMPO is global for all modes, enabling switching among effects while keeping same tempo.
Hold this button to enter hands-free tuner mode, in which the tuner reads the audio signal from either channel 1 or channel 2 as selected by the MODE BUTTON (Y). The four red LEDs along the top of the footswitch (MODE and FUNCTION BUTTON LEDs) indicate varying degrees f sharpened and flattened pitch (illumination of the red LED above this button indicates a greater degree of sharpened pitch). CENTER TUNER LED (DD) illuminates green when correct pitch is attained. See “Looper” section for looper “UNDO” function of this button/LED.
- DD:CENTER TUNER LED: In tuner mode, illumination of this green LED indicates correct pitch
LOOPER
LOOPER mode enables the user to record loops up to 90 seconds long and overdub subsequent parts. Any number of overdubbed parts can be layered over the original recorded part; however, only the last overdub created can be undone.
Looper functions can be done by hand using the LOOPER BUTTONS (K) on the control panel (close-up image below), or hands-free by using the footswitch in looper mode (see “RECORDING” below). Recording/overdubbing actions are done using the control panel “REC/DUB” button or footswitch FUNCTION BUTTON 1 (Z). Playback/stop actions are one using the control panel “PLAY/STOP” button or footswitch FUNCTION BUTTON 2 (BB). Deleting the last recorded passage is done by using the control panel “UNDO” button or footswitch FUNCTION BUTTON 3 (CC).
RECORDING
To begin recording a loop, press the “REC/DUB” button on the control panel (K) or step on footswitch MODE BUTTON (Y) until the “LOOPER” MODE LED (X) is illuminated, and then step on footswitch FUNCTION BUTTON 1 (Z), labeled “REC/DUB.” The “REC/DUB” button/LED will begin flashing and the footswitch DISPLAY WINDOW (AA) will show “REC,” indicating that the looper is in recording mode. Play a passage of any duration up to 90 seconds.
PLAYBACK AND OVERDUBBING
To stop recording and automatically begin playback of the first passage, press the “PLAY/STOP” button (on the control panel or footswitch). The “PLAY/STOP” button/LED will illuminate, and the footswitch DISPLAY WINDOW will indicate playback by showing “PLA” . To stop playback, press “PLAY/STOP” again; the footswitch DISPLAY WINDOW will show “STP”
Alternately, when finished playing the first musical passage, press “REC/DUB” again (on the control panel or footswitch)to go straight into overdub mode. The “REC/DUB” button/LED will continue flashing and the footswitch DISPLAY WINDOW will show “DUB,” indicating that the looper is now in overdub mode and a second musical passage can be recorded over the first. Overdub mode can also be activated during playback of the first passage or after stopping layback by pressing the “REC/DUB” button again. Continue overdubbing musical passages as often as desired. After an overdub is recorded, press the “PLAY/STOP” button to start and stop playback of all recorded parts.
“UNDO” FUNCTION
While recording, playing back or stopped on the first musical passage, the user can undo the recording if desired by pressing the looper “UNDO” button (on the control panel or footswitch). When doing so, recording will stop and the footswitch DISPLAY WINDOW will show three dashes, indicating that whatever had been recorded is now erased. Once overdubs have been added, however, the UNDO function applies only to the last overdub recorded; preceding overdubs cannot be undone.
CLEARING LOOPER
To clear all looper contents, push “PLAY/STOP” (once if playing, twice if recording or overdubbing), to stop recording. Then, once the looper is stopped, pushing “REC/DUB” will start a fresh recording, effectively “clearing” the previously recorded audio.
Also when using the looper, note that:
- Recorded audio is not stored when turning the amplifier off.
- Looper output is mono only (no stereo effects are produced).
- VOLUME control (B) will not affect the looper once a recording has been made.
- Looper can be used on both channels; both inputs (A) are automatically mixed equal to their volume levels.
BLUETOOTH
- Press and hold PAIR button (G) for three seconds to activate pairing mode. PAIR button will begin flashing and then remain illuminated when connection is successful (will time out in two minutes if connection is unsuccessful). Amp will subsequently pair automatically with last connected device (if available).
- To connect, enable Bluetooth on external device, scan Bluetooth devices shown and select “FENDER ACOUSTIC”. Use external device’s volume control to set Bluetooth volume level through amplifier.
- To end connection or connect to another device, disable Bluetooth connection on mobile device or press and hold PAIR button (G) for three seconds. Amp will return to pairing ode for two minutes until connection is successful.
PERFORMANCE TIP: Amplifier streams audio from user’s mobile device only. Telephone calls will not come through amplifier, but streaming audio will be muted when a call is received. To avoid such streaming interruptions, engage airplane mode on mobile device and manually enable Bluetooth.
SPECIFICATIONS
Acoustic Junior, Acoustic Junior Go
TYPE: PR 5724
POWER REQUIREMENTS: 155 watts 35 watts (typical)
POWER AMP OUTPUT : 100 watts into 4Ω
NPUT IMPEDANCES : 4.7MΩ (instruments) 18.2kΩ (microphones) 18kΩ (aux input)
INPUT SENSITIVITY: 40mVrms (instruments) 4mVrms (microphones) 900mVrms (aux in, both channels driven), channel volume/tone controls at max
PHANTOM POWER: 16V (XLR inputs
TONE CONTROLS: Low: ±12db @ 80Hz Mid: ±12db @ 700Hz High: ±12db @ 5kHz (shelving type)
LINE OUT: Max level: +19.8dBu Nominal level: +4dBu (2x) Impedance: 600Ω (balanced)
SPEAKERS : 8” speaker (4Ω) and compression tweeter
HEADPHONE OUTPUT: 140mW into 16Ω/channel
BATTERY (ACOUSTIC JUNIOR GO ONLY) : Lithium ion rechargeable Recharge time: 4 hours (after complete discharge) Battery life: 5 hours (max volume), 12 hours (moderate volume)
FOOTSWITCH: Four-button MGT-4 (optional, PN 0994071000), use with included magnetic overlay label
DIMENSIONS: Width: 15.71” (39.9 cm) Height: 12.02” (30.5 cm) Depth: 9.4” (23.9 cm)
WEIGHT: Acoustic Junior: 15.7 lbs. (7.14 kg) Acoustic Junior Go: 17.1 lbs. (7.78 kg)
Acoustic SFX II
TYPE: PR 5725
POWER REQUIREMENTS: 300 watts (max) 49 watts (typical)
POWER AMP OUTPUT: 2 x 100 watts into 4Ω
INPUT IMPEDANCES: 4.7MΩ (instruments) 18.2kΩ (microphones) 18kΩ (aux input)
INPUT SENSITIVITY: 40mVrms (instruments) 4mVrms (microphones) 900mVrms (aux in, both channels driven), channel volume/tone controls at max.
PHANTOM POWER: 16V (XLR inputs)
TONE CONTROLS: Low: ±12db @ 80Hz Mid: ±12db @ 700Hz High: ±12db @ 5kHz (shelving type)
LINE OUT: Max level: +19.8dBu Nominal level: +4dBu (2x) Impedance: 600Ω (balanced)
SPEAKERS: Front: 8” speaker (4Ω) and compression tweeter Side: 6.5” speaker (8Ω)
HEADPHONE OUTPUT: 140mW into 16Ω/channel
FOOTSWITCH: Four-button MGT-4 (optional, PN 0994071000), use with included magnetic overlay label.
DIMENSIONS: Width: 15.7” (39.9 cm) Height: 19.39” (49.2 cm) Depth: 10.21” (25.9 cm)
report this adWEIGHT: 22 lbs. (9.98 kg)
References
[xyz-ips snippet=”download-snippet”]