
![]()

BCM1020Original instructions


BATTERY CHARGER
Thank you for buying this ferm product By doing so you now have an excellent product, delivered by one of Europe’s leading suppliers. All products delivered to you by Ferm are manufactured according to the highest standards of performance and safety. As part of our philosophy, we also provide excellent customer service, backed by our comprehensive Warranty. We hope you will enjoy using this product for many years to come.
![]() Carefully read the instructions before you use the Battery charger!
Carefully read the instructions before you use the Battery charger!
Know you apparatusBefore you use theBattery charger, carefully read the instructions, especially the safety rules. Observe the instructions for maintenance to ensure your apparatus always operates properly. Before attempting to operate the apparatus, familiarise yourself with the controls and make sure you know how to stop it quickly in an emergency. Save this user’s manual and the other documents supplied with this apparatus for future reference.
Intended useThis BCM1020 is a car charger with impulse trickle charge (Chip Software) suitable for charging and trickle charging the following 6 V or 12 V rechargeable lead batteries with electrolyte the solution, AMG batteries, lead-acid batteries, deep cycle (marine batteries), or gel batteries:• For automotive and motorcycle batteries with 12 V / 6 V and 8-180 Ah capacity.
You can also regenerate drained batteries (depending on battery type). The car charger features a protective circuit against sparking and overheating. Any improper or incorrect use will void the warranty. The manufacturer is not liable for damage caused by improper use. The device is not intended for commercial use.Note: The car charger is not suitable for charging electric vehicles with built-in rechargeable battery.
DATA
Technical specificationsInput voltage – 230 V ~ 50 HzRated output voltage – 6V/12VCharging current – 2 A, 6 A, 12 ABattery type with – 12V/6V and 8-180 Ah capacity
This apparatus has a overload protection by means of a thermal fuse which will switch on as soon as the electricity is switched off.
Parts description1. Digital display button2. Battery type button3. Charger start button4. Fuse with cover5. “+” Terminal connection cable (red)6. “-“ Terminal clamp (black)7. “+” Terminal clamp (red)8. “-“ Terminal connection cable (black)9. Mains cable10. Digital display
Packaging contentsThe following is supplied with yourBattery charger:1 Battery charger/Jump starter1 Set battery clamps1 Manual1 Warranty card
Explanation of symbols![]() Read instructions carefully
Read instructions carefully![]() In accordance with essential applicable safety standards of European directives
In accordance with essential applicable safety standards of European directives![]() Denotes risk of personal injury, loss of life or damage to the tool in case of non-observance of the instructions in this manual.
Denotes risk of personal injury, loss of life or damage to the tool in case of non-observance of the instructions in this manual.![]() Indicates electrical shock hazard.
Indicates electrical shock hazard.![]() Indicates explosion hazard
Indicates explosion hazard![]() Faulty and/or discarded electrical or electronic apparatus have to be collected at the appropriate recycling locations.
Faulty and/or discarded electrical or electronic apparatus have to be collected at the appropriate recycling locations.
Safety instructions for battery chargerIn the design of the battery charger the requirements for safe usage have been taken into account. Any change, adaptation, conversion or other use may interfere with the safety of the apparatus. In addition, the guarantee will no longer be valid because of this.
![]() Keep out of the reach of children!
Keep out of the reach of children!
- Avoid a danger to life and the risk of injuries due to improper use!
- Do not operate the device if the cables, the mains cables or plug are damaged. A damaged mains cable indicates a life-threat- ending danger due to electric shock.
- Only have a damaged power cable repaired by authorized and trained professionals! In the event a repair is required, please contact the service center for your country
- Danger for electric shock! For batteries permanently mounted in a vehicle, verify the vehicle is switched off! Switch off the ignition ans put the vehicle in park with the handbrake engaged (e.g. car) or fixed rope (e.g. electric boat)!
- Danger for electric shock! Disconnect the car charger from the mains before connecting or removing the connectors to/from the battery.

- First connect the clamp not connected to the car body.
- Connect the other clamp to the car body, away from the battery and the petrol pipe. Then only connect the car charger to the power supply.
- Disconnect the car charger from the power supply after charging.
- Danger of electric shock! Only touch the terminal connection cables (“-“ and “+”) in the insulated area!
- Danger of electric shock! Establish the connection to the battery and the mains current socket completely protected from moisture.
- Danger of electric shock! Only assemble, maintain and care for the car charger whilst disconnected from the mains!
- Danger of electric shock! Once the charging and discharge process is completed, in batteries permanently installed in vehicles first disconnect the charger’s negative terminal connection cable (black) from the battery’s negative terminal.
- Do not leave toddlers or children unsupervised with the car charger!
- Children are not yet able to assess potential danger in handling electric appliances. Always supervise children to ensure they do not play with the tool.
- This device may be used by children age 8 years and up, as well as by persons with reduced physical, sensory or mental capacities, or lacking experience and/or knowledge, so long as they are supervised or instructed in the safe use of the device and understand the associated risks.
- Explosion hazard! Protect yourself from a highly explosive hydrogen-oxygen reaction! The battery may emit gaseous hydrogen during charging and trickle charging. Oxyhydrogen is an explosive mix of gaseous hydrogen and oxygen. Contact with open fire (flames, embers or sparks) will cause the so-called oxyhydrogen reaction! Perform charging and trickle charging in a well-ventilated room protected from the weather. Be sure there is no open fire during charging and maintenance charging!
- Danger of explosion and fire hazard! Ensure that there is no possibility of ignition of explosive or flame able materials, such as petrol or solvents, while using the charger!
- Explosive gasses! Avoid flames and sparks!
- Ensure adequate ventilation whilst charging.
- Place the battery on a well ventilated surface whilst charging. Ignoring this may damage the device.
- Explosion hazard! Ensure the positive terminal connection cable does not come into contact with fuel lines (e.g. petrol pipe)!
- Danger of chemical burns! Protect your eyes and skin against corrosion from acids when coming into contact with the battery!
- Use acid-proof goggles, clothing and gloves! If eyes or skin has come into contact with sulphuric acid, rinse the effected body region off with a plenty of clean water and consults a doctor straight away!
- Avoid electric short-circuits when connecting the car charger to the battery. Only connect the negative terminal connection cable to the negative battery terminal or the car body. Only connect the positive terminal connection cable to the positive battery terminal!
- Before connecting to the mains, verify the mains power has the required 230 V~ 50 Hz, neutral lead, a 16 A fuse and an ELCB switch (earth leakage circuit breaker)! Ignoring this advice may damage the device.
- Do not place the charger close to fire, heat and prolonged temperatures over 50 °C! The output power of the car charger automatically drops In higher temperatures.
- Ensure no fuel lines, electric cables, hydraulic-, water pipes are damaged by the screws whilst assembling the charger! Otherwise there is a risk of death or injuries!
- Only use the car charger with the included original parts!
- Do not cover the car charger with objects! Ignoring this advice may damage the device.
- Protect the surfaces of the battery‘s electrical contacts from short circuiting!
- Only use the car charger for charging and maintenance charging undamaged 6 V- / 12 V leadacid batteries (with electrolyte solution or gel)!
- Otherwise material damage could occur.
- Do not use the car charger for charging or trickle charging non-rechargeable batteries. Otherwise material damage could occur.
- Do not use the car charger to charge or trickle charge a damaged or frozen battery! Otherwise, material damage could occur.
- Before connecting the charger, refer to the battery‘ s original operating instructions for battery maintenance information! Otherwise there is a risk of injury and / or damaging thedevice.
- Before connecting the charger to a battery permanently connected to a vehicle, refer to the vehicle‘s operating instructions for information about maintaining electrical safety and maintenance! Otherwise there is a risk of injury and/or property damage.
- Also disconnect the car charger from the mains when not in use for environmental reasons! Remember standby operation also consumes electricity.
- Always be alert and always be careful what you do. Always proceed with caution and do not operate the car charger when unconfused or feel unwell.
OPERATION
![]() Remove the mains plug from the mains socket before performing any work on the car charger. Risk of electric shock! Danger of damage to property! Risk of injury.
Remove the mains plug from the mains socket before performing any work on the car charger. Risk of electric shock! Danger of damage to property! Risk of injury.
Product propertiesThis device is designed to charge a variety of SLA batteries (sealed lead-acid batteries) primarily used in cars, motorcycles and some other vehicles. These can be e.g. WET- (with liquid electrolyte), GEL- (with gelifi electrolyte) or AGM batteries (with electrolyte absorbent glass mat). The special design of the device (also referred to as “three-level charging strategy“) allows the battery to be charged to nearly 100 % of its capacity. The charger can further be connected to the battery for extended periods to keep it in optimal condition.Connecting• Before charging and trickle charging a battery permanently connected to the vehicle, first disconnect the batteries negative terminal connection cable (black) from the negative battery terminal. The negative battery terminal is typically connected to the car body.• Then disconnect the vehicle’s positive terminal connection cable (red) from the positive battery terminal.• Only then connect the battery charger’s “+” crocodile clamp (red) (7) to the “+” battery terminal.• Connect the “-“ crocodile clamp (black) (6) to the “-“ battery terminal. Plug the car charger’s mains cable (9) into the mains socket.
Note: If the connector clamps are correctly connected, the display will show the voltage and “connected“ will light up. If the poles are reversed, the display will read 0.0 and “connected“ will not light up.Disconnecting• Disconnect the device from the mains.• Remove the “-“ crocodile clamp (black) (6) from the “-“ battery terminal.• Remove the “+” crocodile clamp (red) (7) from the “+” battery terminal.• Reconnect the vehicle’s positive connection cable to the positive battery terminal.• Reconnect the vehicle’s negative connection cable to the negative battery terminal
Selecting the charging modeYou can charge a variety of batteries at different ambient temperatures using different charging modes. Compared to conventional car chargers, this device features a special function for reusing a drained battery/ rechargeable battery. You can recharge a completely drained battery/rechargeable battery. The safe charging process protects against faulty connection and shortcircuits. The integrated electronics do not switch the car charger on immediately after being connected, but only after selecting a charging mode. If the connector clamps connected to the battery and the device is connected to power, the digital display (10) will read “Connected”. After selecting a charging mode, the display will read “Charging”. Once charging is complete, the display will read “Charged”. A continuously lit display with the battery not yet fully charged indicates a fault.• In this event, verify if the connection clamps (6) (7) are correctly connected to the battery and the correct battery type is selected. If the display is still continuously lit, the batter may be defective.
Digital display button (1):Use to switch between the digital display of voltage and charging progress in percent (Battery %). Use this button to switch between the following displays:– Battery %: Indicated the charging process for the connected battery in percent.– Voltage: indicated the voltage of the connected battery.– Alternator %: output power in percent.
Battery type button (2):Use this button to set the battery type to be charged. You can choose battery types. The battery type must absolutely be correctly selected before starting the charging process:– 12 V Regular: these batteries (lead-acid batteries) are typically used in cars, lorries and motorcycles. They have vent caps and are often labelled “low-maintenance“ or “maintenance-free“. This battery type is designed to quickly transfer energy (e.g. starting an engine). “Regular“ batteries should not be used for “Deep Cycle“ applications.– 12 V Deep Cycle: These batteries are commonly also labelled “Deep Cycle“ or “Marine“. This type of battery is typically larger than other battery types. It delivers less short-term energy but transmit energy longer. These batteries withstand numerous discharge cycles.– 12 V AGM / Gel: The AGM battery type is typically a good Deep Cycle battery. They provide the best “life“ when recharged before being drained more than 50 %. When fully discharged they withstand about 300 charging cycles. The GEL battery type is similar to AGM. The charging voltage is lower than for other lead acid batteries. Using the wrong charger for a gel battery will result in a reduction in power or a shorter life.– 6V regular: Select this mode for conventional6V batteries.Battery start button (3):Use this button to switch between the following options– Fast charge: charges quickly (recommended in low outdoor temperatures/winter)– Normal charge: normal charging process (normal speed)– Start: Delivers :75 ampere to bridge a weak or drained battery to jump start an engine.
Jump startingWARNING! Always make all the connections as described in the correct order. The vehicle’s electronics may otherwise be damaged. Proceed against the specifications at your own risk and responsibility.Attention: This function is not suitable for batteries below 45 Ah. This function could damage batteries below 45 Ah. Diesel vehicles and large-volume engines in part require amperages above 75 A for jump-starting.Note: The charger features an analysis program to protect the battery from damage (e.g. sulphation or rapid voltage drops), particularly during jump starting. The device will not switch on the jump starter with severely drained or heavily stressed batteries to protect the battery. During this process the battery is already being charged with lower currents (Charging lights up). The display continues to read “0“. In this event the jump start function cannot be used. This will protect the battery from damage. You should then first charge the battery. You may also use the “Fast charge” or “Normal charge” function for this purpose.• Connect the car charger’s mains cable (9) to power.• Connect the red connector clamp ( 7) to the positive battery terminal. (The positive terminal is marked with a “+“ symbol and a black mark.)• Connect the black connector clamp ( 6to the negative battery terminal. (The negative terminal is marked with a “-“ symbol and a black mark.)• If the connector clamps are connected correctly, the car charger will automatically select the correct battery type. You may review it in the “Battery Type“ option field and if necessary change it by pressing the battery type button (2) .• Now select the “Start“ function using the Charge Start button 3 . The cart charger will now analyze the battery‘s charge level. The display will now read “0“.• Start the vehicle‘s ignition. The display will now show a 5-second countdown (of which 2-second priming/analysis function and 3-second jump start function at 75 A) when needing the car charger for jump-starting. (previously analyzed by the car charger). During this countdown, the car charger will briefly deliver 75 A to bridge the battery to start the car. This is followed by a 180-second pause to protect the battery. The cycle will now restart (2-second priming/analysis function and 3-second jump starting at 75 A / 180-second pause).• To disconnect the device, first remove the terminal clamps ( (6) / (7) ) and unplug the power cord (9) .Note: If the battery is completely drained, the 75A will not be sufficient to start all engines (e.g. diesel vehicles).In this case, please select “Fast Charge” option using the charge start button (3) and charge the battery 60% (preheating of diesel engines draws power from the battery. This requires 60% after preheating).You can monitor the charging process in the display by selecting the “Battery%” option using the digital display button (1). Once 60% has been reached, jump start again.Attention: Exit the mode by unplugging the mains cable (9).
MAINTENANCE
Always remove the plug from the mains socket when the battery charger is being serviced or cleaned. Never use any water or other liquids when cleaning the charger. Keep the cable and your battery charger clean. Some cleaners and solvents (petrol, thinner) can affect or dissolve plastic parts. These products contain a.o. benzene, trichloroethylene, chloride and ammonia.CAUTION! To avoid electrical danger, the charger should be connected to a mains supply with good earthing and may not be subjected to rain or snow. Any damaged cables must be immediately replaced by a qualified specialist. Replace the fuse The car charger fuse can be damaged by e.g. hardware failure, overload, ect.
• Unplug the power cord (9) before replacing the fuse.• Remove the fuse (4) cover by slightly pressing in the side.• Unscrew the fuse (4) with a fitting open-end spanner and secure the new fuse.• Then screw it tight and replace the cover (4).Note: If you need a new fuse, please contact our service department (see chapter warranty and service information)Defective batteries• Damaged batteries that do not retain their charge.It is often the case that batteries that are in very bad condition can no longer be charged; they need to be replaced because they do not retain their charge.• Short circuited batteries.If, after several hours the battery charger still does not indicate that the battery is being charged, this usually means that one of the elements is short-circuited. The battery needs to be replaced.
MalfunctionIf your battery charger no longer functions as it should, this may be due to the following reasons:• The clamp has been connected wrongly. Check if the right clamp is connected to the right terminal.• The safety switch is switched off.Battery lifeThe life of your battery will be considerably longer if the following advice is taken:• Check the liquid level of the battery every month and, if necessary, fill it up with distilled water.• Clean the terminals of your battery regularly to prevent deposit. Put a little bit of vaseline on the terminals.• If the vehicle is seldom used, the battery will discharge. Therefore it needs to be charged regularly to maximum capacity. In this way malfunctioning can be prevented.If everything has been checked, and the battery charger still does not charge as it should, it needs to be taken to the Service address on the warranty card.
ENVIRONMENT
To prevent damage during transport, the appliance is delivered in a solid packaging which consists largely of reusable material. Therefore please make use of options for recycling the packaging.Faulty and/or discarded electrical or electronic apparatus have to be collected at the appropriate recycling locations.![]() Only for EC countriesDo not dispose of power tools into domestic waste. According to the European Guideline 2012/19/EU for Waste Electrical and Electronic Equipment and its implementation into national right, power tools that are no longer usable must be collected separately and disposed of in an environmentally friendly way.
Only for EC countriesDo not dispose of power tools into domestic waste. According to the European Guideline 2012/19/EU for Waste Electrical and Electronic Equipment and its implementation into national right, power tools that are no longer usable must be collected separately and disposed of in an environmentally friendly way.
WARRANTYFor the conditions of warranty, please refer to the separately provided warranty card.
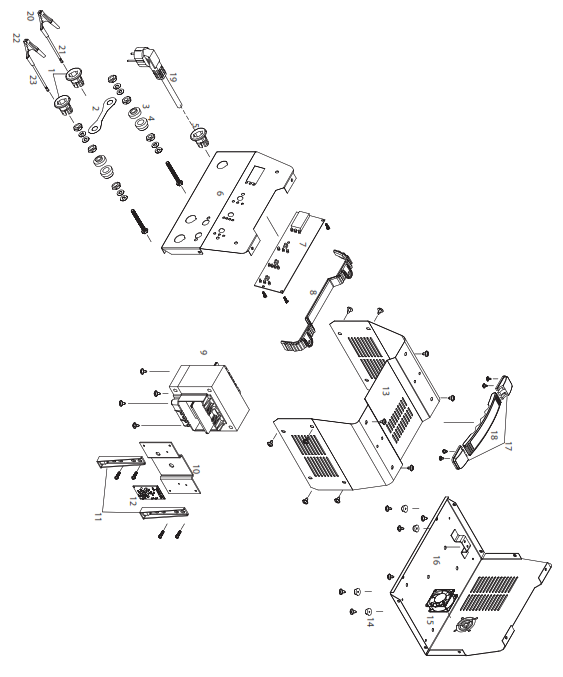
Spare parts listBCM1020
|
Art. No. |
Description |
Position no. |
| 102990 | Fuse | 2 |
| 102991 | Fan | 15 |
| 102992 | Clamp – Negative pole | 20 |
| 102993 | Clamp – positive pole | 22 |
| 102994 | Fuse cover | ……. |
Exploded view
![]() DECLARATION OF CONFORMITY BCM1020 – POWER BATTERY CHARGER / JUMP STARTER
DECLARATION OF CONFORMITY BCM1020 – POWER BATTERY CHARGER / JUMP STARTER
We declare under our sole responsibility that this product is in conformity with directive 2011/65/EU of the European Parliament and of the council of 8 June on the restriction of the use of certain hazardous substances in electrical and electronic equipment is in conformity and accordance with the following standards and regulations:
EN60335-1, EN60335-2-29, EN62233, EN55014-1, EN55014-2, EN61000-3-2, EN61000-3-3, EN61000-3-11 2014/35/EU, 2014/30/EU, 2011/65/EU, 2012/19/EC
Zwolle, 01-03-2019
 H.G.F RosbergCEO FERMFERM – Lingenstraat 6 – 8028 PM – Zwolle – The Netherlands
References
[xyz-ips snippet=”download-snippet”]