
FERM Power Planer

PLANER
Thank you for buying this Ferm product.By doing so you now have an excellent product, delivered by one of Europe’s leading suppliers. All products delivered to you by Ferm are manufactured according to the highest standards of performance and safety. As part of our philosophy we also provide an excellent customer service, backed by our comprehensive Warranty. We hope you will enjoy using this product for many years to come.
The numbers in the following text correspond with the pictures at pages 2 + 3
Read this operators guide carefully, before using the machine. Ensure that you know how the machine works, and how it should be operated. Maintain the machine in accordance with the instructions, and make certain that the machine functions correctly. Keep this operator’s guide and other enclosed documentation with the machine.Product description This doubly insulated electric tool is designed to be manually operated. It has an appealing shape and small dimensions, which facilitate easy transportation. It is safe and reliable when in operation. It is driven by a single phase electric motor via a V-belt. It is suitable for planning wooden beams or boards.
MACHINE INFORMATION
Technical specifications
| Voltage | 230 V~ |
| Frequency | 50 Hz |
| Power consumption | 650 W |
| Number of revolutions, idle | 16500/min |
| Maximum planning width | 82 mm |
| Maximum planning depth | 2.0 mm |
| Weight | 2.8 kgs |
| LpA (sound pressure) | 84.7 dB(A) |
| LwA (sound capacity) | 95.7 dB(A) |
| Vibration value | 4.27 m/s2 |
| Protection class | IP 20 |
Vibration level
The vibration emission level stated in this instruction manual has been measured in accordance with a standardized test given in EN 60745; it may be used to compare one tool with another and as a preliminary assessment of exposure to vibration when using the tool for the applications mentioned
- using the tool for different applications, or with different or poorly maintained accessories, may significantly increase the exposure level
- the times when the tool is switched off or when it is running but not actually doing the job, may signify cantily reduce the exposure level
Protect yourself against the effects of vibration by maintaining the tool and its accessories, keeping your hands warm, and organizing your work patterns
Contents of packing1 Planer1 Rip fence1 Wrench1 Extra teeth belt1 Dust adapter1 Dust bag1 Instruction manual1 Safety instructions1 Warranty card
Check the machine, loose parts and accessories for transport damage.
Parts list
Fig. 1 + 2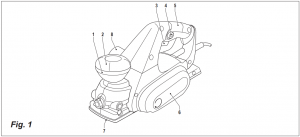

- Control knob for adjustment of planing depth
- Indication of planing depth
- Operating Switch
- Release Button
- Handle
- Cover, left
- Planer shoe with V-groove
- Dustbag connection
SAFETY INSTRUCTIONS
Explanation of symbols
 Denotes risk of personal injury, loss of life or damage to the tool in case of nonobservance of the instructions in this manual.
 Indicates electrical shock hazard.
 Wear ear and eye protection
 Wear a dust mask
Switch off the machine immediately in case of:
- Malfunction in the mains plug, power cable or damaging of cable.
- Broken switch.
- Smoke or stench of scorched insulation.
Wait for the cutter to stop before setting the tool down. An exposed cutter may engage the surface leading to possible loss of control and serious injury.
Electrical safetyWhen using electric machines always observe the safety regulations applicable in your country to reduce the risk of fire, electric shock and personal injury. Read the following safety instructions and also the enclosed safety instructions. Keep these instructions in a safe place!
Always check that the power supply corresponds to the voltage on the rating plate.
 Class ll machine. Your machine is double insulated; therefore no earthwire is required.
When replacing old cables or plugsThrow away old cables or plugs immediately as soon as new ones have replaced these. It is dangerous to put the plug of a loose cable into the socket outlet.
When using extension cablesOnly use an approved extension cable that is suitable for the machine’s power. The cores must have a diameter of at least 1.5 mm2. When the extension cable is on a reel, unroll the cable in its entirety.
OPERATION
 Before setting up, repair or maintenance of the appliance you must always turn off the operating switch and pull out the mains plug!
Before initial operation
- Check if the rated voltage and rated frequency of the mains supply correspond to the details of the type plate.
- Place the workbench on a stable and even base.
Operation
Fig. 1
- To adjust the planing depth, turn the control knob (1) in a clockwise direction. On the control knob there is a pointer which shows the planing depth in mm. Turn the control knob until the desired planing depth is shown.
Never alter the planing depth during an operating cycle, otherwise this will result in an uneven surface. To prevent operating errors turn the control knob back to “0” when planing is completed.
- Secure the work piece with clamps or similar.Place the front sole on the edge of the work piece in such a way that the planing tool does not yet touch the work piece. The work piece must be level.
Switching on and off
- This machine is equipped with a safety switch.
- Start the machine by pressing the “lock off” button (to disengage the switch) and switch on the machine.
- The planer is now switched on and you can let go of the release button.
- Always hold the planer with both hands on the handles, so as to gain the best possible control over your planing operations. Besides you do not risk becoming in touch with the moving parts.
- When the machine has reached full speed it can be pushed to the front over the work piece. At the beginning of the planing operation, put some pressure on the front and at the end of the operation, on the rear of the appliance. This results in the appliance remaining flat on the work piece and prevents the corners from getting rounded off.
- To obtain a level and smooth surface use a greater planing depth when rough planing and a lesser planing depth when planing a layer. Hold the electric tool straight during the operation, otherwise you will obtain an uneven surface. After the operation switch off the electric tool and remove the mains plug.
Bevelling edges
Fig. 1
The V-groove in the planer shoe allows easy beveling of workpiece edges. Place the planer with the V-groove (7) onto the edge of the workpiece and guide along the edge.
Warning! Use spindle lock only in stand still mode.
- Take care that your hand never comes in contact with the work piece during the operation.
- Only use the electric plane on the upper side of the work piece, never from below or from the side.
- Store the appliance only after it has come to a complete standstill.
- Use a suction device to suck off wood shavings or dust. For this use the connecting pipe and connect a suction pipe to it.
- Use a holding device to work on small work pieces.
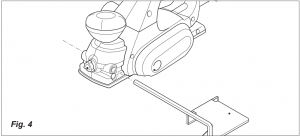
Fitting the rip fenceFig.4
- Loosen knob (9).
- Insert the rip fence into the slots provided.
- Set the correct cut width and tighten the knob (9).

CARE & MAINTENANCE
Before undertaking any care or maintenance always remove the mains plug from the socket.
The planing tool becomes worn after a period of operation. If you use a blunt or damaged planing tool operational efficiency is reduced and the electric motor might become overloaded. Check the planing tool regularly with regard to wear or damage. Depending on its condition, the planing tool will have to be replaced.
Removal of plane bladeFig. 3Use the enclosed open-jawed spanner (Accessories). First unscrew the three clamping screws (6) with the open-jawed spanner and remove the plane blade (3), the plane blade holder (2) and the plane blade support (4) from the holding shaft (1).
Installation of plane bladeFig. 3Take the new plane blade (3) and position it between the plane blade support (4) and the plane blade holder (2). Now turn the clamping screws (6) as far as possible into the plane blade support. But not so far that the plane blade and the plane blade holder become detached again from the plane blade support. Afterwards put the plane blade, plane blade holder and plane blade support together into the holding shaft. The plane blade support, plane blade and plane blade holder will now be fastened together in the holding shaft by releasing the clamping screws with the openjawed spanner and thus the plane blade, plane blade support and plane blade holder are clamped in position.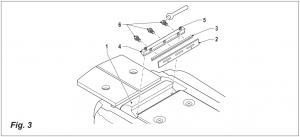
Attention! Unscrew clamping screws as fas as possible so that a sufficient attachment is ensured.
Warning!
Fitting the rip fence Fig.4 · Loosen knob (9). · Insert the rip fence into the slots provided.
- When installing and removing the plane blade, care has to be taken that all parts (plane blade, plane blade holder, plane blade support and holding shaft) are clean. Dirt or possible existing layers of dirt have to be removed.
- The Allen screws (5) are secured with an adhesive. These screws must not be adjusted.The position of these screws may only be altered by the manufacturer!
Check regularly if the clamping screws are tightened firmly. Always tighten screws firmly
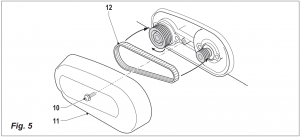
Replacing the drive beltFig. 5
- Loosen screw (10) and take off the belt cover (11).
- Remove worn drive belt (12).
- Before assembling a new drive belt, clean both belt pulleys.
- Place the new drive belt on the small pulley first and then work it on the large pulley by hand while rotating.
- Reattach the belt cover (11) and tighten with the screw (10).
Troubleshooting
- The operating switch is switched on, but the motor is not working.● The electric circuit is broken.• Have the electric circuit repaired.● Wires in the mains plug or in the socket are loose.• Have socket and plug checked or repaired.● The switch is faulty.• Have the switch replaced.
- The operating switch is switched on, but unusual noises can be heard, the motor is not working or only very slowly.● Switch contact has fused.• Have the switch replaced.● Component jammed.• Have the electric tool checked or repaired.● Too much thrust, as a result the motor is dragging.• Use less thrust during the task.
- Motor gets hot.● Foreign substances have got inside the motor.• Have the foreign substances removed.● Lack of or contaminated lubricating grease.• Have lubricating grease applied or replaced.• Pressure too high.• Use less thrust during the task● Planing tool blunt.• Replace the planing tool.
- The motor is working, but the planing tool is not moving.● V-belt worn.• Have V-belt replaced.
- Frequent or strong sparks on the commutator.● Short circuit on the armature.• Have the armature replaced.● Carbon brushes worn out or jammed• Have the carbon brushes checked.● Rough running of the commutator.• Have the surface of the commutator cleaned or ground
For your own safety, never remove parts or accessories of the electric tool during operation. In case of fault or damage have the electric tool repaired only by a specialist workshop or by the manufacturer
Use only original spare parts and original plane blades!
Maintenance
Make sure that the plug is removed from the mains when carrying out maintenance work on the motor.
The machines have been designed to operate over a long period of time with a minimum of maintenance. Continuous satisfactory operation depends upon proper machine care and regular cleaning.
CleaningRegularly clean the machine housing with a soft cloth, preferably after each use. Keep the ventilation slots free from dust and dirt. If the dirt does not come off use a soft cloth moistened with soapy water. Never use solvents such as petrol, alcohol, ammonia water, etc. These solvents may damage the plastic parts.
LubricationThe machine requires no additional lubrication.
FaultsShould a fault occur, e.g. after wear of a part, please contact the service address on the warranty card. In the back of this manual you find an exploded view showing the parts that can be ordered.
EnvironmentTo prevent damage during transport, the appliance is delivered in a solid packaging which consists largely of reusable material. Therefore please make use of options for recycling the packaging.
![]() Faulty and/or discarded electrical or electronic apparatus have to be collected at the appropriate recycling locations.
Faulty and/or discarded electrical or electronic apparatus have to be collected at the appropriate recycling locations.
GuaranteeThe guarantee conditions can be found on the separately enclosed guarantee card.
References
[xyz-ips snippet=”download-snippet”]