FERM® TSM1033 Table Saw Original Instructions

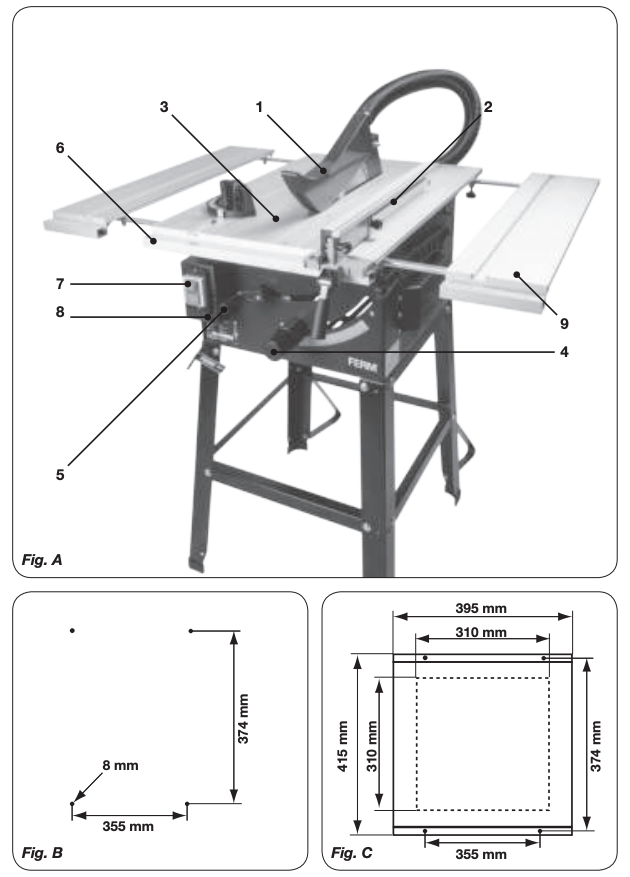
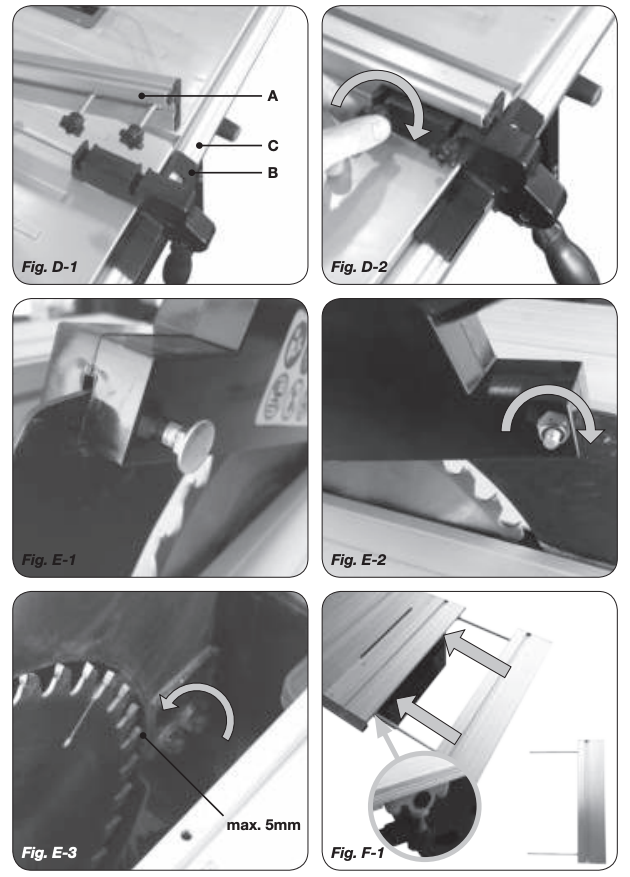
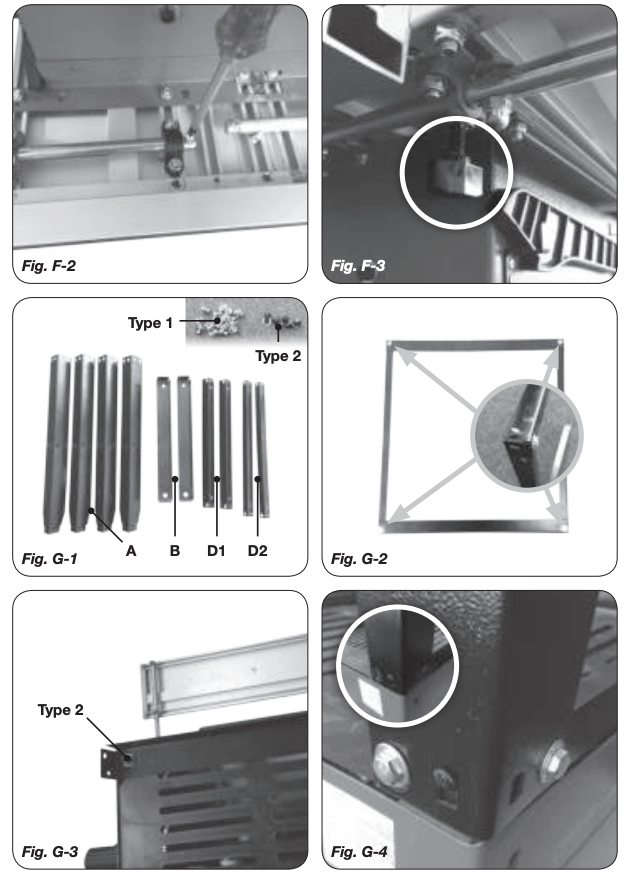

TABLE SAWTSM1033
Thank you for buying this Ferm product. By doing so you now have an excellent product, delivered by one of Europe’s leading suppliers. All products delivered to you by Ferm are manufactured according to the highest standards of performance and safety. As part of our philosophy we also provide an excellent customer service, backed by our comprehensive warranty. We hope you will enjoy using this product for many years to come.
The numbers in the following text refer to the pictures on page 2 – 5
![]() Read the operating instructions carefully before using this device. Familiarise yourself with its functions and basic operation. Service the device as per the instructions to ensure that it always functions properly. The operating instructions and the accompanying documentation must be kept in the vicinity of the device.
Read the operating instructions carefully before using this device. Familiarise yourself with its functions and basic operation. Service the device as per the instructions to ensure that it always functions properly. The operating instructions and the accompanying documentation must be kept in the vicinity of the device.
Contents
- Technical specifications
- Safety instructions
- Assembly instructions
- Operation
- Maintenance
TECHNICAL SPECIFICATIONS
Voltage: 230-240 V~Frequency: 50 HzPower input: 1500W (S1) 1800 W (S6 40%)No load speed: 4700/minSaw blade dimensions: 250 x 30 x 2.8 mmNumber of teeth: T40Max.workpiece height 90º: 74 mmMax.workpiece height 45º: 63 mmThickness of the riving knife: 2.0 mmBlade body thickness: 1.6-1.9 mmMeasurements of bench (max): 930 x 625 mmWeight: 22.5 kgLpa (sound pressure level): 94.8 dB(A) K=3dBLwa (sound power level): 107.8 dB(A) K=3dB
Product information
Fig. A
- Protective cap
- Parallel guide
- Table
- Mitre handle
- Height handle
- Ruler for parallel guide
- On/off switch
- Thermic safety switch
- Workbench
Check first whether or not the delivery has been damaged by transport and/or whether all the parts are present.
SAFETY INSTRUCTIONS
Explanation of symbols
![]() Denotes risk of personal injury, loss of life or damage to the tool in case of nonobservance of the instructions in this manual.
Denotes risk of personal injury, loss of life or damage to the tool in case of nonobservance of the instructions in this manual.
![]()
![]()
![]()
![]()
![]()
![]()
![]()
![]()
![]()
![]()
![]()
![]()
![]()
![]()
![]()
![]()
Material to be processed
This powertool is intended as a stationary machine for making straight lengthways and crossways cuts in hard and soft wood free from foreign bodies such as nails, screws and mortar.
ATTENTION! When using electric tools to protect against electric shock, injury and fire the following basic safety measures must be observed. Make sure to read all of these instructions before you use this power tool, keep the safety booklet and preserve it well for later reference.
- Always keep your workplace clean and tidy.
- An untidy workplace can lead to unwanted accidents.
- Consider environmental influences.
- Do not expose the power tool to rain.
- Do not use the power tool in a damp or wet environment.
- Make sure that your working space has sufficient lighting.
- Do not use the power tool in areas where there is a fire or explosive hazard.
- To protect yourself from an electric shock.
- Avoid body contact with grounded parts (e.g. pipes, radiators, electric stoves, refrigerators etc.).
- Keep other people away
- Keep other people away especially children, do not let them touch your power tool or cable and keep the children away from your working area.
- Store the unused power tools safely.
- Unused power tools should be locked up or stored in a place that is dry and out of reach of children.
- Do not overload your power tool.
- You work better and safer in the specified power range.
- Use the correct power tool.
- Do not use low-power machines for heavy work
- Do not use the power tool for purposes that they are not intended for. For example you cannot cut tree limbs or a log of wood using a hand saw.
- Wear suitable clothing.
- Do not wear loose clothing or jewelry; they can be caught in the moving parts.
- When working outdoors non-skid footwear is recommended.
- For long hair, wear a hairnet.
- Use protective equipment.
- Wear protective goggles
- When doing work that generates dust, use a breathing mask.
- Connect the vacuum device
- If connection to the vacuum and catcher are available then you know that these are connected and properly used.
- Do not use the cable for purposes that it is not intended for.
- Do not use the cable to the connector to pull it out of the socket. Protect the cable from heat, oil and sharp edges.
- Secure the power tool.
- Use clamps or a vice to hold the power tool. It is safer than holding it with your hand.
- Avoid an abnormal posture.
- It ensures stability and keeps you balanced at all times.
- Keep and maintain tools with care.
- Keep the cutting tools sharp and clean, this ensures that you work better and that it is as safe as possible.
- Follow the lubricating and tool changing instructions.
- Check the connection cable of the power tool regularly and let a qualified expert repair any damages.
- Check the extension cables regularly and replace them if they are damaged.
- Keep the handles clean, dry and free of grease and oil.
- Unplug the power tool from the power outlet.
- When you are not using the power tool, when you conduct maintenance and when you change your tools such as blades, drills and cutters.
- Do not leave the key inside the tool.
- Before switching it on, make sure that keys and setup tools have been cleared
- Avoid unintentionally switching the power tool on.
- Verify that while connecting the plug into the socket that the power is off.
- Use the extension cables while outdoors.
- When using the power tool outdoors make sure to use the appropriate and approved labeled extension cable.
Additional safety instructions
- When using the saw blades with hard metal teeth (Carbon tipped) it is advisable to use blades with a negative or slightly positive cutting angle. Do not use any saw blades with deeply cut teeth. They can grip the protective cap.
- Attention: First carefully assemble all the parts before starting work. Follow the procedure as indicated.
- If you are not familiar with using such a machine, you would be better to be informed first by a professional, an instructor or by a technician.
- Always clamp or press the workpiece firmly against the saw guide, before you carry out the process. The use of all possible clamping setups is preferable to using your hands.
- Important: If you are holding the workpiece by hand for the process to be carried out, keep a minimum distance of 100 mm from the saw blade.
- Always press the workpiece against the bench.
- Keep the saw blade sharp and check regularly whether it rotates freely without abnormal vibrations. Replace the saw blade if necessary.
- Allow the machine to rotate freely until it reaches the maximum number of revolutions, before you start the process.
- Maintain the air inlets at the back and the bottom of the bench saw machine and electric motor for a longer machine life. Dust piles must be removed.
- Always lock the different degree set-ups before you start processing.
- Only buy suitable saw blades with a number of revolutions of at least 6000 revolutions per minute.
- Only use the correct saw blade. Too small or too big saw blades are extremely dangerous.
- Regularly inspect the saw blade for any faults. Replace the saw blade if necessary.
- Grease the new saw blade and clean the flanges before you assemble the new blade. Then assemble the blade in the correct direction and pull the flanges firmly using the central bolt.
- Only use original flanges. All other types are not suitable.
- Never work without the protective cap of the saw blade.
- The moving part of the protective cap must also remain assembled.
- Never grease the saw blade while it is rotating.
- Always keep your hands removed from the track of the saw blades.
- Never pick up the workpiece by grasping with your hands along or behind the saw blade.
- Ensure that the workpiece never touches the saw blade before the machine has been switched on.
- Never process metal or stone sorts with this machine.
- Use support aids in order to support long workpieces.
- Never use the machine in a dangerous environment, where inflammable gases or fluids are present.
- Never leave the machine unattended without first disconnecting it from the mains voltage.
- If you hear abnormal noises, try to trace them or take the machine to a recognized fitter, or repair company.
- If a part is broken or damaged, replace it or repair it immediately.
- Never stand in the track of the saw blade but stand to the left or the right of the saw bench.
- Your hands must likewise be placed next to the track of the saw blade.
- Always use the push stick instead of your hands to push the wood through the saw.
- Always place the wood at the front of the saw bench and then push it further back.
- For mitring only the adjustable guide must be used and the fence must be removed. (Fig. J)
- Never use the fence as a linear measure for cutting off beams.
- If the saw blade is locked: first switch off the machine before you attend to the fault.
- Avoid workpieces hitting back in your direction by taking the following measures:
- Always use sharp saw blades.
- Do not saw too small workpieces.
- Never release the workpiece before it has been completely pushed through the saw.
- Always adjust the guide parallel to the saw blade.
- Never remove the saw protection.
- Before you continue sawing, ensure that you are standing firmly and that your hands are in the required position.
- Never use thinners to clean the machine. Only use a damp cloth for cleaning.
- Do not use saw blades which are damaged or deformed.
- Replace table insert when worn.
- Only use saw blades specified by the manufacturer that are intended for working with wood or similar materials according to EN847-1.
- Take care that the selection of the saw blade depends on the material to be cut.
- Connect tabelsaws to a dust-collecting device when sawing.
- Use and correct adjustment of the riving knife
- Use and correct adjustment of the upper saw blade quard.
- Take care when slotting.
Make sure, when changing the saw blade, the blade width is not smaller and the main blade thickness of the saw blade is not greater than the thickness of the riving knife.
Wear personal protective equipment, these could include:
- Hearing protection to reduce the risk of hearing loss
- Eye protection
- Inhale respiratory protection to reduce the risk of harmful dust
- Gloves when handling the blades and rough materials (recommendation, saw blades, are whenever practicable, carried in a container)
![]()
![]()
![]()
![]()
![]()
![]()
![]()
![]()
![]()
![]()
![]()
![]()
![]()
- Insert the push stick in its holder when not in use.
- Use a push stick or a push block to guide the workpiece.
![]()
![]()
![]()
![]()
![]()
![]()
![]()
![]()
![]()
![]()
![]()
![]()
![]()
- Only use saw blades, whose maximum speed is at least the speed indicated on the saw and is suitable for the material to be cut.
- During the transport, the upper part of the saw blade has to be covered, by the guard.
Switch off the machine immediately when you discover:
- A defective mains plug or mains lead.
- A defective switch.
- Overheating of the machine.
- Smoke or odeur caused by scorched insulation.
Electrical safety
When using electric machines always observe the safety regulations applicable in your country to reduce the risk of fire, electric shock and personal injury. Read the following safety instructions and also the enclosed safety instructions.
![]()
![]()
![]()
Replacing cables or plugs
Immediately throw away old cables or plugs when they have been replaced by new ones. It is dangerous to insert the plug of a loose cable in the wall outlet.
Using extension cables
- As a supply for this machine always use an unloaded line and/or an extension cable with conductors of at least 1,5 mm2 and protected with a 16 A fuse. Be sure that this extension cable is not longer than 20 metres.
- This machine can be switched to the single-phase network (230-240 V/50 Hz). If you are in doubt about the earth of the electricity provisions, consult an electrician first.
Power supply
- The motor is fitted with an overload switch (8). If the table saw overloads, the overload switch switches the equipment off automatically to protect the table saw from overheating. If the overload switch triggers, switch off the table saw using the ON/OFF switch (7) and wait until the table saw cools down. Then press the overload switch (8) and restart the table saw.
ASSEMBLY INSTRUCTIONS
Assembly of the table extensions
Fig. F
- Assemble table extensions (2pcs) like shown on Fig.F1
- Tighten the screws (4pcs) like shown on Fig.F2
- Use knobs (4pcs) to tighten the table extensions Fig.F3
Assembly of the dust extraction
Fig. I
- Assemble dust extraction like shown on Fig.I
- Attach vacuum cleaner to A (Fig.I)
Installation of the machine on a workbench or on the subframe
This machine is a stationary machine and for safety reasons must always be firmly installed and not used for mobile applications.
You can install the machine in two ways:
a. As a stationary machine on a workbench. In this case the machine must be secured to the workbench with 4 bolts.
b. As a stationary machine on the subframe. In this case the machine must be secured to the subframe with 4 bolts and the subframe anchored to the floor or to a floor plate with dimensions of at least 1 square metre
Assembly of the bench saw on the workbench
Fig. B & C
![]()
![]()
![]()
![]()
![]()
Fig. B shows the distance of the holes to be drilled in the workbench on which to fasten the machine. Drill holes of 8 mm.
![]()
![]()
![]()
![]()
![]()
![]()
![]()
![]()
![]()
![]()
![]()
![]()
![]()
- Fig. C shows the part to be sawn out (310 x 310 mm), so that the sawdust can fall through it and piling up is prevented! Only if you do not use an extraction system!
- Fasten the machine with bolts.
- If the frame is used it must be fixed to the floor with at least 2 screws on the front legs (Fig.H)
Assemble undercarriage
Fig. G
- 1: Create the square by using beams from D using bolts and nuts supplied (type 1) , make sure beams D1 (2pcs) are placed over D2 (Fig. G1, and Fig.G2) do not tighten the bolts yet
- 2: Mount beams B on the machine using bolts type 2, make sure they are mounted on the sides of the table extensions (Fig.G3)
- 3: Mount legs A on the machine like on Fig.G4 and use 2 bolts (type 1) per leg to tighten
- 4: Mount the square in between the legs, make sure the D2 beams are on the side of the table extensions
- 5: Make sure the square is fixed well, and tighten the nuts and bolts well (Fig.G5)
- 6: Place rubber feet (Fig.G6)
- 7: Tighten the nuts and bolts from step 1
- 8: Mount 2 sliding feet (Fig.G7)
Assembly and attachment of the parallel guide
Fig. D
- Attach the aluminium guide (A) to the positioning block (B).
- Now you can attach the complete parallel guide to the bench top.
- Slide the parallel guide via one end of the positioning rail (C) over the bench top.
- Adjust the position of the aluminium guide profile (A) such that the end corresponds to the rear edge of the saw.
Assembly of the riving knife and the protective cap
Fig. E
- Turn sawblade completely upwards (Fig.A, number 5)
- Assemble the guard (Fig.E1 & Fig.E2)
- Above the saw table the radial distance between the riving knife and the toothed rim of the saw blade shall not at any point exceed 5 mm at the depth of cut set.
- The tip of the riving knife shall not be lower than 5 mm from the tooth peak, as shown in Fig.E3.
Assembly of the saw blade
Fig. K
![]()
![]()
![]()
![]()
![]()
![]()
![]()
![]()
![]()
![]()
![]()
![]()
![]()
![]()
![]()
![]()
![]()
![]()
- Remove the inlay from the bench. Use a screwdriver for this purpose.
- Turn the saw axle completely upwards (Fig.A, 5). Remove the nut and the outside flange from the saw axle (Fig. K, direction A).
- Now slide the saw blade over the saw axle and now put the outside flange and the nut back. Tighten the nut by hand.
- Now use the 2 keys: one for the flange and one for the nut and now clamp it (Fig. K, direction B).
- Now put the inlay back in the bench and fasten it.
Use of the mitring set-up
Fig. A
By turning the handle (4) at the front of the machine you can adjust the saw blade to a maximum of 45°.
OPERATION
Switching On/Off
Fig. A (7)
- Press the switch into position `1′ to put your machine into operation.
- To switch off the machine the same switch needs to be pressed to position `0′.
- Always keep the mains cable away from moving parts.
Using the height handle
Fig. A
- Turn height handle (5) clockwise to raise the sawblade
- Turn height handle counterclockwise to lower the sawblade
- Turn the saw blade approximately 2 mm higher than the total thickness of the wood to be sawn.
Using mitre handle
Fig. A
- Release mitre handle (4) by turning the outer part counter clockwise
- Use mitre handle to set the right mitre angle for your cut by turning the inner part
- mitre handle by turning the outer part clockwise.
Working instructions
There are two types of sawing methods:
- Lengthwise sawingSawing the workpiece in the length of the wood grain.
- Cross-cutting or cutting offSawing off the workpiece crosswise.
If it concerns a panel, we do not usually distinguish between the wood grain, but we name the method where we saw off a part of the width of the panel (lengthwise sawing) and when we cut off the length (cross-cutting or cutting-off).
![]()
![]()
![]()
![]()
![]()
![]()
![]()
![]()
![]()
![]()
![]()
![]()
![]()
Attention! Before you start sawing, first check the following:
- Is the saw blade secured?
- Are all the locking handles secured?
- Is the fence parallel to the saw blade?
- Is the protective cap working properly?
- Are you wearing safety goggles?
- Is the saw blade not rubbing against anything?
![]()
![]()
![]()
![]()
![]()
![]()
![]()
![]()
![]()
![]()
![]()
![]()
![]()
Lengthwise sawing
- Secure the fence to the correct measuring position and remove the cut-off guide from the bench carriage. (Fig. J)
- Turn the saw blade approximately 2 mm higher than the total thickness of the wood to be sawn.
- Press the wood lightly towards the bench and let it glide against the cut-off fence.
![]()
![]()
![]()
![]()
![]()
![]()
![]()
![]()
![]()
![]()
![]()
![]()
![]()
- Switch on the motor and wait until the saw blade has reached the maximum number of revolutions before you start sawing.
- While you press the wood against the bench and the fence, you can carefully push the wood through the saw blade without forcing it.
- Never pull the workpiece backwards. If necessary, switch off the motor first without altering the position of the workpiece.
Lengthwise sawing with a (vertical) mitre
This method is practically the same, except that the saw blade is placed at the angle required.
![]()
![]()
![]()
![]()
![]()
![]()
![]()
![]()
![]()
![]()
![]()
![]()
![]()
Lengthwise sawing of narrow workpieces
![]()
![]()
![]()
![]()
![]()
![]()
![]()
![]()
![]()
![]()
![]()
![]()
![]()
Take all the necessary safety measures and continually push the workpiece through (until behind the saw blade) using a push stick instead of by hand.
Crosswise sawing
- Remove the fence and apply the cross-cut fence in the righthand carriage.
- Adjust the height of the saw blade (see lengthwise sawing).
- Press the workpiece against the cross-cut fence and keep at least 2,5 cm distance from the front of the saw blade.
- Switch on the motor and wait until the maximum number of revolutions has been reached.
- Press the workpiece against the fence and the bench. Carefully push the wood through the saw blade. Continue until behind the saw blade. Then switch off the motor and keep this position until the saw blade has stopped completely before you remove the wood.
- Never pull the wood back. If necessary, switch the motor off and keep the position until the saw blade has stopped completely.
Crosswise sawing with a vertical mitre
This method is practically the same, except that the saw blade is placed in the angle required.
![]()
![]()
![]()
![]()
![]()
![]()
![]()
![]()
![]()
![]()
![]()
![]()
![]()
Crosswise sawing with a horizontal mitre
With this method the cross-cut fence must be secured at the angle required. Keep the workpiece pressed firmly against the cross-cut fence and the bench before you start cutting off.
MAINTENANCE
![]()
![]()
![]()
![]()
![]()
These machines have been designed to operate over a long period of time with a minimum of maintenance. Continuous satisfactory operation depends upon proper machine care and regular cleaning.
Transporting the bench saw
Before transporting the bench saw, the following steps must be carried out:
- Pull the mains plug
- Turn the hand-wheel 5 (Fig. A) in anticlockwise direction, lower the blade as much as possible
- Remove all accessories that cannot be mounted firmly to the power tool
If possible, place unused saw blades in an enclosed container for transport
- Slide the saw-table extension 9 completely inward and turn the knob (Fig F-3) to lock it
- Wind the mains cable and bind it
- For lifting or transport, carry the main table 2 (Fig.A)
![]()
![]()
![]()
![]()
![]()
![]()
![]()
![]()
![]()
![]()
![]()
![]()
![]()
Malfunctions
In the case that the machine is not functioning properly, we give a number of possible causes and appropriate solutions below.
- Working instructions
- The plug is not in the mains.
- The cable has been interrupted.
- The workpieces is jamming against the riving knife during processing
- The saw blade must be aligned (Fig. E).
- The saw cut is not smooth (frayed)
- The saw blade must be sharpened.
- The saw blade has been assembled back-tofront.
- The saw blade has become coated with resin or sawdust.
- The saw blade is not suitable for this process.
- The workpiece is touching the back of the saw blade and is jumping out
- The riving knife must be aligned (Fig. E).
- The fence is not being used.
- The saw blade is thicker than the riving knife or the riving knife is not being used
- The saw blade must be sharpened.
- The workpiece has not been kept in its place until after sawing.
- The tension button of the cross-cut fence is loose.
- The height and/or mitre handle is blocked
- Sawdust and dust must be removed.
- The motor has difficulty reaching the maximum number of revolutions
- The extension cable is too thin and/or too long.
- The mains voltage is lower than 230-240 V.
- The machine is vibrating
- The machine has not been fastened onto the workbench.
- The frame is not level with the floor.
- The saw blade has been damaged.
Cleaning
Keep the ventilation slots of the machine clean to prevent overheating of the motor. Regularly clean the machine housing with a soft cloth, preferably after each use. Keep the ventilation slots free from dust and dirt. If the dirt does not come off use a soft cloth moistened with soapy water. Never use solvents such as petrol, alcohol, ammonia water, etc. These solvents may damage the plastic parts.
Lubrication
The machine requires no additional lubrication.
Faults
Should a fault occur, e.g. after wear of a part, please contact your local Ferm dealer. In the back of this manual you find an exploded view showing the parts that can be ordered.
ENVIRONMENT
To prevent damage during transport, the appliance is delivered in a solid packaging which consists largely of reusable material. Therefore please make use of options for recycling the packaging.


Only for EC countries
Do not dispose of power tools into domestic waste. According to the European Guideline 2012/19/EU for Waste Electrical and Electronic Equipment and its implementation into national right, power tools that are no longer usable must be collected separately and disposed of in an environmentally friendly way.
WARRANTY
Read the warranty conditions on the separately supplied warranty card.
The product and the user manual are subject to change. Specifications can be changed without further notice.
Spare parts list
TSM1033
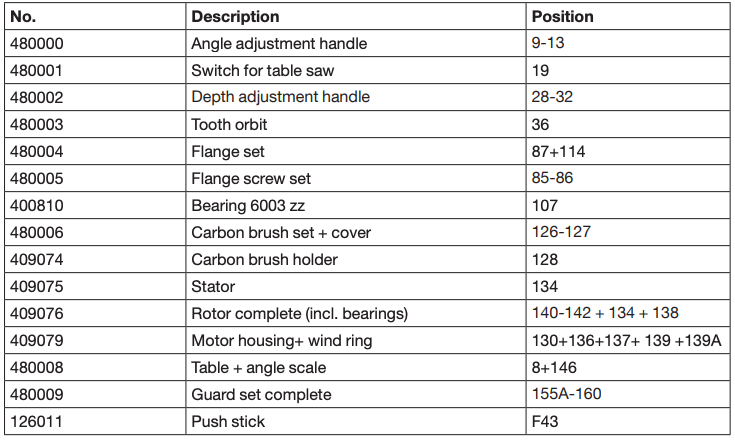

Exploded view
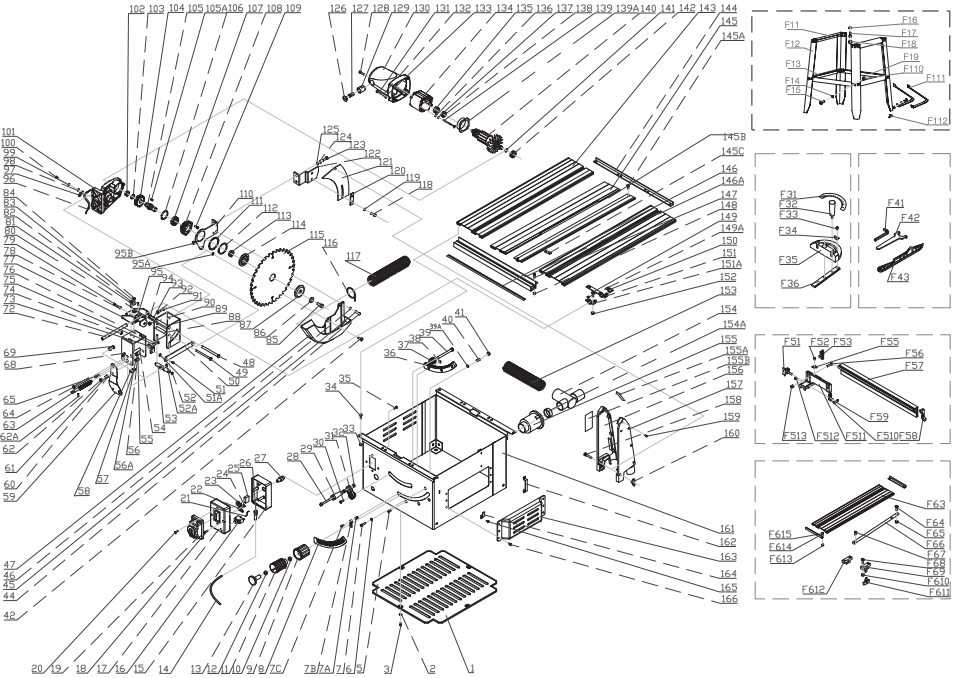


TSM1033 – TABLE SAW
We declare under our sole responsibility that this product is in conformity with directive 2011/65/EU of the European parliament and of the council of 9 June on the restriction of the use of certain hazardous substances in electrical and electronic equipment is in conformity and accordance with the following standards and regulations:
EN61029-1, EN61029-2-1, EN55014-1, EN55014-2, EN61000-3-2, EN61000-3-11, IEC 62321
2006/42/EC, 2014/30/EC, 2011/65/EU, 2012/19/EU
FERM B.V. – Lingenstraat 6 – 8028 PM – Zwolle – The Netherlands
References
[xyz-ips snippet=”download-snippet”]

