FiiO Earphones Instructions
About FiiO
FiiO is a high-tech enterprise focusing on researching and developing portable music products, with current mainstay products being Hi-Res music player, portable headphone DAC /AMP and headphones/earphones.
FiiO is specialized in self research and development, and sells FiiO-branded products through sales agents worldwide. By virtue of high quality products and great customer service, FiiO enjoys high reputations in the industry and has received countless well-known awards.
FiiO is committed to its brand proposition “Born for Music” and ceaselessly pursues perfection in product design and manufacturing, to supply users with the best audio products at the best prices.
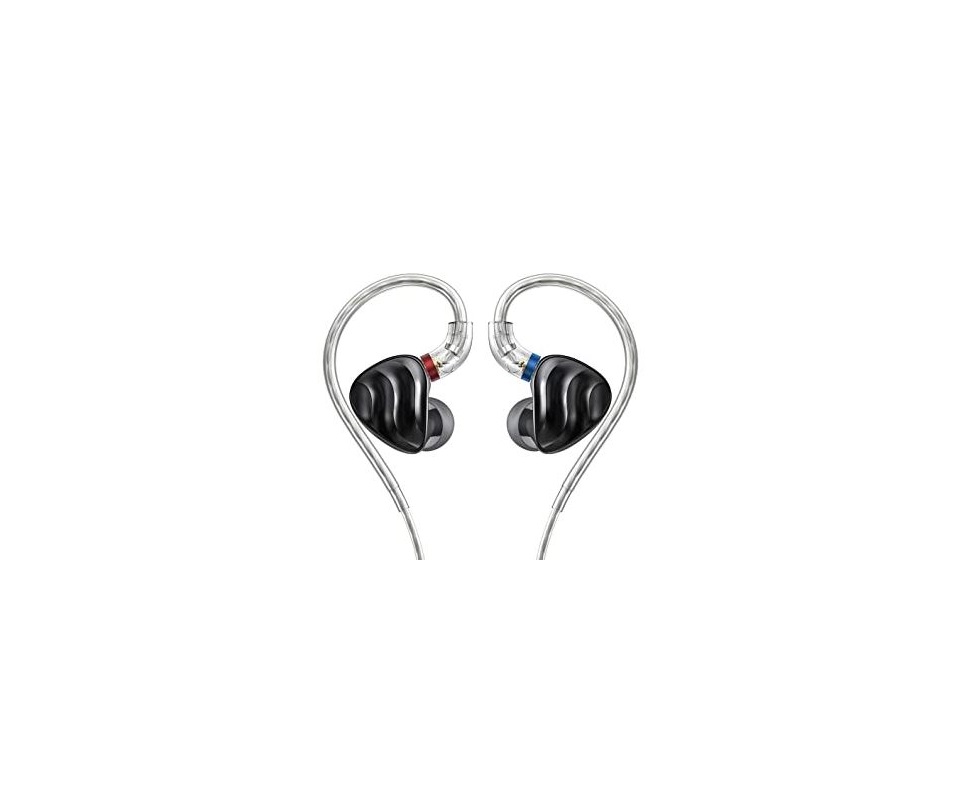
Wearing Instructions
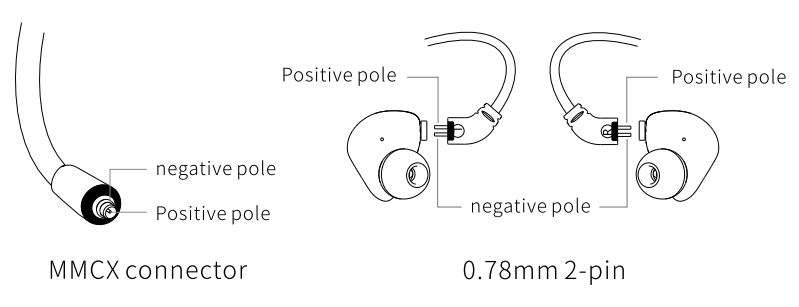
Correctly identify the left and right side through the Land R signs on the earphone unit and cable. In the case of no character signs, the “blue” mark is the left side and the “red” mark is the right side.

When replacing other cables, please choose cables with the same type of connector as this product, so as not to affect the sound quality and experience.
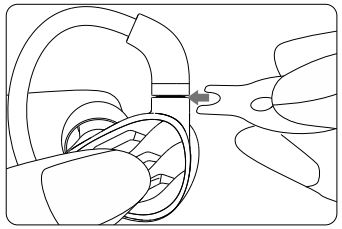
This product adopts over-the-ear wearing design. When installing the earphone cable, please make the earphone unit and cable form a shape that can wrap around the ear, as shown in the figure below.
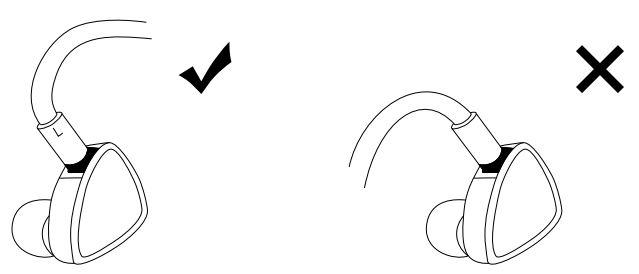
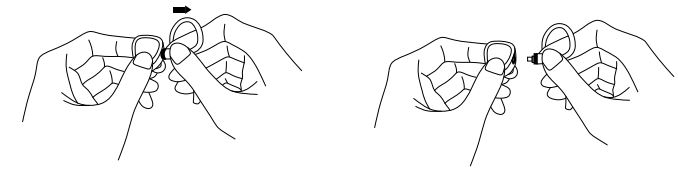
When wearing, gently rotate and press the earphones according to the direction shown in the picture. After properly wearing, put the earphone cable over your ear and adjust the earphones until you feel comfortable.

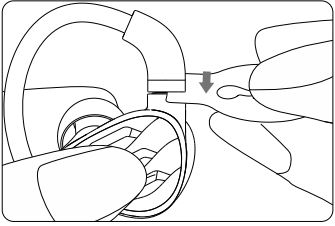
When removing the earphone cable, hold the cable connector and the earphone unit tight with your fingers. Keep them in the same line and then pull them apart. Note that do not rotate the 0.78mm 2-pin cable.
Do not install or remove the cable at a tilted angle. Do not pull the earphone cable directly, to avoid it being broken.
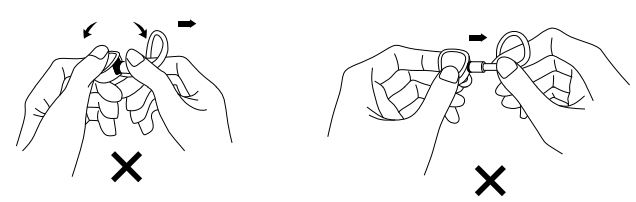
Note: If it is difficult to remove the earphone cable, do not remove it violently. If necessary, please contact the official after-sales staff for assistance.
Notes and Precautions
- For your safety, please avoid using earphones in dangerous environments.
- Please adjust the volume to a suitable level to protect your hearing.
- Please do not place the device in humid or strong-magnetic environments for a long time.
- 1f the earphones are to be left unused for a long time, please unplug it from the playing device.
- Please do not disassemble the earphones on your own.
Warranty
- FiiO provides a month of direct replacement guarantee and a year of free maintenance for products against defectives in material and workmanship under proper operation. (Only available within Chinese Mainland. Other areas will be in accordance with the local laws and regulations; Besides, you may be asked to provide proof of purchase for after-sales services, so please keep the purchase invoice/receipt in a safe place.) Note: The warranty service is applied to authentic products brought from FiiO authorized sales agents with valid security code. If it is unauthentic, purchasers are bound to take all the responsibilities themselves.
- The warranty is null and void under the following circumstances.–Defects or damage caused by improper operations such as vibrating, bumping, falling to the ground, buckling, tearing, excessive pulling.–Defects or damage caused by disassembly of the product by user or unauthorized repair personnel.–Defects or damage for being put in humid environments, high-intensity magnetic fields or soaked into water.–Defects or damage caused by natural disasters.–Unable to provide valid proofs of purchase, such as purchase invoice/ receipt from FiiO authorized dealers.Note: Man-made damage is determined by the judge of FiiO’s maintenance personnel.
- Free replacement or repair is only applied to earbuds, excluding any accessories or gifts.Note: The above guarantees start from the issue date of the sales invoice/ receipt. FiiO reserves the final interpretation and amendment for the above warranty terms and conditions.
Authenticity Checking
- Scratch off the coating to get a 20-bit security code.
- Please open this link: http://check.fiio.com/, and then enter your 20-bit security code.
- Checking result:
- The product you are checking is genuine. The product is manufactured by FiiO. Thanks for choosing us.
- The number you are checking does not exist. The product is not manufactured by FiiO.
- The number has been checked. If this is the first time you entered the security code after scratching the coating personally, it means the product is not an authentic one.
- The security code you input is less than 20 bits, please try again.
Procedures of After-Sales Service
- Please contact the local dealer first once you find problems with the device. If they refuse to give related after-sales services, please give feedback to FiiO Support by sending an email to [email protected] or [email protected]. We would handle it properly to ensure customers’ satisfaction.
- For repair service, you are supposed to send the defective product to FiiO with freight paid. After it has been repaired, we will send the product back to you with freight paid by FiiO.
- it is highly suggested to buy from local authorized sales agents to get better, faster before- and after-sales services.
- Please do not maintain or dismantle the product on your own and keep it away from water.
- For abnormal working issues or any further questions, please log in to our official website at the Support area to get related information or send an email to [email protected] to consult.
Contact Information for After-Sales Service
Guangzhou FiiO Electronics Technology Co,. Ltd.Address: 2/F, F Building, Hougang Industrial Zone, ShigangVillage, Huangshi West Road, Baiyun District, Guangzhou, China.Postcode: 510430Web: https://www.fiio.comFacebook: https://www.facebook.com/FIIOAUD1O
WEEE Directive & Product Disposal
![]() At the end of its serviceable life, this product should not be handed as household or general waste. It should be handed over to the applicable collection point for the recycling of electrical and electronic equipment, or returned to the supplier for disposal.
At the end of its serviceable life, this product should not be handed as household or general waste. It should be handed over to the applicable collection point for the recycling of electrical and electronic equipment, or returned to the supplier for disposal.
Internal/Supplied BatteriesThis symbol on the battery indicates that the battery is to be collected separately. This battery is designed for separate collection at an appropriate collection point.
This equipment has been tested and found to comply with the limits for a Class Biota I device, pursuant to pa rt 15 of the FCC Rules. These Ii m its a re designed to provide reasonable protection against harmful interference in a residential installation. This equipment generates, uses and can radiate radio frequency energy and, if not installed and used in accordance with the instructions, may cause harmful interference to radio communications. However, there is no guarantee that interference will not occur in a particular installation. If this equipment does cause harmful interference to radio or television reception, which can be determined by turning the equipment off and on, the user is encouraged to try to correct the interference by one or more of the following measures:
-Reorient or relocate the receiving antenna.-Increase the separation between the equipment and receiver.-Connect the equipment into an outlet on a circuit different from that to which the receiver is connected.-Consult the dealer or an experienced radio/TV technician for help.
This device complies with part 15 of the FCC Rules. Operation is subject to the following two conditions: (1) This device may not cause harmful interference, and (2) this device must accept any interference received, including interference that may cause undesired operation.
When attaching the connector:
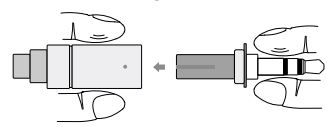
(1) Align the male end to the female end, ensuring the notch of the male end is in parallel with the inside raised dot of the female end. Plug the male end until it is in an appropriate position.
![]()
(2) Follow the arrow direction on the diagram to rotate the female end until it is tight to lock them.
When detaching the connector:
![]()
(1) Follow the arrow direction on the diagram to rotate the female end until the female end can be pushed front and back to unlock them.
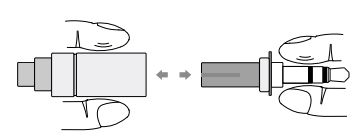
(2) Pull the male end to detach the two connectors. (Objects that can generate greater friction like tissues or a strip of cloth can be used to help to detach.)
How to adjust the tuning switch:
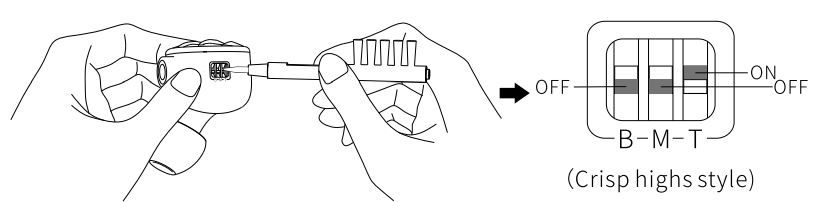
(1) Included in the package is a small tool with a cleaning brush and a tuning stick which can be used to adjust the tuning switch.(2) When adjusting it, please hold the earphone tightly, and align the tip of the tuning stick to the switch position to gently toggle the switch.
Notes:(1) Please do not adjust it with violence. Please do not use inappropriate tools to adjust the switches, so to avoid damage. If you need any assistance, please contact our official customer support.(2) The tuning stick should only be used for the tuning switch of the earphones. Since it is sharp, please seriously follow the instructions when using it, keep it in a safe place away from children and do not use it for other purposes.
How to use the M MCX assist tool:
(1) Align the semi-circular indentation of the MMCX assist tool to the gap between the connector’s male and female components.

(2) Ensure the tool is parallel to the gap and position it towards the gap between the connector’s male and female components until it is in place.
(3) Apply pressure by pressing down towards the other end of the tool.

(4)) The earphone unit will then be detached from the earphone cable.
Notes:
(1) The MMCX assist tool should only be used for the FiiO’s earphones when it is hard to detach it from an MMCX-connector earphone cable. Please do not use the assist tool for other earphone models, so to avoid damage.(2) As the MMCX assist tool is a metal product, it may have the possibility of bruising the earphones. Please be careful when using it.
[xyz-ips snippet=”download-snippet”]