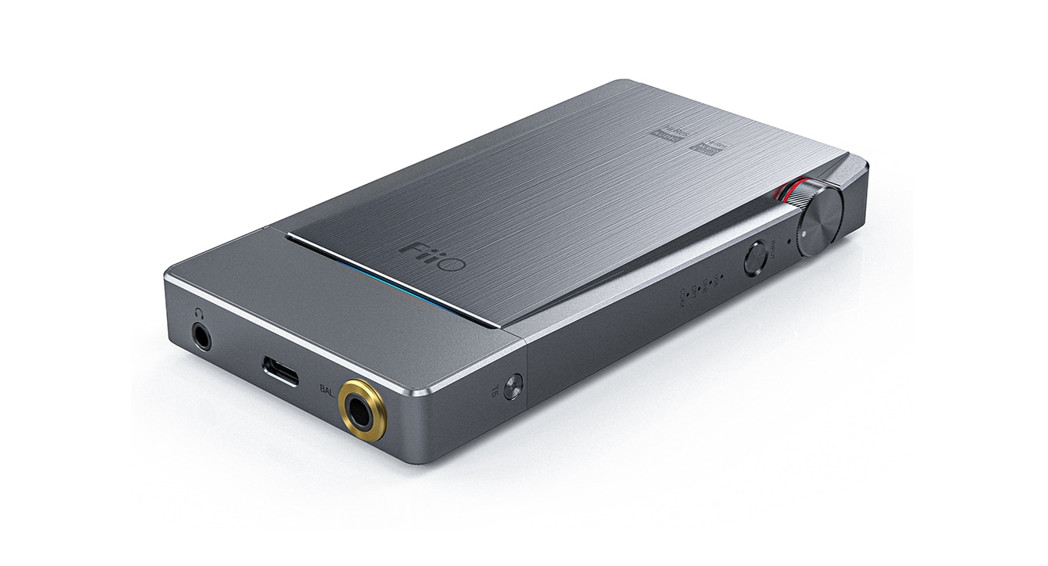
(The Q5s is equipped with the amp module AM3D-Type C; for extra needs of other amp modules, please consult local sales agents)
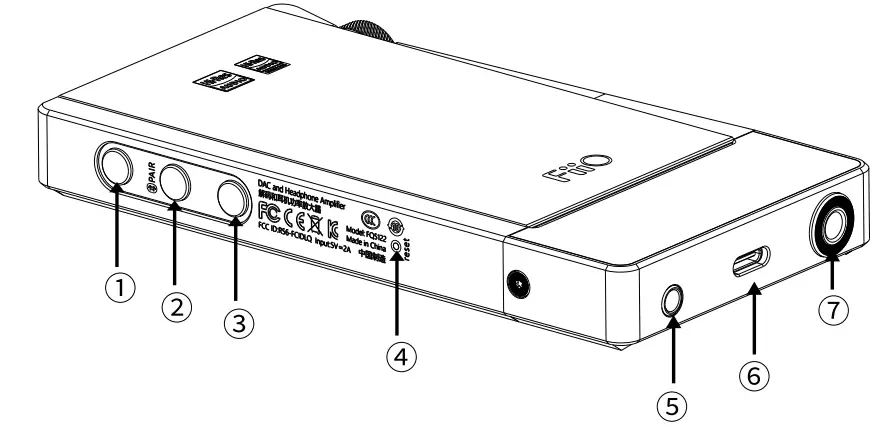
- Previous track (Bluetooth mode)
- Pause/Play (Bluetooth On/Off)
- Next track (Bluetooth mode)
- Reset
- 3.5mm headphone output
- USB Type C port
- 4.4mm balanced headphone output

- Side indicator (Battery/Working status)
- Switch (USB/Line/Optical/Coaxial input)
- Power/Volume knob
- Gain
- Bass
- Line/Optical/Coaxial input
- The line output is the Front indicator
Operation and indicator explained
- Power on/off and volume adjustment Turn the “Power/Volume” knob until a click sound is heard to turn on the device, then the indicator will light up; keep turning clockwise to increase volume; Turn anticlockwise to decrease volume, turn anticlockwise until a click sound is heard to turn off the device.
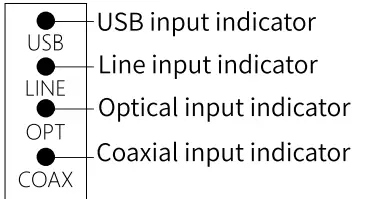
- Input selection and indicator explaineda. Press the “Switch” button briefly to switch among USB/Line/Optical/Coaxial inputs; the corresponding indicator on the side will light up to display the current input mode, as shown on the right. And the Q5s remember the input mode you used last time before turning the device off, and will automatically display it as the current input mode after you turn the device on next time.b. The side indicator can also display the battery and charging status:
 b. The side indicator can also display the battery and charging status:
Hold the “Switch” button for about 3 seconds, the side indicator will light up and show the battery status as follows:

Icon explained: ![]() No light
No light ![]() Blue light ©Red lightLow battery warning: When the battery is less than 10%, the side Coaxial input indicator will flash red twice every 3 seconds to remind you that the device needs to be recharged.When charging, the side indicator will show the charging status as follows:
Blue light ©Red lightLow battery warning: When the battery is less than 10%, the side Coaxial input indicator will flash red twice every 3 seconds to remind you that the device needs to be recharged.When charging, the side indicator will show the charging status as follows:
 Icon explained:
 ![]() No light
No light ![]() Blue light
Blue light![]() Blue light flashes The indicator will not indicate the current input mode when charging, but you can press the “Switch” button briefly to check the input mode; at this time, you can switch the input mode by pressing the “Switch” button within 5 seconds, if not, the indicator will go back to charging status. c. The front indicator is to display the sampling rates of different input mode and Bluetooth status. USB input: Blue (for sampling rates<48kHz ); Yellow (for sampling rates>48kHz); Green (for DSD tracks) Line input: Sampling rates are not available and the Blue light stays steadily on Optical/Coaxial inputs: Blue (for sampling rates’48kHz ); Yellow (for sampling rates>48kHz) Bluetooth status display will be specified in the Bluetooth mode part.
Blue light flashes The indicator will not indicate the current input mode when charging, but you can press the “Switch” button briefly to check the input mode; at this time, you can switch the input mode by pressing the “Switch” button within 5 seconds, if not, the indicator will go back to charging status. c. The front indicator is to display the sampling rates of different input mode and Bluetooth status. USB input: Blue (for sampling rates<48kHz ); Yellow (for sampling rates>48kHz); Green (for DSD tracks) Line input: Sampling rates are not available and the Blue light stays steadily on Optical/Coaxial inputs: Blue (for sampling rates’48kHz ); Yellow (for sampling rates>48kHz) Bluetooth status display will be specified in the Bluetooth mode part.
Bluetooth mode
a. While the unit is powered on, hold the “Bluetooth On/Off” button for about 2s, the device will enter Bluetooth mode and then the Q5s will connect back to the last-connected Bluetooth device automatically; if the connecting fails, the Q5s will enter Bluetooth pairing mode.b. While the unit is powered on, hold the “Bluetooth On/Off” button for about 5s, the device will enter Bluetooth pairing mode.c. Bluetooth status display
| Status | Codec | Front indicator | |
| Re-connecting | X | Blue light flashes | |
| Paring | X | Red and blue light flash alternatively | |
| Connected | Non-Playing | X | Blue light stays steadily on |
| Playing | LDAC | White light pulsates | |
| aptX HD | Yellow light pulsates | ||
| apex-adaptive | Greenlight pulsates | ||
| aptX/apt LL | Purple light pulsates | ||
| MC | Cyan light pulsates | ||
| SBC | Blue light pulsates |
d. When at Bluetooth mode, the Q5s will only remember the input mode prior to Bluetooth mode before turning the device off and will display it as the current input mode after you turn the device on next time; if you want to enter Bluetooth mode, hold the “Bluetooth On/Off” button for about 2s.e. When Bluetooth is enabled, other input will become invalid; hold the “Bluetooth On/Off” button for about 2s to exit Bluetooth
USB DAC
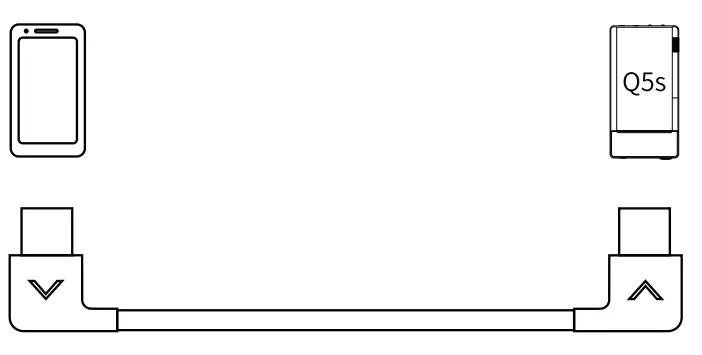
a. When using the device with a Windows computer at USB1.1 mode, it doesn’t need any drivers.Operation guide: Turn on the device by rotating the “Power/Volume” knob, switch to the USB input, and then hold the “Previous track” button on the left side still and plug in the USB cable to connect to the computer. After connected, please choose the corresponding output device.b. When using the device with a Windows computer for the first time at USB2.0 mode, please go to our website to download the driver and follow the corresponding instructions to install the driver. Download link: http://www.fiio.com/supportsc. When using with a MAC OS computer, it doesn’t need any drivers. After connected, please choose the corresponding output device.d. Using the included Lightning-TypeC cable to connect the Q5s with your iPhone/iPad/iPod and play the music on your iOS device, then you could better enjoy your Hi-Res music.It’s recommended to set the system output volume on the computer to the max level and then adjust the output volume of the Q5s to a suitable level with its volume knob.e. How to use the Type C to Type C USB cableWhen using the included Type C to Type C USB cable to connect the Q5s to a mobile device, please follow the direction of the arrow on the cable end. The end with a downward arrow should be used for the mobile device while the upward arrow for the Q5s.Here is the diagram.
Firmware update
The Q5s supports firmware updates, please go to www.fiio.com/supports to check for the instructions.
Precautions
- Please set the volume with moderation to protect your hearing and your audio equipment.
- Please take off the headphone from your ears before plugging or unplugging the headphone to avoid any possible impulsive sound damaging your hearing.
- Do not disassemble, expose the unit to water or carry out an unauthorized repair on the unit.
- If the unit is to be left unused for a long time, it should be recharged periodically to preserve its battery life.
- Your hearing and environmental awareness are affected when using headphones. For your own safety, please do not use headphones in dangerous environments.
- If the system shows an error, please try to press the “Reset” button with a calm insulating pin for 5s to restore to normal operation.
List of items included in the package
(please check to make sure that all items are included)
- USB A to Type C USB cable
- Silicone bands (long)
- Lightning to Type C USB cable
- Silicone bands (short)
- 3.5mm coaxial adapter cable
- Silicone pad
- 3.5mm optical adapter
- Cloth carrying pouch
- 3.5mm-3.5mm audio cable
- Screwdriver
- Type C to Type C USB cable
- T5 screw
- Buttons and ports instruction card
- Warranty card
- Quick user guide
Learn more
To learn more about FiiO products, please go to www.fiio.com. To learn more about operating your FiiO product, please go to www.fiio.com/supports.
WEEE Directive & Product Disposal
 At the end of its serviceable life, this product should not be handed as household or general waste. It should be handed over to the applicable collection point for the supplier for disposal.Internal/Supplied BatteriesThis symbol on the battery indicates that the battery is to be collected separately. This battery is designed for separate collection at an appropriate collection point. Qualcomm aptX is a product of Qualcomm Technologies, Inc. and/or its subsidiaries. Qualcomm is a trademark of Qualcomm Incorporated, registered in the United States and other countries. aptX is a trademark of Qualcomm Technologies International, Ltd., registered in the United States and other countries. LDAC and LDAC logo are trademarks of Sony Corporation.
 report this ad
 Qualcomm’ aptX-HD
[xyz-ips snippet=”download-snippet”]