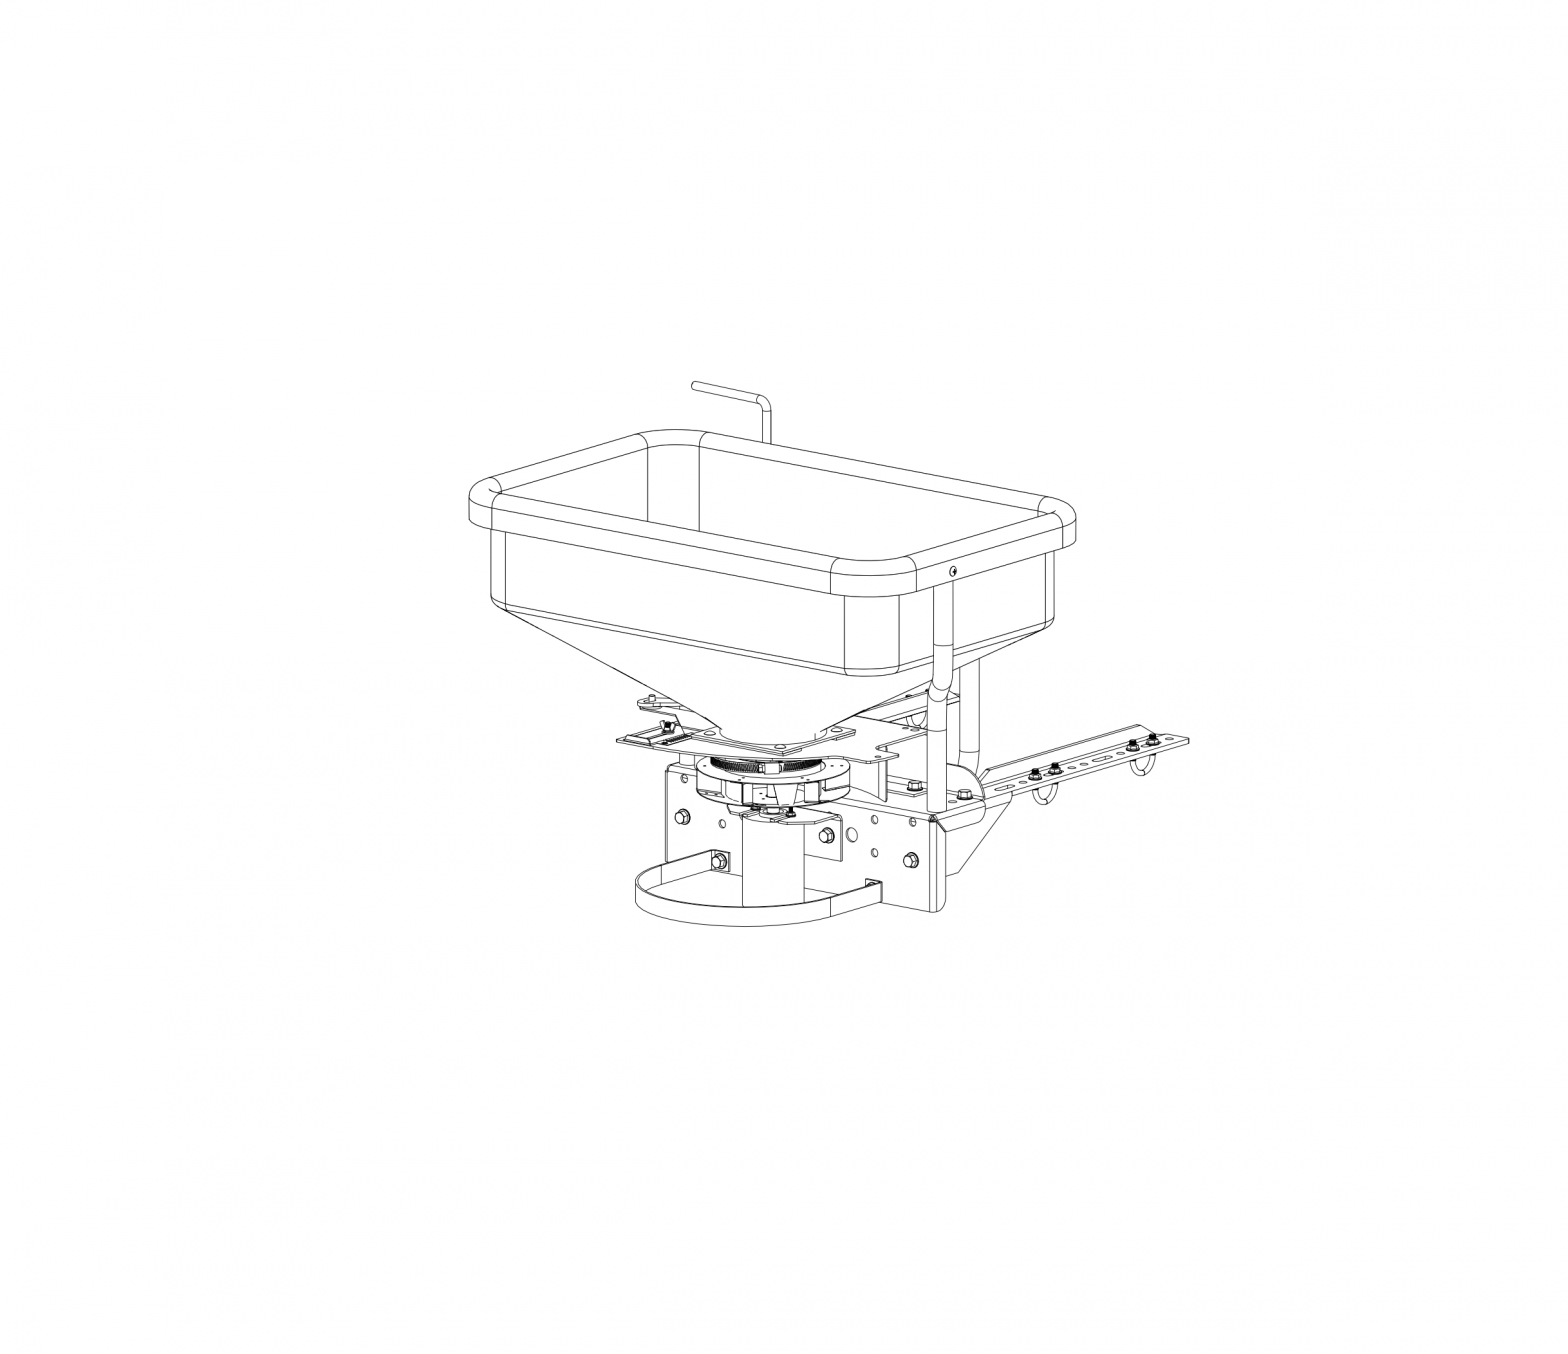
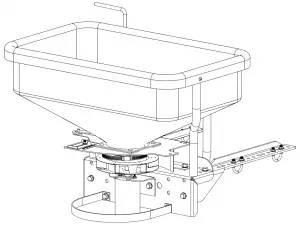
FIMCO ATV-DMS-12V ATV Dry Material Spreader
Operating Safely
Read this owner’s manual before you assemble or operate the Dry Material Spreader.Use eye, hand and breathing protection appropriate to the materials that you are spreading. Read the manufacturers or suppliers labels for proper protective equipment.Read and follow the manufacturer’s instructions and notes for spreading and handling materials used for spreading.Do not allow anyone to ride on or sit with you while operating the spreader.Do not modify Dry Material Spreader or safety devices and guards.
Assembly Instructions
- Make sure the contents of the spreader’s carton match the items shown on page 2 of the manual.
- Follow assembly instructions page 2 to complete the Dry Material Spreader
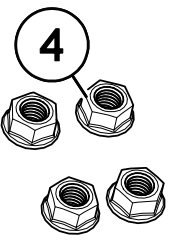
Technical Specifications
- Hopper Capacity: 2.2 Cu. Ft.
- Spread Width: 5’ to 45’.
- 12 Volt Motor w/Variable Speed Control (VSC)
- Stainless Steel 6-Blade Radial Fan
- Holds Up To 145 lbs. Potash or 99 lbs. Urea
Approved for:♦ Fertilizer ♦ Seed ♦ Bait♦ Pellets ♦ Ice Melting Pellets♦ Granular Insecticides, Fungicides & Herbicides
Not Recommended for Rock Salt or Sand
|
BEFORE RETURNING THIS PRODUCTFOR ANY REASON, PLEASE CALL1-800-831-0027 |
|
IF YOU SHOULD HAVE A QUESTION OR EXPERIENCE A PROBLEM WITH YOUR FIMCO INDUSTRIES PRODUCT:1-800-831-0027 BEFORE YOU CALL, PLEASE HAVE THE FOLLOWING INFORMATION AVAILABLE:SALES RECEIPT & MODEL NUMBER. IN MOST CASES, A FIMCO INDUSTRIES EMPLOYEE CAN RESOLVE THE PROBLEM OVER THE PHONE. |
General Information
Thank you for purchasing this product. The purpose of this manual is to assist you in operating and maintaining your dry material spreader.
 |
WARNING: To reduce the risk of injury, the user must read and understand the operator’s manual before using this product. |
|
WARNING: Cancer and Reproductive Harm www.P65Warnings.ca.gov |
Retain a copy of your receipt for your unit, as it will be required to validate any warranty service Products are warranted against manufacturer or workmanship defects for one year from date of purchase for home owner usage and 90 days for commercial usage.For technical assistance, visit our website @www.fimcoindustries.com or call: TOLL FREE @ 1-800-831-0027Our Technical Support Representatives will be happy to help you.To obtain prompt, efficient service, always remember to give thefollowing information…
● Correct Part Description and/or part number● Model #/Serial # of your spreader
Part descriptions and numbers can be obtained from the illustrated parts list section(s) of this manual.
Contents of your spreader’s carton
(ATV-DMS-12V – 5301845):
Parts Bag #5275992
 |
||||||||||||||||||||||||
 |
 |
|||||||||||||||||||||||
 |
 |
|||||||||||||||||||||||
|
|
|
|
|
|
|
 Pre-Assembled Unit
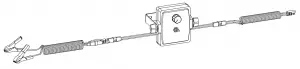 VSC-10 (5275918) Variable Speed Control
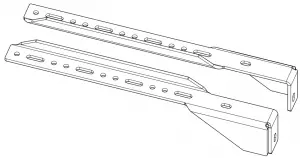
Assembly Instructions
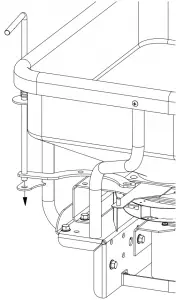
- Insert gate On/Off handle into lower handle bracket on spreader frame and apply pressure upward to compress the spring.
Place the friction washer (garden hose washer) over the pin on the slide gate and make sure that the pin is in the slot on the handle bracket. Operate the gate On/Off handle to check that the slide gate moves and stays in the full open and closed positions.
If the slide gate moves freely or seems to stick, slightly bend slide gate arm up to tighten or down to loosen the action.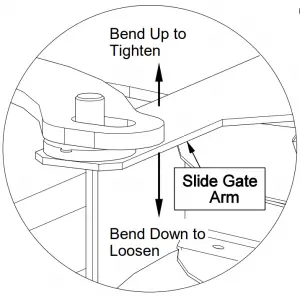
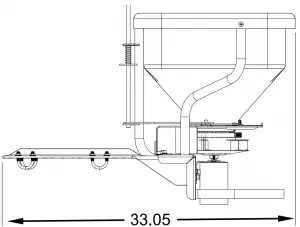
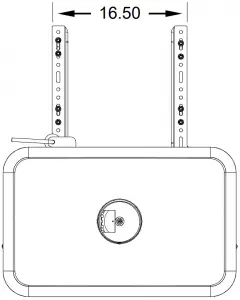
Installation
- Determine which mounting holes on the mounting bracket weldment need to be used that will fit best on the vehicle rack. Use the widest mount holes possible on the spreader’s frame.
- Attach the spreader’s mounting brackets to the vehicle’s rear rack using the hardware provided.
- Use 12V motor controller (battery cable) clip to connect directly to the battery. Connect to the red clip (wire) to the positive (+) terminal first, then connect the black clip (wire) to the negative (-) terminal.
Route 12V motor controller battery cable and 12V motor controller (motor cable) securely and carefully to prevent damage from moving parts and exhaust heat.
Turn the Motor Controller switch to the OFF position before connecting to motor cable.
Set the Motor Controller to the number “5” and switch the fan motor on. The fan should run at ½ speed. Rotate to number “10” for full fan speed and then rotate to number “1” for slowest fan speed.
This should be done without material in the hopper and the slide gate closed.
When disconnecting, make sure Motor Controller switch is OFF, disconnect the motor cable from the motor. Then disconnect the negative (black) connection and finally the positive (red) connection
Operation
Replace or repair loose or missing components.Operate controls and switches to make sure they respond correctly.Conditions of weather and terrain must be considered when setting spreader. Do not spread on windy days, with light weight materials, such as grass seed. Protective clothing must be worn in some cases.
- Determine vehicle speed:If vehicle does not have a speedometer, determining speed can be accomplished by marking off 100, 200 or 300 feet.The speed chart indicates the number of seconds it takes to travel the distances.Using a watch or stop watch for time, travel into and out of the marked distance for a more accurate application speed.See the recommended speeds/settings later in this manual.SPEED (MPH) = Distance (Ft.) x 60/Time (seconds) x 88
Speed Chart
Time Required in seconds to travel a distance of
Speed in M.P.H. (Miles Per Hour)
100 Ft. 200 Ft. 300 Ft.
1.0
68 sec. 2.0 34 68 102
3.0
23 45 68 4.0 17 34 51
5.0
14 27 41 6.0 11 23 34
7.0
9.7 19 29 8.0 8.5 17 26
9.0
7.6 15 23 10.0 6.8 14 20
- Set Electronic Speed Control:Adjust speed control to set the spread width. The highest fan speed will spread the widest pattern.After adjusting the speed control to the desired width for the material you are using. Leave the dial on this setting and use the power switch to turn the fan on and off.
- Set Opening Gauge Control:Refer to the settings chart for the proper settings.Loosen wing nut and move gate slide gauge to the desired setting. Tighten wing nut.
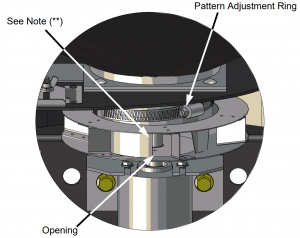
- Adjust Pattern Adjust Ring Position to Center Spread Pattern:If the spread pattern is off-center, adjust by rotating the pattern adjusting ring. This adjustment is only require if the material density has dramatically changed.Pattern adjust ring has been set at the factory for UREA.CAUTION: Making adjustments with spinner running is unsafe.Never adjust pattern ring with spinner powered. Make sure motor controller switch is OFF and disconnect the motor cable from the motor before doing any pattern adjusting.♦ Loosen worm gear clamp only enough to allow pattern adjust ring to be removed with slight force.♦ Adjust pattern ring to re-center spread pattern:If pattern is too heavy to the driver’s right, rotate the pattern adjust ring clockwise (as viewed from the top) until the pattern is even. If pattern is too heavy to the driver’s left, rotate the pattern adjust ring counter-clockwise (as viewed from the top) until the pattern is even.Retighten the worm gear clamp to a snug fit. DO NOT OVERTIGHTEN!NOTE: To return the pattern adjust ring to the factory setting, simply align the pattern adjust ring to the center of the mounting plate, as pictured below (**).
 Do not fill and transport over long distances. This will result in material packing and caking. Remove and clean all material at the end of your spreading day
 Do not fill and transport over long distances. This will result in material packing and caking. Remove and clean all material at the end of your spreading day
Cleaning/Storing
- Remove and clean all material from the hopper.
- Rinse inside and outside of hopper and dry before storing.
- Motor and Motor Controller are NOT water resistant. Do Not submerge into water or use high pressure sprayers to clean.
- The spreader should be stored in a dry area.
Exploded View ATV-DMS-12V (5301845)
Check Parts List Down Below for Part Numbers
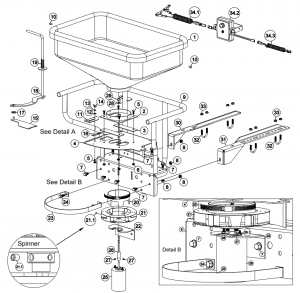
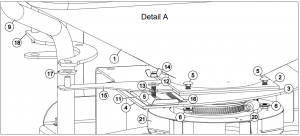
Inside Hopper:Spindle (Item 26) comes up through the base plate weldment. Washer (Item 28) is held down to base plate by Grommet (Item 29), to keep material from falling out around spindle.
Parts List: ATV-DMS-12V (5301845)
| Ref.# | Part# | Description | Qty |
| 1 | 5083007 | Hopper (Dry Material Spreader) | 1 |
| 2 | 5275923 | Hopper Base/Ring Plate Weldment | 1 |
| 3 | 5127198 | Plastic Spacer/Guide | 2 |
| 4 | 5275950 | Mounting Plate Weldment | 1 |
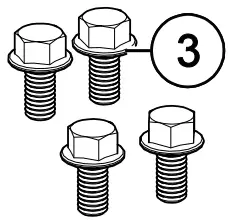
| 5 | 5034481 | SS Carriage Bolt, 1/4″-20 x 3/4″ | 5 |
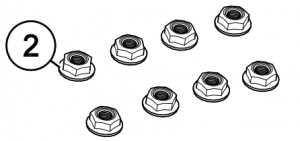
| 6 | 5006306 | 1/4″-20 Hex Whiz (Flange) Locknut | 4 |
| 7 | 5034660 | H.H.C.S. Flanged 3/8″-16nc x 3/4″ | 8 |
| 8 | 5006259 | 3/8-16nc Hex Flanged Whiz Nut Gr. 5 | 10 |
| 9 | 5275928 | Frame Weldment | 1 |
| 10 | 5117333 | 12-14 x 1/2″ Self-Tapping Screw Phillips | 2 |
| 11 | 5131073 | Gate Stop | 1 |
| 12 | 5016300 | 1/4″ S.S. Flat Washer | 1 |
| 13 | 5016309 | 1/4″ S.S. Lock Washer | 1 |
| 14 | 5006358 | Wing Nut, 1/4″-20 | 1 |
| 15 | 5275925 | Slide Gate Weldment | 1 |
| 16 | 5027132 | Gate Scale Plate | 1 |
| 17 | 5016066 | Garden Hose Washer | 1 |
| 18 | 5277687 | OMS Gate Handle Weldment | 1 |
| 19 | 5019267 | Spring | 1 |
| 20 | 5275924 | Pattern Adjusting Ring Weldment | 1 |
| 21 | 5160003 | Spinner | 1 |
| 21.1 | 5117316 | Hex Set Screw, B18.3.6M – M6 x 1.0 x 6, SS | 1 |
| 22 | 5038754 | Motor Mount Bracket | 1 |
| 23 | 5133267 | Safety Strap | 1 |
| 24 | 5117307 | H.H.C.S. Flanged 3/8″-16nc x 1″ | 2 |
| 25 | 5275840 | 12 Volt Motor 5/16″ Dia Shaft | 1 |
| 25.1 | 5006186 | #10-24 Hex Flange whiz Nut, ZP | 2 |
| 26 | 5024115 | Dry Spreader Motor Spindle | 1 |
| 27 | 5117326 | Hex Set Screw, MS x .8 x 10 Long, S.S. | 2 |
| 28 | 5016030 | Flat washer, 3/8″ | 1 |
| 29 | 5075020 | Grommet/Dry Spreader | 1 |
| 30 | 5275995 | Mounting Bracket Weldment (LH) | 1 |
| 31 | 5275996 | Mounting Bracket Weldment (RH) | 1 |
| 32 | 5034220 | Round U-Bolt, 5/16″-18 x 1 5/16″ x 1 3/4″ | 4 |
| 33 | 5006307 | 5/16″-18 Hex Whiz (Flange) Locknut | 8 |
| 34 | 5275918 | 12V Motor Controller Set | 1 |
| 34.1 | 5157210 | 12V Motor Controller (Battery Cable) | 1 |
| 34.2 | 5157208 | Motor Controller (12 Volt, 10 Amp) | 1 |
| 34.3 | 5157211 | 12V Motor Controller (Motor Cable) | 1 |
Optional EquipmentReceiver Hitch AdaptorsAllows the use of receiver hitches on vehicle to attach Dry Material Spreader.
Rain/Dust Cover: (5058193) |
An agitation clip (pin), not included, is not necessary with this unit. If you find you need one with some materials, you can use a hairpin cotter pin through the hole in the spindle.
Troubleshooting Guide
|
Symptom |
Possible Cause |
Action |
| Spreader Motor Does Not Run | 1. Loose or corroded connection | 1. Clean, check and reconnect |
| 2. Speed Control Light is OFF | 2. Check fuse. Replace if necessary | |
| 3. Loose battery connection | 3. Adjust battery clamp contact | |
| 4. Broken spreader wiring | 4. Replace or repair damaged wiring | |
| 5. Over or Under voltage | 5. Power to harness connected to aux. circuit; Connect direct to battery | |
| 6. Controller is not functioning | 6. Bypass the controller, by connecting the wires together | |
| Erratic Spread Pattern | Spinner Shaft Set Screws Loose | Tighten Set Screws |
| Gate will not close or open | Fertilizer around Slide Gate | Remove slide gate and clean after emptying hopper of material |
| Gate will not stay open or closed | 1. Friction washer is lost or worn | Replace friction washer |
| 2. Friction washer is in place | Bend slide gate arm up to tighten and down to loosen gate action. |
Settings & Charts
|
Grass (3 MPH & 10′ Spread Width) |
|||
|
lbs/1000 Sq. Ft. |
lbs/per Acre | Gate Setting |
Materials |
| 5-10 | 220-440 | 7.5-9.5 | Bahia Grass |
| .80-1.49 | 35-65 | 1-1.5 | Bent grass |
| 2.5-5 | 110-220 | 3-7.5 | Bermudagrass |
| .18-.28 | 8-12 | .5 | Big Bluestem |
| .28-.46 | 12-20 | 2 | Brome grass |
| 2-3 | 85-130 | 3-4 | Buffalo grass |
| 4-5 | 175-220 | 7-7.5 | Carpet grass |
| .5-1 | 25-45 | .75-2.5 | Centipede grass |
| .11-.18 | 5-8 | .25 | Chicory |
| 3-8 | 125-200 | 4-9.5 | Creeping Red Fescue |
| .18-.28 | 8-12 | .5 | Eastern Gama grass |
| .46-.69 | 20-30 | 1 | Festulolium |
| .22-.34 | 10-15 | .5 | Indian grass |
| 2-6 | 100-175 | 3-8 | Kentucky Bluegrass-Lawn |
| .46-.69 | 20-30 | 1 | Kentucky Bluegrass-Pasture |
| 3-8 | 125-300 | 4-9.5 | Lawn Mixtures |
| .34-.46 | 15-20 | .75 | Orchard grass |
| .18-.28 | 8-12 | .5 | Reed Canary Grass |
| .11-.18 | 5-8 | .25 | Red Fescue |
| .18-.28 | 8-12 | .5 | Red Top |
| .57-.69 | 25-30 | 2 | Ryegrass-Annual |
| .57-.69 | 25-30 | 2 | Ryegrass-Perennial |
| 5-8 | 200-325 | 7.5-9.5 | Ryegrass Fine Leaved Perennial |
| .18-.28 | 8-12 | .5 | Switchgrass |
| .69-.80 | 30-35 | 1 | Sudan Grass |
| .22-.28 | 10-12 | .5 | Timothy-Grass |
| .34-.46 | 15-20 | 1.5 | Tall Fescue |
| 5-8 | 200-325 | 7.5-9.5 | Turf Type Fescue-Lawn |
| 1-2 | 45-85 | 2.5-3 | Zoysia |
|
Turf Materials (3 MPH & 20′ Spread Width) |
||
|
lbs/1000 Sq. Ft. |
Gate Setting |
Materials |
| 10 | 6.5 | All America All Purpose Fertilizer 10-10-10 |
| 3 | 4.5 | Bayer Season Long Grub Control |
| 2.4 | 4 | Bayer Season Long Grub Control |
| 3 | 4 | Bayer Complete Insect Killer |
| 2 | 3.5 | Bayer Complete Insect Killer |
| 3 | 3 | Bayer Power Force Multi-Insect Killer |
| 2 | 2.5 | Bayer Power Force Multi-Insect Killer |
| 4 | 4 | EC Grow Premier Turf Fertilizer 25.3-10 |
| 3 | 4 | Eliminator Ant, Flea & Tick Killer Granules |
| 2.5 | 3.5 | Eliminator Ant, Flea & Tick Killer Granules |
| 2 | 3.5 | Eliminator Ant, Flea & Tick Killer Granules |
| 2 | 3.5 | Eliminator Fire Ant Killer Granules |
| 2 | 4 | Eliminator 5% Diazinon Killer Granules |
| 7 | 5.5 | Howard Johnsons All Purpose Fertilizer 8-8-8 |
| 7 | 5.5 | Howard Johnsons All Purpose Fertilizer 10-10-10 |
| 7 | 5.5 | Howard Johnsons All Purpose Fertilizer 12-12-12 |
| 5 | 5 | Ironite 1-0-0 |
| 4 | 4 | Klay Soft Pelletized Gypsum Soil Conditioner |
| 3 | 3.5 | Klay Soft Pelletized Gypsum Soil Conditioner |
| 2 | 3 | Klay Soft Pelletized Gypsum Soil Conditioner |
| 4 | 5 | Lesco Pre-M 0.86% Plus Fertilizer 25-0-7 |
| 4.2 | 4.5 | Lesco Starter Fertilizer 18-24-12 |
| 4.2 | 4 | Lesco Turf Fertilizer 24-2-11 |
| 4 | 4 | Lesco Weed & Feed |
| 8 | 7 | Milorganite 6-2-0 |
| 16 | 8.5 | Milorganite 6-2-0 |
| 3.2 | 4 | Miracle-Gro Lawn Fertilizer Plus Weed Control 26-3-3 |
| 3.6 | 4 | Miracle-Gro Starter Lawn Fertilizer 20-27-5 |
| 3.1 | 3.5 | Miracle-Gro Starter Lawn Fertilizer 29-3-4 |
| 9.6 | 6 | Ortho Lawn Insect Granules |
| 4.8 | 4 | Ortho Lawn Insect Granules |
| 2.4 | 2.5 | Ortho Lawn Insect Granules |
| 1.2 | 2 | Ortho Lawn Insect Granules |
| 4 | 4.5 | Ortho Max Insect Killer for Lawns |
| 2 | 3.5 | Ortho Max Insect Killer for Lawns |
| 1 | 2.5 | Ortho Max Insect Killer for Lawns |
| 10 | 6.5 | Parkers Super Soilite Lawn & Garden Fertilizer 10-10-10 |
| 6.5 | 5 | Parkers Super Soilite Lawn & Garden Fertilizer 16-4-8 |
| 3.6 | 4 | Pennington Lawn Starter Fertilizer 18-24-6 |
| 2 | 3 | Real-Kill Multi-Purpose Lawn & Garden Insect Killer |
| 2.5 | 3.5 | Real-Kill Multi-Purpose Lawn & Garden Insect Killer |
| 10 | 7.5 | Ringer Lawn Restore 10-2-6 |
| 12.3 | 8 | Sam’s Choice Crabgrass Preventer 30-3-4 |
| 8.1 | 6.5 | Sam’s Choice Crabgrass Preventer 30-3-4 |
| 6 | 6 | Sam’s Choice Crabgrass Preventer 30-3-4 |
| 5.4 | 5.5 | Sam’s Choice Crabgrass Preventer 30-3-4 |
| 3 | 3.5 | Sam’s Choice Insect Control Plus Fertilizer 28-4-6 |
| 3.2 | 4 | Sam’s Choice Lawn Food 29-3-4 |
| 6 | 6 | Sam’s Choice Starter Fertilizer 20-27-5 |
| 3.6 | 4.5 | Sam’s Choice Starter Fertilizer 20-27-5 |
| 2.3 | 3 | Scotts Grubex |
| 3.1 | 4.5 | Scotts Grubex Season Long Grub Control |
| 2.3 | 4 | Scotts Grubex Season Long Grub Control |
| 1.4 | 3 | Scotts Lawn Fungus Control |
| 2.7 | 4.5 | Scotts Lawn Fungus Control |
| 3.6 | 4 | Scotts Starter Fertilizer 20-27-5 |
| 5.9 | 5 | Scotts Starter Fertilizer 20-27-5 |
| 2.7 | 4 | Scotts Turf Builder 28-3-8 |
| 3.1 | 3.5 | Scotts Turf Builder Lawn Fertilizer 29-3-4 |
| 2.7 | 4 | Scotts Turf Builder w/Summer Guard |
| 2.9 | 4 | Scotts Turf Builder Plus Weed Control |
| 4.7 | 4.5 | Scotts Winterizer 24-3-12 |
| 3.3 | 4 | Scotts Winterizer 24-3-12 |
| 4.6 | 5 | Sevin Lawn Insect Granules |
| 2.33 | 4 | Sevin Lawn Insect Granules |
| 2.25 | 4 | Sevin Lawn Insect Granules |
| 3 | 4.5 | Spectracide Grub Stop |
| 3 | 2.5 | Spectracide Triazicide Insect Killer Granules |
| 3.6 | 4 | Sta-Green Lawn Fertilizer 29-2-5 |
| 2 | 3.5 | Sta-Green Lawn Weed Control |
| 3.2 | 4 | Sta-Green 200 Plus Weed & Feed 28-3-3 |
| 3.6 | 4 | Sta-Green Starter Fertilizer 18-24-10 |
| 3.2 | 4 | Sta-Green Weed & Feed 28-2-4 |
| 3 | 2.5 | Vigoro Insect Control Plus Fertilizer |
| 3.6 | 5 | Vigoro Starter Fertilizer |
| 3.5 | 4 | Vigoro Turf Fertilizer 29-3-4 |
| 3 | 3.5 | Vigoro Ultra Turf Winterizer 22-3-14 |
| 3.2 | 5 | Vigoro Weed & Feed |
| 3.2 | 4 | Wal Mart Weed & Feed 28-3-3 |
|
Legumes (3 MPH & 10′ Spread Width) |
|||
| lbs/1000 Sq. Ft. | lbs/per Acre | Gate Setting | Materials |
| .22-.34 | 10-15 | .5 | Alfalfa |
| .18-.22 | 8-10 | .5 | Alsike Clover |
| .11-.18 | 5-8 | .25 | Arrowleaf Clover |
| .34-.46 | 15-20 | .5 | Berseem Clover |
| .11-22 | 5-10 | .25 | Birdsfoot Trefoil |
| .34-.46 | 15-20 | .5 | Crimson Clover |
| .18-.22 | 8-10 | .5 | Crown Vetch |
| .57-1.5 | 25-60 | .75-1.5 | Hairy Vetch |
| .11-.18 | 5-8 | .25 | Kura Clover |
| .05-.18 | 2-8 | .25 | Ladino Clover |
| .22-.34 | 10-15 | .5 | Medium Red Clover |
| .18-.28 | 8-12 | .5 | Mammoth Red Clover |
| .34-.46 | 15-20 | .5 | Rose Clover |
| .22-.34 | 10-15 | .5 | Sweet Clover |
| .11-.18 | 5-8 | .25 | White Clover |
| .11-.18 | 5-8 | .25 | Yellow Blossom Sweet Clover |
|
Grains & Forages (3 MPH & 10′ Spread Width) |
|||
|
lbs/1000 Sq. Ft. |
lbs/per Acre | Gate Setting |
Materials |
| 1.65-2.2 | 72-96 | 1.5-3 | Barley |
| 1.25-2 | 56-84 | 5.0-6.0 | Fall/Winter Cereal Rye Grain |
| 1.5-2 | 60-90 | 5.5-6.0 | Hard Red Spring Wheat |
| 1.5-2 | 60-90 | 5.5-6.0 | Hard Red Winter Wheat |
| 1.5-2.2 | 64-96 | 5.5-6.0 | Oats – Nurse Crop |
| 1.5-2.75 | 64-128 | 5.5-6.0 | Oats – Grain |
| .46-.69 | 20-30 | 1 | Pearl Millet |
| .34-.69 | 15-30 | .75-1 | Sorghum |
| .05-.18 | 2-8 | .25 | Rape |
| .14-.18 | 6-8 | .25 | Rape-Dwarf Essex |
| Dial Setting | Spread Width (Feet) | UREA 46-0-0 |
| 1 | 5 | |
| 2 | 7.5 | |
| 3 | 12 | |
| 4 | 20 | |
| 5 | 25 | |
| 6 | 30 | |
| 7 | 35 | |
| 8 | 40 | |
| 9 | 45 | |
| 10 | 50 |
|
Ice Melt (3 MPH & 5′ Spread Width) |
|||
| Ounces/Square Yard | lbs./1000 Sq. Ft. | Gate Setting | Materials |
| 2 | 15-30 | 4.5 | Freez Gard |
| 2 to 4 | 15-30 | 4 to 5.5 | Peladow |
| 2 to 4 | 15-30 | 4.5 to 5.5 | Dead Sea Works Ice Melting De-Icer |
| 2 to 4 | 15-30 | 4.5 to 5.5 | MAG Ice Melting Pellets |
| 2 to 4 | 15-30 | 4.5 to 5.5 | Ice No Mor |
| 1/4 to 1 | 2-8 | 2 to 3.5 | Professional Ice Melter |
| 2 to 4 | 20-40 | 4 to 6.5 | Professional Ice Melter |
| 2 to 4 | 20-40 | 4 to 6 | EC Grow Lightning Fast |
| 2 to 4 | 20-40 | 3.5 to 5.5 | Thaw Master |
| 2 to 4 | 20-40 | 4 to 6 | Kansas Medium Rock Salt |
| 1/4 | 2-1/2 | 2 | Snowplow |
| 8 | 80 | 10 | Snowplow |
| 8 | 80 | 9 | Safe Step |
Do Not Use any kind of agitation clip with Ice Melt products when using speed dial setting at less than 4
♦♦♦♦♦♦♦♦♦♦♦♦♦♦♦♦♦♦♦♦♦♦♦♦♦♦♦♦♦♦♦♦♦♦♦♦♦♦♦♦♦♦♦♦♦♦♦♦♦♦♦♦♦♦♦♦♦♦♦♦♦♦♦♦♦♦♦♦♦♦♦♦♦♦♦♦♦♦♦♦♦♦♦♦♦♦♦♦♦♦♦♦♦If your rate is different than what shows on the charts, you will need to adjust the gate setting accordingly.It would be suggested to mark off 1000 sq. ft. and spread, checking your spread pattern and rate before spreading your field.
If the material you’re spreading is not in one of these charts, match it to the closest material in the charts and check your spread pattern and rate. If needed, you will adjust from those settings.♦♦♦♦♦♦♦♦♦♦♦♦♦♦♦♦♦♦♦♦♦♦♦♦♦♦♦♦♦♦♦♦♦♦♦♦♦♦♦♦♦♦♦♦♦♦♦♦♦♦♦♦♦♦♦♦♦♦♦♦♦♦♦♦♦♦♦♦♦♦♦♦♦♦♦♦♦♦♦♦♦♦♦♦♦♦♦♦♦♦♦♦♦
| Fimco assumes no liability pertaining to seed rates claimed with this spreader. Rates listed on chart are generic for the U.S.A. and should be used as a starting point or guide only. Check with your local extension office or state for official application rates. Seed rate chart gate settings were calibrated through in house testing with spreader. Use lower rates on more productive soils. Seed rates, gate settings, and information listed is subject to change without notice. |
| IMPORTANT!! To prevent spreading miscalculations, make field checks to be sure you are spreading at the desired rate. |
This is information off the sticker on the hopper.
|
lbs./1000 Sq. Ft. |
0.6 | 0.7 | 0.8 | 1 | 1.5 | 2 | 3.5 | 4.5 | 6.0 | 7.5 | 9.0 | 10.0 | 11.0 | 13.0 | 15.0 | 17.0 |
| Flow Control Setting | 1 | 2 | 2.5 | 3 | 3.5 | 4 | 4.5 | 5 | 5.5 | 6 | 6.5 | 7 | 7.5 | 8 | 9 |
10 |
| Operation Instructions | * USE APPLICATION INFORMATION ON BAG, FIND CALIBRATION SETTING (ABOVE) AND SET GATE STOP TO CORRECT FLOW SETTING* IF SPREAD PATTERN IS OFF CENTER ADJUST PATTERN RING POSITION, SEE OWNER’S MANUAL* NOTE: ABOVE CALIBRATION SETTINGS HAVE BEEN DETERMINED USING UREA 46-0-0, 20 FOOT SWATH & 3 MPH (TRAVEL 88 FT. IN 20 SECONDS)* NOTE: CALIBRATION GUIDE SETTINGS IS TO BE USED AS A GENERIC GUIDE. FOR SPECIFIC PRODUCTS, SEE YOUR OWNER’S MANUAL |
Warranty
LIMITED WARRANTY FOR NEW FIMCO, IND. EQUIPMENT
WHO MAY USE THIS LIMITED WARRANTY. This limited warranty (the “Limited Warranty”) is provided by Fimco, Ind. to the original purchaser (“you”) of the Equipment (as defined below) from Fimco, Ind. or one of Fimco, Ind.’s authorized dealers. This Limited Warranty does not apply to any subsequent owner or other transferee of the Equipment. THIS LIMITED WARRANTY GIVES YOU SPECIFIC LEGAL RIGHTS, AND YOU MAY ALSO HAVE OTHER RIGHTS WHICH VARY FROM STATE TO STATE.
WHAT THIS LIMITED WARRANTY COVERS AND FOR HOW LONG. Fimco, Ind. warrants that any new Equipment will be free from defects in material and workmanship for a period of one (1) year (homeowner), 90 days (commercial user), after delivery of the Equipment to you (the “Warranty Period”). The Warranty Period is not extended if Fimco, Ind. repairs or replaces the Equipment.
WHAT IS NOT COVERED BY THIS LIMITED WARRANTY. This Limited Warranty does not apply to: (1) used Equipment; (2) any Equipment that has been altered, changed, repaired or treated since its delivery to you, other than by Fimco, Ind. or its authorized dealers; (3) damage or depreciation due to normal wear and tear; (4) defects or damage due to failure to follow Fimco, Ind.’s operator’s manual, specifications or other written instructions, or improper storage, operation, maintenance, application or installation of parts; (5) defects or damage due to misuse, accident or neglect, “acts of God” or other events beyond Fimco, Ind.’s reasonable control; (6) accessories, attachments, tools or parts that were not manufactured by Fimco, Ind., whether or not sold or operated with the Equipment; or (7) rubber parts, such as tires, hoses and grommets.
HOW TO OBTAIN WARRANTY SERVICE. To obtain warranty service under this Limited Warranty, you must (1) provide written notice to Fimco, Ind. of the defect during the Warranty Period and within thirty (30) days after the defect becomes apparent or the repair becomes necessary, at the following address: Fimco, Ind., 1000 Fimco Lane, North Sioux City, SD 57049; and (2) make the Equipment available to Fimco, Ind. or an authorized dealer within a reasonable period of time. For more information about this Limited Warranty, please call: 800-831-0027.
WHAT REMEDIES ARE AVAILABLE UNDER THIS LIMITED WARRANTY. If the conditions set forth above are fulfilled and the Equipment or any part thereof is found to be defective, Fimco, Ind. shall, at its own cost, and at its option, either repair or replace the defective Equipment or part. Fimco, Ind. will pay for shipping and handling fees to return the repaired or replacement Equipment or part to you.
LIMITATION OF IMPLIED WARRANTIES AND OTHER REMEDIES. THE REMEDIES DESCRIBED ABOVE ARE YOUR SOLE AND EXCLUSIVE REMEDIES, AND FIMCO, IND.’S SOLE LIABILITY, FOR ANY BREACH OF THIS LIMITED WARRANTY. TO THE EXTENT APPLICABLE, ANY IMPLIED WARRANTIES, INCLUDING, WITHOUT LIMITATION, THE IMPLIED WARRANTIES OF MERCHANTABILITY AND FITNESS FOR A PARTICULAR PURPOSE, SHALL BE LIMITED IN DURATION TO THE WARRANTY PERIOD, AND THE REMEDIES AVAILABLE FOR BREACH THEREOF SHALL BE LIMITED TO THE REMEDIES AVAILABLE UNDER THIS EXPRESS LIMITED WARRANTY. SOME STATES DO NOT ALLOW LIMITATIONS ON HOW LONG AN IMPLIED WARRANTY LASTS, SO THE ABOVE LIMITATION MAY NOT APPLY TO YOU. IN NO EVENT SHALL FIMCO, IND.’S LIABILITY UNDER THIS LIMITED WARRANTY EXCEED THE ACTUAL AMOUNT PAID BY YOU FOR THE DEFECTIVE EQUIPMENT, NOR SHALL FIMCO, IND. BE LIABLE, UNDER ANY CIRCUMSTANCES, FOR ANY CONSEQUENTIAL, INCIDENTAL, SPECIAL OR PUNITIVE DAMAGES OR LOSSES, WHETHER DIRECT OR INDIRECT. SOME STATES DO NOT ALLOW THE EXCLUSION OR LIMITATION OF INCIDENTAL OR CONSEQUENTIAL DAMAGES, SO THE ABOVE LIMITATION OR EXCLUSION MAY NOTAPPLY TO YOU.
 www.fimcoindustries.com1000 FIMCO Lane, P.O. Box 1700, North Sioux City, SD 57049Toll Free Phone: 800-831-0027 : Toll Free Fax: 800-494-0440
References
[xyz-ips snippet=”download-snippet”]