
HW1 Mains Powered Heat Alarm with 9V Battery Back-Up
220-240 V AC 50-60 Hz mains powered heat alarm. 9V battery back-up.WARNING: Wiring should be installed by a qualified electrician in accordance with local building standards. The wiring must conform to current regulations for electrical installations. Check with local building and fire regulations for your property, to ensure compliance.
For the best protection, heat alarms should always be installed as part of a complete fire protection system that includes smoke alarms.Class A2 detection. This heat alarm will sound a warning when the ambient temperature in a room is between 54°C and 70°C.This heat alarm is not intended for any non-residential, commercial or industrial application, nor for any other purpose than described above.
Technical SupportOnline: www.fireangel.co.uk/supportE-mail: [email protected]fireangel.co.ukPhone: 0800 141 2561Note: This user manual is also available in large text and other formats. Please email: [email protected] or call 0800 141 2561 for further information.
POSITIONING
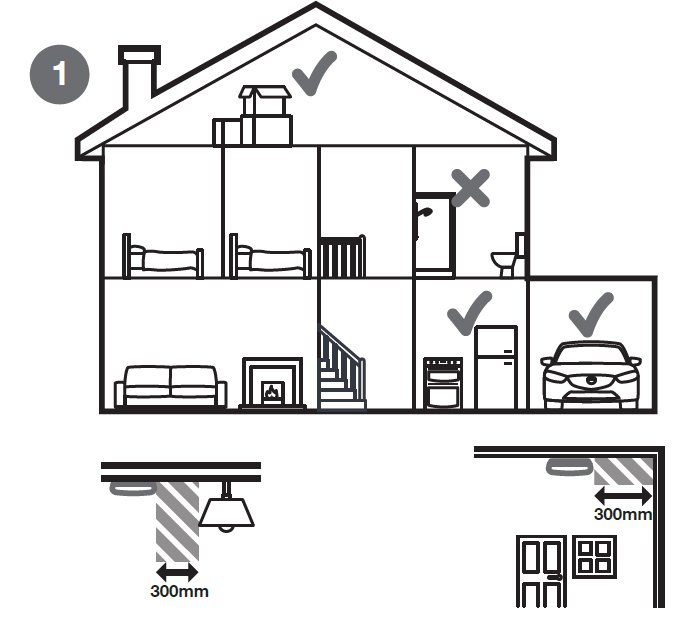
Your heat alarm is suitable for the kitchen, garage and loft.Heat alarms should be sited at least 300mm from light fittings and walls. Ideally as central as possible in the room. Do not install heat alarms on a wall.Install your heat alarm at a distance no greater than 5.3m from the farthest wall, no greater than 5.3m from a door to any room in which a fire might start and no greater than 5.3m from the next heat or smoke alarm.If there is fluorescent lighting, heat alarms should be installed at least 1500mm from these fittings and wiring. Keep any wiring at least 1000mm from fluorescent lighting.Do not use circuits containing fluorescent light fittings or dimmer switches.
Locations of alarms must be compliant with either BS 5839: Part 6 or relevant Building Regulations if in any doubt.
INSTALLATION
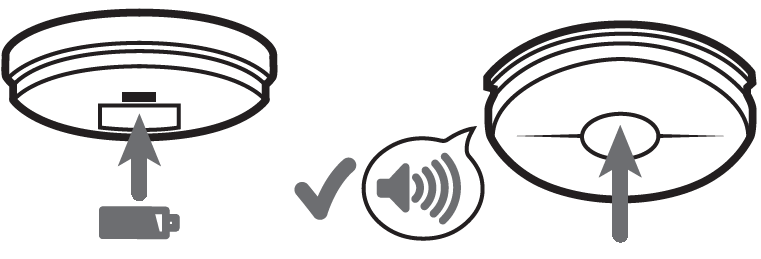
- Unwrap battery. Insert battery into battery compartment (match ‘+’ to ‘+’). Remove dust cover. Press and hold the test button for 5 seconds. The alarm will sound.
- Switch off electricity supply.
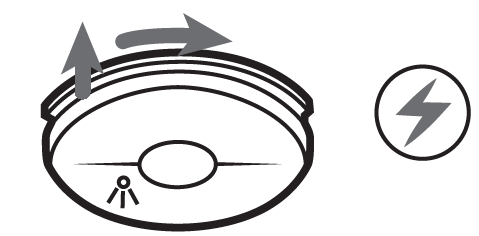
- Remove the baseplate by twisting the alarm anti-clockwise.
- Connect the house wiring to the power connector provided.
- Ensure a permanent connection is made in a suitable junction box (not provided).No connection should be made to the mains electricity supply earth terminal. Terminate house wiring earth in spare connector.Fit the base to ceiling using the screws provided. Feed the wiring through the hole in the base plate and connect the power adapter to the alarm.
- Push and twist the alarm clockwise onto the base plate. Turn the electricity supply back on and check that the green LED is on.
- Press and hold the test button for 5 seconds. The alarm will sound.
 No connection should be made to the mains electricity supply earth terminal. Terminate house wiring earth in spare connector.Fit the base to ceiling using the screws provided. Feed the wiring through the hole in the base plate and connect the power adapter to the alarm.
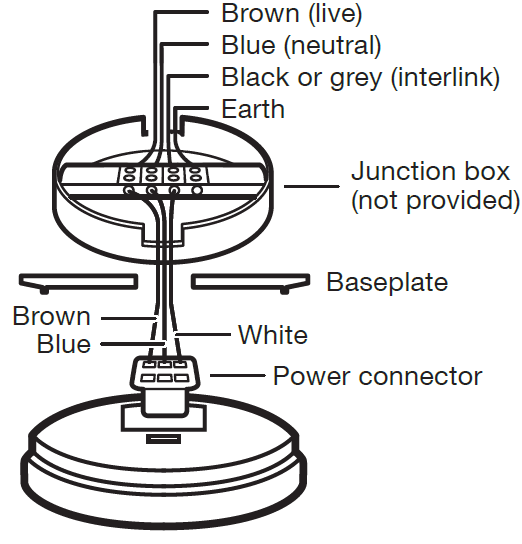

OPTIONAL LOCKING FEATURE
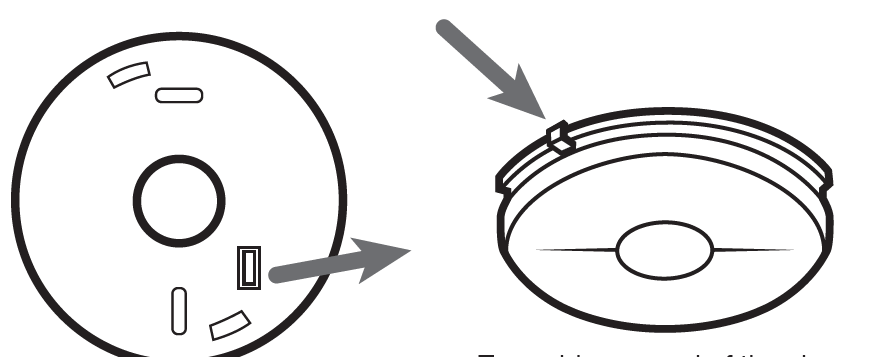
Remove locking plug from baseplate. Insert into hole between base plate and alarm
If desired, the alarm can be interconnected with up to 11 other smoke, heat or carbon monoxide alarms from the FireAngel range via the ‘I’ connector. (See Optional Interconnecting Feature).
IMPORTANT: The circuit used to Power the alarm must be a 24 hour voltage circuit that cannot be turned off by a switch.
In accordance with BS 5839: Part 6, we recommend: For mains powered alarms, each with an integral standby supply, the mains electricity supply should take the form of either a) an independent circuit at the dwelling’s main circuit board, in which case no other electrical equipment should be connected to this circuit (other than a dedicated monitoring device installed to indicate failure of the mains electricity supply to the alarms); or b) a separately electrically protected, regularly used local lighting circuit. Check with local building and fire regulations for your property, to ensure compliance.Ensure dust cover is removed before operation.The red LED on the front of the alarm should flash once every 32 seconds (approx.) to show that the alarm sensor is actively monitoring for heat. When the test button is pressed, the alarm will flash once every 8 seconds for 8 minutes.
SILENCE FEATURE
In a known false alarm, the alarm can be silenced temporarily.
- Press and hold the button for 5 seconds.
- The alarm will silence for 10 minutes.

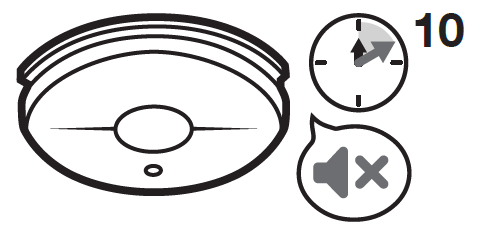
Your alarm features ‘Silence’ technology. In the event of a known false alarm you can temporarily silence it by pressing the button. After 10 minutes your alarm will automatically sound 2 chirps and return to full sensitivity.The red LED on the front of the alarm will flash once every 8 seconds to show that it is in Silence mode.The alarm will sound continuously and the red LED will flash every second when the alarm senses dangerous heat levels. NEVER IGNORE ANY ALARM. If an alarm is sounding, it is warning you of a potentially hazardous situation. Do not ignore it. Ignoring the alarm may result in injury or death. If your heat alarm activates and you are not absolutely certain of the source of the problem, get everyone out of the house immediately.
OPTIONAL INTERCONNECTING FEATURE
Up to 12 FireAngel mains smoke, heat or carbon monoxide alarms can be interconnected on a single network.
- For multiple alarm installations use a ‘three core and earth’ style cable between all the alarms to be interconnected.Connect the 3rd core of the cable (‘Interconnect’ cable), to the white wire from the heat alarm’s power connector (see Installation).
- Test each alarm and ensure every connected alarm sounds within 10 seconds.

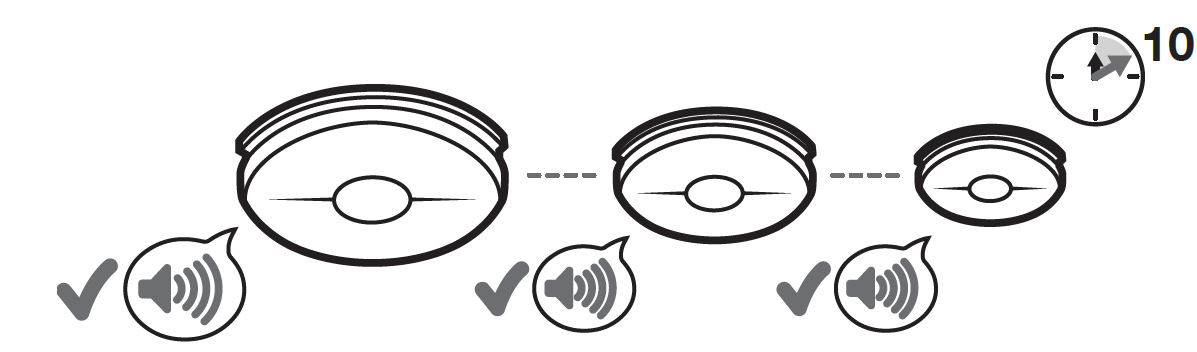
On an interconnected network, only the alarm that senses the fire will sound and flash its LED. Other connected alarms will sound a warning but will not flash their LED. Do not connect more than 11 other devices.IMPORTANT: The interconnect wire (minimum 0.75 mm2 cable) must be treated as Live, it should be insulated and sheathed.
MAINTENANCE
- Test the alarm every month. Press the test button for 5 seconds. The alarm will sound.
- Vacuum your alarm every 3 months.
- Do not use cleaners or solvents.
- Do not paint the alarm.
- Replace the alarm every 10 years.Do not use any other test method except the process described in this manual.


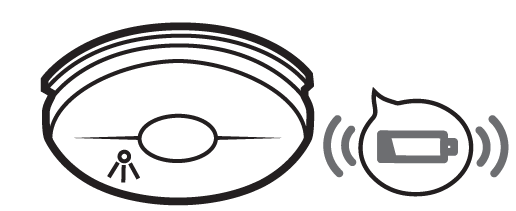
LOW BATTERY WARNING
- When the alarm battery is low, the alarm will ‘chirp’ and the LED will flash every 32 seconds.
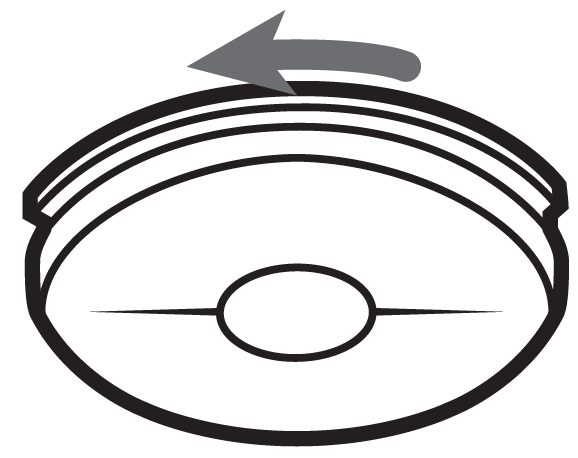
- Switch off electricity supply.
- Twist alarm anti-clockwise to remove from base plate and disconnect power adapter.
- Replace the batteries and re-install. (See ‘Installation’)
- Always test the alarm after replacing the batteries.

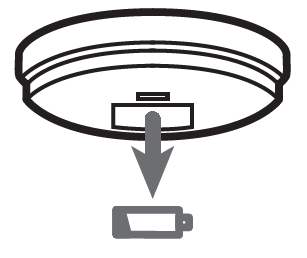

Your alarm requires 1 x 9V (PP3) battery. Under normal use, the battery should last approximately one year. Use of a battery other than those recommended here may have a detrimental effect on the alarm performance: Duracell MN1604, Gold Peak: GP1604S, Raymax: 6F22.
TROUBLESHOOTING GUIDE
| If the green LED does not light when the alarm is connected to power: | • Check that your heat alarm is connected to the power supply and that the battery is correctly installed. |
| If your heat alarm does not sound during testing: | • Check that your alarm is connected to the power supply and that the battery is installed correctly.
• If testing after installation, allow a few seconds for the alarm to settle. • Push and hold the centre of the test button firmly for 5 seconds. • Check that the alarm is properly connected to the mains power. |
| If your heat alarm activates when no smoke is visible: | • Check the location of your heat alarm.
• Clean the heat alarm. |
| If your heat alarm sounds unusual or ‘chirps’ intermittently: | • Check the location of your heat alarm.
• Check that your heat alarm is definitely the source of the chirping; make sure the noise isn’t coming from another alarm. • If the alarm ‘chirps’ every 32 seconds and the red LED flashes at the same time – replace the battery. • If the alarm ‘chirps’ every 32 seconds without a red LED flash, a fault is indicated – contact Techincal Support. |
| If you experience frequent unwanted alarms: | • Check the location of your heat alarm.
• Clean the heat alarm. |
WARRANTY AND DISPOSAL
Sprue Safety Products Ltd warrants to the original purchaser that its enclosed smoke alarm be free from defects in materials and workmanship under normal residential use and service for a period of 5 (five) years from the date of purchase (not including the replaceable battery). Provided product is sent back to Sprue Safety Products with proof and date of purchase, Sprue Safety Products Ltd hereby warrants that during the 5 (five) year period commencing from the date of purchase Sprue Safety Products Ltd, at its discretion, agrees to replace the unit free of charge.
The warranty on any replacement HW1 alarm, will last for the remainder of the period of the original warranty in respect of the alarm originally purchased – that is from the date of original purchase and not from the date of receipt of the replacement product. Sprue Safety Products Ltd reserves the right to offer an alternative product similar to that being replaced if the original model is no longer available or in stock. This warranty applies to the original retail purchaser from the date of original retail purchase and is not transferable. Proof of purchase is required.
This warranty does not cover damage resulting from accident, misuse, disassembly, abuse or lack of reasonable care of the product, or applications not in accordance with the user manual. It does not cover events and conditions outside of Sprue Safety Products Ltd’s control, such as Acts of God (fire, severe weather etc.). It does not apply to retail stores, service centres or any distributors or agents. Sprue Safety Products Ltd will not recognise any changes to this warranty by third parties.
Sprue Safety Products Ltd shall not be liable for any incidental or consequential damages caused by the breach of any expressed or implied warranty. Except to the extent prohibited by applicable law, any implied warranty of merchantability or fitness for a particular purpose is limited in duration for 5 (five) years.
This warranty does not affect your statutory rights. Except for death or personal injury, Sprue Safety Products Ltd shall not be liable for any loss of use, damage, cost or expense relating to this product or for any indirect, or consequential loss, damages or costs incurred by you or any other user of this product.
DISPOSAL
Waste electrical products should not be disposed of with your other household waste. The alarm is ideally suited for disposal within the waste electronic and electrical equipment (WEEE) recycling scheme.Please recycle where facilities exist. Check with your local authority, retailer or contact our Technical Support team for recycling/disposal advice as regional variations apply.Once the batteries are removed, the low battery warning chirp will stop. The batteries should always be removed before disposal. Do not attempt to open. Do not burn.
[xyz-ips snippet=”download-snippet”]