GOLD BUG®2PROSPECTOR’S METAL DETECTOR

ABOUT YOUR GOLD BUG 2
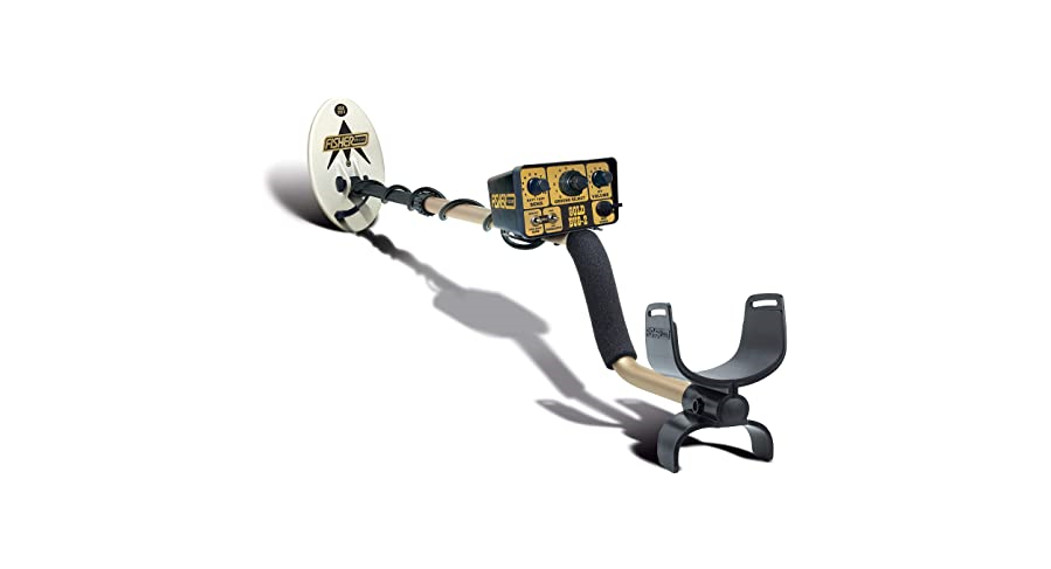
Congratulations on your purchase of the Fisher GoldBug2, the standard against which all other gold prospecting detectors are compared.The GoldBug2 is specially designed for finding gold nuggets. The GoldBug2’s high frequency, at 71 kHz, is extremely sensitive to small gold nuggets.The GoldBug2 can be used in high, normal, or low mineralization soils. When set for high mineralization, this new circuitry allows prospectors to hunt in areas previously off-limits due to high ground mineralization or the presence of numerous hot rocks. The GoldBug2 sets new standards for size and depth at which nuggets can be unearthed in many soil conditions.To identify the most bothersome gold-field objects, learn to use the DISC model. Identify hot rocks and trash metals, such as nails and other ferrous objects.Use the BOOST mode to find smaller nuggets at greater depths. The BOOST mode automatically increases the volume of any faint signal, such as small or deep gold nuggets. It does this without increasing the volume of larger, shallower targets.
Here are some other features of the GoldBug2:
- Dust and moisture resistant control box.
- Removable control housing for hip-mount and fatigue-free prospecting.
- Elliptical search coils are available in three sizes: 6.5, 10, and 14-inch.
- Lightweight design, only 2.9 lbs. with cushioned armrest and foam-grip handle.
- Built-in detector stand.
- Intuitive manual ground mineralization adjustment with digital read-out.
- Double-locking, fiberglass-reinforced, nylon lower stem.
- Quartz-crystal-locked electronics.
- Built-in Fisher quality backed by 90 years of engineering excellence.
Now that you have the right equipment, find the most productive prospecting location and study this manual to learn the skill and art of the rewarding endeavor of gold prospecting.Happy Hunting!Fisher Research Laboratories
SETTING UP
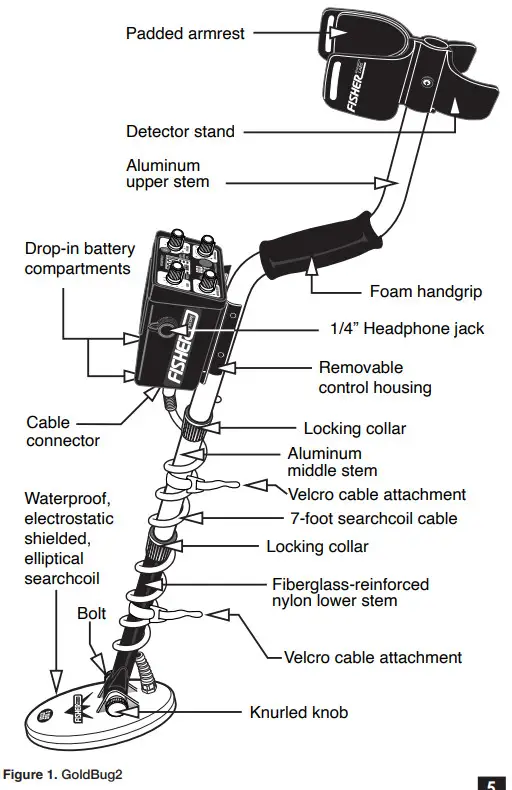
The GoldBug2 requires minimal assembly. To assemble the GoldBug2: connect the upper, middle, and lower stems, connect the search coil connector to the back of the control housing, and then adjust the angle of the search coil. Take a look at page 5 and familiarize yourself with the parts of the GoldBug2 before proceeding.
- Unpack your new GoldBug2 carefully. Save the box and inserts – they may come in handy for future storage or shipment.
- Connect lower, middle, and upper stems (see pg. 5 Figure 1).
- Adjust the stem length and coil angle so that the search coil rests flat on the ground about 6 inches in front of, and slightly to the right of, your right foot (for left-handers, to the left of your left foot). Your arm should be straight and relaxed with a loose grip. (see Figure 2).REMEMBER: THE LONGER THE SHAFT, THE MORE YOU WILL HAVE TO BEND YOUR ELBOW AND THE SOONER YOUR ARM WILL GET TIRED. THE GOLDBUG2 IS BALANCED FOR COMFORTABLE SEARCHING IN A TIGHT SEMICIRCLE IN FRONT OF THE OPERATOR.
 Figure 2.Adjust the stem length and coil angle resting the search coil flat on the ground and about 6 inches in front of your right foot (left foot for left-handers).
 - Tighten the locking collars to secure the stems; secure the coil with the bolt and nut.
- With the stem length properly adjusted, wrap the searchcoil cable tightly around the upper stem and secure it with the two velcro straps. Connect the cable connector to the control housing.CAUTION: MAKE SURE THE CABLE IS NOT PULLED TIGHT AT THE CONTROL HOUSING AND THAT YOU HAVE ENOUGH SLACK AT THE SEARCHCOIL TO ADJUST IT AT ANY ANGLE.
- With the shaft length and coil angle properly adjusted, you should be able to move into your “search” position (as shown on page 6) by leaning forward very slightly and raising your arm (still straight) until the searchcoil is just above the ground and 12-inches in front of your foot. The searchcoil should be parallel to the ground and may have to be slightly readjusted at this point.
HIP-MOUNTING
Your GoldBug2 is lightweight and well balanced; however, if you are going to be swinging it for more than a few hours, you may want to “hip-mount” it by removing the ontrol box and strapping it to your waist. Follow this procedure:
The GoldBug2 control housing can be hip-mounted to reduce weight on the stem and create nearly effortless hunting. Beltloops are provided on the underside of the control housing.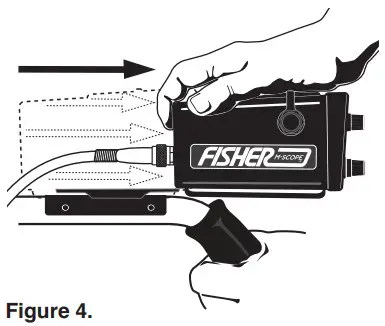
To remove the control housing from the stem, grasp the top of the control box firmly and pull it directly toward the armrest while holding the GoldBug2 handle.
- Disconnect the cable from the control housing and unwind all but the last 12-inches or so from the stem. Secure the lower end of the cable with a velcro strap at least 12-inches up from the coil.CAUTION: MAKE SURE THAT YOU HAVE ENOUGH SLACK AT THE SEARCHCOIL
- Slide the control housing off the handle by holding the hand grip with one hand and pulling the housing toward you with the other hand.
- Reconnect the cable to the control housing. NOTE: It is especially important that the cable connector be installed tightly to prevent false signals during hip-mount use. Hand tighten only: Never use tools to tighten the connector.
- Put your belt through the slots on the underside of the housing.
- Left handers should wear the housing on their right hip and right handers on their left hip.
NOTE: if you are working in shallow water, you may want to strap the control housing on your chest in a heavy plastic bag, and seal it tightly around the cable.
CONTROL PANEL
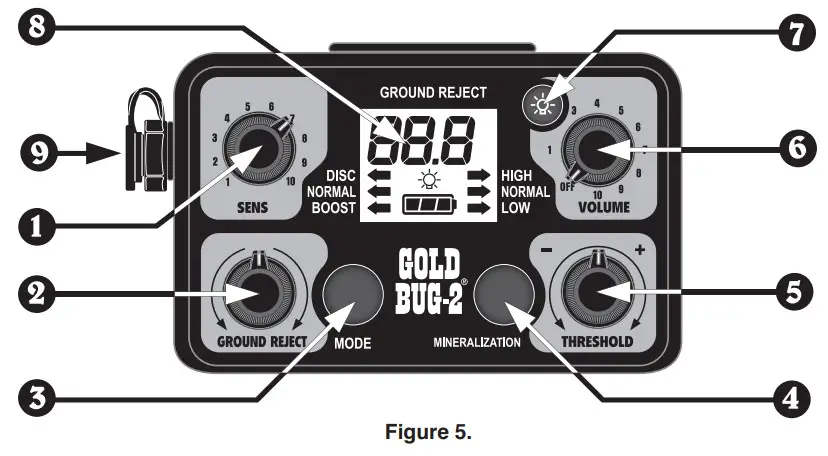
- SENS: This knob adjusts the GoldBug2’s sensitivity to targets. By increasing the sensitivity, you can detect smaller and deeper targets; however, high sensitivity settings can result in false signals in mineralized soil or in areas with electricalinterference. If experiencing “ground chatter” or false signals from electrical interference, reduce the sensitivity. Do not set the sensitivity to less than 5 unless you have already tried switching to a higher mineralization setting.
- GROUND REJECT: In NORMAL and BOOST modes, use this control knob to adjust or “GROUND BALANCE” your detector to the soil conditions in the area you are prospecting. As you rotate the knob, the 3-digit Ground Reject value indicates the setting. Rotate the knob slowly for fine adjustment. Rotate faster, or spin the knob, to quickly adjust over a wider ground range. Press-and-hold to return to default level of 75.0.
- MODE: Select one of the three operating modes (see the next section, “Mode and Mineralization Selections,” for details).
- MINERALIZATION: Select one of the three ground mineralization settings, depending on the mineralization content of the ground you are searching (see next section, “Mode and Mineralization Selections,” for details).
- THRESHOLD: This control sets the volume level of the faint but continuous background tone.
- VOLUME: This knob turns the power on and adjusts the signal-response volume. If you are wearing headphones with independent volume controls, set your GoldBug2 VOLUME control to 10 and decrease the volume of your headphone controls to a comfortable level. This will ensure the hottest possible signal from your GoldBug2.
- BACKLIGHT: Press to turn backlight on/off. To adjust the illumination level of the backlight, press and hold while rotating the Ground Reject Knob. Your illumination setting will be saved.
- LCD DISPLAY KNOB: Ground Reject Setting, Operating Mode Indicator, Mineralization Indicator, Backlight Indicator, Battery Status.
- HEADPHONES: This jack accepts most stereo and mono headphones with 1/4-inch plugs. When using headphones witha stereo/mono switch, put the stereo/mono switch in the stereo position. Although your GoldBug2 is equipped with a dust and moisture resistant speaker, we recommend that you always wear headphones while hunting to maximize the number of targets you hear. Furthermore, we recommend our Fisher® Phones, which enhance faint-target response by blocking out unwanted external noises, such as wind and vehicle sounds. To plug in your headphones, unplug the tethered seal and plug in your headphone jack. When not using headphones, be sure to keep the seal plugged into the HEADPHONE jack to keep dust and moisture out of the control housing. This device is to be used with interconnecting cables/ headphone cables shorter than three meters.
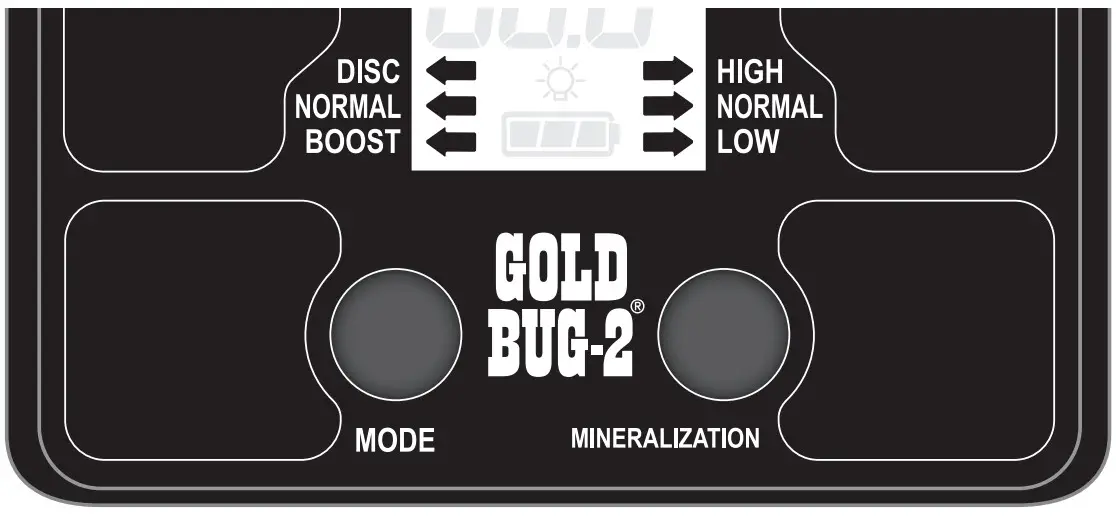
Figure 6.The two push-buttons on your GoldBug2 enable you to search in just about any kind of ground condition. The trick is learning which combination of settings is right for each ground condition.The MODE button on your GoldBug2 offers three different operating modes: DISC, NORMAL and BOOST.USING THE MODE BUTTON:
- Press-and-hold to switch between NORMAL and BOOST modes.
- Quick-press to enter DISC mode.
- Quick-press to exit DISC mode.
- NORMAL and BOOST are continuous search modes in most locations.
- DISC is usually invoked to check a target that has been detected in NORMAL or BOOST, thus the reason a quick-press jumps in and out of DISC.
Each mode offers its own advantages and disadvantages in any given situation. You want to choose the best setting for the condition of the ground you are hunting.Regardless of the MODE or MINERALIZATION settings, your GoldBug2 always operates in a motion mode, meaning the searchcoil must be in motion to detect a target.The MINERALIZATION button adjusts your GoldBug2 to the ground conditions. It does this by decreasing or increasing the sensitivity (or gain) of your GoldBug2. Unlike the SENSITIVITY control, the MINERALIZATION button also affects the retune speed, which is the amount of time it takes for your GoldBug2 to automatically retune itself after the searchcoil has passed over a target. A fast retune speed means a quick response to targets.USING THE MINERALIZATION BUTTON:
- Quick-press MINERALIZATION in NORMAL or BOOST modes to adjust your detector to the type of ground MINERALIZATION you are hunting: Low, Normal or High.
- In DISC mode, the MINERALIZATION control is de-activated. The GoldBug2 has a fixed mineralization set-point for checking targets and sites heavily littered with iron trash.
The following is a brief description of the MODE and MINERALIZATION settings.
- NORMAL MODE: This is an all-metal search mode used for most nugget-hunting conditions. The sensitivity is normal and the retune speed is fast.
- BOOST MODE: In this mode, your GoldBug2 automatically amplifies faint target sounds. At volume levels above 7, faint target sounds continue to get louder while loud, shallow target sounds remain constant.
- DISC MODE: This mode ignores hot rocks and ferrous objects. It also features a very sharp target response. The MINERALIZATION button is deactivated in DISC. Do not adjust threshold while in DISC.
- NORMAL MINERALIZATION: With MINERALIZATION set to NORMAL position, the sensitivity of your GoldBug2 is optimumfor most gold-bearing soils. The retune speed is fast.
- LOW MINERALIZATION: This setting is used for ideal conditions – areas with few hot rocks, little black sand, low groundmineralization and little trash. The LOW MINERALIZATION setting provides better sensitivity and a slower retune speed for better response to smaller, deeper nuggets.
- HIGH MINERALIZATION: In this setting, the sensitivity of your GoldBug2 is reduced to allow operation in areas of extreme mineralization. The retune speed is fast.
The chart below shows how your GoldBug2’s sensitivity and ability to operate in mineralized soil is affected by each combination of MINERALIZATION and MODE settings.

In either the BOOST or NORMAL mode, the GoldBug2’s sensitivity decreases as you increase MINERALIZATION settings from LOW to HIGH.
MINERALIZATION CONTROL
In general, you should start searching with the MINERALIZATION set to LOW. If you experience too much “ground chatter”, even after adjusting the GROUND REJECT in the LOW MINERALIZATION mode, try reducing the sensitivity or set the MINERALIZATION to NORMAL. If that does not do the trick, set the MINERALIZATION to IGH and readjust the GROUND REJECT control. If there is still to much “ground chatter,” reduce the SENSITIVITY .In the LOW MINERALIZATION setting, the searchcoil response (retune speed) is slow and the circuit gain (amplification) is high. In the NORMAL MINERALIZATION setting, searchcoil response is fast and the circuit gain is reduced slightly. In the HIGH setting, response is fast and the gain is further reduced.Moist, alkali soil conditions will usually require use of the NORMAL or HIGH MINERALIZATION settings. Heavy, black sand conditions will usually require the HIGH MINERALIZATION setting.
DISC MODE
Do not search in the DISC mode unless the area is heavily littered with iron trash. In most situations you want to hunt in the NORMAL or BOOST modes and then switch to the DISC mode to identify a strong target response. The DISC mode will generally not identify weak target sounds currently. Targets that have been unearthed can also be checked for their gold content by using the DISC mode. Swing the object past the searchcoil, holding it in your fingers or in a plastic scoop. If it is a “hot rock” or small ferrous object, there will be no sound. Some iron objects chirp or click. If it is a nonferrous metal such as gold, your GoldBug2 will give a solid “beep.”Unlike the BOOST and NORMAL modes, the DISC mode operates without an audible threshold hum.NOTE: Some faint static and occasional chatter is normal in this mode. If you are running your sensitivity too high for ground conditions (heavy mineralization, trash and or hot rocks) you may experience a constant, loud chatter as you sweep.
BOOST MODE
In this mode, weak signals are louder than in the NORMAL mode, but maximum loudness of strong signals is the same. The primary purpose of the BOOST mode is to help you hear weak signals when there is interfering environmental noise from wind, mining equipment, vehicles, etc. Also, if you prefer using the speaker (most people use headphones), you may prefer the BOOST mode, even in quiet conditions. Hunting in the BOOST mode is best when the area has few trash items, hot rocks and low ground mineralization. In areas with many false signals, the BOOST mode will amplify them as well as signals from gold nuggets. The BOOST mode can also be used to recheck a disappearing signal, or to check a faint signal to see if it sounds like a hot rock.
POWER-ON PROCEDURE
- Set your controls as follows:SENS: 10VOLUME: CLICK ONMODE: NORMALGROUND REJECT: 75.0MINERALIZATION: LOWNOTE: You will probably find that most of your searching will be done with MODE = Normal, MINERALIZATION = Low and SENS < 10. If you are working in unfamiliar ground, however, we recommend that you try starting at the maximum sensitivity and LOW MINERALIZATION settings.
- Hold the searchcoil waist high, away from any nearby metal.
- Turn the VOLUME control to 10. A short, loud squawk is normal at turn-on, so if you are wearing headphones, start the volume at 0 and let the audio settle down before you increase it to a level that is comfortable when the coil is passed over a large or shallow target.NOTE: If your headset has volume controls, set the volume on your GoldBug2 to “10” and your headset volume to zero. Then adjust your headset volume controls to a comfortable level when the coil is passed over a large or shallow target.
- With the searchcoil still in the air, rotate the THRESHOLD control until you hear a very faint, continuous signal. You want to always hear this faint background hum, the “threshold tone” to maximize the audio performance and your ability to hear the signal from all gold nuggets.
 NOTE: You will probably find that most of your searching will be done with MODE = Normal, MINERALIZATION = Low and SENS < 10. If you are working in unfamiliar ground, however, we recommend that you try starting at the maximum sensitivity and LOW MINERALIZATION settings.
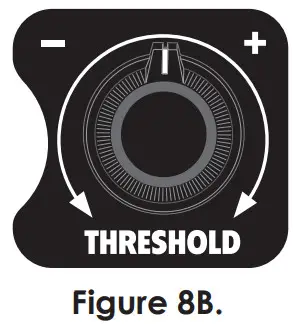
GROUND REJECT PROCEDURE
When your GoldBug2 is properly tuned or “ground balanced,” it will have only a minimal response to ground minerals when the searchcoil is raised from or lowered to the ground. Precise adjustment of the GROUND REJECT control is critical to your success. The lower the MINERALIZATION or the higher the SENSITIVITY settings, the more important it is to maintain proper ground rejection. The GROUND REJECT control allows for a fine or course adjusment, depending on how fast you turn the knob.If you change the MINERALIZATION setting, you may have to retune your GoldBug2 to maintain optimum performance. However, the GROUND REJECT settingshould be close enough for pinpointing or for a quick check in one of the other modes. At worst, a change in modes will require only a minor fine tuning.
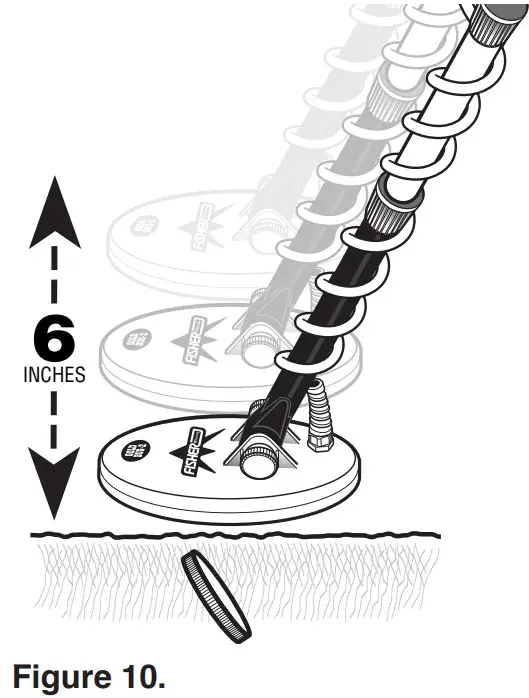 Tune your GoldBug2 by bobbing thesearchcoil up and down while adjusting the GROUND REJECT control.To tune your GoldBug2, follow these steps:
- With your controls still set as described in the “Power On Procedures” (see page 15), hold the searchcoil parallel to and about 6-inches above the ground.
- Lower the searchcoil to within an inch of the ground and quickly raise it. Note that the thresholdtone becomes louder as you lower the searchcoil, disappears when you raised it and finally returns to normal when you hold it 6 just above ground.
- Your objective now is to adjust the GROUND REJECT control so that there is no change in the sound, a very small change in the threshold hum as you bob the coil up and down. Start by setting Ground Reject to 75.
- Bob the searchcoil up and down once again. One of three things will happen to your threshold hum:1) The tone will continue to get louder as you lower the coil and disappear when you raise it.2) The tone will disappear as you lower the coil and get louder as you raise it.3) The tone will remain the same or change only slightly while bobbing the coil.
- If the tone remains unchanged or changes only slightly, you are properly “Ground Balanced.” Fine tune with one click at a time.
- If the tone gets louder lowering the coil and fades raising the coil, continue rotating the knob counterclockwise until the tone change is minimal when you bob the coil.
- If the tone fades lowering the coil, and increases when raising the coil, rotate the knob clockwise until the tone change is minimal; then fine tune with just one click at a time.
- With practice, you will learn to click the knob counterclockwise as you bob the coil. Listen for the change in the tone to switch from the down-stroke to the up-stroke. Then, while continuing to bob the coil, rotate the knob clockwise until the tone becomes even or until you hear only a slight change on both the up-stroke and the down-stroke.
- If you are having trouble ground balancing, try one or more of the following:1) Move to another spot because you may be over a piece of buried metal.2) Reduce the SENSITIVITY.3) Change your MINERALIZATION setting from LOW to NORMAL or from NORMAL to HIGH.
SEARCHING
The GoldBug2 is built for balanced searching in a tight semicircle around the front of the operator.
- Sweep the searchcoil continuously at a comfortable rate. Remember that the GoldBug2 is a motion detector and responds only when the searchcoil is moving over the ground.
- Keep the searchcoil parallel to and as close to the ground as possible. This is important for maximum coverage and depth.
- Overlap your sweeps at least one half the length of the searchcoil.
- Search in a methodical manner and sweep your searchcoil in a tight semicircle. Pay close attention to where you are going and where you have been.
- Take your time. If you walk too fast, you will not overlap your sweeps, and you will miss a lot of ground. If you sweep too fast, you will lose sensitivity and miss small, deep nuggets that normally would be within the range of your GoldBug2.
- Recheck the ground adjustment frequently by raising and lowering the searchcoil and listening for changes in the threshold volume. In some nugget-bearing areas, ground mineralization can change dramatically within a matter of feet, so check it often.
- Try reducing the sensitivity if you hear too much ground chatter and false signals. If you find you must decrease the SENSITIVITY below 5, is probably a good idea to change the MINERALIZATION setting to NORMAL and set the SENSITIVITY back to 10. You also might have to retune the GROUND REJECT control slightly. Remember, when you switch from LOW to NORMAL MINERALIZATION, you also slightly decrease the sensitivity of your GoldBug2, and the retune speed increases slightly. This increase in the retune speed helps your GoldBug2 ignore abrupt changes in ground mineralization and hot rocks, but it also results in a slight decrease in sensitivity.
- If, after switching to NORMAL MINERALIZATION, you continue to hear ground chatter and false signals, reduceSENSITIVITY even fruther. Still having problems? You must be in an area of extremely high mineralization. The only way to hunt this area is in the HIGHMINERALIZATION setting with the MODE knob in NORMAL.As in the other MINERALIZATION settings, back off on the SENSITIVITY control and readjustthe GROUND REJECT control as needed. Figure 12. Keep the bottom of your searchcoil parallelto the ground while sweeping it in a tight semicircle.
- Avoid hunting in the DISC mode unless the area is so littered with ferrous trash that it is impossible to hunt in any other way. The DISC mode will cause your GoldBug2 to ignore ferrous objects and hot rocks, but it may also cause you to miss small gold nuggets. We recommend that you hunt in either the NORMAL or BOOST modes, and switch to the DISC mode to check a target that has already been dug. Targets often come out of the ground covered with dirt, and it is impossible to tell if they are ferrous or gold. The DISC mode, however, will ignore most hot rocks and small ferrous objects while responding togold and other nonferrous metals.
- You can also use the DISC mode to identify many buried targets that produce a good, strong signal. Once you have zeroed in on a target, switch to DISC and pass the coil over it. If you still get a response, dig it.
NOTE: Keep in mind that the DISC mode is not 100% accurate. Small and/or deep nuggets giving faint target responses will often be ignored in the DISC mode. Conversely, large iron objects, like a railroad spike, may produce a good signal in the DISC mode. Remember, when in doubt, dig!
PINPOINTING
Always use the same procedure to pinpoint with the GoldBug2, regardless of control settings. With a little practice you will be able to zero in on most targets quickly and accurately. Use this procedure:
- Once a buried target is indicated by the “beep” of the GoldBug2, continue sweeping the searchcoil from side-to-side, narrowing the search pattern.
- When you have narrowed the sweep as much as you can and still hear the target, stop the searchcoil.
- Now move the searchcoil forward and then straight back toward you a couple of times. Stop the searchcoil over the area where you get the strongest response.
- Move the searchcoil slowly side-to-side one more time, stopping at the loudest target response.
- Your target should be below the “HOT SPOT” of the searchcoil, which is marked with a bull’s eye.
- Slowly move the coil aside, keeping your eyes on the spot where the HOT SPOT was, and quickly mark the target location with your finger or digging tool.
- For very strong signals, you may improve your pinpointing accuracy by adding one or more of the following steps:1) Lift the coil until the signal is just barely heard.2) Lower the sensitivity level.3) Rest the coil on the ground and move it back and forth very slowly.
- For very weak signals, try the following:1) Switch to the BOOST mode.2) Move the searchcoil closer to the ground.3) Increase the sensitivity. Recheck your ground-reject setting.4) Sweep searchcoil faster.
TARGET RECOVERY
The moment of truth!But not so fast . . . take your time. You may have pinpointed a target, but that does not mean you can reach down and pick up a nugget. Even if it is lying on top of the ground, you are going to have to determine which of those pebbles really is a gold nugget. And if you have to dig for it, you will have to determine which handful of dirt is pay dirt. Butthe worst part is that most of your targets will not be gold. They will be nails, bullets, junk, hot rocks, etc. The only way to be absolutely sure is to dig them up.
- Your objective is to recover your target neatly and quickly, leaving virtually no trace of your excavation. Repeat: No trace of your excavation. If you leave the area looking like a battlefield, blame only yourself if it has been declared off limits to metal detectors when you return.
- Your digging tool should be selected for the type of soil you are in. Most nuggets are found in hard, dry, rocky ground, so a small pick axe is first choice for most electronic prospectors. Always carry a small magnet to determine if your target is just a nail or some other ferrous object. A ferrous object will stick to the magnet, whereas a gold nugget will not.
- Once your target has been pinpointed by crisscrossing the target area with your searchcoil, lay your GoldBug2 so that the searchcoil is within easy reach but not close enough to detect your digging tool as you dig.
- If the target sounds large (a loud, s harp sound), grab a handful of dirt that you suspect holds the target and pass your hand in front of the searchcoil. If you do not hear a signal, discard the dirt and pick up another, repeating the process until you hear a signal. If the target is large, you can probably find it by searching your hand.NOTE: Because of the extreme sensitivity of the GoldBug2 searchcoil, the electrical charge of your hand may be picked up as a target. Sounds incredible, but it is true. Therefore, if you pinpoint a target and it sounds small, do not try to identify it by passing a handful of dirt in front of the searchcoil. The signal you hear may be your hand. Instead, use the sprinkle method. Test the sensitivity of your GoldBug2 to your hand by waving your empty hand in front of the searchcoil. If it is a large target, you may use your hand. The loud signal from a large target will mask any signal produced by your hand.You can find an elusive target in a handful of dirt by pouring it on top of your GoldBug2 searchcoil. If the first handful does not produce a target, pinpoint your target again and grab another, sprinkle it on the searchcoil, and repeat the process until you have identified your target (hopefully a gold nugget). Remember, many gold nuggets look just like a brown clump of dirt until you get them home and wash them off. Only your GoldBug2 knows the difference in the field.
- If the target sounds small (faint and soft), sprinkle some of the target dirt on top of the GoldBug2 searchcoil. If you get a response, you can set aside the rest of the dirt in your hand and concentrate on the dirt on your coil. If you get no response from your coil, sprinkle more dirt on the coil until you hear a signal. By repeating this process several times you should be able to identify even a very small target.
- Recheck your target area to make sure you are not leaving a second target behind.
- Scrape all loose dirt back in the hole and move on only after the area appears as it was before you got there.
FALSE SIGNALS
A false signal occurs when something that should not sound like a good target sounds like one. For example, the GoldBug2 may detect metal in your boots if you swing your searchcoil too close to your feet. Here are some other sources of false signals, and here is what to do about them.
- Hot Rocks: Mineralized rocks that respond like metal.Solutions: Most hot rocks seem to be on top of the ground, so you can just kick them out of the way and recheck the ground beneath them. The GoldBug2 will ignore some hot rocks. Certain other types of hot rocks have their own distinctive sound, which you will learn to recognize. Or you can “tune-out” most hot rocks in the air or on the ground by adjusting the GROUND REJECT knob right over the rock. If is a nugget, you will not be able to tune it out unless is very small. Many strong hot-rock signals will disappear rapidly when you lower the sensitivity level, whereas a strong nugget signal will just get weaker. Of course, the best way to check a possible hot rock is to flip your mode switch into “DISC mode”.
- Highly Mineralized Soil: Unfortunately, this is where most nuggets are found. The GoldBug2 will handle all but the very worst soil.Solutions: Switch to the HIGH mineralization setting. Ground adjust very carefully and often. Lower the sensitivity. Ground adjust to a height just high enough to eliminate most false signals and adjust your stem length to sweep at that height.
- Dissolved Salts: On a wet ocean beach or moist inland soil.Solutions: Same as highly mineralized soil.
- Junk: Nails, pull-tabs, beer cans, etc. The GoldBug2 was designed for extreme sensitivity to small bits of gold. That means it is also extremely sensitive to small bits of ferrous metal.Solution: Hunt in the NORMAL mode, but use the DISC mode to check targets to see if they are ferrous. Fortunately, there is not much junk in nugget country, and with practice you will be able to recognize a lot of it. Nails, for example, will respond with two beeps across the length of the nail (end to end), but only one beep when the searchcoil is swept at right angles to the length of the nail. Also, most trash is shallow and comes in bigger sizes than nuggets. Hence, it will usually sound different. Trash will sound off over a larger area of the coil, the tone will be louder and the pitch will increase more, starting out at a low beep and increasing to a loud signal.
- Digging Tool: If you are carrying a digging tool in one hand, your GoldBug2 may sound off each time you swing the coil beneath it.Solution: Hold the digging tool behind your back or up above your waist.
OPERATING TIPS
- We have already said it, but it bears repeating: take your time, overlap your sweeps, keep your coil close to the ground, recheck your ground adjustment often.
- Use good headphones: Your GoldBug2 will detect small, deep nuggets other detectors have missed. But to hear the very faintest targets, you will need headphones.
- Bury a small nugget and check it at different depths, sensitivity levels and in each mineralization and mode setting. Pay close attention to the nugget’s response compared to the response of hot rocks, nails and other targets. Take a small nugget with you and do the same thing when searching in unfamiliar soil.
- Practice. The GoldBug2 is easy to use, and it is highly sensitive to gold. But you still have to learn how to use it. Read this instruction manual thoroughly and use your GoldBug2 often. You will develop your own special techniques for optimum performance in the type of soil you are searching. Whatever works best for you is right, but you will have to put in hours of searching to really know what “right” is.
- Research. Spend more time deciding where to search. The odds are in your favor if you look where gold has already been found. If you know of a spot that is yielded nuggets to other detector users, but has been “hunted out,” that is GoldBug2 territory. Chances are you will find the small or deep ones they missed.
COIN SHOOTING, BEACH AND RELIC HUNTING
There is no reason why you cannot use your GoldBug2 for “coin-shooting” in parks, relic hunting old town sites or hunting on the beach. True, the GoldBug2 was designed for prospecting, but it is also suitable for Treasure Hunting. Like most coin-shooting and relic hunting machines, the GoldBug2’s iron discrimination mode can be used to filter out trash targets in areas where relics and coins are normally found.
BATTERIES
The 3-segment battery status indicator is calibrated to alkaline batteriesIf using, lithium or nickel metal hydride batteries, your detector may turn off due to insufficient battery voltage before you receive a low-battery indication. Two 9V batteries are located in separate compartments at the rear of the GoldBug2 control housing.
Figure 13.Your GoldBug2 operates ontwo 9V batteries that drop into compartments at the rear of the control housing. Snapping the door latch in place makes the battery connection.
- Make sure the backlight is turned off in daylight.
- High quality brand name alkaline batteries provide up to 20 hours of operation.
- Lithium batteries can provide up to 40 hours of operation.
- Nickel metal hydride rechargeable batteries provide about 8 hours of operation.
- DO NOT USE ordinary zinc carbon batteries. They are sometimes marketed as “heavy duty” batteries.
- At one segment, less than 5 hours of operation remain.
- If the battery icon is flashing, the detector will turn of within minutes. Replace batteries immediately.

- To replace the batteries, open the battery compartment by gently pressing down on the battery door latches. The doors are tethered with short, nylon string. Do not attempt to completely remove them.
- Tilt the housing gently, and the batteries will slide out.
- Insert the new batteries. Make sure the contact end goes in first and you match the polarity markings on the control housing.
- To close, simply hook the lower edge of the battery door over the inside of the battery compartment and gently push it shut.
- Push the latch up to make sure it has snapped in place.
DO NOT MIX OLD AND NEW BATTERIES
MAINTENANCE
Your GoldBug2 does not require a lot of care but there are a few things you should do to keep it in peak operating condition.
- If you are not going to be using it for awhile, take the batteries out. Acid damage caused by leaking batteries can be severe.
- Avoid extreme temperatures. Do not leave it inside a closed car sitting in the sun. Even worse, the trunk of a car.
- If you “scrub” the searchcoil on the ground, you will eventually wear through the bottom. Replacement coils are expensive. Instead, invest in an inexpensive coil cover.
- Although the GoldBug2 control housing is moisture and dust resistant, it is a good idea to put a plastic bag or the optional “rain cover” over the control housing if you are hunting in the rain.
- Keep your GoldBug2 dry and clean. Wipe off the lower stembefore sliding it into the upper stem, and keep the lock nut free of sand and dirt.
USING HEADPHONES
Using headphones (not included) improves battery life, and allows you to hear subtle changes in the sound more clearly, particularly if searching in a noisy location. For safety reasons, do not use headphones near traffic or where other dangers are present. This device is to be used with interconnecting cables/headphone cables shorter than three meters.
TREASURE HUNTER’S CODE OF ETHICS
LET’S PRESERVE OUR TREASURED SPORT!Laws governing the use of metal detectors are becoming more and more common. In many countries, the use of metal detectors is illegal or severely restricted. Do not let this happen in your area.
- Always check Federal, State, County and local laws before searching.
- Respect private property and do not enter private property without the owner’s permission.
- Take care to refill all holes and leave no damage.
- Remove and dispose of any and all trash and litter found.
- Appreciate and protect our inheritance of natural resources, wildlife and private property.
- Act as an ambassador for the hobby; use thoughtfulness, consideration and courtesy at all times.
- Never destroy historical or archaeological treasures.
- All treasure hunters may be judged by the example you set; always conduct yourself with courtesy and consideration of others.
Where To Use Your Metal Detector In the U.S.
National Forest and Federal Lands—Metal detecting is allowed only by special permit acquired from the federal government. Each area has a district office.Corps of Engineers, Lakes, Shorelines and Lands—Permission has been granted only on pre-disturbed sites, such as beaches and attached swimming areas. New Corps lakes and lands must be okayed by the main office of the Army Corps of Engineers. Each area has a district office.State Parks and Lands—Some state parks are open to metal detecting, but some are not. Always check with the park ranger before attempting to use your detector.Bureau of Land Management (BLM) Lands—Some areas are open for metal detecting, and some are not. Always check with the district office.City or County Park Lands—Most are open to metal detecting unless notice is given by a sign or city ordinance. When in doubt, always check with the City’s Parks and Recreation Department.Public School Grounds—Most are open to metal detecting unless notice is given by a sign, city ordinance, law enforcement official, or school employee. You should always check with the school office first.Privately Owned Lands (Private Property)—Permission is required and it is always best to have the permission in writing.Historically Marked Lands or Sites—Metal detecting is not allowed. Do not even think about it.
SPECIFICATIONS
Length …………………………..Extended ……………………………………..53”Collapsed ……………………………………..40”Weight ………………………….Complete ………………………………. 2.9 lbs.¹Control Housing …………………….. 1.0 lbs.¹Handle and Coil …………………….. 1.9 lbs.¹Frequency ………………………LF Search …………………………… 71.01 kHzResponse ……………………………… (V.C.O.)²Operating Modes …………….1. All Metal Auto-Tune (NORMAL)³2. All Metal Auto-Tune (BOOST)33. Iron Discrimination (DISC)³Mineralization Settings …….1. HIGH (attenuated, fast Auto-Tune)2. NORMAL (fast Auto-Tune)3. LOW (gain boosted, slow Auto-Tune)Ground Adjustment ………..Manual, Digitally controlled high resolution adjustmentControl Housing …………….Dust, Moisture Resistant …………………YesAudio Output …………………Speaker ………………2” Moisture Resistant Headphone Jack ………. 1/4” stereo/monoManual Threshold Tuning ……. Effective in All Metal, Auto-Tune modeSearchcoil ……………………..Type ……………………..Elliptical, Co-PlanarSizes available 10” or 6.5” standard,14” accessory coilShielding …………….100% ESI Coverage4Interchangeable ……………………………..YesWaterproof…………………………………….YesCable Length …………………………….. 7 feetHandle-Mount / Hip-Mount Convertible ……………………………………YesBuilt-in Armrest and Detector Stand ………………………………………..YesBatteries ……………………….Type ……………………………(2) 9V TransistorLife-Carbon Zinc ……………. 10-20 hours¹Life-Alkaline …………………… 25-35 hours¹NiCads ……………………………. 5-10 hours¹Notes:
- Approximate.
- Voltage Controlled Oscillator. Volume and frequency increase as target is approached.
- The Gold Bug2 is a “motion” detector. The searchcoil must be moving at least slightly to detect a target.
- Electro-Static Insulated to eliminate certain types of false signals.
Fisher® Research Laboratory does not warrant suitability to specific use. Fisher® Research Laboratory shall in no event be liable for any direct, incidental, consequential or indirect damages.This page left intentionally blank
5-Year Limited Warranty
The GoldBug2 metal detector is warranted against defects in materials and workmanship under normal use for five years from the date of purchase to the original owner.Damage due to neglect, accidental damage or misuse of this product is not covered under this warranty. Decisions regarding abuse or misuse of the detector are made solely at the discretion of the manufacturer.Proof of Purchase is required to make a claim under this warranty.Liability under this Warranty is limited to replacing or repairing, at our option, the metal detector returned, shipping cost prepaid to Fisher ® Labs. Shipping cost to Fisher ® Labs is the responsibility of the consumer.To return your detector for service, please first contact Fisher® Labs for a Return Authorization (RA) Number. Reference the RA number on your package and return the etector within 15 days of calling to:Fisher® Research Labs, Inc.1120 Alza DriveEl Paso, TX 79907Phone: 915-225-0333 ext.118Fax: 915-225-0336Warranty coverage does not include the cost of transporting the detector back to an owner who is located outside of the United States of America.NOTE TO CUSTOMERS OUTSIDE THE U.S.A.This warranty may vary in other countries, check with your distributor for details.Warranty does not cover shipping costs.According to FCC part 15.21 Changes or Modifications made to this device not expressly approved by the party responsible for compliance could void the users authority to operate this equipment.This device complies with FCC Part 15 Subpart B Section 15.109 Class B.
Copyright© 2021 by Fisher® Research Labs,Inc.All rights reserved, including the right to reproduce this book, or parts thereof, in any form.Published by Fisher® Research Labs, Inc.Fisher®is a registered trademark of Fisher® Research Labs, Inc.www.fisherlab.com1120 Alza Drive, El Paso, TX 79907 • (915) 225-0333MADE IN U.S.A.
 report this ad
MGB2-2Rev.1071321
References
[xyz-ips snippet=”download-snippet”]