![]() Operations ManualFOR HI-LOW SL BEDSwww.Flexabed.com
Operations ManualFOR HI-LOW SL BEDSwww.Flexabed.com
CHEERS TO YOU
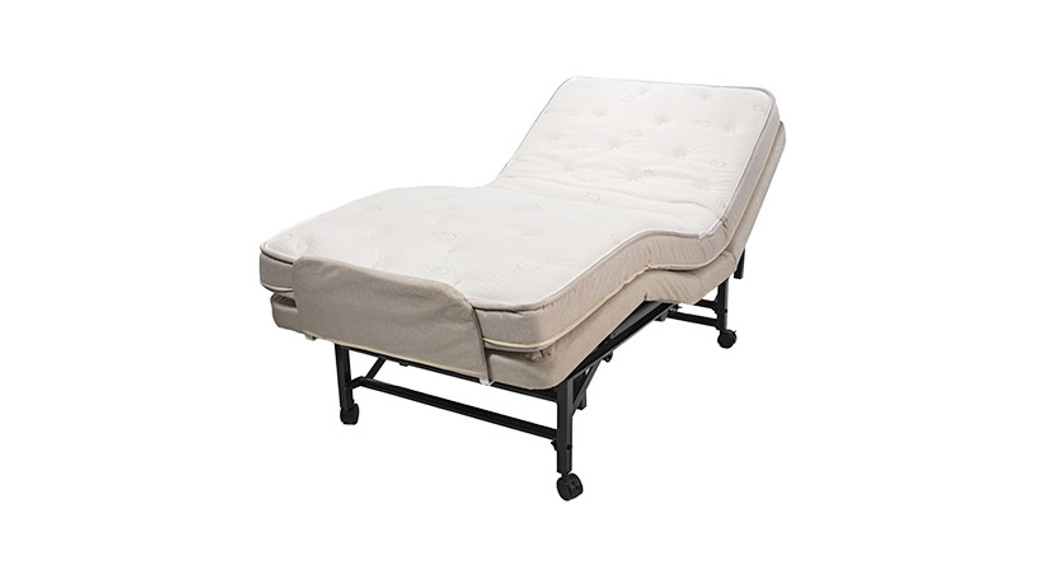
Congratulations on the purchase of your new Flexible!Your Flexible was custom built by skilled craftsmen in Lafayette, GA using the same principles of quality that we have built our reputation on since 1969. Our beds providemultilevel support in literally thousands of positions for sleeping, watching television, reading or simply relaxing.Should you ever experience technical problems with your Flexabed, simply call our customer service department at 1-800-648-1256 and we will make sure you are resting comfortably again in no time!Please take notice of your bed’s serial number below. If you ever need to call our customer service department, this serial number will allow us to diagnose your issue accurately and efficiently. Your serial number is the number on the first line of the label below.
STEP ONE Remove any items attached to the bed for shipping purposes.
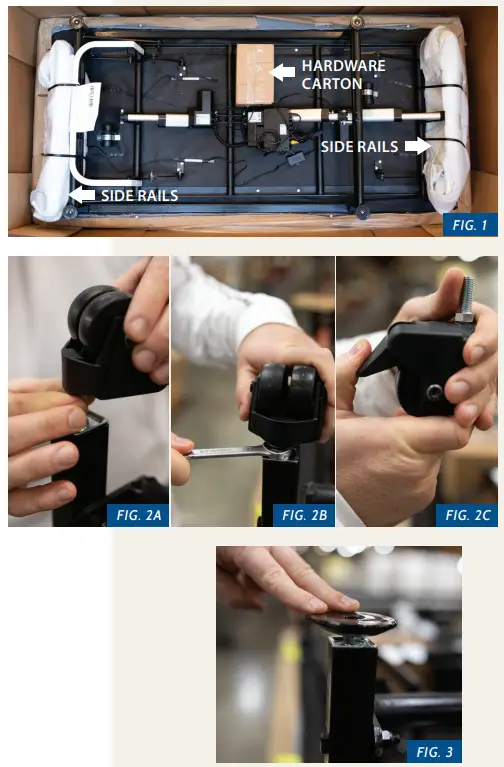
First, remove the hardware carton that is stapled to the underside of the bed (Fig. 1). The hardware carton contains your hand control, power supply, casters and/or leg caps, and bed literature. Next, remove the wooden leg pads that are inserted in to each bed leg. Finally, if you ordered safety rails, remove the rails from the frame. Each safety rail is zip-tied to the bed frame.
STEP TWO Install your casters/leg caps into each leg.
To install casters, insert the caster into the threaded insert on the bed leg. Next, using your fingers, thread the caster into the bed leg by rotating the hex nut (Fig. 2a). Once you can no longer use your finger to tighten the caster, use a ½” wrench to finish tightening the caster in to the bed leg (Fig. 2b). Once the bed is turned upright, you can lock each caster by depressing the locking lever on each caster (Fig. 2c). It may be easiest to lock the caster using your foot.If you ordered leg caps instead of casters, insert each leg cap into the threaded insert on each bed leg. Hand tightens the leg cap in the bed leg until it is flush with the hex nut (Fig. 3). You can adjust each leg cap as needed to level the bed.
STEP THREE Backup Battery
Each Flexible power supply is equipped to supply emergency bed lowering capability via battery power. Emergency battery power is optional—the bed will function properly with or without batteries in the power supply. Your bed’s power supply is mounted to the head platform section underneath the bed. The only time it is necessary to remove the power supply from the bed is when you need to access the battery compartment to change the 9-volt batteries or to replace the power supply altogether in the event of a part failure. To remove the power supply from the bed, unscrew the two Phillips head screws that secure the power supply to the bed with a screwdriver. Each power supply is shipped from the Flexabed factory with two 9-volt batteries already installed in the power supply’s battery compartment. We recommend replacing both of the 9-volt batteries every 12 months. You can replace the batteries by sliding the battery compartment door to the open position (Fig. 5). In the event of a loss of electrical power, the emergency battery power will allow you to lower the bed to a flat position. Battery backup power does not provide sufficient power to raise the bed. If you desire to have the capability to raise the bed in the event of a loss of electrical power, you will need an alternative power source such as a generator.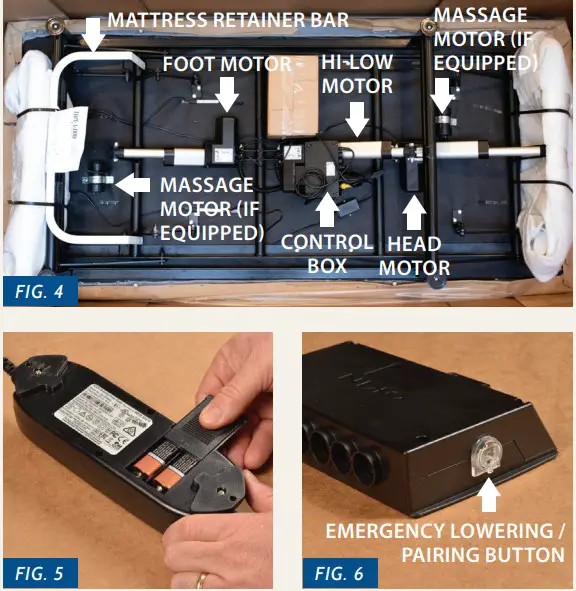 Your Flexible is also equipped with an emergency lowering button (Fig 6) that is located on the control box underneath your bed. In the event that your hand control is not functional, you can press and hold the emergency lowering button and the bed will return to the flat position. The emergency lowering button also serves as the pairing button for syncing the bed to your compatible Bluetooth device or syncing the control box to a new hand control in the event of a service replacement. Pairing instructions for Bluetooth and remote syncing are covered later in this manual on page 12.
STEP FOUR Power Supply & Cables
Your bed’s power supply is mounted to the head platform section underneath the bed. Insert the electrical plug from the power supply (Fig. 7) in to a standard 110/120-volt household electrical outlet. The power supply has a small indicator light that will illuminate green if it is properly receiving electrical power. If you have plugged the power supply into a wall receptacle and the indicator light does not illuminate green, you will need to check your cable connections and your wall receptacle. All electrical and motor cables should already be connected to their appropriate sources when the bed is shipped from the factory. In the event that a cable has become disconnected during shipping or installation, refer to “Cable Connections” on pages 14-16 in this operations manual to reconnect cables. We strongly recommend that you plug your bed into a surge protector to prevent damage to the electronics of the bed in the event of a power surge in your home’s electrical system. Flexabed’s warranty does not cover damages to the bed as the result of a power surge.
OPTIONAL Mattress Retainer Bar
If you ordered a foundation with a standard-sized mattress this step is not necessary as the mattress retainer bar is installed at the factory. If you ordered a foundation only or a foundation and a low-profile mattress, you will need to install the mattress retainer bar before using the bed. The mattress retainer bar secures the mattress in place when the bed is flexed and prevents the mattress from sliding off the foundation. Raising the foot section of the bed with your hand control will make this installation easier.  Underneath the foot end of the bed, there will be 4 bolts with a wing nut attached. Unscrew the 4 wingnuts and align the holes on the mattress retainer bar with the bolts (Fig. 8). Once the mattress retainer bar is properly aligned, hand tighten the 4 wing nuts to the bolts to secure the mattress retainer bar in place (Fig. 9). Place the mattress retainer bar cover (found in the mattress bag) over the mattress retainer bar as shown above (Fig. 10).
Safety Rails
All Flexible Hi-Low models come factory equipped with a plate mounting system at the head and foot sections of the bed to facilitate a quick and sturdy installation of your Flexabed safety rails. The only tool needed to complete a safety rail installation is a 9/16” wrench.
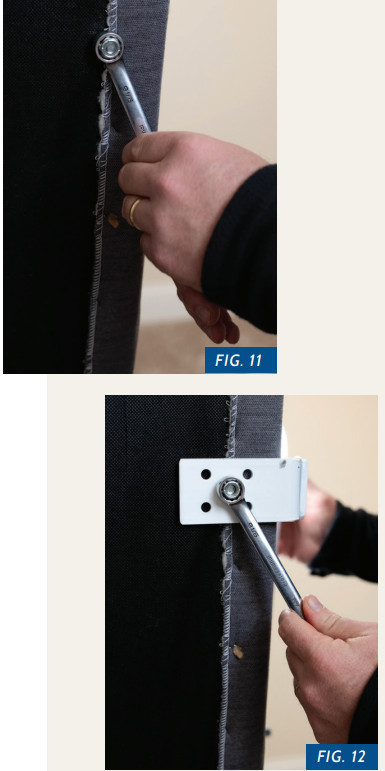
- Raise the head section of the bed to the most upright position using your hand control. If installing safety rails at the foot section, they also raise the foot section to the most upright position. On twin beds, failing to raise the head and/ or foot sections of the bed before installing safety rails can cause serious damage to your bed and damages caused by improper safety rail installation is not covered under warranty!
- After raising the head section to 100%, locate the 2 bolts and nuts on the underside of the foundation approximately 1” from the edge of the bed (Fig. 11).
- Remove the nuts from the bolts using a 9/16th wrench (Fig. 12).

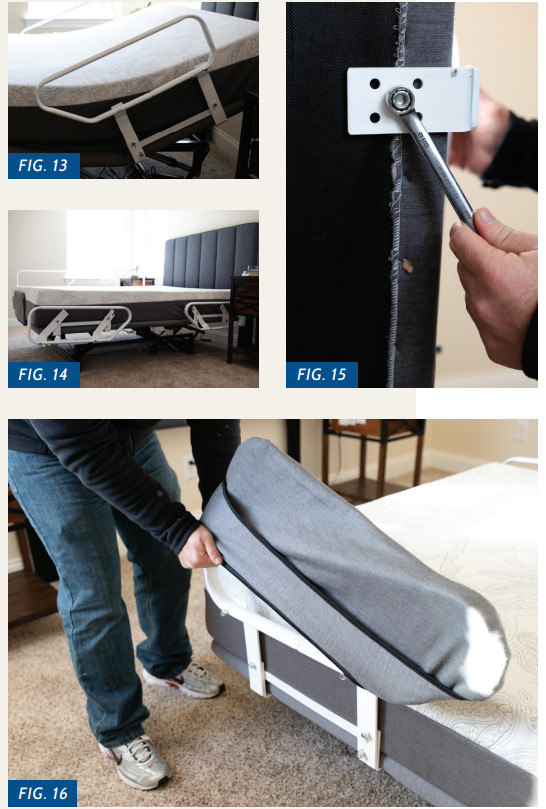
- If installing a safety rail at the head section of the bed, place the holes in the middle of the “L” shaped brackets onto the bolts making sure that the pointed end of the safety rail points toward the foot end of the bed (Fig. 13). This step is performed much easier with the assistance of a 2nd person.
- If installing a safety rail at the foot section of the bed, place the holes in the middle of the “L” shaped brackets onto the bolts making sure that the pointed end of the safety rail points toward the head end of the bed (Fig. 14). This step is performed much easier with the assistance of a 2nd person.
- Replace the nuts removed in step 3 and tighten them down with a 9/16 wrench (Fig. 15).Remember: your Flexabed side rail can be lowered to allow for easy entry to and from the bed. Simply pull UP on the side rail and swivel the side rail to the lowered position (Fig. 14 & 15). When installing safety rails on a twin-sized Hi-Low bed, the brackets will contact the metal bed frame when the bed is in the lowered position. This is normal and does not void your warranty.If you ordered safety rail covers, be sure to install the cover over the pointed end of the safety rail first (Fig. 16). Pull the safety rail over the backside of the safety rail by stretching the cover slightly. This will require some force but the cover is designed to fit tight over the safety rail. If you have ordered a safety rail cover set, you can choose to install your covers to where the storage pocket faces either the inside or outside of the bed.

WIRED &WIRELESS Hand Controls
USE YOUR SMARTPHONE AS A REMOTESimply download the Okin Smart Remote App and pair your phone with your bed.Note: If you did not select optional add-ons with your bed, the buttons will be present on the hand control but will not function.
Massage System
All Flexabed Hi-Low remotes come with massage operation buttons whether your bed was ordered with a massage or not. If you did not order a massage option when you purchased your bed then all of the message-related buttons will not be operable. If desired, you can order a massage system from your Flexabed dealer at any time for the life of your bed.
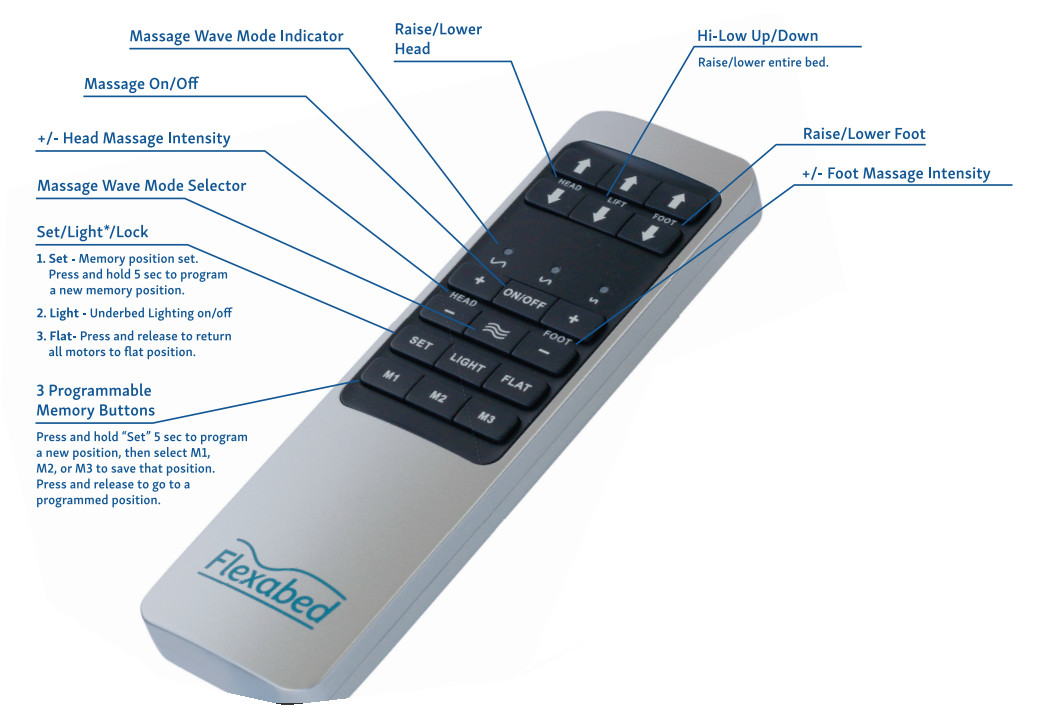
To activate the massage system, press the “On/Off” button. This will activate both head and foot massage motors in the “constant” mode. Both the head and foot massage motors have three intensity settings: low, medium and high. You can adjust the intensity setting on either massage motor by pressing the “+” or “-“ button one time for each level of intensity you want to adjust. You can turn either of the massage motors off by continuing to press the “-“ button for the motor that you want to deactivate.To activate the wave massage mode, press the massage wave mode selector button. Once you press this button, one of the massage wave mode indicator lights will be illuminated indicating which wave cycle you have selected. The light on the far left indicates a longer wave frequency while the button on the far right indicates a shorter wave frequency. You can change the wave frequency by pressing the massage wave mode selector button.
Underbed Lighting
All Flexabed Hi-Low remotes come with an under-bed lighting control button whether your bed was ordered with under-bed lighting or not. If you did not order under bed lighting when you purchased your bed then the “Light” button will not be operable. If desired, you can order an under-bed lighting system from your Flexabed dealer.
MEMORY Positions
Your Flexabed allows you to store 3 of your own custom memory positions. To program your custom memory position you will need to do the following:
- Adjust the bed to the position you want to save to memory
- Press and hold the “Set” button for 5 seconds until you hear a beep noise from the control box, then release the button.
- Press and release the memory button you want to program (M1, M2 or M3). You should hear a beep noise from the control box to confirm programming.
SYNCING Your Hand Control (wireless remote only)
If your bed is equipped with a wireless remote, the remote is automatically synced to your bed at the factory during the manufacturing process. In the event that you order a new replacement remote or a new control box in the future, you will have to sync the wireless remote to your control box. To sync a wireless remote to your controlbox:
- Press the quarter-sized pairing button on your control box two times in quick succession until the blue LED light on the pairing button is illuminated.
- Once the blue LED light is illuminated, you have 60 seconds to pair the remote to the control box. If the LED light starts blinking, you will have to restart the process.
- While the blue LED light is illuminated, press the head-up button and the flat button at the same time. If the pairing is performed correctly, the pairing button will flash two times and will make a “beep” sound indicating that the remote and control box has successfully paired.
BLUETOOTH Connectivity
Your Flexabed can be controlled with any compatible Bluetooth-enabled Android or iPhone device. To pair your device to your Flexabed, perform the following procedures:
- Activate the Bluetooth pairing mode on your Flexabed control box by either of these two methods:• Unplug the bed from your electrical receptacle for at least 60 seconds and then plug the bed back in.• Locate the quarter-sized pairing button on the side of your control box located underneath the bed (Fig. 6 on Page 4).Press the button two times in quick succession.
- If you have performed Step 1 correctly, the pairing button on the side of your control box will be illuminated in blue color. The button will remain illuminated for 60 seconds. After 60 seconds, the button will flash for an additional 60 seconds. The control box is in Bluetooth pairing mode only during the 60 seconds when the button is flashing.
- While your bed is in Bluetooth pairing mode (button flashing for 60 seconds), activate Bluetooth detection on your compatible device and perform a scan for available devices. You should see a device named “OKIN-Receiver.” Select the device named “OKIN-Receiver” and pair it to your device.
- Download the Okin Smart Remote App from your device’s respective app store.
- Open the app and you should see the home screen (Fig. 17).
- Swipe the screen to the right for the additional functions menu (Fig. 18).
- Press the gear icon on the lower right to open the settings menu (Fig. 18), then press “Select Device” (Fig. 19).
- Put your bed back in Bluetooth pairing mode (see Step 1) and while the pairing button is blinking, press “Scan For Devices” in the app (Fig. 20).
- You should see “Okin-Receiver” listed under “Devices” (Fig. 20). Press the device labeled “Okin-Receiver.”

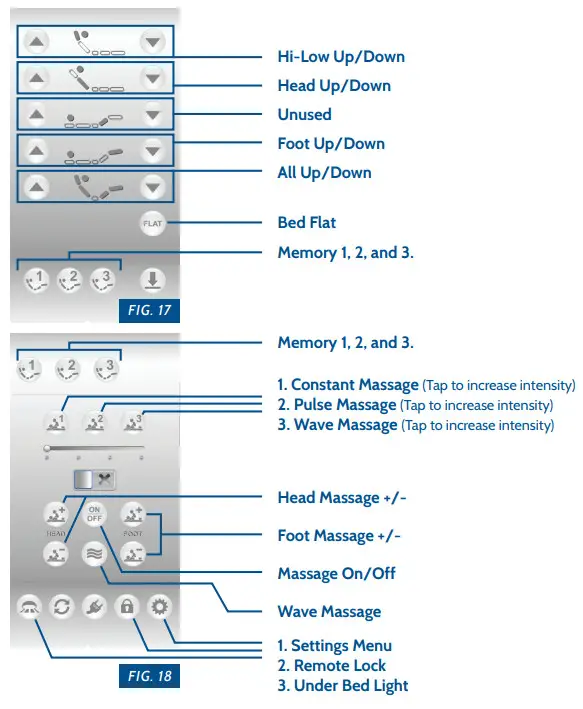
Once you have selected the device you will be returned to the app’s home screen where you can control the bed.There are two menus in the app that allow you to control your bed. The home screen menu (Fig. 17) contains the basic bed operation controls; the second menu (Fig. 18) offers additional functions.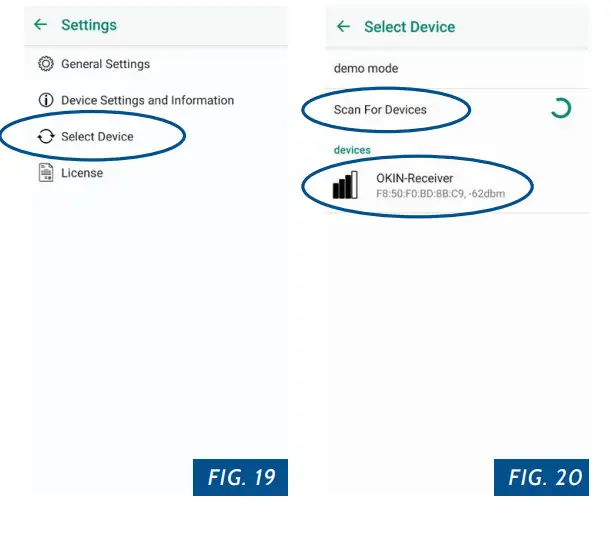
CABLE Connections
As stated earlier in this manual, all cables are set up and connected at the factory when your Flexabed is built. However, those cables can become disconnected during the shipping and delivery process. Also, there may be a point in time during the life of your Flexabed where you need to replace a component of the motor system. The purpose of these instructions is to help you properly connect all cables and connections on your bed to ensure proper operation.Your bed’s power supply (Fig. 17) is mounted to the head platform section underneath the bed. If your bed is not functioning properly, The first thing you should check is the connections on the power supply.

POWER SUPPLY CONNECTIONS
The power supply (Fig. 17) is mounted to the head platform section underneath the bed. The power supply is a critical component and is the first item that should be checked in the event that your bed is not operating properly. The power supply is a small black box that plugs in to your home’s wall receptacle to supply electrical power to the bed. The power supply has a small indicator light that will illuminate green if there is power being supplied. If the indicator light is not illuminated, check the following two connections that are located on opposite ends of the power supply (Fig. 17).
- Power cord connection—This is the cable that plugs directly into your wall receptacle. Check and make sure the cable is plugged in securely to the power supply. It is also a good idea to check your wall receptacle with another appliance (i.e. lamp, radio, etc) to make sure the receptacle is supplying power.
- Extension cable connection—This cable runs from the power supply to the 3-way splitter cable on the head motor. Check to make sure the cable is plugged in securely to the power supply.
HEAD MOTOR CONNECTIONS
The 2nd place to check and ensure that all cables are properly connected is the 3 way splitter cable that is connected to the head motor. Check the following 3 connections (Fig. 18).
- Male Connector—This is the shortest cable coming out of the head motor. It has a 2-prong male connector. This connector should be plugged in to the extension cable that comes from the power supply.
- Female Connector—This connector is should be plugged into the 2-prong male connector wire that comes from the foot motor (curly telephone style wire). The foot motor is the only motor that points towards the foot-end of the bed.
- 7 Pin Connector—This connector should be plugged into the cable that comes directly from the control box that is attached to the foot motor.
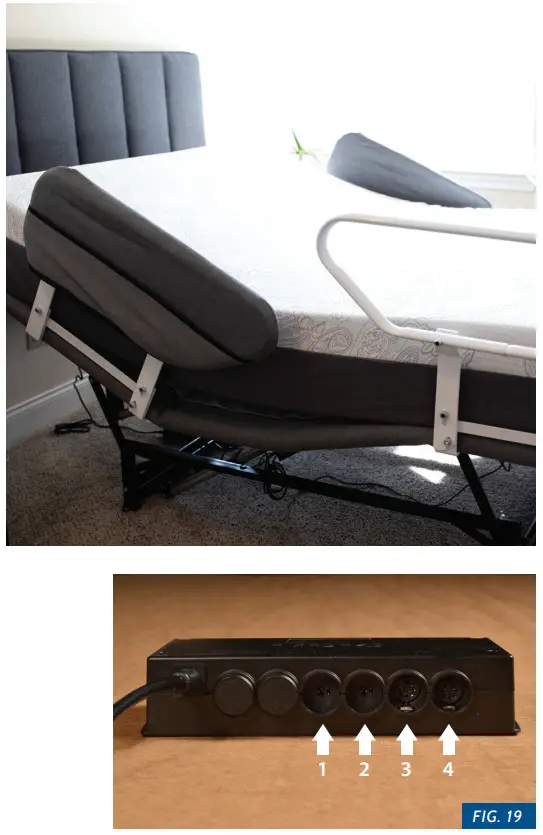
CONTROL BOX CONNECTIONS
The control box is the “brain” of your Flexabed which allows the hand control to communicate with all of the motors on your bed. There are four ports on the control box. If you have checked all connections on the power supply and the head motor splitter cable, the next step is to check all connections on your control box and make sure that the plugs are securely connected to the control box (Fig. 19).Port 1 (Hi-Low Motor) – This port is where your hi-low motor plugs in.Port 2 (Unused) – This port is not used. Nothing should be plugged into port #2.Port 3 (Massage) – This port is the massage system port. Your bed may or may not be equipped with a massage system depending on if you ordered it or not when you purchased your bed. If your bed is equipped with a massage system, the massage 2-way splitter cable should be plugged into this port. The head and foot massage motors plug into the 2-way splitter cable and the cable with the red label plugs into the foot massage motor. If your bed is not equipped with a massage system, then nothing should be plugged into this port.Port 4 (Accessory & Wired Remote Port) – This port is used for optional accessory items such as an LED under-bed lighting system and/or wired hand control. It is possible that nothing is plugged into this port if you have a wireless hand control and did not order an under-bed lighting system. The only time that something must be plugged into this port is if you have wired hand control, and in that case, the hand control must be plugged into this port at all times.
HI-LOW SL BED Limited Lifetime Warranty
 report this ad
Because Flexabed builds every bed by hand, we stand behind our product with a great warranty.This warranty covers the entire bed—each and every component and design feature (even the mattress!), without exception.
BEST OF ALL
Our warranty is even transferable. It’s not limited to the person who purchases the bed. So if you sell or give the bed to someone else, it remains under warranty.This warranty does not apply to any product subjected to customer misuse, electrical surges, damage in transit or handling by the delivering agent unless the customer signs the bill of lading with damages noted, or which, in the opinion of Flexabed, has been altered or repaired by an unauthorized representative in any way that affects the reliability or detracts from the performance of the product. Replacement parts are warranted for the unexpired balance of the original warranty period. This warranty does not include responsibility for transportation or handling expenses except those specified. The foregoing is in lieu of all other warranties, expressed, implied, or statutory. Flexabed neither assumes nor authorizes any person to assume for it any other obligation or liability in connection with the sale of this product.In order to prove a defect in materials or workmanship, the customer will be expected to provide pictures and/or video as prescribed by Flexabed service personnel in order to prove the defect is not normal wear and tear on the product.If you experience any problem with your Flexabed at any time regardless of the stage of your warranty, please contact us and we will make every effort to help you.
MOTORS AND LIFTING MECHANISM
- During the first 12 months after purchase, Flexabed will provide in-home parts and labor at no charge. All parts will be shipped via UPS ground. Any expedited charges must be paid by the customer.
- After the first year, any part may be sent to the factory freight prepaid by the customer for repair, reconditioning or replacement at the factory’s option for a $100.00 fee plus any shipping charges incurred to ship the part back to the customer.
MATTRESS AND UPHOLSTERED BASE
- During the first 12 months after purchase, Flexabed will provide in-home repairs or replacement at the factory’s option at no charge provided the defect is demonstrated to be a defect in materials or workmanship and is more than normal wear and tear.
- After the first year of purchase, the mattress and or the upholstered base may be sent to the factory freight prepaid by the customer for repair, reconditioning or replacement at the factory’s option for a $100.00 fee and will be returned freight-collect at the customer’s expense.Note – If the mattress shows unmistakable signs of abuse or wetting the warranty is void and you will have the option to have it returned to you as-is freight collect or discarded.

WelcomeWe welcome you as a Flexabed owner, and we know you will enjoy the years of comfort and pleasure your new Flexabed will provide. Should your bed ever require service, whether or not the warranty applies, call the manufacturer at the number below or write to:Flexabed Inc., P.O. Box 568,LaFayette, Georgia, 307281-800-648-1256We’re based in friendly LaFayette, Georgia.1-800-648-1256 | [email protected]www.Flexabed.com
References
[xyz-ips snippet=”download-snippet”]