
![]()
OCEAN SCOUTQuick Start Guide

Power Button– Ocean ScoutTM has three power states: On, Off, & Auto Shutdown.
- On Takes approximately 4 seconds (during bootup the FLIR splash screen appears on the eyepiece display).
- Off Push the power button to turn the camera off.
- Auto Shutdown – If no buttons are pushed for about five minutes, Auto shutdown 30s appears in the display and after counting down for 30 seconds, the camera will turn off.
Display Brightness – If the camera is on, press to toggle through 5 brightness settings.White/Black Hot/InstAlert™ -In White Hot, hotter items appear as white or light grey. In the Black Hot, hotter items appear as black or dark grey. In InstAlertTM, hot items in a scene are highlighted in red.Zoom/Freeze Frame -A quick press causes the image to toggle between 1x and 2x zoom (320 model only). With the 240 camera, the zoom button freezes the image with one click and unfreezes the image with a second click.Diopter Controls -The diopter allows adjustment of the eyepiece for optimal viewing.

Charging the Camera -The battery in the camera should be fully charged prior to use. The initial charge time is approximately 4 hours. The camera MUST be turned OFF throughout the charging cycle to obtain a full charge.Caution! -Charging MUST only be done at temperatures from 0°C to 40°C (32°F to 104°F) or battery damage may occur.To charge the camera, lift the cover from the mini-USB port, plug in the mini-USB cable provided with the camera, then plug the opposite end into a USB power source. ·
- Charging correctly - indicator lit orange.
- Fully charged indicator lit solid green.
- While the camera is on, a battery status indicator always appears in the corner of the display image. This indicator provides an estimation of the remaining battery charge.

Mini-USB/Video Adapter Cable
To obtain analog video out (320 model only), insert the adapter cable into the mini-USB connector. The camera will detect the adapter cable and provide the video stream. Use an RCA cable to connect to a monitor or a video recorder.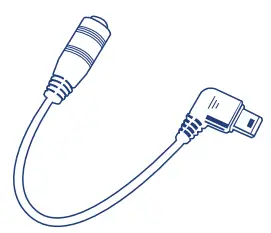
Diopter Controls
The diopter adjustment lever allows you to adjust for optimum image sharpness in the eyepiece. When the diopter adjustment lever is pointing straight away from the front of the camera, it is in the neutral position. Adjust the diopter setting for the sharpest image in the viewfinder.
[xyz-ips snippet=”download-snippet”]