![]() FLIR BREACH®MultifunctionalThermal Imaging MonocularUSER MANUAL
FLIR BREACH®MultifunctionalThermal Imaging MonocularUSER MANUAL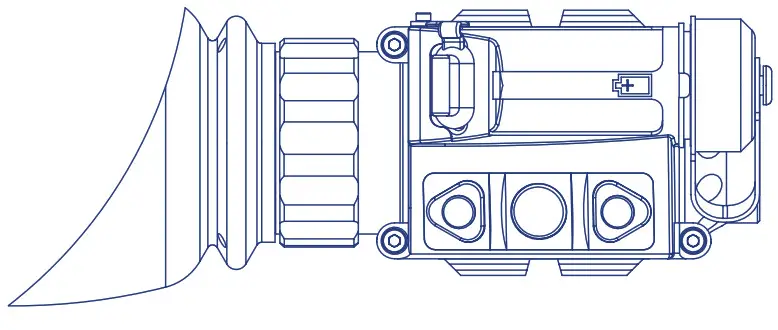
© 2020 FLIR Systems, Inc. All rights reserved worldwide. No parts of this manual, in whole or in part, may be copied, photocopied, translated, or transmitted by any electronic medium or in machine-readable form without the prior written permission of FLIR Systems, Inc.Names and marks appearing on the products herein are either registered trademarks or trademarks of FLIR Personal Vision Systems and/ or its subsidiaries. All other trademarks, trade names, or company names referenced herein are used for identification only and are the property of their respective owners.This product is protected by patents, design patents, patents pending, or design patents pending.If you have questions that are not covered in this manual or need service, contact FLIR customer support for additional information prior to returning a camera.Phone:1-888-959-2259Email: https://flir.custhelp.com/This documentation is subject to change without notice.
Proper Disposal of Electrical and Electronic Equipment (EEE)
 The European Union (EU) has enacted Waste Electrical and Electronic Equipment Directive 2002/96/EC (WEEE), which aims to prevent EEE waste from arising; to encourage reuse, recycling, and recovery of EEE waste; and to promote environmental responsibility.In accordance with these regulations, all EEE products labeled with the “crossed-out wheeled bin” either on the product itself or in the product literature must not be disposed of in regular rubbish bins, mixed with regular household or other commercial waste, or by other regular municipal waste collection means. Instead, and in order to prevent possible harm to the environment or human health, all EEE products (including any cables that came with the product) should be responsibly discarded or recycled.To identify a responsible disposal method where you live, please contact your local waste collection or recycling service, your original place of purchase or product supplier, or the responsible government authority in your area. Business users should contact their supplier or refer to their purchase contract.
Important Instructions and Notices to the User:
Modification of this device without the express authorization of FLIR Systems, Inc. may void the user’s authority under FCC rules to operate this device.Note 1: This equipment has been tested and found to comply with the limits for a Class B digital device, pursuant to Part 15 of the FCC rules. These limits are designed to provide reasonable protection against harmful interference in a residential installation.This equipment generates, uses, and can radiate radio frequency energy and, if not installed and used in accordance with the instructions, may cause harmful interference to radio communications. However, there is no guarantee that the interference will not occur in a particular installation. If this equipment does cause harmful interference to radio or television reception, which can be determined by turning the equipment off and on, the user is encouraged to try to correct the interference by one or more of the following measures:
- Reorient or relocate the receiving antenna
- Increase the separation between the equipment and receiver
- Connect the equipment into an outlet on a circuit different from that of the receiver
- Consult the dealer or an experienced radio/ television technician for help.
Industry Canada Notice:This Class B digital apparatus complies withCanadian ICES-003.FLIR Personal Vision Systems9 Townsend West Nashua, NH 03063Phone: 1-888-959-2259or (603) 324-7900Fax: 1-888-959-2260E-mail: flir.custhelp.com/www.flir.comExport InformationEquipment described herein may require US Government authorization for export purposes. Diversion contrary to US law is prohibited.©2018 FLIR Systems, Inc.Specifications are subject to change without notice, check our website: www.flir.com
SAFETY STATEMENT
- Read and follow all instructions
- Read all warnings
- Only use the attachments/accessories specified by the manufacturer
- All service must be provided by the manufacturer
WARNING:DO NOT DISASSEMBLE THE DEVICE.Disassembly can cause permanent damage and void the warranty.WARNING:This product contains natural rubber latex, which may cause allergic reactions!CAUTION:Use of controls or adjustments or performance of procedures other than those specified herein may result in hazardous radiation exposure.CAUTION:
- Do not point the camera at high-intensity radiation sources such as the sun, lasers, or arc welders
- Do not leave fingerprints on the camera’s infrared optics. Clean only with low-pressure fresh water and a lens cloth
- Keep the equipment clean. Protect it from moisture, dramatic temperature drops, and electrical shocks
- DO NOT force the equipment controls past their stopping points
- DO NOT leave the equipment activated during breaks in operation
- DO NOT store the equipment with the batteries installed
- Thoroughly clean and dry each item before placing them into the storage case
NOTES:
- To avoid losing unsaved data, DO NOT remove the batteries or disconnect the external power source while the product is on
- Inadvertent sun damage is not considered a defect in material or workmanship and is therefore not covered in the product warranty
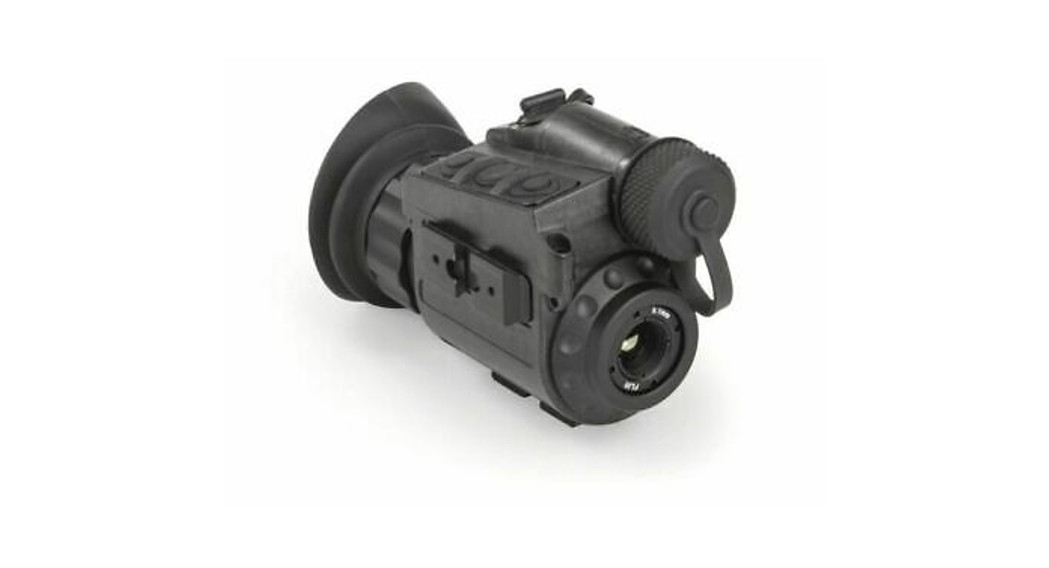
Breach® Thermal MonocularThe Breach thermal imaging monocular is used as a handheld viewer, and it has the ability to save an image or a video clip.Nevertheless, in the industry and throughout this manual, this type of device is also referred to as a camera.
INTRODUCTION
MONOCULARThis manual covers the FLIR Breach thermal monocular and all applicable components. It is recommended that you read and understand this manual to optimize the monocular’s operation.INTRODUCTIONBuilt for the rigors of law enforcement, the FLIR Breach spots the heat of suspects and objects in total darkness. Featuring the new FLIR Boson core and a compact design, the FLIR Breach offers unmatched tactical awareness. Weighing only 7.4 ounces (210 grams), the FLIR Breach can be concealed in a pocket or mounted to a helmet with its mini-rail feature, while adding minimal weight to officers’ heavy gear. Additional features include onboard recording and seven palettes for fast detection of suspects or evidence, day or night.Breach employs a fixed focus 1x lens and provides up to 4x digital e-Zoom. It has three external buttons for unit operation and an internal menu to configure options. The Breach monocular is powered by one CR123A (3V) battery.The breach has three integral rail mounts. The mineral design allows for mounting on a wide variety of in-service head mounts, helmet mounts, and installing additional equipment.Equipped with a digital compass and inclinometer, Breach offers the operator the tools necessary to interpolate accurate distance to the target and target orientation.The Breach monocular has internal storage for video recording and pictures. It is capable of digital video out via the USB-C. The breach has internal video and image recording. The files can be transferred directly to the computer.
NOTE: Internal recording and image capture cannot be used when USB-C is plugged into a computer.
FEATURES
- FLIR BOSON 12μm Pitch Thermal Sensor
- High-resolution FLCOS display
- Multiple palettes
- Integrated digital compass and digital inclinometer
- Onboard video recording and picture capture (internal storage)
- USB-C connectivity
- Battery status indicator
- Rapid start-up
- Easy adaptability to a wide selection of head and helmet with Dove Tail/ Bayonet interfaces
- Rugged construction
- Limited 3-year warranty
- 10-year warranty on FLIR detector
- Made in the USA
REGISTER YOUR BREACHIn order to validate the warranty on your FLIR Personal Vision System product you must register it on: https://www.flir.com/support-center/support-hq/
INFRARED THERMAL VISION VERSUS IMAGE INTENSIFIED NIGHT VISIONBreach makes images from heat, not light, a feat impossible for the naked eye or image intensified (I2) night vision devices. This allows you to see clearly without any visible light. People, animals, and objects all generate or reflect heat and are clearly seen by the Breach in even the most adverse conditions.BREACH ENABLES THE USER TO:
- See people or objects in difficult terrain, reduced visibility, or total darkness
- See through smoke, dust, and light fog
- See more and further than low light night vision
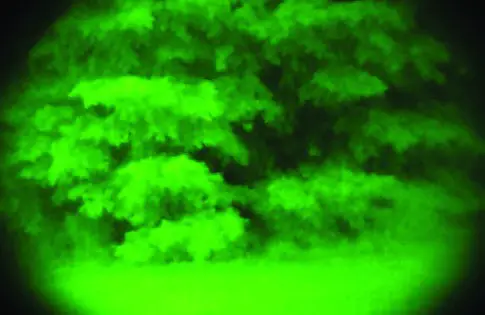 IMAGE INTENSIFIED I²
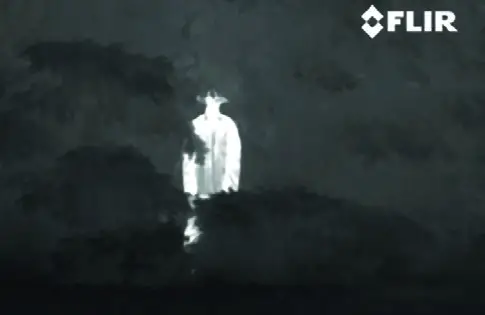
THERMAL IMAGING
DETECTION, RECOGNITION, IDENTIFICATION
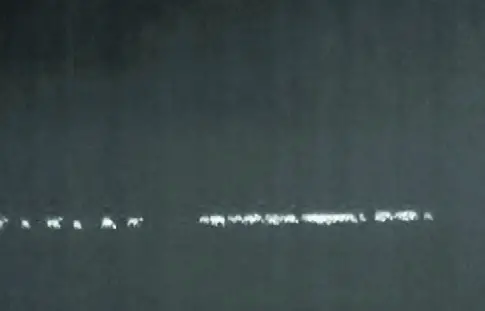 DETECTIONI see something.
 RECOGNITIONIt’s a four-legged animal.
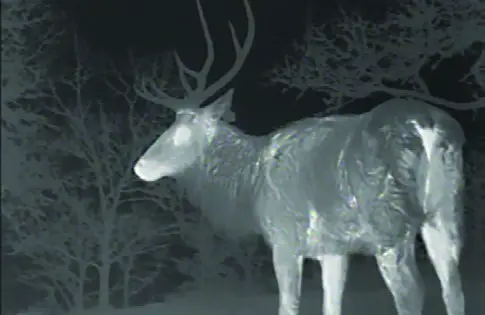 IDENTIFICATIONI can tell it is an Elk.
GETTING STARTED
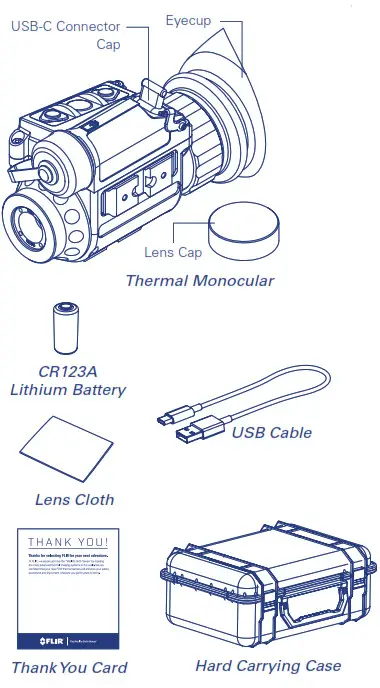
UNPACKING AND INSPECTINGThe FLIR Breach monocular is available with the features, options, and accessories described in this manual. Refer to the packing list enclosed with your product to determine the actual contents of your product package. In addition to the product, the following items are included in the product package:
- FCC Declaration of Conformity
- CE Declaration of Conformity
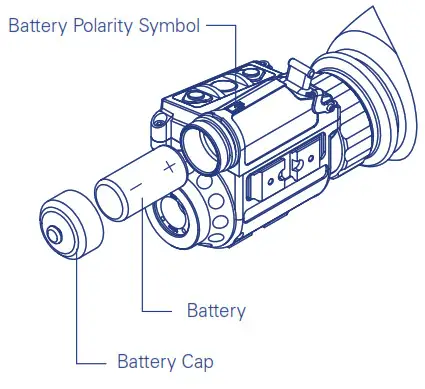
BATTERYThe FLIR Breach monocular uses one standard CR123A Lithium battery or one CR123 type rechargeable battery with voltage from 3.0V to 3.7V.BATTERY STATUS INDICATORWhile the monocular is ON, a battery status indicator is always shown in the corner of the display. This indicator provides an estimation of the remaining battery charge.BATTERY INSTALLATIONVerify that the equipment is off before installing the battery.Install the battery as follows:
- Unscrew the battery cap.
- Insert the CR123A battery into the battery compartment, observing the polarity markings on the body of the monocular.
- Replace the battery cap.
OPTIONAL EQUIPMENTOptional items are shown and listed in the table below. The PART NO. column indicates the primary number used by the manufacturer to identify an item.
| IMAGE | DESCRIPTION | PART NO. |
 |
Swing Arm #37Mini rail to Bayonet adapter mounts monocular to standard US Mil headset (PVS7/PVS14 type) and helmet. | ANHG000002 |
 |
Swing Arm #172Mini rail to Dovetail adapter mounts monocular to Dovetailtype headsets and helmet mounts. | ANHM000172 |
OPERATING THE SYSTEM
SYSTEM CONTROLSThis section details the use of the Breach controls.
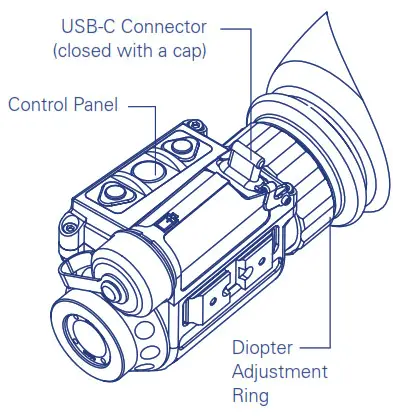
DIOPTER ADJUSTMENTThe diopter adjustment allows a user to alter the viewfinder to accommodate that individual’s eyesight for optimum image sharpness. While looking through the eyepiece, rotate the diopter adjustment ring to optimize the sharpness of the image in the viewfinder.
CONTROL PANEL BUTTONSThe control panel buttons configure operational settings.

TURNING ON/OFFPush and hold the ● button to turn on the power.Hold down ● the button again for more than 8 seconds to turn off the power. DISPLAY BRIGHTNESS CONTROLPush the ▲button to increase the screen brightness or push the ▼ button to decrease the screen brightness.
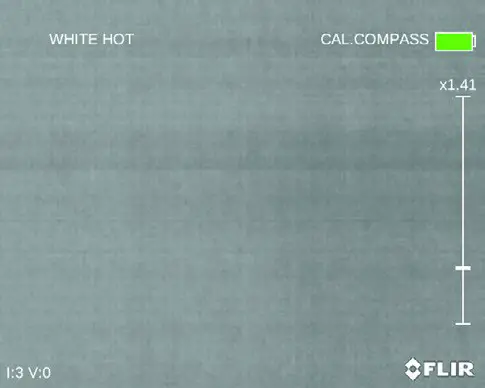
DIGITAL ZOOM CONTROLPush and hold the ▲ button to increase the camera e-Zoom continuously from 1x up to 4x zoom. Push and hold the ▼ button to decrease e-Zoom. The central part of the image is magnified by the zoom level selected.When e-Zoom is changed from 1x a scale will appear on the right side of the display.The actual e-Zoom value will be displayed at the top of the scale. The scale will continue to display until e-Zoom is returned to 1x.
USER-CONTROLLED MANUAL NON-UNIFORMITY CORRECTION/FLAT-FIELD CORRECTION (UCMNUC/FFC)Use UCMNUC/FFC (User-Controlled Manual Non-Uniformity Correction/Flat-Field Correction) function to improve image quality. As the camera changes temperature, its pixels may drift due to internal and external temperature change. The pixels do not drift uniformly. The camera software compensates for the drift up to an accurate position point. The UCMNUC/FFC function is triggered when the limit is reached. A uniform mechanical shutter is placed between the lens and the detector for a moment, and the signal is processed.Push the two control buttons ▲ and ▼ at the same time manually trigger a User-Controlled Manual Non-Uniformity Correction/Flat-Field Correction.If necessary, interrupt the automatic UCMNUC/FFC process by pushing the central ● button on the control panel during the 5-second countdown which appears at the bottom of the display. The shutter will not interrupt viewing.SNAPSHOTThe snapshot function is used to capture images and to record video. Up to 1,000 pictures and up to 2.5 hours of recorded video can be stored in the camera’s internal memory at one time.TAKING A PICTUREClick ● the button to capture a single image. Image Capture # will appear in the middle of the displayRECORDING VIDEODouble click ● the button to begin video recording and double-click again to stop recording.MAIN MENUWhen the monocular is turned on pushing and holding ● buttons will bring up the Main Menu selection.Use ▲/▼ buttons to navigate through the items on the menu.Push the ● button to view the settings available for the item selected.USING USB-C CONNECTORRemove the connector protective cap. Connect USB-C cable.To view video using the USB-C, connect the cable to a USB input of a computer. Then it can be viewed as an external webcam.To read/copy/delete files on the internal memory of Breach, operate it like any external mass storage device connected by a USB cable.To power, the Breach from an external source plugs the cable into any standard USB power source.
MAIN MENUMost setup options can be accessed from the MAIN MENU.To display the MAIN MENU, hold down the central ● button on the control panel.
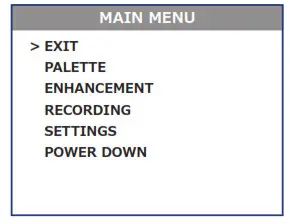
Once the MAIN MENU is displayed, use ▲/▼ buttons to navigate through the items on the menu.Push ● button to view the settings available for the item selected.Use ▲/▼ buttons to adjust the settings when specified on the menu screen with < > symbols. Select the EXIT item and then push ● the button to return to the MAIN MENU.
PALETTE MENUThe PALETTE menu allows you to select from a choice of temperature imaging modes.The palettes act as color templates for the visualization of temperature changes in the scene.
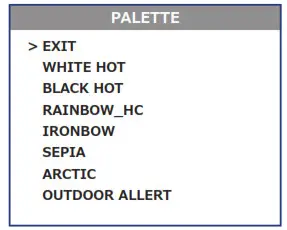
To navigate through the items on the PALETTE menu, press ▲ or ▼ button.There are seven palettes available. Please see the following images for examples of Breach’s color palettes.WHITE HOTMost commonly used palette. Hot objects appear white. Good for scenes with either high or low contrast.

BLACK HOTHot objects appear black. Scenes appear more lifelike than White-Hot, especially at night.

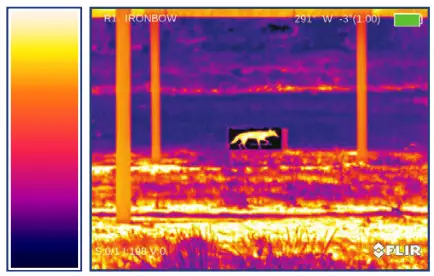
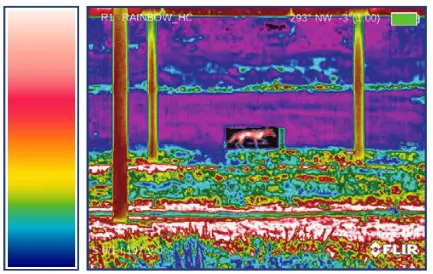
RAINBOW_HCThe Rainbow is a multi-color thermal palette that displays the temperature of objects in a wide color range.

RAINBOWRainbow color palette simulates the glow of objects that are heated to visible incandescence, similar to iron in the fire.
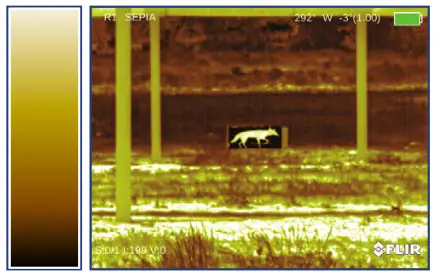
SEPIAThe Sepia thermal palette displays the heat intensity from black to yellow.
ARCTICThe Arctic is a thermal palette that sharply displays objects with higher temperature differences.
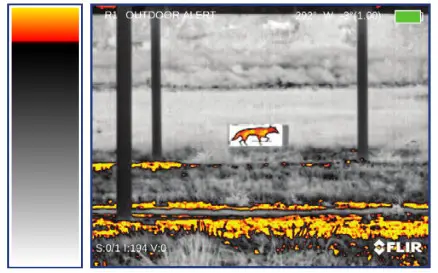
OUTDOOR ALERTOutdoor Alert combines the life-like detail seen in Black Hot images with the easy-to-spot bright targets highlighted from dark red to bright yellow to help identify target features. It assumes that the target is hotter than its surroundings.
ENHANCEMENT MENUThe ENHANCEMENT menu settings allow the user to take advantage of advanced signal processing algorithms and improve the quality of the image under a variety of different thermal environments.
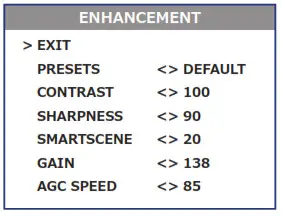
PRESETSA group of default settings for various environmental conditions that are optimized toward best camera performance is available: Default, Sky/Sea, Indoors, and Outdoors.For example, turning the “Sky/Sea” preset will improve contrast, but at the possible loss of some scene content. This is especially helpful in scenes with great expanses of visible sky or water. The following table is provided all presets and their settings.
| ITEM | RANGE | DEFAULT | SKY/SEA | INDOORS | OUTDOORS |
| Contrast | 50 to 250 | 100 | 100 | 100 | 100 |
| Sharpness | 0 to 800 | 90 | 100 | 75 | 110 |
| Smart Scene | 0 to 100 | 20 | 30 | 10 | 80 |
| Gain | 2510800 | 138 | 120 | 110 | 138 |
| AGC Speed | 0 to 100 | 85 | 85 | 85 | 99 |
CONTRASTActive Contrast Enhancement (ACE) – a digital contrast correction that allows for a smart scene optimization based on dynamic adjustments, where a variety of contrast levels occur. See presets table for adjustment range and default value. Lower values will cause hotter objects to have greater contrast, and higher values will cause colder objects to have greater contrast.

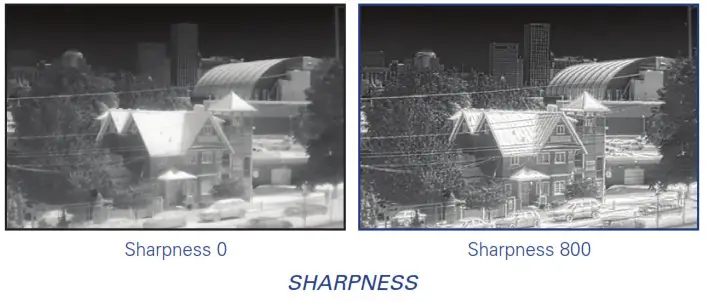
SHARPNESSSecond Generation Digital Detail Enhancement (DDE) – a sharpness correction that digitally enhances the picture, significantly improving edge sharpening and further reducing image noise. See presets table for adjustment range and default value. Lower values will create an image with softer edges. Higher values will make objects sharper, enhance details, and increase the signal-to-noise ratio.
SMART SCENESmart Scene Optimization (SSO) – a fine-tuning computational correction that significantly improves overall visual acuity for targets with thermal signatures similar to the surrounding background. Higher values provide a more linear automatic gain control, and objects with similar, but not identical temperatures can be differentiated with greater accuracy. See presets table for adjustment range and default value.

GAINAutomatic Gain Control (AGC) – a correction that is used to automatically adjust the gain to an appropriate range, the weaker the image signal, the stronger the gain. See presets table for adjustment range and default value.

AGC SPEEDAGC Speed – parameter that allows the user to control the refresh rate of Automatic Gain Control (AGC). See presets table for adjustment range and default value.
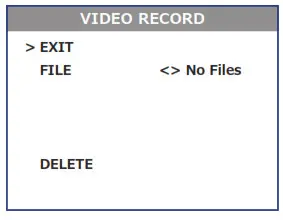
RECORDING MENUThe RECORDING menu allows the operator to delete the selected image and video files stored in the camera.
SETTINGS MENUThe SETTINGS menu allows you to make compass calibration, to change the position of the image on the screen, pair a new remote with the camera, as well as to restore the settings to their factory defaults. The Firmware (FW) revision number is listed at the bottom of the menu display.
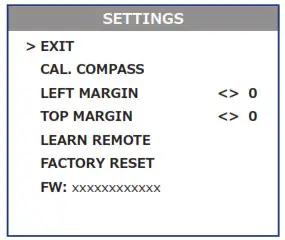
CALIBRATE COMPASSSelect to calibrate the compass. When selected, rotate the camera in all directions for best calibration results.LEFT MARGINShifts the screen left to right.TOP MARGINShifts the screen up and down.
LEARN REMOTELearns the remote channel and encryption. Select this to pair a new remote with the camera. When pushed, the phrase PUSH ANY REMOTE KEY will appear. Push any button on the remote. When calibration is successful, the phrase LEARN SUCCESSFULly will appear.NOTE: Remote may not be available in every countryFACTORY RESETResets the camera to factory defaults.FW: Displays the System software version and the thermal camera software version.POWER DOWN MENUSelect POWER DOWN item of Main Menu and then push ● button to turn monocular off. Or hold down ● the button for more than 8 seconds. STANDBY MODESThe available Standby mode within the Power Down menu is available only when used with the remote control. While in Standby mode, BREACH can be activated by using the remote.
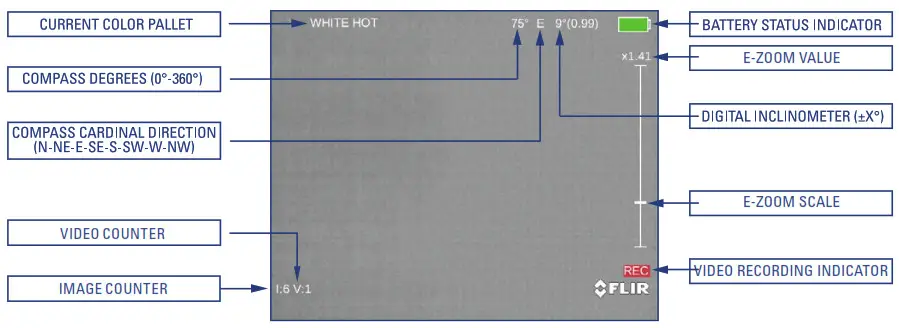
DISPLAY INDICATION
Information on the current operating state (battery status, active function, etc.) is continuously displayed, making the field operation of the FLIR Breach simple and convenient.
MAINTENANCE
BATTERY REPLACEMENTRefer to Part 2.2 for the battery installation procedure.CLEANING BREACHWipe the housing with a damp cloth as needed.CAUTION: Do not use abrasives or solvents to clean the housing, lens, or display window. Do not use ammonia-based cleaning products to clean the lens. Doing so may damage the anti-reflective coating of the lens.The Breach thermal camera lens is designed for the harsh outdoor environment and has a coating for durability and anti-reflection, but it may require cleaning occasionally. Avoid scratching the lens and/or leaving fingerprints on the optics. The camera optics can be damaged by improper cleaning. Clean the lens according to the instructions below when image quality degradation is noticed or excessive dirt or other contaminant is on the lens.Do not use abrasive materials, such as paper or scrub brushes as this will possibly damage the lens by scratching it. Only wipe the lens clean when there is visible contamination on the surface.
PREFERRED METHOD FOR CLEANING THE LENSMaterials:
- Optical-grade cloth
- Pure water (de-ionized or other)
- Isopropyl alcohol (IPA)
Saturate a piece of the lens tissue with the water and drape it over the lens. Let the surface tension of the water pull the tissue onto the lens surface and then drag the tissue across the lens surface. Repeat several times with different pieces of tissue.Repeat the same step using IPA instead of water. Drag the final piece of tissue over the lens several times to prevent pooling, which could leave a residue behind.
WARRANTY
GLOBAL LIMITED WARRANTYFollow the link to https://www.flir.com/support-center/warranty/ retrieve FLIR’s warranty document.PRODUCT REGISTRATIONIn order to validate the warranty on your product, FLIR Personal Vision Systems must register the product on https://www.flir.com/support-center/support-hq/.
OBTAINING WARRANTY SERVICE9 Townsend West Nashua, NH 03063Phone: 1-888-959-2259or (603) 324-7900Fax: 1-888-959-2260E-mail: https://flir.custhelp.com/www.flir.com
SPECIFICATIONS
The table below contains the latest product specifications for the Breach; however, with all of our products as they evolve and are further developed these specifications are subject to change without notice.
SENSOR SPECIFICATIONS
| Detector Type | FLIR BOSON 12um VOx Microbolometer |
| Resolution | 320 x 256 |
| Refresh Rate | 60 Hz |
| SYSTEM SPECIFICATIONS | |
| Lens System | 91 mm. F/1.04 |
| Optical Magnification | lx |
| Field of View 11-1 x VI | 24° x 19° |
| Digital e-Zoom | lx – 4x continuous |
| Diopter Adjustment Range | -5 to .5 Opt |
| Focusing Range | 0.25m to infinity not focusable) |
| Eye Relief | 16 mm |
| Display | Quad-VGA (1280 x 960) LCD |
| Video Output | Digital Video |
| Internal Memory | Up to 1.000 pictures and up to 2.5 hours of recorded video can be stored in the camera’s memory |
| Temperature Imaging Modes (Image Palettes) | White Hot, Black Hot. Rainbow BC, Ironbow. Sepia.The Arctic. Outdoor Alert |
| USER INTERFACE | |
| Control Panel Buttons | •Turning Unit On/Off•Display Brightness Control•Image Palette Control•Digital Zoom Control•On-Screen Menu Navigation•Image Snapshot /Video Recording |
| Diopter Adjustment Ring | Adjusts the Eyepiece Diopter |
| INTERFACING | |
| USB-C Connector | Power In; Video out; Video and image files transfer |
| POWER | |
| Battery Type | One CR123A 3V Lithium battery or CR123 type rechargeable battery with voltage from3.0V to 3.7V |
| Battery Life (Operating) | Up to 90 minutes at 20°C |
| ENVIRONMENTAL | |
| Operating Temperature Range | -20 to +50°C (-4 to +122°F) |
| Storage Temperature Range | -40 to +60°C (-40 to +140°F) |
| PHYSICAL | |
| Weight | 210 g (0.46 lbs) |
| Size | 139 × 70 × 49 mm (5.5 × 2.7 × 1.9 in) |
| Color (housing) | Black |
| Country of Origin | USA |
NOTES
______________________________________________________
PERSONAL VISION SYSTEMS9 Townsend West Nashua, NH 03063Phone: 1-888-959-2259 or (603) 324-7900Fax: 1-888-959-2260Technical Support, Repairs, Returns, Refunds & Warranty: https://flir.custhelp.com/www.flir.comEquipment described herein is subject to US export regulations and may require a license prior to export. Diversion contrary to US law is prohibited. Imagery for illustration purposes only. Specifications are subject to change without notice. ©2018 FLIR Systems, Inc. All rights reserved. 10/23/2018 18-2356-OTS
 report this ad
![]()
References
Thermal Imaging, Night Vision and Infrared Camera Systems | Teledyne FLIR
FLIR Support Center | Teledyne FLIR Icon-ContactSales Grid View Exported from Streamline App (https://app.streamlineicons.com) Model Selector Model Selector Logo Search Cart Search Logo User Cart Location Search [Missing text \’/header/search\’ for \’English
FLIR Support Center | Teledyne FLIR Icon-ContactSales Shape Grid View Exported from Streamline App (https://app.streamlineicons.com) Model Selector Model Selector Logo Cart Search Cart Logo Search Search User Cart Cart [Missing text \’/header/search\’ for \’E
FLIR Technical Support Center
FLIR Technical Support Center
[xyz-ips snippet=”download-snippet”]