![]()
QUICK Install GuideK-400H-5002PerforMAX® FILL VALVE & SEAL KIT + GREEN TOILET TOOLTM
 HOW-TO VIDEOVISIT: FLUIDMASTER.COMK-400H-5002 PRODUCT PAGE
*See back page for important product warnings and warranty information SPANISH – Page 16
INSTALL WITH CONFIDENCE
GETTING STARTED
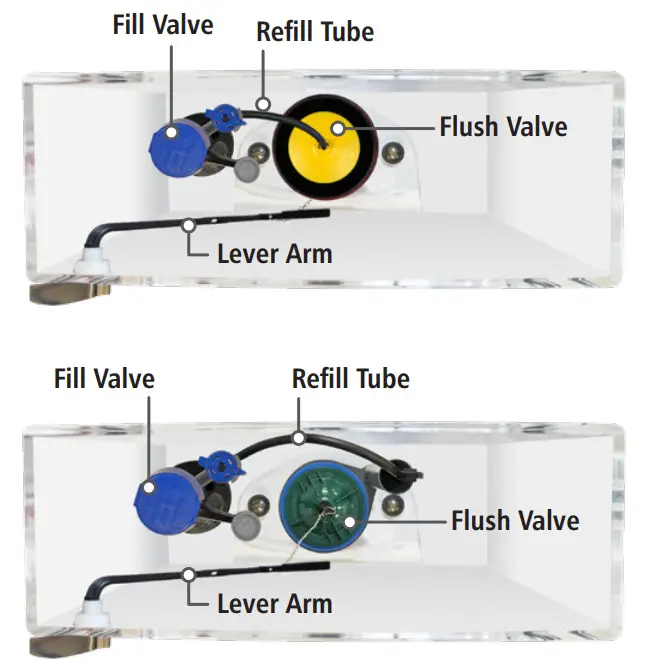
PARTS OVERVIEW
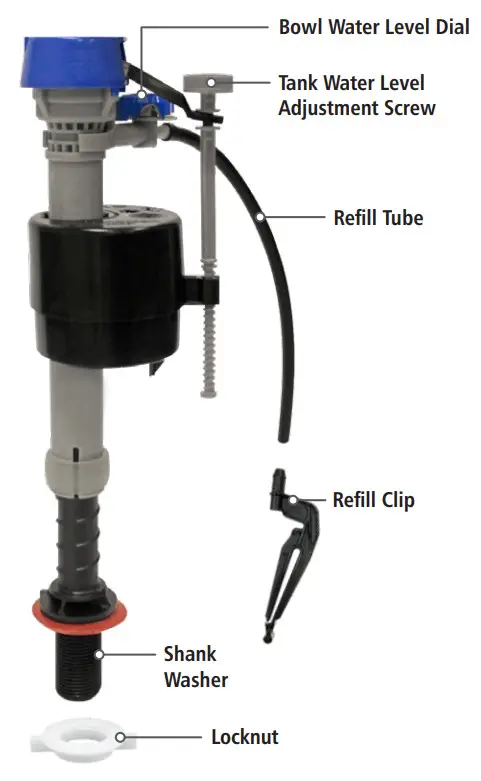
PERFORMAX® FILL VALVE
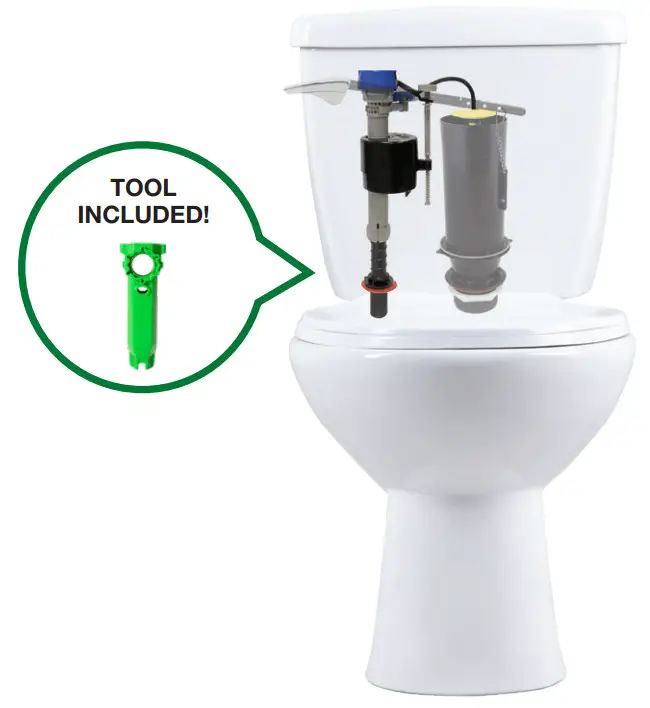
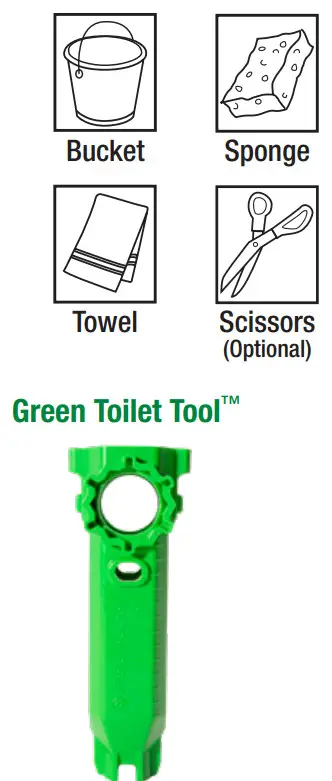
TOOLS NEEDED
 TOP-DOWN VIEW
 TOP-DOWN VIEW
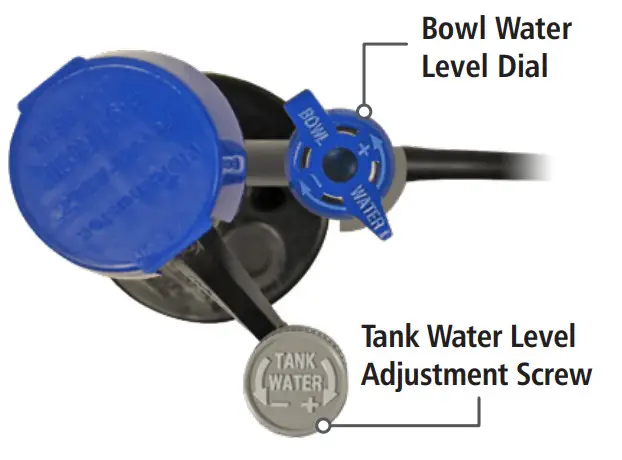
FLUSH VALVE SEALS
 |
 |
STEP 1: PREPARE TANKA: TURN OFF WATER
B: DRAIN WATERFlush the toilet to drain most of the water from the tank.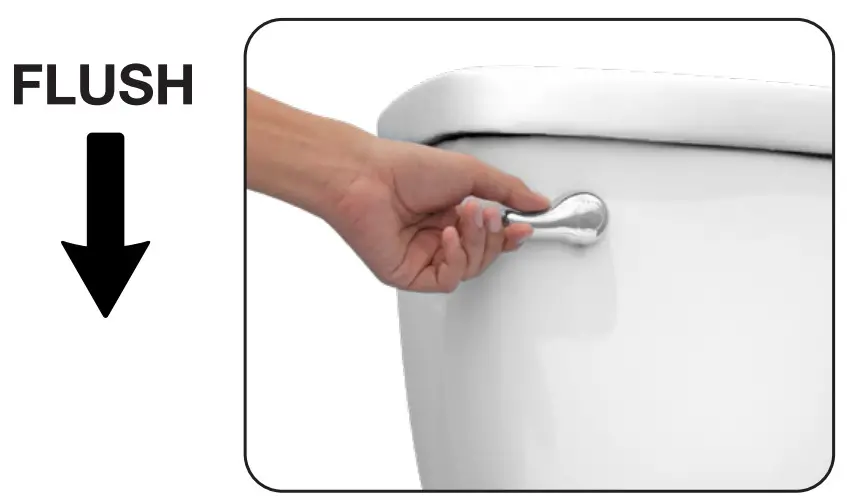 C: USE A SPONGE OR TOWEL TO SOAK UP EXCESS WATER IN TANK
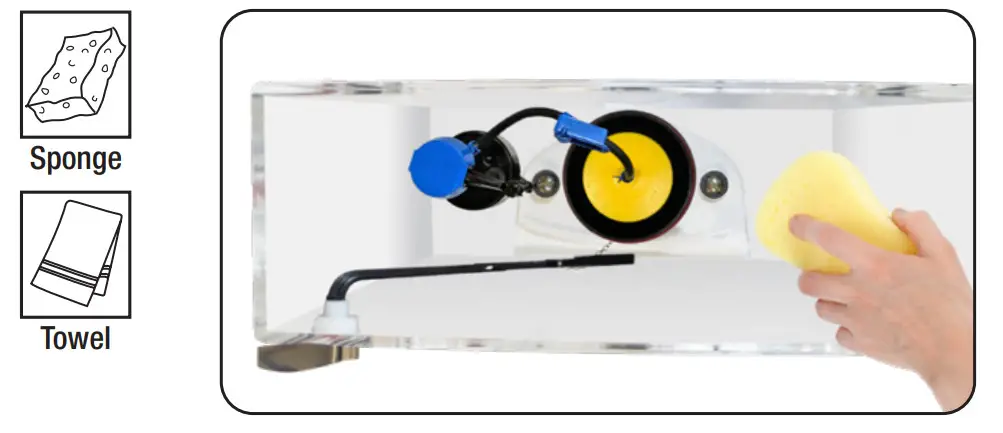 STEP 2: REMOVE OLD FILL VALVE
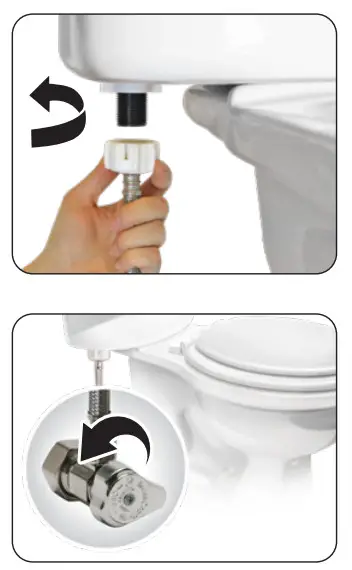
A: REMOVE CONNECTORRemove the water supply connector from the bottom of the fill valve.
 NOTE: Inspect the water supply connector. Replace it if it is worn, or you don’t know how old it is, to prevent flooding and property damage.

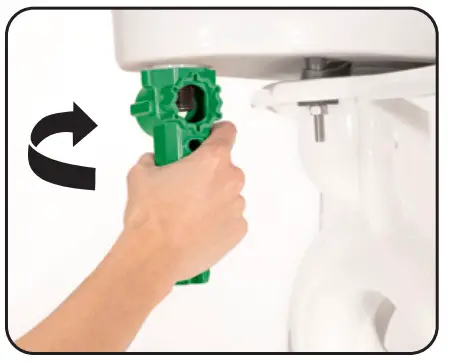
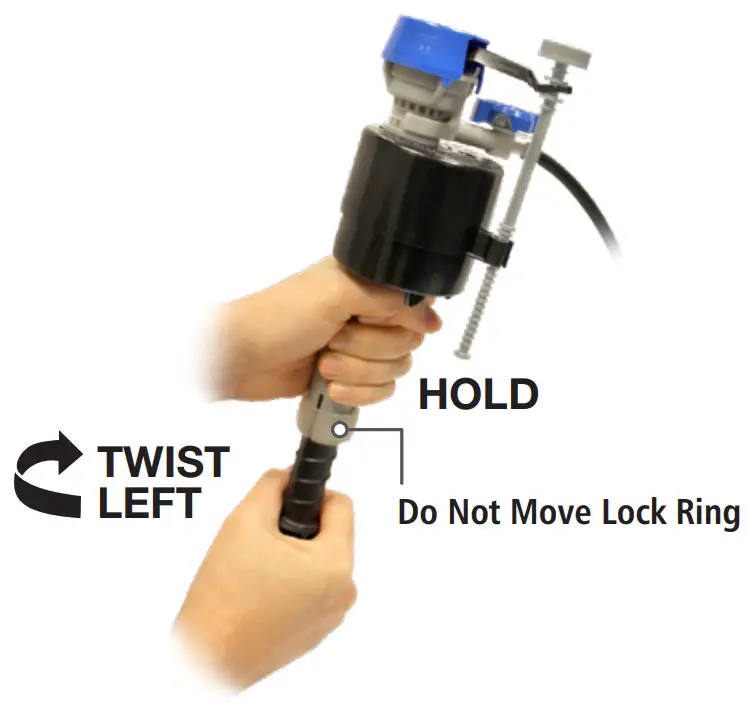
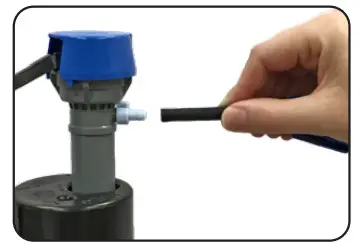
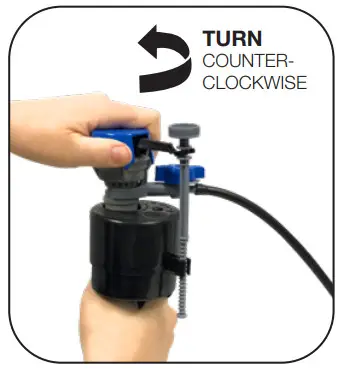
B: REMOVE OLD LOCKNUT Use the Green Toilet Tool™ to twist the locknut below the tank to remove the locknut from the fill valve.
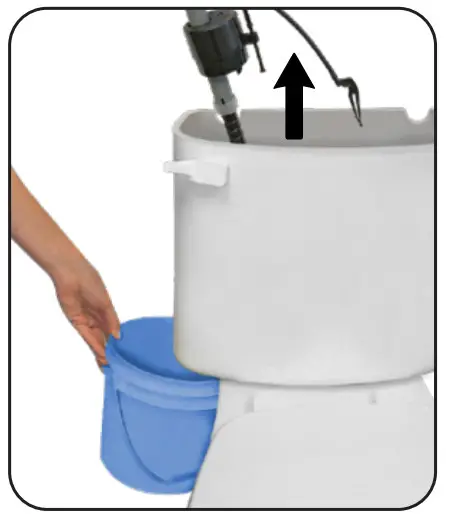
C: REMOVE OLD FILL VALVEIncluding refill tube, refill clip, and shank washer.
 Drain any excess water into the bucket by removing the fill valve from the tank. (Pull fill valve up)
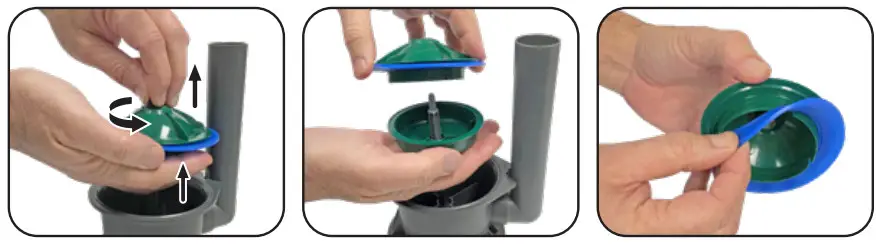
STEP 3: REMOVE & REPLACE FLUSH VALVE SEALSee below for your specific flush valve seal replacement instruction.For more detailed instructions and installationvideos, please visit our website at Fluidmaster.com & enter K-400H-5002 in the search field.Kohler® AquaPiston (use YELLOW seal):
Remove and replace the old seal, placing the new seal in the groove at bottom of the canister.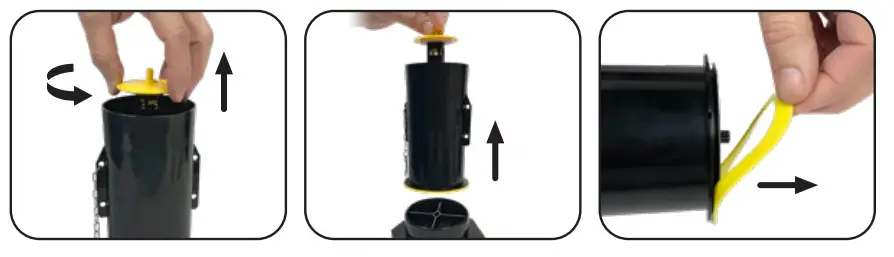 American Standard®Champion 3 (use YELLOW seal):
Remove and replace the old seal by sliding the seal up and over the valve. Replace with the new seal in the groove at bottom of the canister.

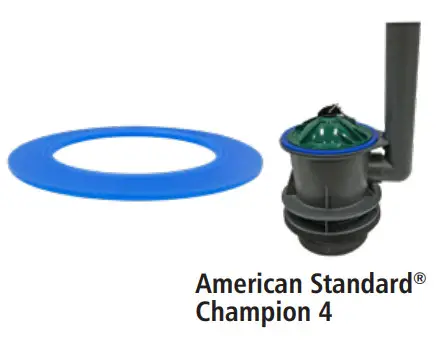
American Standard® Champion 4 / Eljer® Titan 4 (use BLUE seal):
Unthread black nut on top of green cover. Remove cover and replace the seal.
STEP 4: ADJUST HEIGHT OF NEW FILL VALVE
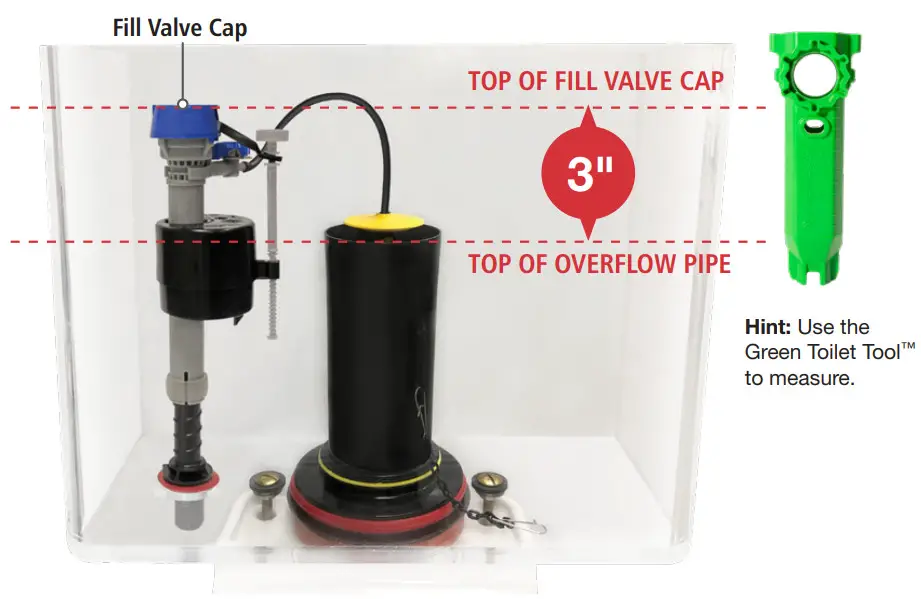
A: TWIST FILL VALVE TO ADJUST HEIGHTThe top of the fill valve cap should measure roughly 3″ above the top of the overflow pipe when installed.
NOTE:The increasing height allows more water to fill in the tank.
STEP 5: INSTALL NEW FILL VALVE
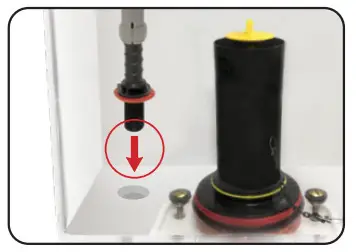
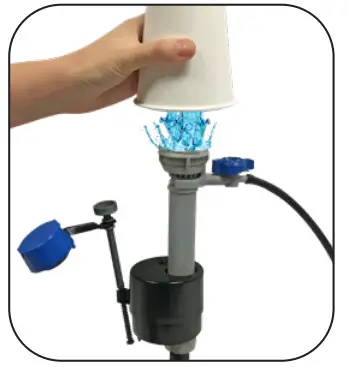
A: INSERT FILL VALVEPosition refill tube to face flush valve making sure fill valve parts do not interfere with the lever arm. HINT: See next page for full tank setup.
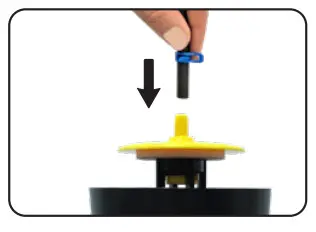
B: INSTALL LOCKNUT
 Using Green Toilet Tool™, screw locknut onto fill valve shank (below the tank). Tighten 1/4” beyond hand tight. Do Not Overtighten*.
 C: PUSH REFILL TUBE ONTO REFILL PORT
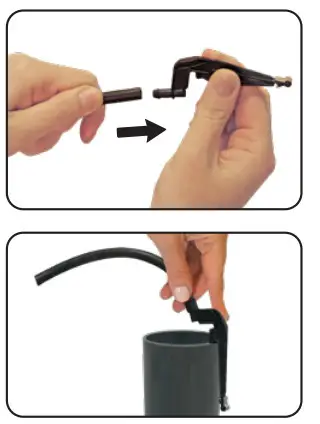
D: CONNECTING REFILL TUBE TO FLUSH VALVE
FOR KOHLER® AQUAPISTON:Push refill tube onto yellow nipple on the flush valve.
STEP 5: INSTALL NEW FILL VALVE (CONT’D)
FOR AMERICAN STANDARD® CHAMPION 4: Push refill tube onto refill clip.Attach refill clip to the right side of overflow pipe so the refill tube points into the pipe, not the tank.
FOR AMERICAN STANDARD® CHAMPION 3:
 Push refill tube onto refill clip, then attach refill clip to flush valve overflow pipe. Reuse original refill clip. Do not use Fluidmaster® refill clip.NOTE: If the refill tube is too long to fit inside the tank with the lid closed, cut the tube.
STEP 6: FINISHING STEPS
A: ATTACH WATER SUPPLY CONNECTOR TO FILL VALVETwist to tighten.
*Hand-tighten only.DO NOT OVERTIGHTEN.
B: TURN ON WATERCheck for leaks.
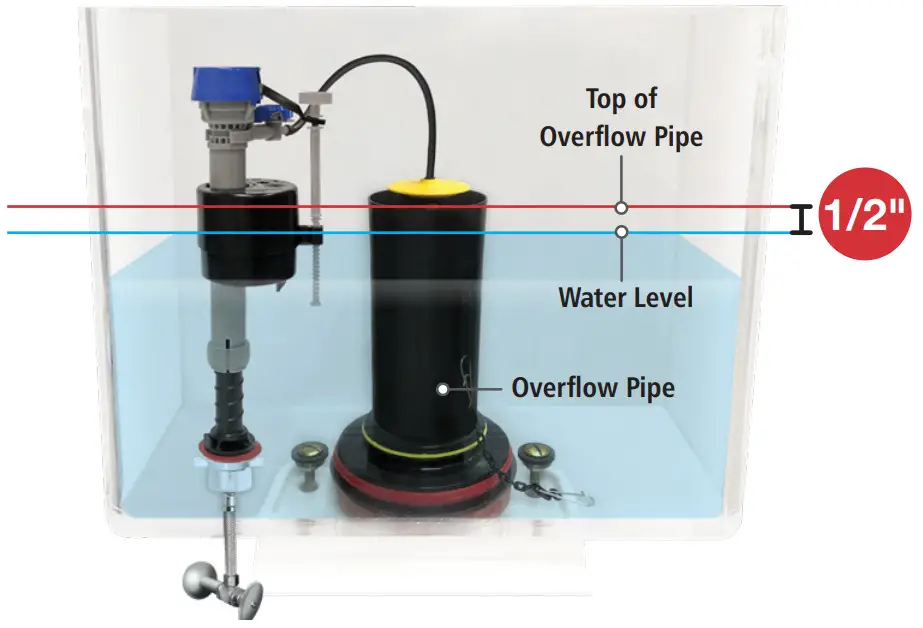
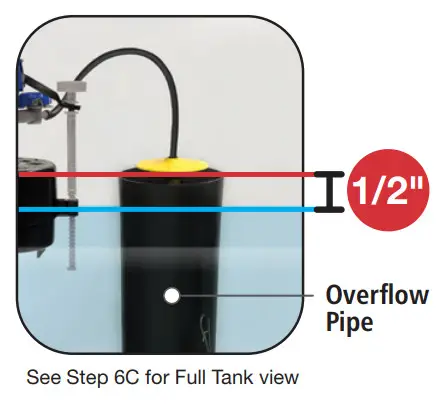
C: WATER LEVELAfter the tank stops filling, the water level should fill the tank to roughly ½ inch below the top of the overflow pipe to ensure a proper flush. (Does not need to be exact.)
- Over tightening may crack the fill valve or tank causing flooding. Make sure the float cup does not touch the tank walls or tank lever and flush valve.
STEP 7: FINE-TUNE TANK WATER LEVEL
A: FLUSH THE TOILET TO CHECK THE TANK WATER LEVELAfter the water stops filling the tank, the water level should be roughly ½ inch below the top of the overflow pipe to ensure a proper flush.
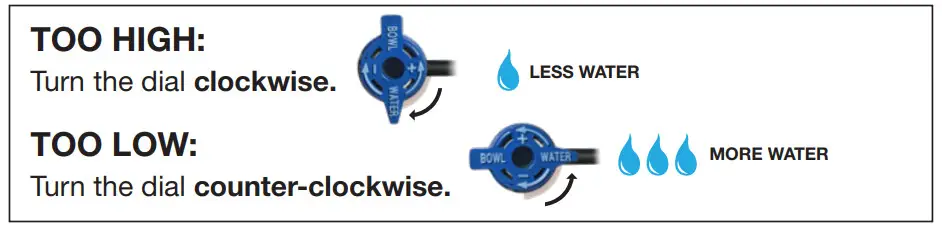
B: WATER LEVEL IS TOO LOWTurn the tank water level adjustment screw clockwise to raise the float. Flush to reset water level.
THE WATER LEVEL IS TOO HIGHTurn the water level adjustment screw counterclockwise to lower the float. Flush to reset water level.
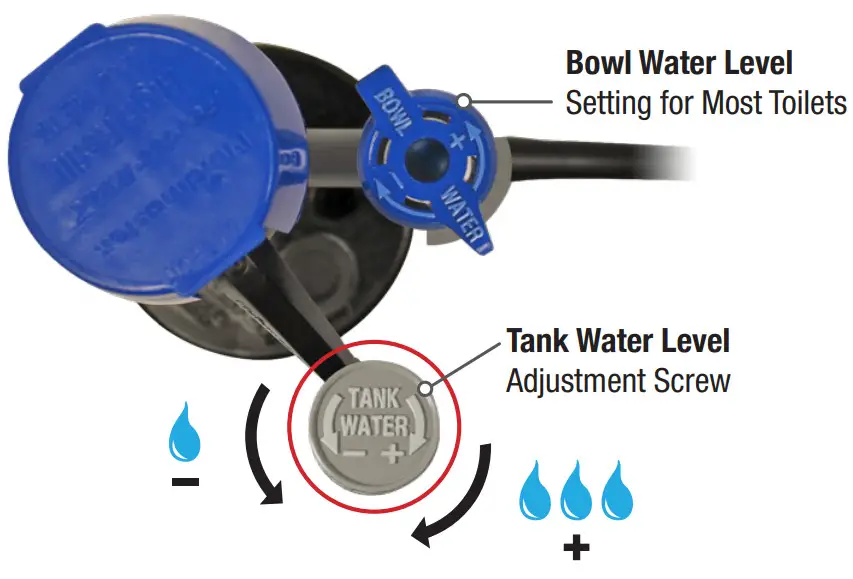
STEP 8: FINE-TUNE BOWL WATER LEVELNOTE: The PerforMAX Fill Valve is pre-set to fill the proper bowl water level in most toilets straight out of the box (see the previous page).
A: FILL BOWL WITH A GALLON OF WATERWait 1 minute until the bowl water level recedes down and stops. B: MARK THE WATER LEVEL IN THE BOWLWith a pencil, draw a line at the top of the water level in the bowl. (Pencil mark will easily wash off).
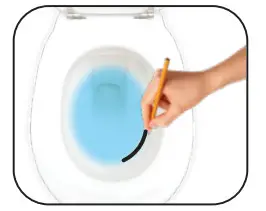 C: FLUSH TOILET TO CHECK BOWL WATER LEVELIf the water level matches the line you’ve made in the bowl when the fill valve stops filling the tank, the water level is correct, proceed to Step 9.
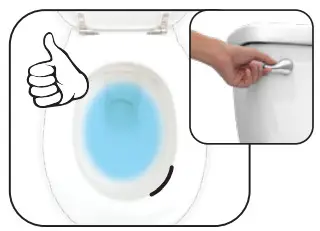 If the water level matches the line in the bowl and then the fill valve is STILL FILLING, then the bowl water is TOO HIGH, proceed to Step 8D.
 If the valve shuts off and the water level does NOT match the line in the bowl, the water level is TOO LOW, proceed to Step 8D.
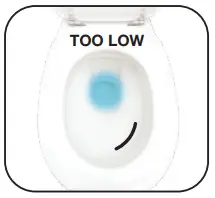
D: ADJUST THE BOWL WATER LEVEL
STEP 9: FLUSH THE TOILET
A: FLUSH THE TOILET, CHECK BOWL WATER LEVEL.Repeat Steps 8C and 8D until the water level in the bowl matches the line when the fill valve shuts off.
If you’re satisfied with the flush, YOU’RE DONE!

YOU DID IT!
We knew you could!Share your success storywith friends and family!

#FixedMyToilet#Fluidmaster
Still not working exactly right?See the next page for Troubleshooting.
TROUBLESHOOTING
IF THE FILL VALVE:
- DOES NOT TURN ON
- WON’T TURN OFF
- WON’T REFILL TANK
REMOVE CAP AND CHECK FOR DEBRIS
 |
 |
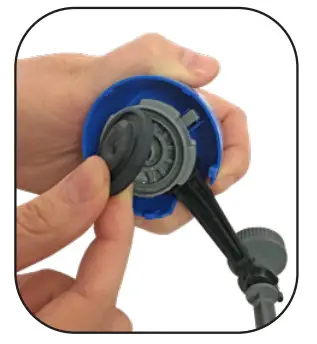
A: Turn off the water supply.B: Flush toilet.C: With right-hand push float up, grip, and hold shaft under afloat.D: With left-hand twist cap and lever arm counterclockwise to unlock the cap. Let cap hang on float cup.E: Hold empty cup upside down over uncapped valve to prevent splashing.F: Turn the water supply on and off a few times.G: Turn the water supply off.H: Replace the valve cap.
- Place cap assembly on top of the gray valve body by aligning the cap arm and adjustment rod next to the refill tube.
- Press down on the top cap while rotating top & arm clockwise to the locked position.
See Our TroubleshootingHOW-TO VIDEOhttp://bit.ly/2yAdZn7
TROUBLESHOOTING
REPLACE FILL VALVE SEAL
 A: Remove cap (see page 12).B: Replace seal with a *genuine Fluidmaster 242 Seal.C: Replace the valve cap.
- Place cap assembly on top of the gray valve body by aligning cap arm and adjustment rod next to refill tube.
- Press down on the top cap while rotating top & arm clockwise to the locked position.
* Always use genuine Fluidmaster parts when installing or repairing. Fluidmaster will not be responsible or liable for use of non-Fluidmaster parts during installation or repair.
IF YOU CAN’T REMOVE THE AQUA PISTON YELLOW / BLACK CAP
- Turn off the water supply. Flush toilet.
- Remove refill tube from the top of yellow/black cap.
- Lift up on Canister (A) until it stops.
- Reach into the tank and grab the Center Guide (B).Turn counterclockwise and remove from the tank.
- Remove the old seal, placing new Seal (C) in the groove at bottom of the canister (A).
- Align Center Guide (B) with a hole in the center of the base. Insert into the hole. Turn 1/4 clockwise to lock.
- Replace the refill tube back into the cap.

 report this ad
![]()
References
[xyz-ips snippet=”download-snippet”]