![]()
![]()
Instruction manual: LED Strip Light and Aquarium
READ THOROUGHLY PRIOR TO INSTALLATION AND OPERATION
IMPORTANT: FULLY ASSEMBLE THE CABINET BEFORE REMOVING THE TANK FROM ITS BOX AND NEVER PLACE THE AQUARIUM ON ANY SURFACE OTHER THAN THE CABINET TO PREVENT DAMAGE TO THE AQUARIUM BASE.
FLUVAL SHAKER LED: PARTS
The Shaker Aquarium kit contains two separate packages. Carefully remove all components from the packaging and make sure that nothing is missing or damaged. 1 package including:1x glass tank (A), 2x sliding top covers (B),1x LED Strip light (C) + LED driver with instruction manual,1x plastic bag with 4x cable guides (D) and 1x over rim cable guide (E) with bi-adhesive pad,1x Fluval filter, with its instruction manual,1x heater with its instruction manual1 package (supplied separately) including: the disassembled cabinet and the top wooden frame to apply to the glass tank, with instruction manual.
IMPORTANT SAFETY INSTRUCTIONS
WARNING: To guard against injury, basic safety precautions should be observed when handling the LED Strip Light, including the following:
- For the complete enjoyment, use and understanding of this product, READ AND FOLLOW ALL SAFETY INSTRUCTIONS and all important notices on the appliance before using. Failure to do so may result in loss of fish life and/or personal injury or damage to the unit.
- DANGER To avoid possible electrical shock, special care should be taken due to the close proximity of the LED Strip Light to water. For each of the following situations, do not attempt repairs yourself; return the appliance to an authorized service facility for service or discard the appliance. (See Customer Service information at the end of this manual).
 If the unit falls into the water, DON’T reach for it! First unplug it and then retrieve it. If the electrical components of the appliance get wet, unplug the appliance immediately. Carefully examine the appliance after installation. It should not be plugged in if there is water on parts not intended to be wet.Do not operate any appliance if it has a damaged cord or plug, or if it is malfunctioning, dropped or damaged in any manner. The power cord of this appliance cannot be replaced; if the cord is damaged, the appliance must be discarded. Never cut the cord.To avoid the possibility of the appliance plug or wall socket getting wet, position the unit to one side of a wall mounted socket to prevent water from dripping onto the socket or plug. A “drip loop” (see illustration) should be arranged to the socket. The “drip loop” is that part of the cord below the level of the socket (or the connector if an extension cord is used), to prevent water travelling along the cord and coming into contact with the wall socket. If the plug or socket does get wet, DON’T unplug the cord. Disconnect the fuse or circuit breaker that supplies power to the appliance. Then unplug and examine for presence of water in the wall socket.
 - WARNING – Close supervision is necessary when any appliance is used by or near children. This appliance can be used by children ages 8 years and above and persons with reduced physical, sensory or mental capabilities or lack of experience and knowledge if they have been given supervision or instruction concerning use of the appliance in a safe way and understand the hazards involved. Children shall not play with the appliance. Cleaning and user maintenance shall not be made by children without supervision. This product is not a toy.
- To avoid injury, do not come into contact with moving parts or hot parts such as heaters, LED devices, etc.
- CAUTION Always unplug or disconnect all appliances in the aquarium from electricity supply before placing hands in water, before putting on or taking off parts and when this LED Strip Light is being installed, maintained or handled. Never yank cord to pull plug from outlet. Grasp the plug and pull to disconnect.Always unplug an appliance from an outlet when not in use.WARNING: BE SURE YOU UNPLUG THE LED DRIVER FROM THE POWER OUTLET; JUST SWITCHING OFF THE APPLIANCE WITH THE APP IS NOT ENOUGH BECAUSE IT DOES NOT STOP THE POWER SUPPLY.Do not use this appliance for any purpose other than its intended use (i.e. don’t use in swimming pools, garden ponds, bathtubs, etc.). The use of attachments not recommended or sold by the appliance manufacturer may result in a dangerous situation. Do not try to repair any product component: in case of damage, replace the damaged component with genuine spare parts.
- IMPORTANT: This LED Strip Light is an AQUARIUM LUMINAIRE suitable FOR INDOOR USE ONLY designed to be assembled onto Fluval Shaker Aquariums only. For fresh and salt water ornamental aquariums with max 35°C water temperature. Do not install or store the appliance anywhere where temperatures may drop below freezing.
- IMPORTANT: Make sure that the LED Strip Light is securely and correctly installed before operating. This LED Strip Light must never operate in water.Fill the aquarium up to the level indicated on the label situated on the inside of the aquarium (see the image on the right). IMPORTANT: Do not overfill.Overfilling the aquarium can cause water to pass under the top frame which then runs down the outside of the aquarium. WARNING: Do not plug in the LED Strip Light if there is water on parts not intended to be wet. WARNING: Do not place any object(s) on the LED Strip Light (C) or on the cover. Ensure sufficient airflow around the LED Strip Light. The safety of this appliance is only ensured provided that it has been properly installed.
- Read and observe all the important notices on the appliance.
- If an extension cord is necessary, a cord with a proper rating should be used. A cord rated for less amperes or watts than the appliance rating may overheat. Care should be taken to arrange the cord so that it will not be tripped over or pulled.
- SAVE THESE INSTRUCTIONS.
FOR USA ONLYFCC Statement This device complies with part 15 of the FCC rules. Operation is subject to the following two conditions: (1) This device may not cause harmful interference, and (2) this device must accept any interference received, including interference that may cause undesired operation. Change or modifications not expressly approved by the party responsible for compliance could void the user’s authority to operate the equipment.
NOTE: This equipment has been tested and found to comply with the limits for a Class B digital device, pursuant to part 15 of the FCC Rules. These limits are designed to provide reasonable protection against harmful interference in a residential installation. This equipment generates uses and can radiate radio frequency energy and, if not installed and used in accordance with the instructions, may cause harmful interference to radio communications. However, there is no guarantee that interference will not occur in a particular installation. If this equipment does cause harmful interference to radio or television reception, which can be determined by turning the equipment off and on, the user is encouraged to try to correct the interference by one or more of the following measures:
- Reorient or relocate the receiving antenna
- Increase the separation between the equipment and receiver
- Connect the equipment into an outlet on a circuit different from that to which the receiver is connected
- Consult the dealer or an experienced radio/TV technician for help
FULL SETUP GUIDE
AQUARIUM CABINET INSTALLATION AND PREPARATION
![]() Before handling the aquarium tank and cabinet, ensure you have sufficient people to move them without any risk.
Before handling the aquarium tank and cabinet, ensure you have sufficient people to move them without any risk.
ASSEMBLE THE AQUARIUM CABINET BEFORE REMOVING THE AQUARIUM FROM ITS PACKAGING.
![]() You MUST place the Fluval aquarium on the appropriate Fluval cabinet which was designed with the correct dimensions and structure to bear the weight of the aquarium full of water. The use of different cabinets, pieces of furniture, TV stands, etc., WILL invalidate your warranty and will compromise the product safety.Please refer to the instruction manual of the aquarium cabinet. Do not attempt to set up the cabinet without reading and following the instruction manual. If it is missing or unusable, contact the store or Hagen Customer Service.
You MUST place the Fluval aquarium on the appropriate Fluval cabinet which was designed with the correct dimensions and structure to bear the weight of the aquarium full of water. The use of different cabinets, pieces of furniture, TV stands, etc., WILL invalidate your warranty and will compromise the product safety.Please refer to the instruction manual of the aquarium cabinet. Do not attempt to set up the cabinet without reading and following the instruction manual. If it is missing or unusable, contact the store or Hagen Customer Service.
Placing the aquarium with its cabinet in the final locationLocation of the aquarium is very important. Place the aquarium away from direct sunlight. This will reduce the risk of excessive algae build-up and avoid overheating the aquarium by the sunrays. Keep your Fluval Aquarium away from other sources of heat (air ducts, radiators, etc.) for proper temperature maintenance. Drafts should also be avoided. Do not locate your Fluval Aquarium where water spills will cause damage.
![]() WARNING: Ensure that the selected position has an even and level surface which is able to support the total weight of the aquarium full of water and the cabinet. Place your new Fluval Aquarium and cabinet close to an electrical outlet. After placing the cabinet, assure that it is perfectly level by using an adequate leveling tool.
WARNING: Ensure that the selected position has an even and level surface which is able to support the total weight of the aquarium full of water and the cabinet. Place your new Fluval Aquarium and cabinet close to an electrical outlet. After placing the cabinet, assure that it is perfectly level by using an adequate leveling tool.
![]() IMPORTANT: Fluval cabinets are designed to support the total weight of the aquarium. The table below shows the approx. height of filling of the tank and approx. weight of the aquarium full of water (rocks, decorations or gravel have not been considered).
IMPORTANT: Fluval cabinets are designed to support the total weight of the aquarium. The table below shows the approx. height of filling of the tank and approx. weight of the aquarium full of water (rocks, decorations or gravel have not been considered).
| FLUVAL SHAKER AQUARIUMS | |||
| Model | External Tank Dimensions | Height of Filling(Up to the max water level line) | Weight of aquarium filled only with water |
| Fluval Shaker 168 L | 70 x 40 x 60 cm (27.6 x 15.7 x 23.61 | 54.5 cm (21.5″) (Water capacity = 140 L (37 US gal)) | 168 kg (370Ib) |
| Fluval Shaker 252 L | 105 x 40 x 60 cm (41.3 x 15.7 x 23.6″) | 54.5 cm (21.5″) (Water capacity = 210 L (56 US gal)) | 261 kg (5751b) |
THE AQUARIUM INSTALLATION
![]() Before handling the aquarium tank and cabinet, ensure you have sufficient people to move them without any risk.
Before handling the aquarium tank and cabinet, ensure you have sufficient people to move them without any risk.
Take the aquarium tank out from its packaging.
![]() The aquarium glass tank comes with runners glued to it to support the LED Strip Light and covers. Do not try to remove the runners.
The aquarium glass tank comes with runners glued to it to support the LED Strip Light and covers. Do not try to remove the runners.![]() The tank is made of glass, always handle it with the utmost care. Make sure to lift it only by the base.
The tank is made of glass, always handle it with the utmost care. Make sure to lift it only by the base.
Place the aquarium tank onto the cabinet.
![]() IMPORTANT: Thoroughly clean the top side of the cabinet base and the lower side of the aquarium base.Place the empty aquarium tank onto the cabinet, making sure that the connections lie in the appropriate opening of the cabinet and NEVER insert any lining (e.g. Polystyrene) mats, or bases between cabinet and aquarium.
IMPORTANT: Thoroughly clean the top side of the cabinet base and the lower side of the aquarium base.Place the empty aquarium tank onto the cabinet, making sure that the connections lie in the appropriate opening of the cabinet and NEVER insert any lining (e.g. Polystyrene) mats, or bases between cabinet and aquarium.
![]() https://fluvalaquatics.com/care2020/For further information on aquarium care, scan here.
https://fluvalaquatics.com/care2020/For further information on aquarium care, scan here.
![]() WARNING: Risk of breaking the glass tank base. The glass tank features protruding fittings at the bottom, which can never be used as support points. Never try to lay the tank on any support except its cabinet, which is fitted with a special cavity to accommodate the fittings. When placing the tank onto its cabinet, remove the tank from the box and rest it on the cabinet paying the utmost attention not to damage the bottom fittings.
WARNING: Risk of breaking the glass tank base. The glass tank features protruding fittings at the bottom, which can never be used as support points. Never try to lay the tank on any support except its cabinet, which is fitted with a special cavity to accommodate the fittings. When placing the tank onto its cabinet, remove the tank from the box and rest it on the cabinet paying the utmost attention not to damage the bottom fittings.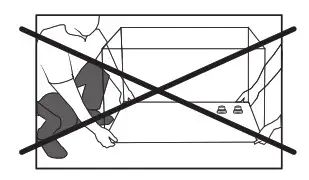
![]() Never attempt to move or transport the cabinet with the glass tank or any other load on top of it.
Never attempt to move or transport the cabinet with the glass tank or any other load on top of it.![]() Although the glass tank was manufactured with the maximum care and the most advanced techniques, we still recommend making a simple inspection prior to the installation to verify that unexpected events during handling and transportation have not damaged the tank or impaired its water-tightness.
Although the glass tank was manufactured with the maximum care and the most advanced techniques, we still recommend making a simple inspection prior to the installation to verify that unexpected events during handling and transportation have not damaged the tank or impaired its water-tightness.
- Make a visual inspection of the glass tank to check for damage or cracks. Do not continue the installation if the tank is damaged.
- If no damages and cracks are detected, proceed with the normal aquarium set up.
- After the full installation of the aquarium kit with filter, heater, LED strip light, decorations, etc., has been completed, fill the tank with water 5 cm at a time, while making sure there are no leaks.
![]() Never attempt to move or transport the tank if it is not completely empty of water or any other material.
Never attempt to move or transport the tank if it is not completely empty of water or any other material.![]() Always take care not to damage the seals at the edges of the glass panels while maintaining your aquarium, ie: with planters or algae scrapers.
Always take care not to damage the seals at the edges of the glass panels while maintaining your aquarium, ie: with planters or algae scrapers.![]() Never use toxic or aggressive substances to clean your aquarium, such as household detergents.
Never use toxic or aggressive substances to clean your aquarium, such as household detergents.
QUICK CONNECTION SYSTEM INSTALLATION
This section only applies to Fluval Aquariums with Fluval External filter and “QuickConnect” System.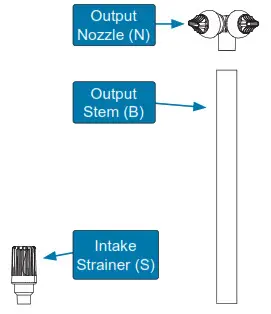
Installing water intake/output with “QuickConnect” system (Intake/output fittings are included in the filter packaging)These Fluval Aquarium models feature the “QuickConnect” system, which allows the direct connection of the tank to the external filter through the bottom glass by means of special fittings. Normally, the same type of connection is achieved through specially-made devices, which are complex and require the intervention of expert technicians. On the contrary, in just a few minutes the “QuickConnect” system can be easily and safely installed, giving your aquarium a professional and tidy filtration solution.
![]() Before proceeding, identify and count all parts required by referring to the exploded view in the side illustration. If any part is missing, do not proceed with the installation and contact your local supplier.
Before proceeding, identify and count all parts required by referring to the exploded view in the side illustration. If any part is missing, do not proceed with the installation and contact your local supplier.![]() Before proceeding, check stems (A) for the presence of all 3 rubber rings (C). Do not proceed with the installation if one of the rubber rings (C) is missing and contact your local supplier.Locate the 2 openings in the tank bottom glass and assure that the corresponding openings
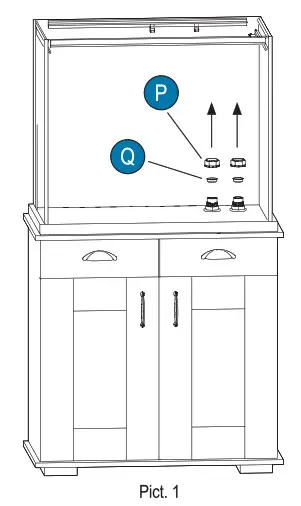
Before proceeding, check stems (A) for the presence of all 3 rubber rings (C). Do not proceed with the installation if one of the rubber rings (C) is missing and contact your local supplier.Locate the 2 openings in the tank bottom glass and assure that the corresponding openings![]() in the cabinet are aligned with them. The 2 openings in the tank bottom glass are complete with factory-installed special plastic fittings, which must never be removed, turned or loosened and with 2 sealing plugs (P) and (Q). The output group should be installed in the opening (O), whereas the intake group should be installed in the opening (I).
in the cabinet are aligned with them. The 2 openings in the tank bottom glass are complete with factory-installed special plastic fittings, which must never be removed, turned or loosened and with 2 sealing plugs (P) and (Q). The output group should be installed in the opening (O), whereas the intake group should be installed in the opening (I).![]()
![]() Do not force, loosen or turn the factory-installed special fittings on tank openings (I) and (O).
Do not force, loosen or turn the factory-installed special fittings on tank openings (I) and (O).![]() Once the output/intake groups are installed, do not shift the tank with respect to the cabinet as this may damage the output/intake devices and the glass tank.
Once the output/intake groups are installed, do not shift the tank with respect to the cabinet as this may damage the output/intake devices and the glass tank.
Output system installation
- Manually unscrew plug (P) and remove plug (Q) from opening (O) (Pict. 1). IMPORTANT: keep plugs (P) and (Q) for any future use.
- Slip connector stem (A) fully through opening (O) until it stops (Pict. 2).
- Open the cabinet. Screw and tighten the ring nut (R) onto the bottom end of stem (A) (Pict. 3).
- Insert the output nozzle (N) into one end of output stem (B).
- Insert output stem (B) onto connector stem (A) (Pict. 4).
- Adjust the height of output nozzles according to your requirement by sliding outlet stem (B) along connector stem (A).
- The output nozzles (N) can be easily rotated to divert the water flow where desired.
![]() Direct water jets so as not to let water overflow from the tank. Avoid directing the water jets towards the LED Strip Light.
Direct water jets so as not to let water overflow from the tank. Avoid directing the water jets towards the LED Strip Light.
Intake system installation
- Manually unscrew plug (P) and remove plug (Q) from opening (I) (Pict. 1). IMPORTANT: keep plugs (P) and (Q) for any future use.
- Slip the second connector stem (A) fully through opening (I) until it stops (Pict. 2).
- Open the cabinet. Screw and tighten the nut ring (R) onto the bottom end of the second stem (A) (Pict. 3).
- Insert the intake strainer (S) onto connector stem (A) (Pict. 5). The assembly end result is shown on Pict. 6 and Pict. 7.
![]() The height of the intake strainer is high enough to suit most standard aquarium decorations. When decorating the aquarium, ensure it remains at least 5 cm from the gravel bottom at all times to prevent it from sucking gravel or sand and ensure that no decorations block the passage of water. Ornaments and rocks should be positioned while the aquarium is still dry.
The height of the intake strainer is high enough to suit most standard aquarium decorations. When decorating the aquarium, ensure it remains at least 5 cm from the gravel bottom at all times to prevent it from sucking gravel or sand and ensure that no decorations block the passage of water. Ornaments and rocks should be positioned while the aquarium is still dry.![]() CAUTION!: Never force Connector Stems (A) sideways, as this may damage the output/intake systems and the glass tank. In the event a different filtration system is used, which does not require the Intake/Output systems supplied with this unit (e.g. an internal filter), restore the initial conditions by removing the 2 connector stems (A) and closing openings (O) and (I) with plugs (P) and (Q). Plug (Q) ensures a watertight seal and has to be inserted into its seat by pressing it. Plug (P) is designed to protect plug (Q) and ensure that plug (Q) remains in its seat properly. Screw plug (P) by hand only until it will no longer go without forcing it.DO NOT USE ANY TOOLS, AS DOING SO MAY DAMAGE THE UNIT.
CAUTION!: Never force Connector Stems (A) sideways, as this may damage the output/intake systems and the glass tank. In the event a different filtration system is used, which does not require the Intake/Output systems supplied with this unit (e.g. an internal filter), restore the initial conditions by removing the 2 connector stems (A) and closing openings (O) and (I) with plugs (P) and (Q). Plug (Q) ensures a watertight seal and has to be inserted into its seat by pressing it. Plug (P) is designed to protect plug (Q) and ensure that plug (Q) remains in its seat properly. Screw plug (P) by hand only until it will no longer go without forcing it.DO NOT USE ANY TOOLS, AS DOING SO MAY DAMAGE THE UNIT.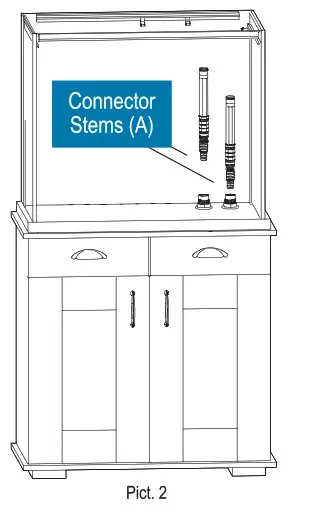

CABLE GUIDES AND OVER RIM CABLE GUIDE ASSEMBLY INSTRUCTIONS
The power cables of the heater and the LED strip light will be routed out through the back of the aquarium using an over rim cable guide which can be placed on the right or on the left.
- Determine if the cables should come out from the left or from the right. (TIP: Heaters are most effective when positioned near the filter output stem).
- Place the cable guides where most appropriate, by sliding them in the lower runner of both rails (Pict. 8).
- Clean and dry the area where the over rim cable guide will be positioned.
- Stick the double-sided tape in the provided location of the over rim cable guide (Pict. 9).
- Peel off the cover paper from the tape.
- Apply the over rim cable guide inside the tank after aligning it with the top edge of the glass (as shown in Pict. 8) by gently pressing it to the glass. To ensure optimal adhesion wait 24 hours before filling the tank with water.
ASSEMBLE THE TOP WOODEN FRAME (SEE SEPARATE INSTRUCTION MANUAL WHICH IS FOUND IN THE CABINET BOX).
FLUVAL FILTER & HEATER INSTALLATION, USE AND MAINTENANCE
Please refer to the instruction manual of the Fluval filter/heater. Do not attempt to set up the Fluval filter/heater without reading and following the instruction manual. If it is missing or unusable, contact the store or Hagen Customer Service.
LED STRIP LIGHT INSTALLATION INSTRUCTIONS
![]() WARNING: Disconnect the plug of all electrical equipment used for the aquarium, before placing your hands in aquarium water and/or performing any maintenance of any kind.Initial start-up
WARNING: Disconnect the plug of all electrical equipment used for the aquarium, before placing your hands in aquarium water and/or performing any maintenance of any kind.Initial start-up
- Carefully place the LED Strip Light (C) on the runner of the top frame in the final position (Pict. 11).
- Pull the LED Strip cable out through the cross of the rim cable guide (as indicated above).
- Hook up the lighting unit to the LED driver with its connector (Pict.12). WARNING: Do not plug in the LED Strip Light if there is water on parts not intended to be wet.
Switching the LED Strip Light OnPlug in the unit and use a smartphone or tablet with the FluvalSmart app downloaded to connect to it. The FluvalSmart App can be downloaded from the iOS or Android App stores, or scan the QR code to download. Use exclusively the LED driver supplied with the LED Strip Light. In all cases, make sure that the LED driver specifications comply to the specifications indicated in the LED Strip Light identification codes table below.
 http://www.fluvalaquatics.com/led-uk
| FLUVAL SHAKER LED STRIP LIGHT SPECIFICATIONS | ||
| Aquarium Model | 168L SHAKER | 252L SHAKER |
| LED STRIP LIGHT UNIT | BT LED UNIT SHAKER | BT LED UNIT SHAKER |
| LED STRIP LIGHT MODEL NUMBER | A13246 | A13247 |
| LUMINAIRE WATTAGE | 16.5 W | 24 W |
| LUMENS | 13001m | 19501m |
| LUMINAIRE OPERATING VOLTAGE | 24Vdc | 24Vdc |
| LED DRIVER TYPE | S018BA[X] 2400063 | S024AM[X] 2400100 |
| LED DRIVER INPUT VOLTAGE | 100-240 Vac | 100-240 Vac |
X = B For UK Plug X = V For EU Plug X = U For US Plug X = S For AUS Plug
Place the sliding covers on the tank.Peel off the protective film from the two aquarium covers.
- Lay the narrow cover in the lower sliding surface of the runners (support rails).
- Lay the wider cover in the upper sliding surface of the runners (support rails).
Maintenance
For maximum LED performance, it is recommended that the fixture and the LED lens be cleaned on a weekly basis. Unplug the LED driver prior to cleaning the light fixture. Use both hands when manipulating this appliance. Wipe exposed surfaces carefully with a damp cloth to remove any dust or mineral deposits that may collect over time. Do not use detergents or harsh cleaners as it can damage the light fixture. Use Fluval LED Lens Cleaning Kit (A3969) to clean the LED portion of the light fixture. Make sure all surfaces are dry before re-connecting the LED driver to the power source.
Troubleshooting
If the LED Strip Light does not turn on, please proceed as follows:
| PROBLEM | CAUSE | SOLUTION |
| The light isn’t working. | Missing connection of the LED driver to the power outlet. | Connect the LED driver to the power outlet. |
| Missing connection of the lighting unit to the LED driver. | Connect the lighting unit to the LED driver with its connector. | |
| If the problem is not solved after following the above, please contact your Hagen retailer. |
LED STRIP LIGHT AND TANK MAINTENANCE
Cleaning the LEDStrip Light Disconnect the Strip Light from power supply before any maintenance operation.
![]() WARNING: Be sure you unplug the LED driver from the power outlet; just switching off the lights with the APP is NOT enough because it does not stop the power supply. Never place the LED Strip Light under water jets or submerge in water.No special maintenance is required for the Fluval LED Strip Light and covers, other than periodic cleaning with a damp cloth (never use harsh chemical products or detergents). To remove calcareous deposits, it is recommended to use a mild acid such as lemon juice, followed by a thorough wipe down with a damp cloth to remove any residue.
WARNING: Be sure you unplug the LED driver from the power outlet; just switching off the lights with the APP is NOT enough because it does not stop the power supply. Never place the LED Strip Light under water jets or submerge in water.No special maintenance is required for the Fluval LED Strip Light and covers, other than periodic cleaning with a damp cloth (never use harsh chemical products or detergents). To remove calcareous deposits, it is recommended to use a mild acid such as lemon juice, followed by a thorough wipe down with a damp cloth to remove any residue.
Saltwater aquariums
It is commonly known that salt water is far more corrosive, conductive (of electricity) and generally degrades both plastic and metal parts at an accelerated rate versus fresh water. To minimize salt accumulations on the Fluval Covers and on the LED Strip Light, it is recommended to take note of the following helpful tips:
- Make sure filter outputs do not spray above the water surface; position them below the water surface with a slight downward angle, but still allow for surface movement (contributes to oxygenation).
- If an air pump must be used, frequent removal of salt deposits will be necessary.
- Keep the water level as constant as possible (regular top-ups due to evaporation). This is beneficial in providing stable salinity and will help protect the cover.
- It is recommended to regularrly clean all LED Strip Light components that come into contact with salt water on a weekly basis. The cleaning should be carried out with a wet cloth (never use harsh chemical products or detergents). Simple lemon juice may be used to take away salt accumulation. Afterwards, rinse carefully to eliminate every residue of acid.
REPLACEMENT PARTS
Always use genuine Fluval Spare Parts to guarantee continued performance and safety. For a full listing of replacement parts, please visit www.fluvalaquatics.com
| Fluval Shaker 168 | Fluval Shaker 252 | |
| 2 x Top Sliding Covers | A13308 | A13309 |
| 1 x LED Strip Light | A13246 | A13247 |
| 1 x LED Driver | A20431 | A20432 |
| 1 x Over Rim cable guide with bi-adhesive pad | A13865 | A13865 |
RECYCLING
![]() This product bears the selective sorting symbol for waste electrical and electronic equipment (WEEE). This means that this product must be handled pursuant to European Directive 2012/19/EU in order to be recycled or dismantled to minimize its impact on the environment. For further information, please contact your local or regional Authorities. Electronic products not included in the selective sorting process are potentially dangerous for the environment and human health due to the presence of hazardous substances.
This product bears the selective sorting symbol for waste electrical and electronic equipment (WEEE). This means that this product must be handled pursuant to European Directive 2012/19/EU in order to be recycled or dismantled to minimize its impact on the environment. For further information, please contact your local or regional Authorities. Electronic products not included in the selective sorting process are potentially dangerous for the environment and human health due to the presence of hazardous substances.
2 – YEAR LIMITED WARRANTY
Your Fluval Aquarium and LED Strip Light are guaranteed for defective parts and workmanship for a period of two years from the date of purchase. This guarantee is valid with proof of purchase only. The guarantee is limited to repair or replacement only and does not cover consequential loss, loss or damage to livestock and personal property or damage to animate or inanimate objects, irrespective of the cause thereof.This guarantee is valid provided the aquarium is placed in a suitable location that is flat and level and has been installed in accordance with the installation instructions and care guide. This guarantee excludes aquarium breakage due to misuse, chips, stress cracks caused by improper support or other breakage. This guarantee is valid only under normal operating conditions for which the unit is intended. It excludes any damage caused by unreasonable use, negligence, improper installation, tampering, abuse or commercial use. The warranty does not cover wear and tear, breakage of glass or parts which have not been adequately or correctly maintained.If at sometime in the future you have cause to claim under this guarantee, you will need to provide proof and date of purchase. We recommend that you retain your receipt for this purpose. Rolf C. Hagen Inc. wishes you many hours of enjoyment with your Fluval aquarium.
For Authorised Guarantee Service, please return (well packaged and by registered post) to the address listed on the last page enclosing dated receipt and reason for return. If you have any queries or comments about the operation of this product, please let us try to help you before you return the product to your retailer. Most queries can be handled promptly with a phone call. When you call (or write), please have all relevant information such as model number, age of product, details of aquarium setup, as well as the nature of the problem.If you have any queries or comments about the operation of this product, please contact your Specialist Aquatic Retailer in the first instance. Most queries can be handled easily at store level. In the unlikely event that it cannot, please return the item to the retailer, with your valid proof of purchase, for repair or replacement under the two year warranty terms.
![]()
CANADA![]() CALL US TOLL-FREE AT:1-800-554-2436between 9:00 a.m. and 4:00 p.m. EasternStandard Time.Ask for Customer Service.FOR AUTHORISED GUARANTEE REPAIR SERVICE:Return with dated receipt to:Rolf C. Hagen Inc.20500 Trans-Canada HwyBaie-D’Urfé, Québec H9X 0A2
CALL US TOLL-FREE AT:1-800-554-2436between 9:00 a.m. and 4:00 p.m. EasternStandard Time.Ask for Customer Service.FOR AUTHORISED GUARANTEE REPAIR SERVICE:Return with dated receipt to:Rolf C. Hagen Inc.20500 Trans-Canada HwyBaie-D’Urfé, Québec H9X 0A2
USACALL US TOLL-FREE AT:1-800-724-2436between 9:00 a.m. and 4:00 p.m.Eastern Standard Time. Ask for Customer Service.FOR AUTHORISED GUARANTEE REPAIR SERVICE:Return with dated receipt to:Rolf C. Hagen (USA)305 Forbes Blvd Mansfield, MA 02048
UKCustomer Services Helpline Number:01977 521015. Between 9:00 AM and 5:00 PM,Monday to Thursday and 9:00 AM and 4:00 PMon Friday (excluding Bank Holidays).Rolf C. Hagen (UK) Ltd, Customer ServiceDepartment California Drive, Whitwood Ind Est.,Castleford West Yorkshire WF10 5QH
![]()
References
[xyz-ips snippet=”download-snippet”]