FoodSaver Vacuum Sealing System User Manual & Recipe Book
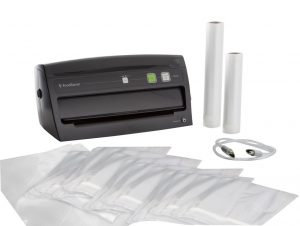
Important Safeguards & Tips
Important Safeguards For your own safety, always follow these basic precautions when using a FoodSaver appliance:
- Read the User Manual carefully for operating instructions. Read all instructions in this manual before use.
- Do not use appliance on wet surfaces or outdoors.
- To protect against electric shock, do not immerse any part of appliance, power cord or plug in water or other liquid. Unplug from outlet when not in use and before cleaning.
- To disconnect, unplug power cord from electrical outlet. Do not disconnect by pulling on cord.
- Do not operate appliance with a damaged power cord or plug. Do not operate appliance if it malfunctions or is in any way damaged. For details, contact Consumer Services at number listed below.
- Use appliance only for its intended use.
- Closely supervise children when using any electrical appliance. Do not allow appliance to be used as a toy.
- Caution: A short power cord is provided to reduce risks from entanglement or tripping over a longer cord. An extension cord may be used when marked electrical rating is no less than electrical rating of this appliance. All cords should not drape over counter or tabletop where cords can be tripped over or pulled on unintentionally, especially by children. 10. Do not place on or near a hot gas or electric burner, or heated oven. Extreme caution must be used when moving products containing hot liquids. 11. Wait 20 seconds between seals to allow appliance to cool.
Important Tips
- Vacuum packaging is NOT a substitute for the heat process of canning. Perishables still need to be refrigerated or frozen.
- For best results, use only with FoodSaver® Bags, Rolls, Containers and Accessories.
- During the vacuum packaging process, small amounts of liquids, crumbs or food particles can be inadvertently pulled into the Vacuum Channel. Empty the Drip Tray after each use.
- Avoid overfilling, always leave at least 3 inches of bag material between bag contents and top of bag. This allows room for the bag material to cinch tightly against the food and prevents the bag from pulling out of the vacuum channel during the sealing process. Then leave at least one additional inch of bag material for each time you plan to reuse bag.
- Do not create your own side seams for a FoodSaver® Bag. These bags are manufactured with a special side seam, which is sealed all the way to the outer edge.
- To prevent wrinkles in the seal when vacuum packaging bulky items, gently stretch bag flat while inserting bag into vacuum channel and continue to hold bag until vacuum pump starts.
- When you are vacuum packaging items with sharp edges (dry spaghetti, silverware, etc.), protect bag from punctures by wrapping item in soft cushioning material, such as a paper towel. You may want to use a canister or Mason jar instead of a bag.
- When using accessories, remember to leave one inch of space at top of canister or container.
- Pre-freeze fruits and blanch vegetables before vacuum packaging for best results. See “Guidelines for Vacuum Packaging” section.
This appliance has a polarized plug (one blade is wider than the other). As a safety feature, this plug will fit in a polarized outlet only one way. If the plug does not fit fully in the outlet, reverse the plug. If it still does not fit, contact a qualified electrician. Do not attempt to defeat this safety feature.
For Household Use Only
SAVE THESE INSTRUCTIONS
Welcome to FoodSaver® Vacuum Sealing System
Congratulations…
You are about to enjoy the freshness benefits of FoodSaver®, The #1 Selling Brand of Vacuum Packaging Systems. For years, the FoodSaver® Vacuum Packaging System has helped millions of households keep food fresh longer in the refrigerator, freezer and pantry. The FoodSaver® system is designed to remove air and extend freshness up to five times longer than conventional storage methods. Keep your FoodSaver® appliance on your countertop, and you’ll soon discover its convenience and versatility.
Free Gift with Registration!
Register now and you’ll receive a free gift. It’s our “thanks” to you for being a FoodSaver® customer. Register online at www.foodsaver.com/register. You’ll have access to special sale items for online registrants only!
Questions? Contact customer service at 877-777-8042 or visit www.foodsaver.com.
Do not return this product to place of purchase.
FEATURES
FoodSaver® V3000 Series
Shown V3040, V3020 operates in the same manner except where noted.
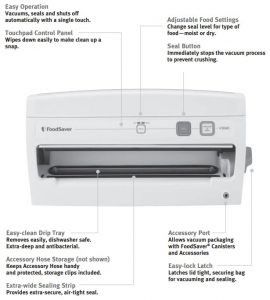

The user-friendly control panel makes it easy for you to get the most out of your FoodSaver® System.
- Adjustable Food Settings Select food type to optimize the seal – Dry (normal seal time) for foods without liquid; Moist (longer seal time) for juicy foods.
- Seal Button This button has three uses: 1. Press to create a seal when making bags from a FoodSaver® Roll. 2. Press to immediately stop the vacuum process and begin sealing the bag. This prevents crushing delicate items such as bread, cookies and pastries. 3. Press to create a seal on Mylar bags (such as a potato chip bag) to keep food sealed airtight.
- Vacuum & Seal Button This button has two uses: 1. Press to vacuum package and seal food airtight. Appliance shuts off automatically. 2. Press to cancel any process at any point.
- Seal Indicator Light This light has two uses: 1. Constant light indicates sealing process is engaged. 2. Flashes to indicate error.
- Vacuum Indicator Light Shows progress of vacuum and seal process. Shuts off when the full process is finished.
How to
How to Make a Bag from a FoodSaver® Vacuum Sealing Roll
- Using scissors, cut enough bag material to hold item, plus 3 inches (7.6cm).
- Rotate latch to unlock, lift sealing door, place bag over sealing strip (Fig. 1).
 Fig. 1
 - Lower door and rotate latch. Press Seal button (Fig. 2).
 Fig 2
Fig 2 - After red light goes off, rotate latch to unlock, lift door and remove bag (Fig. 3).
 Fig 3
Fig 3 - Now you are ready to vacuum seal with your new bag.
How to Vacuum Seal with FoodSaver® Vacuum Sealing Bags
- Begin with a FoodSaver® Vacuum Sealing System Bag (Fig. 1) (or create a bag as described in the “How to Make a Bag from a FoodSaver® Vacuum Sealing Roll” section).
 Fig 1
Fig 1 - Lift door, insert bag end (Fig. 2).
 Fig 2
Fig 2 - Lower door and rotate latch. Press Vacuum & Seal button (Fig. 3).
 Fig 3
Fig 3 - Once Seal light goes off, unlatch, lift door and remove sealed bag (Fig. 4)
 Fig 4
Fig 4
Guidelines for Vacuum Packaging
Vacuum Packaging and Food Safety
The vacuum packaging process extends the life of foods by removing most of the air from the sealed container, thereby reducing oxidation, which affects nutritional value, flavor and overall quality. Removing air can also inhibit growth of microorganisms, which can cause problems under certain conditions:
Mold – Easily identified by its fuzzy characteristic. Mold cannot grow in a low oxygen environment, therefore vacuum packaging can slow the growth of mold.
Yeast – Results in fermentation, which can be identified by smell and taste. Yeast needs water, sugar and a moderate temperature to grow. It causes also survive with or without air. Slowing the growth of yeast requires refrigeration, while freezing stops it completely.
Bacteria – Results in an unpleasant odor, discoloration and/or soft or slimy texture. Under the right conditions, anaerobic bacteria such as Clostridium botulinum (the organism that causes Botulism) can grow without air and sometimes cannot be detected by smell or taste. Although it is extremely rare, it can be very dangerous.
To preserve foods safely, it is critical that you maintain low temperatures. You can significantly reduce the growth of microorganisms at temperatures of 40°F (4°C) or below. Freezing at o°F (-17°C) does not kill microorganisms, but stops them from growing. For long-term storage, always freeze perishable foods that have been vacuum packaged, and keep refrigerated after thawing.
It is important to note that vacuum packaging is NOT a substitute for canning and it cannot reverse the deterioration of foods. It can only slow down the changes in quality. It is difficult to predict how long foods will retain their top-quality flavor, appearance or texture because it depends on age and condition of the food on the day it was vacuumed packaged.
IMPORTANT: Vacuum packaging is NOT a substitute for refrigeration or freezing. Any perishable foods that require refrigeration must still be refrigerated or frozen after vacuum packaging.
Food Preparation and Reheating Tips Thawing and Reheating Vacuum Packaged Foods Always thaw foods in either refrigerator or microwave – do not thaw perishable foods at room temperature.
To reheat foods in a microwave in a FoodSaver Bag, always cut corner of the bag before placing it on a microwave-safe dish. However, to avoid hot spots, do not reheat bone-in meat or greasy foods in microwave within a FoodSaver Bag. You can also reheat foods in FoodSaver® Bags by placing them in water at a low simmer below 170°F (75°C).
Preparation Guidelines for Meat and Fish: For best results, pre-freeze meat and fish for 1-2 hours before vacuum packaging in a FoodSaver Bag. This helps retain the juice and shape, and guarantees a better seal. If it’s not possible to pre-freeze, place a folded paper towel between meat or fish and top of bag, but below seal area. Leave paper towel in bag to absorb excess moisture and juices during vacuum packaging process.
Note: Beef may appear darker after vacuum packaging due to the removal of oxygen. This is not an indication of spoilage.
Preparation Guidelines for Hard Cheeses: To keep cheese fresh, vacuum package it after each use. Make your FoodSaver® Bag extra long, allowing one inch of bag material for each time you plan to open and reseal in addition to the 3-inch room you normally leave between contents and seal. Simply cut sealed edge and remove cheese. When you’re ready to repackage the cheese, just drop it in bag and reseal.
IMPORTANT: Due to the risk of anaerobic bacteria, soft cheeses should never be vacuum packaged.
Preparation Guidelines for Vegetables: Vegetables need to be blanched before vacuum packaging. This process stops the enzyme action that could lead to loss of flavor, color and texture.
To blanch vegetables, place them in boiling water or in the microwave until they are cooked, but still crisp. Blanching times range from 1 to 2 minutes for leafy greens and peas; 3 to 4 minutes for snap peas, sliced zucchini or broccoli; 5 minutes for carrots; and 7 to 11 minutes for corn on the cob. After blanching, immerse vegetables in cold water to stop the cooking process. Finally, dry vegetables on a towel before vacuum packaging.
Note: All vegetables (including broccoli, brussels sprouts, cabbage, cauliflower, kale, turnips) naturally emit gases during storage. Therefore, after blanching, they must be stored in freezer only.
When freezing vegetables, it is best to pre-freeze them for 1-2 hours or until solidly frozen. To freeze vegetables in individual servings, first place on a baking sheet and spread them out so they are not touching. This prevents them from freezing together in a block. Once they are frozen, remove from baking sheet and vacuum package vegetables in a FoodSaver® Bag. After they have been vacuum packaged, return them to the freezer.
IMPORTANT: Due to the risk of anaerobic bacteria, fresh mushrooms, onions, & garlic should never be vacuum packaged.
Preparation Guidelines for Leafy Vegetables: For best results, use a canister to store leafy vegetables. First wash the vegetables, and then dry with a towel or salad spinner. After they are dried, put them in a canister and vacuum package. Store in refrigerator.
Preparation Guidelines for Fruits: When freezing soft fruits or berries, it is best to pre. freeze them for 1-2 hours or until solidly frozen. To freeze fruit in individual servings, first place on a baking sheet and spread them out so they are not touching. This prevents them from freezing together in a block. Once they are frozen, remove from baking sheet and vacuum package fruit in a FoodSaver Bag. After they have been vacuum packaged, return them to the freezer.
You can vacuum package portions for baking, or in your favorite combinations for easy fruit salad all year round. If storing in the refrigerator, we recommend using a FoodSaver® Canister.
Preparation Guidelines for Baked Goods: To vacuum package soft or airy baked goods, we recommend using a FoodSaver Canister so they will hold their shape. If using a bag, pre-freeze for 1-2 hours or until solidly frozen. To save time, make cookie dough, pie shells, whole pies, or mix dry ingredients in advance and vacuum package for later use.
Preparation Guidelines for Coffee and Powdery Foods: To prevent food particles from being drawn into vacuum pump, place a coffee filter or paper towel at top of bag or canister before vacuum packaging. You can also place the food in its original bag inside a FoodSaver® Bag, or use a FoodSaver Universal Lid with the original container to vacuum package.
Preparation Guidelines for Liquids: Before you vacuum package liquids such as soup stock, pre-freeze in a casserole dish, loaf pan orice cube tray until solid. Remove frozen liquid from pan and vacuum package in a FoodSaver® Bag. You can stack these “frozen bricks” in your freezer. When you’re ready to use, just cut corner of bag and place in a dish in microwave or drop into water at a low simmer, below 170°F (75°C).
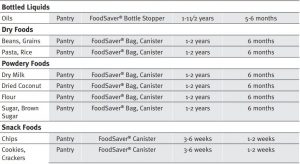
To vacuum package non-carbonated bottled liquids, you can use a FoodSaver Bottle Stopper with the original container. Remember to leave at least one inch of room between contents and bottom of Bottle Stopper. You can re-seal bottles after each use.
Preparation Guidelines for Make-ahead Meals, Leftovers and Sandwiches: Efficiently store your make-ahead meals, leftovers and sandwiches in the stackable, lightweight FoodSaver containers. They are microwaveable, top rack dishwasher safe and come with a custom adaptor. The lightweight containers will be ready to head off to the office or school when you are!
Preparation Guidelines for Snack Foods: Your snack foods will maintain their freshness longer when you vacuum package them. For best results, use a FoodSaver® Canister for crushable items like crackers.
Vacuum Packaging Non-Food Items The FoodSaver vacuum packaging system also protects non-food items from oxidation, corrosion and moisture. Simply follow the directions to vacuum package items using FoodSaver® Bags, Canisters and Accessories.
To vacuum package silver, wrap fork tines in soft cushioning material, such as a paper towel, to avoid puncturing bag. Your FoodSaver® Bags are ideal for outdoor excursions. For camping and hiking, keep your matches, maps and food dry and compact. To have fresh water for drinking, simply fill a FoodSaver Bag with ice, seal it and when needed, let the ice pack melt. If you’re going sailing or boating, vacuum package your food, film and a dry change of clothes. Just remember to bring scissors or a knife to open the bag.
To keep emergency kits safe and dry, vacuum package flares, batteries, flashlights, matches, candles and other necessities. Your emergency items will stay dry and organized in your home, car or boat.
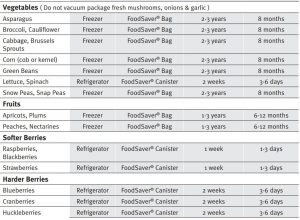
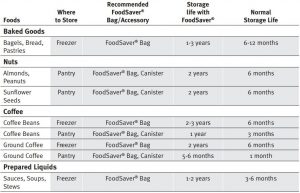
STORAGE GUIDE
Meat, Cheese, Vegetables Fruits

Baked Goods, Coffee, Snacks and Liquids
How to Vacuum Package with FoodSaver® Accessories
- Prepare container according to FoodSaver Accessory Guidelines.
- Insert one end of Accessory Hose into Accessory Port on appliance. Insert other end into port on accessory. Twist tab on Accessory Hose while inserting to ensure a tight fit.
- Press Vacuum & Seal Button.
- When motor and Indicator Light turn off, vacuum process is complete. Note that the appliance will still go through sealing cycle even when vacuuming an accessory. You will hear Motor shut off and then the sealing cycle will begin.
- Gently twist and remove Accessory Hose from accessory and appliance.
- To test vacuum, simply tug on accessory lid. It should not move. Note: For important tips on using accessories with different foods, please refer to the FoodSaver® Reference Guide.
How to Open FoodSaver® Accessories after Vacuum Packaging
FoodSaver Vacuum Packaging Canisters (without large knob on lid) To release vacuum and open, push gray rubber button on lid.
FoodSaver Bulk Canisters and Quick Marinators (with large knob on lid) and Universal Lids. To release vacuum and open, turn knob on lid to open.
FoodSaver Jar Sealer with Mason Jars For use with Ball® and Kerr brand Mason jars. Important: Do NOT use screw bands when vacuum packaging jars. To open, wedge spoon between Mason jar lid and highest part of threaded rim. Twist spoon gently to release vacuum.
FoodSaver Bottle Stoppers To release vacuum and open, twist and pull up on Bottle Stopper.
Care and Cleaning
To Clean Appliance:
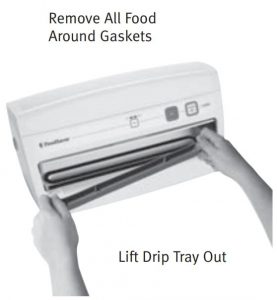
Remove Power Cord from electrical outlet. Do not immerse in liquid. Check Gaskets and around Drip Tray to make sure they are free from food materials. Wipe off gasket with warm soapy cloth if needed. Bottom gasket may be removed for cleaning. Clean with warm, soapy water. The top gasket is not removable.
The Removable Drip Tray makes cleanup easy when small amounts of liquids are inadvertently pulled into the Vacuum Channel during vacuum process.
Empty Drip Tray after each use. Wash in warm soapy water or place in top rack of dishwasher. Dry thoroughly before re-inserting into the appliance. Always leave lid latch in open or store position, never leave in closed position. When appliance is left in closed position, the gaskets become compressed and the unit may not function properly.
Do not leave appliance outside in the environment while not in use.
Recipes
For your FoodSaver® Appliance
For additional delicious recipes using the FoodSaver system to prepare foods in advance, check our website, www.foodsaver.com.
Main Street Meatloaf
This meatloaf is a fantastic All-American version of classic meatloaf! Any leftovers can be packaged in a FoodSaver® Vacuum Storage Bag and frozen.
- 3 Tbsp. unsalted butter
- 3/4 cup yellow onion, chopped
- 3/4 cup celery, with leaves, chopped
- 1/2 cup carrots, peeled and finely chopped
- 1/4 cup fresh parsley, chopped
- 4 cloves garlic, minced
- 2 eggs, lightly beaten
- 1/2 cup light cream
- 1/2 cup ketchup
- 1/2 tsp.ground nutmeg
- 1/2 tsp. dried thyme
- 1/2 tsp. dried marjoram
- 1/4 tsp. salt
- 1 tsp. black pepper, freshly ground
- 2 lbs. lean ground beef
- 1/2 lb.ground veal
- 1/2 lb.ground pork
- 3/4 cup plain bread crumbs
- 1 Tbsp. Worcestershire sauce
- 1/2 cup tomato sauce
- 3 thick slices bacon, uncooked canola oil nonstick cooking spray
Preheat the oven to 375° F. Coat a large rectangular baking dish with cooking spray. In a heavy skillet over medium heat, melt the butter and sauté the onion, celery, carrots, parsley and garlic until softened and the moisture has evaporated, about 10 minutes. Remove from the heat and set aside to cool. In a large bowl, whisk together the eggs, cream, ketchup, nutmeg, thyme, marjoram, salt and pepper. To the egg mixture, add the meats, bread crumbs and cooled vegetables, mixing thoroughly with a wooden spoon or your hands. Form the mixture into a large oval and place in the baking dish. Mix the Worcestershire sauce into the tomato sauce and spoon over the top of the meatloaf. Place the bacon slices lengthwise over the tomato sauce. Place the pan on the middle rack in the oven and bake for 45 minutes.
Remove from the oven, loosely cover and allow to rest for 15 minutes before slicing. Serve immediately or seal and freeze as needed.
Serves 8 or makes 2 meals of 4 servings each.
Grilled Tarragon Mustard Chicken
Tender grilled chicken, marinated in the FoodSaver® Quick Marinating Canister, is a perfect foundation for any meal!
- 3 lbs. boneless, skinless, chicken breast halves (about 8 pieces)
- 1 cup Tarragon Mustard Marinade (below), divided
- 1 Tbsp. lowfat margarine
- 1/2 cup dry white wine
Prepare a charcoal or gas grill to medium high heat. Place the chicken breasts in the FoodSaver® Quick Marinating Canister, cover with 1/2-cup marinade and vacuum seal. Marinate for 20 minutes. Remove the chicken from the canister and discard the marinade. Lightly wipe the grill rack with cooking oil. Place the chicken breasts on the grill and cook over medium-high heat until well browned, about 6 to 8 minutes. Turn the chicken and cook until the meat is no longer pink and the internal temperature reaches 170° F on an instant read thermometer. When the chicken is pierced with a fork, the juices should run clear. While the chicken is grilling, melt the margarine in a medium sauté pan over medium heat. Add the remaining marinade and wine and bring to a boil. Cook the sauce at a high simmer, stirring constantly until slightly thickened. Reduce the heat to low and simmer another 4 minutes. To serve, place 4 grilled chicken pieces on a platter and ladle the sauce over each. Serve immediately.
Makes 4 servings.
Cool the remaining 4 grilled chicken breasts, separate into individual portion control sizes, vacuum seal and freeze.
Tarragon Mustard Vinaigrette
- 3 Tbsp. champagne vinegar
- 1 Tbsp. Dijon mustard
- 1 tsp. lemon juice
- 1 tsp. dried tarragon
- 1/2 tsp. salt
- 1/2 tsp. black pepper, freshly ground
- 3/4 cup extra-virgin olive oil
In a small bowl, whisk together the vinegar, mustard, lemon juice and spices, until blended. Drizzle in the olive oil, whisking constantly, until thoroughly blended.
Makes 1 cup.
Smoky Tomato, New Potato & Fresh Pea Stew
Use handy FoodSaver® Vacuum Storage Bags to freeze pre-chopped onions, garlic, potatoes, tomatoes and parsley. Makes dinner time a snap to prepare!
- 1 Tbsp. extra-virgin olive oil
- 1 cup yellow onion, chopped
- 1 clove garlic, minced
- 11/2 lbs. new red potatoes, unpeeled, diced
- 4 cups Oregano & Garlic Tomato Sauce (below)
- 1 cup water
- 1/2 tsp. bottled liquid smoke flavoring
- 4 medium beefsteak tomatoes, chopped
- 11/2 cups fresh peas, (you may substitute frozen, thawed peas)
- 1 Tbsp. fresh parsley, minced salt and pepper to taste
In a large stockpot, heat the olive oil over medium heat. Sauté the onion and garlic in the oil until the onion is soft. Add the potatoes, Oregano & Garlic Tomato Sauce, water and liquid smoke flavoring. Bring the stew to a boil, reduce the heat to low and simmer for 30 minutes, or until the potatoes are tender. Add the tomatoes, peas, parsley and salt and pepper to taste. Stir to combine, cover and simmer until the peas are just tender.
Oregano & Garlic Tomato Sauce
Use this flavorful sauce immediately or pre-freeze and vacuum seal in a FoodSaver® Vacuum Storage Bag for easy reheating.
- 3 Tbsp. extra-virgin olive oil
- 2 medium yellow onions, chopped
- 2 cloves garlic, minced
- 3 28 oz. cans whole peeled tomatoes
- 3 cups tomato sauce (15 oz. can plus 8 oz. can)
- 5 Tbsp. canned tomato paste
- 3 cups water
- 1 tsp. sugar
- 1/4 tsp. salt
- 3/4 tsp. dried oregano
- 1/2 tsp. black pepper, freshly ground
In a large, heavy saucepan, heat the olive oil over medium heat. Add the onions and garlic and sauté until softened, about 5 minutes. In a large bowl, crush the tomatoes and add to the saucepan with the remaining ingredients. Stir well to blend, reduce the heat to simmer and cook uncovered for 45 minutes, stirring occasionally, reducing and slightly thickening the sauce.
Makes 16 cups (4 quarts).
Grilled Far East Salmon Fillets
Use the FoodSaver® Quick Marinating Canister for quick results in marinating these fillets to perfection.
- 46-oz. salmon fillets
- 1 Cup Far East Marinade (below), divided
- 2 stalks lemongrass, cut in half
- 1 red onion, skin removed, and quartered
Place the fillets in the Quick Marinating Canister with 1/2-cup marinade, vacuum seal and marinate for at least 20 minutes. Prepare a gas or charcoal grill for medium heat. Remove the salmon and discard the marinade. Place the salmon fillets on the grill with a piece of lemongrass on each fillet. Place an onion quarter beside each fillet. Cover the grill and cook for 6 minutes. Turn the fillets over and brush with the remaining 12-cup marinade. Turn the onion quarters and place the lemongrass on top of each fillet. Cover and cook another 4 to 6 minutes, until the fish flakes easily. To serve, plate each fillet with a piece of lemongrass on top and the grilled quartered onion beside the fillet.
Serves 4.
Far East Marinade
- 1/2 cup dry sherry
- 1/2 cup soy sauce
- 1/4 cup rice wine vinegar
- 1/4 cup sake or rice wine
- 2 Tbsp. sesame oil
- 2 Tbsp. fresh ginger, grated
- 2 Tbsp. fresh garlic, minced
- 1 Tbsp. sugar
- 1 Tbsp. fresh cilantro, chopped
- 1 tsp. hot Asian chile paste
Whisk all ingredients in a medium bowl until well blended. Makes
2 cups; enough for 6 pounds of chicken, beef, pork, shrimp or fish.
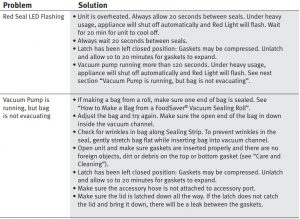
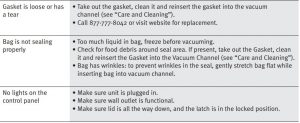
Troubleshooting
1 Year Limited Warranty
Sunbeam Products, Inc. doing business as Jarden Consumer Solutions or if in Canada, Sunbeam Corporation (Canada) Limited doing business as Jarden Consumer Solutions (collectively “CS”) warrants that for a period of one year from the date of purchase, this product will be free from defects in material and workmanship. JCS, at its option, will repair or replace this product or any component of the product found to be defective during the warranty period. Replacement will be made with a new or remanufactured product or component. If the product is no longer available, replacement may be made with a similar product of equal or greater value. This is your exclusive warranty. Do NOT attempt to repair or adjust any electrical or mechanical functions on this product. Doing so will void this warranty.
This warranty is valid for the original retail purchaser from the date of initial retail purchase and is not transferable. Keep the original sales receipt. Proof of purchase is required to obtain warranty performance. JCS dealers, service centers, or retail stores selling ICS products do not have the right to alter, modify or any way change the terms and conditions of this warranty.
This warranty does not cover normal wear of parts or damage resulting from any of the following: negligent use or misuse of the product, use on improper voltage or current, use contrary to the operating instructions, disassembly, repair or alteration by anyone other than JCS or an authorized JCS service center. Further, the warranty does not cover: Acts of God, such as fire, flood, hurricanes and tornadoes.
What are the limits on JCS’s Liability?
JCS shall not be liable for any incidental or consequential damages caused by the breach of any express, implied or statutory warranty or condition.Except to the extent prohibited by applicable law, any implied warranty or condition of merchantability or fitness for a particular purpose is limited in duration to the duration of the above warranty.JCS disclaims all other warranties, conditions or representations, express, implied, statutory or otherwise. ICS shall not be liable for any damages of any kind resulting from the purchase, use or misuse of, or inability to use the product including incidental, special, consequential or similar damages or loss of profits, or for any breach of contract, fundamental or otherwise, or for any claim brought against purchaser by any other party.Some provinces, states or jurisdictions do not allow the exclusion or limitation of incidental or consequential damages or limitations on how long an implied warranty lasts, so the above limitations or exclusion may not apply to you.This warranty gives you specific legal rights, and you may also have other rights that vary from province to province, state to state or jurisdiction to jurisdiction.
How to Obtain Warranty Service
In the U.S.A.If you have any question regarding this warranty or would like to obtain warranty service, please call1.877.777.8042 and a convenient service center address will be provided to you.In CanadaIf you have any question regarding this warranty or would like to obtain warranty service, please call 1.877.804.5383 and a convenient service center address will be provided to you.In the U.S.A., this warranty is offered by Sunbeam Products, Inc. doing business as Jarden Consumer Solutions located in Boca Raton, Florida 33431. In Canada, this warranty is offered by Sunbeam Corporation (Canada) Limited doing business as Jarden Consumer Solutions, located at 20 B Hereford Street, Brampton, Ontario L6Y 0M1. If you have any other problem or claim in connection with this product, please write our Consumer Service Department.PLEASE DO NOT RETURN THIS PRODUCT TO ANY OF THESE ADDRESSES OR TO THE PLACE OF PURCHASE.
FoodSaver Vacuum Sealing System User Manual & Recipe Book – FoodSaver Vacuum Sealing System User Manual & Recipe Book –
Questions about your Manual? Post in the comments!
[xyz-ips snippet=”download-snippet”]


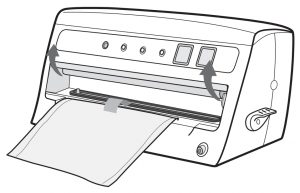 Fig. 1
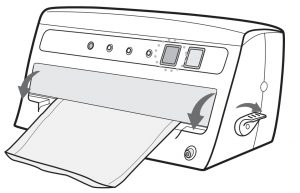 Fig 2
Fig 2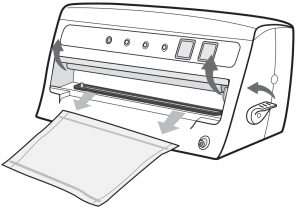 Fig 3
Fig 3 Fig 1
Fig 1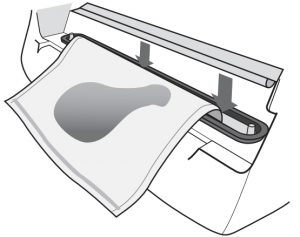 Fig 2
Fig 2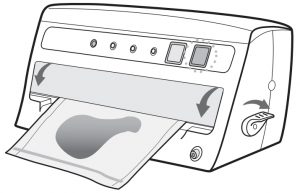 Fig 3
Fig 3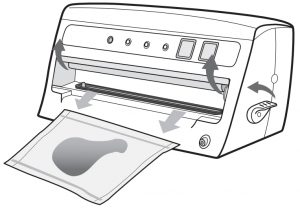 Fig 4
Fig 4