
450MM BELT AUTO INCLINEPREMIUM TREADMILLFSEFBTM450A
SAFETY & WARNINGS
- Install the treadmill in a dry location away from water, dampness, and dust.
- Do not run on the treadmill with bare feet. Wear appropriate exercise clothing.
- Plug the treadmill into a grounded electrical socket.
- Do not plug into an extension board.
- Keep children far away from the machine in case of accidents.
- Maintain the machine regularly.
- Switch off the machine after use.
- Ensure a safety clip is attached to you before operating so the emergency stop will activate properly.
- After using silicone oil, please keep it in a place out of the reach of children to avoid serious results caused by accidental ingestion.
- Before using the machine, please check your clothes are buttoned up or zipped up.
- Don’t wear clothes that can easily hook onto the treadmill.
- Keep the power cord away from hot objects and surfaces.
- Keep children away from the treadmill.
- This equipment is designed and intended for indoor use only.
- Power off and unplug the treadmill before moving.
- Non-professionals are not allowed to disassemble the machine; otherwise, seriousdamage or injury may occur.
- Only one person can use the treadmill at a time.
- During the exercise, if you feel dizzy, have chest pain, nausea, or shortness of breath, please stop exercising immediately and consult your doctor.
- Do not use the treadmill if it is damaged in any way.
- Intended for home use only.
- Do not use when intoxicated.
- The running belt on this treadmill has a visible joint mark. This is completely normal and will not affect the performance or operation of your treadmill.
- This product must be grounded. In the case of electrical malfunction, the ground will provide a path of least resistance for the current in order to reduce the danger of electric shock.
ASSEMBLY
Step 1: Upright FrameLift the upright frame, handle and control console, into position and fix in place using x2 M8x45 screws with x2 M8 nuts and x2 M8x20 screws. One of each on each side of thejoining section as shown in the image.Step 2: Hand GripsScrew-in the handgrips on both sides with M8x20 screw and washer separately by making them pass through the handgrip hole and connect with the upright frame.
Step 3: Column Edge StripsInsert the x8 clips into the column edge strips and then attach the edge strip to the frame by pushing it into position.
Step 4: Leg SheathsAlign the two left and right column sheaths with the holes and press them into position firmly.
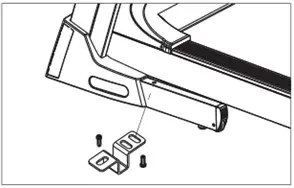
Step 5: Remove Transport Safety BuckleRemove the safety fixing buckle that holds the legs to the bottom frame using a hex wrench.Note: The treadmill cannot be folded and stored with these buckles still attached.
 Step 6: Insert Safety TetherInsert the safety tether provided into the yellow mark tether hole on the console below the display. The treadmill is now ready for use.
OPERATION
Flip the Master Power Switch that is located at the front of the treadmill to the ‘ON’ position. The computer console will beep for 1 second before starting. Before beginning a workout session ensure that the Safety Tether Key is properly placed onto the Computer Console and the Safety Clip is securely attached to an article of your clothing. If the Safety Tether Key is not placed onto the Computer Console, the screen will display ‘—’.Note: Always stand on the side rails when you start the treadmill, never start the treadmill while you are standing on the running belt.Quick start:Press the START/STOP button on the control panel to start exercise, the screen will count down 3 seconds before the running belt starts moving. The running belt starts moving with an initial speed of 0.8 KPH.Press one of the INSTANT SPEED buttons (6 / 8 / 12) on the computer console and on the screen, SPEED will display the speed that you have pressed to 6 KPH, 8 KPH, or 12 KPH respectively and the running speed will change.TIME will display your elapsed workout time in minutes and seconds. The split window of DIS. (DISTANCE) will display the accumulative distance traveled during a workout.CAL. (CALORIES) will display the total accumulated calories burned during a workout. PUL (PULSE) will display your current heart rate in beats per minute (BPM). To activate, grip the hand pulse sensors on both handlebars during exercise and the pulse will display after 45 seconds.For a more accurate reading, grip pulse sensors with both hands. During training, press the start/STOP button on the control panel to stop the treadmill from running at any time or pull out the safety tether key to stop the treadmill.Console Display
| 1 | START/STOP | Press the START/STOP button to start or stop the treadmill. |
| 2 | SPEED +/SPEED • | The speed of the treadmill can is adjusted up and down between 0.8 and 18 KMPH using the SPEED + and SPEED – keys. |
| 3 | INSTANT SPEED (6/8/12) | Press one of the INSTANT SPEED buttons (6 / 8 / 12) on the computer console and the screen will display the speed that you have selected, and the running speed will change. |
| 4 INCUNE4./ INTUNE • | The incline of the treadmill can be adjusted between 0 to 18 levels using the INCLINE 4- and INCLINE -. The default incline is level 5. | |
| 5 | TIME | Displays your elapsed workout time in minutes and seconds. Time starts counting up from 5:00 to 99:00 in 1-second increments. You may also pre-set the target time in STOP MODE-H1 before training. |
| 6 | DISTANCE | Displays the accumulative distance traveled during a workout.The distance starts counting up from 0.5 to 99.9 km. You may also pre-set the target distance in STOP MODE-H2 before training. |
| 7 | CALORIES | Displays the total calories burned during your workout. Calorie starts counting up from 10 to 999 calories. You may also pre-set target calories in STOP MODE-H3 before training. |
| 8 | Bluetooth App | Download Bluetooth app HK-Treadmill. from Google Play for Android OS system. from App Store for Apple 105 system. then customers can control treadmill START. STOP. SPEED or INCLINE by mobile phone. |
| 9 | PULSE | Displays your current heart rate in beats per minute (BPM). To activate, grip the hand pulse sensors during exercise and the pulse will display after 4-5 seconds. For a more accurate reading. Grap pulse sensors with both hands.Note: This is just for reference, not medically accurate. |
| 10 | AUX Music Playback | Music playback devices such as smartphones can be connected to the treadmill via the AUX port. Volume can be increased and decreased using the volume controls. |
| 11 | USB Music Playback | A USB flash drive containing MP3 musk files can be inserted into the USB slot. Musk will play automatically from the drive and can be controlled using the ‘Last Song” and “Next Song’ buttons. Volume can be increased and decreased using the volume controls. |
| 12 | SMART | The treadmill will remember the current trajectory with SMART mode, such as the speed of different time periods. Trajectory data will be saved if the running time is more than 10 minutes. otherwise, it will be discarded. Next time the treadmill is used the previous trajectory settings will be loaded when using SMART mode. If the speed or incline is changed manually during use this will erase the previous trajectory settings and create a new one if the running time is more than 10 minutes. |
| 13 | SELECT | Press the SELECT button, you can select 12 different training programs PI-P12. FAT percentage calculation program and 3 different training MODE (Distance/Time/Calories countdown). |
| 14. MODE | |
| H-1 Time mode | The split window of TIME begins blinking. The initial pre-set target time is 15:00 minutes. Press the SPEED+/SPEED- button on the computer console to change the setting. The pre-set training program time range is from 5:00 to 99:00 minutes. Once you select training time, press the START/STOP button on the console to start the exercise, the screen will countdown 3 seconds before the running belt starts moving. When the pre-set training program time counts down to 0, the computer will beep to alert you. the treadmill will stop automatically. |
| H-2 Distance mode | The split window of DISTANCE begins blinking. The Initial pre-set target distance is 1km. Press the SPEED+/SPEED- button on the computer console to change the setting. The pre-set training program’s distance range is from 0.5km to 99.9km. Once you pre-set training program distance, press the START/STOP button on the computer to start exercise, the screen will countdown 3 seconds before the running belt starts moving. When the pre-set training program distance counts down to O. the computer will beep to alert you. the treadmill will stop automatically. |
| H-3 Calories mode | The split window of CALORIES begins blinking. The initial pre-set target calories are 50. Press the SPEED+/SPEED- button on the computer console to change the setting. The pre-set training program calories range is from 10 to 999. Once you pre-set training program calories, press the START/STOP button on the computer to start exercise, the screen will countdown 3 seconds before the running belt starts moving. When the pre-setting program calories count down to 0, the computer will beep to alert you, the treadmill will stop automatically. |
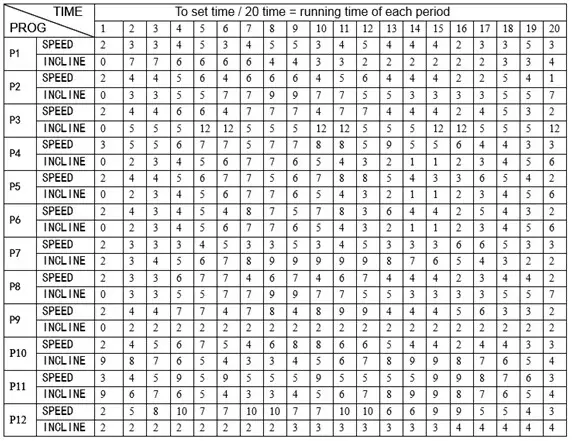
ProgramThe computer offers 12 pre-set programs which vary the speed and incline of your workout over a 20-minute time period. The treadmill must not be running to select a program.Press the SELECT button on the computer console to select the training program.Refer to the table below for a list of programs.
Body Fat Test Program:
- While the treadmill is not running, press a SELECT key and choose the body fat test program (FAT).
- Press the START key for 3 seconds to enter into the body fat test. Set the corresponding parameters:
F-1 Gender 01-Male I 02-Female F-2 Age 10-99 F-3 Height 100-200 F-4 Weight 20-200 F-5 Fat Ratio ≤519 Thin 20-25 Normal 25-29 Overweight .30 Fat - After entering the body fat test function, F-1 will be displayed first, the parameter for gender. Press speed+/- keys to choose between inputs: 01(male), 02 (female). Pressthe START key to making a selection.
- F-2, age parameter. Press speed+/- keys to adjust age (setting range is: 10-99 years old). Press the START key to confirm your age.
- F-3, height parameter. Press speed+/- keys to adjust the height (setting range is: 100200cm).Press the START key to confirm your height.
- F-4, weight parameter. Press the speed+/- keys can adjust weight (setting range is: 20-200kg). Press the START key to confirm your weight.
- F-5, setting window displays “—”, which entering body fat percent getting function; at this moment, put your hands on the heart rates sensors located on the handrails. After 8 seconds your body fat percentage will be displayed on the screen.
CLEANING & CARE
Usage and Lubrication
- When used in a week for less than 3 hours, it should be lubricated once every 5 months.
- Between 4-7 hours, it should be lubricated once every two months.
- For more than 7 hours, it should be lubricated once a month.
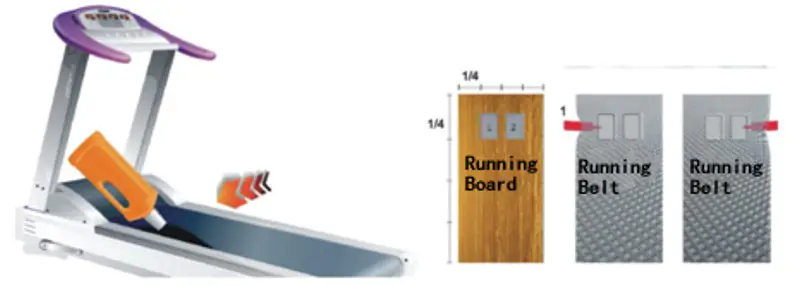
Note: The treadmill can’t be over-lubricated. Proper lubricating is an important factor to increase the treadmill’s service time.Manual LubricationExamine the running board by lifting the belt and observing between the two. If the running board is damp with silicone lubricant, then no extra lubrication is needed. If the running board is dry, then lubrication is needed. Follow the steps below and refer to the images.
- Stop the rotation of the running belt and fold the machine.
- Lift the belt and place the nozzle of the lubricant dispenser near the center of the treadmill running board.
- Evenly coat a line of lubricant reaching to the edges of the running belt.
- Turn on the treadmill and run it at a speed of 1 KH to spread the lubrication.
- Step on the belt from left to right for a few minutes to help coat the lubricant between the belt and the board.

Auto LubricationIn order to ensure adequate lubrication between the treadmill and running belt and to extend the service life of the treadmill, it is equipped with an automatic lubrication system to prevent forgetting to lubricate and possible damage to the treadmill.When setting up the machine, open the hole on the back of the motor cover; add 90ml of lubricant into the reservoir as shown below.
When the treadmill reaches a certain distance, it will automatically dispense lubricant. At 300km the display will show an oil bottle as an indicator to refill the reservoir with lubricant. Press confirm to deactivate the indicator after the reservoir has been refilled.Forced Lubrication
- Power on the treadmill but do not put the safety key in.
- Press the speed decrease button (SPEED -)
- The screen will display ‘-02’
- Press START to dispense lubricant from the reservoir.
Running Belt Tension AdjustmentAll treadmills’ belts should be adjusted before leaving the factory and after the installation; however, after it is used for a period, tension may decrease. To tighten the belt, adjust the tighten bolts at the bottom end of the treadmill evenly on both the left and right sides using a 6mm hex key.Refer to the image below. If the belt is slipping it is too loose. If it is pausing and getting caught, then the belt is too tight and likely putting an unnecessary load on the motor which could cause damage and decrease its life span.
If biased to the left, Adjust the screw on the left side clockwise or the screw on the right side anticlockwise.If biased to the right, then adjust the screw on the right side clockwise or the screw on the left side anticlockwise.
TROUBLESHOOTING
| Fault Code | Main Reason | Solution |
| E01 | from The wireom computer to the bottom control board isn’t properly connected | 1. Check the connection wire between the computer and the control board was well connected.2. Make sure the C on the control board was well inserted. If not re-insert.3. Abnormal power supply in the control board. Please change to a new control board. |
| E02 | Short Circuit | 1 Bad contact with motor open circuit Please change a new motor or check the connector.2. Power cord was punctured. Please change a new power cord or control board. |
| E05 | Over Current Protection | 1. Overloaded.2. Running board with heavy resistance. Needs to be oiled.3. Damage in Motor. Replace motor. |
| E06 | Control Board Self-Checking | |
| E08 | EEPROM Damage | Change the control board |
NOTES
_____________________________
_____________________________
Need more information?We hope that this user guide has given youthe assistance needed for a simple set-up.For the most up-to-date guide for your product,as well as any additional assistance you may require,head online to help.kogan.com.
 report this ad
[xyz-ips snippet=”download-snippet”]