
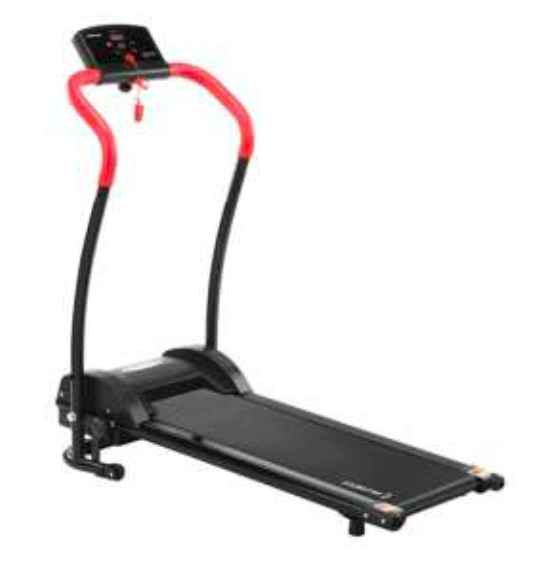
FORTIS Electric Foldable Treadmill
SAFETY & WARNINGS
Caution
To avoid injury, please read this manual carefully before use.
- For safety purposes, do not stand on the running belt when starting the unit.
- Please stop immediately if you feel any nausea or the unit’s motion is no longer smooth.
- Always increase or decrease speed at a slow rate.
- Never adjust the belt during use.
- It is suggested to wear sports shoes when using the machine.
- Children, the elderly, pregnant women should not use the machine.
- Always clip the safety key on your clothing during use.
- Firmly hold the grip bars during use
Safety Information
- Place the machine on flat ground. Do not use the machine in the following locations:1. Outdoors. (The machine is specially designed for indoor use only).2. Any ground that is uneven.3. Any areas in high sunlight or in close proximity to heating units.
- The input for the machine is AC 220V.
- An error may appear if the power is not stable. The unit must not have any other items connected to the same power socket and should not be used through a power board.
- It is suggested to wear sports shoes and gym clothes when using the machine.
- Always increase or decrease speed at a slow rate.
- Be careful of children or surrounding objects when folding and unfolding the machine.
- Never put the machine near wet objects or areas. The unit may produce an error if it is wet.
Caution during use
- If you do not feel well during exercise, please consult with your doctor.
- No liability will be accepted for improper use of the device and any resulting injuries or damage.
- Please pull out safety key after use.
- Please pull out the safety key when moving or changing any parts of the machine.
- Children, the elderly, pregnant women should not use the machine.
- Do not place any items within two meters of the machine.
- Do not start the machine when it is folded.
- Ensure water does not come in contact with the machine, especially the motor, power cable and plug.
- Never wear long dresses or other unsuitable garments during use.
- Do not use the machine in enclosed spaces, locations with uncirculated air or flammable areas.
- Do not put any objects on the machine.
- Keep the plug away from heat.
- Please switch off the unit and remove the plug after using.
- Please do not stand directly on the belt while starting the machine.
- Do not disassemble or modify this machine in any way.
- Please make sure the running belt is fastened before use.
- The running belt on this treadmill has a visible joint mark. This is completely normal and will not affect the performance or operation of your treadmill.
OVERVIEW
Hardware and Tools 
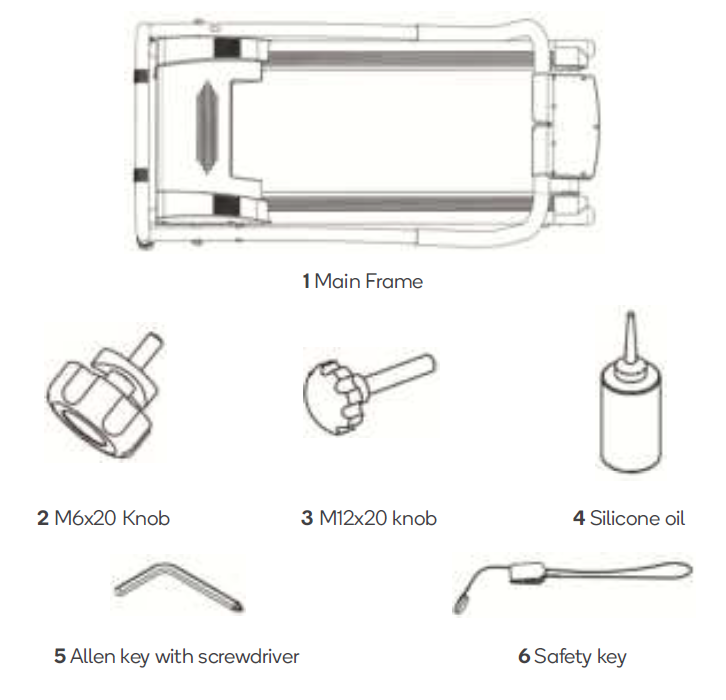
- Main Frame
- M6x20 Knob
- M12x20 knob
- Silicone oil
- Allen key with screwdriver
- Safety key
Parts
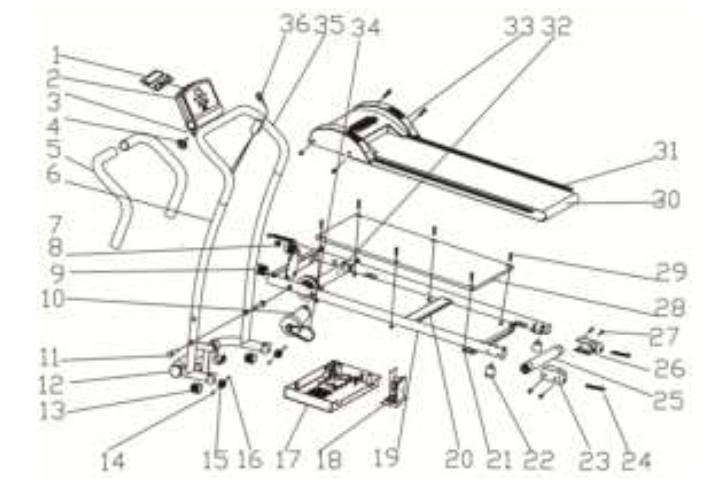
| Serial No | Part Name | Spec | Qty |
| 1 | Console PCB | 1PC | |
| 2 | Console up and down cover | ABS | 1PC |
| 3 | Washer | ABS | 1PC |
| 4 | M6 Knob | M6x12 | 1PC |
| 5 | Armrest foam | Cannot tear | 2PCS |
| 6 | Left and right Columns | Q335 | 1Set |
| 7 | Power cord | Black,2150mm | 1PC |
| 8 | Switch | Red | 1PC |
| 9 | Pipe plug | ||
| 10 | Motor | ||
| 11 | External six angle screw | M12x70 | 2PCS |
| 12 | M12 Knob | M12x20 | 1PC |
| 13 | Foot pads | Nylon | 4PCS |
| 14 | Six angle screws in the cylinder head | M5x40 | 2PCS |
| 15 | Wheel | ABS | 2PCS |
| 16 | Self locking nut | M5 | 2PCS |
| 17 | Motor down cover | ABS | 1PC |
| 18 | Controller | 1PC | |
| 19 | Frame | Q235 | 1PC |
| 20 | Strengthen the angle iron | Q235 | 1PC |
| 21 | Self locking nut | M8 | 6PCS |
| 22 | Foot pad | Rubber | 2PCS |
| 23 | Left end cover | Nylon | 1PC |
| 24 | Inner six angle screw | M6x50 | 3PCS |
| 25 | Rear roller | 1PC | |
| 26 | Right end cover | Nylon | 1PC |
| 27 | Cross head self drilling screws | ST4.2×16 | 6PCS |
| 28 | Running board | MDF | 1PC |
| 29 | Socket Cap Screw | M8x30 | 6PCS |
| 30 | Running belt | Drill Texture | 1PC |
| 31 | Side rail | PVC | 2PCS |
| 32 | Front roller | 1PC | |
| 33 | Pan head tapping screws | ST4x12 | 2PCS |
| 34 | Strap | 140J | 1PC |
| 35 | Console upper handle cover | Q235 | 1PC |
| 36 | Safety key | Red | 1PC |
ASSEMBLY
Fasten the M12 knob and M6 knob in the corresponding positions.
Ensure the safety key placed is place in the middle of console and keep clear free from the M6 knob.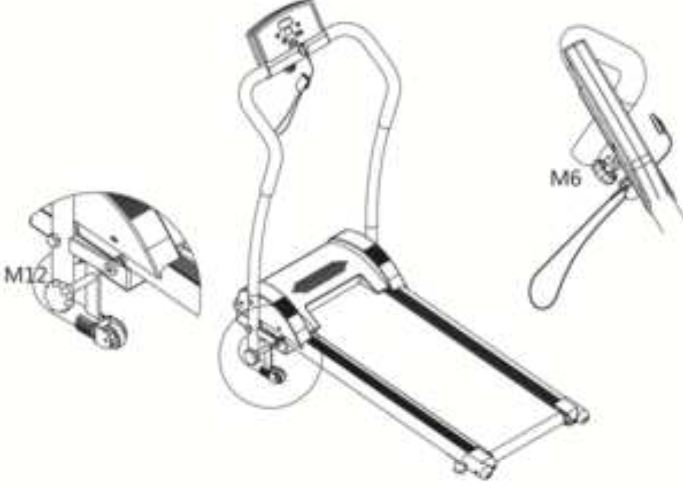
OPERATION
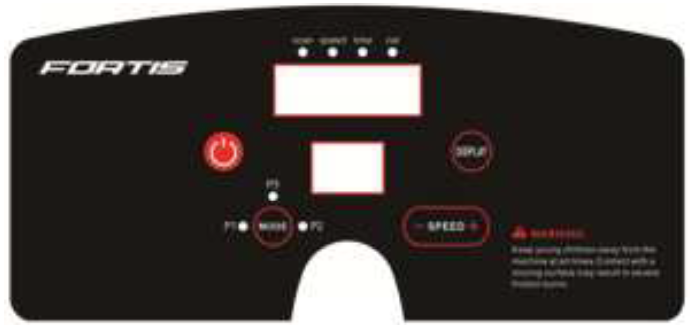
- Ensure the safety key is in place and press the “START” key, the machine will start by counting down for 3 seconds with audible beeps before starting slowly at 1km/h.
- Press the “+” key to speed up and the “-” key to slow down. The fastest speed is 5 km/h and lowest is 1km/h.
- Press the “DISPLAY” key to change the display between Distance, Time and Calories. When “scan” is selected the screen will automatically move between Distance, Time and Calories every 5 seconds.
- The treadmill has 3 inbuilt programs. To select a program, ensure that the treadmill is in standby with the belt stationary. Press the “PROG” button to select the desired program then press “START” to start the machine.
- To stop the unit in an emergency, pull the red safety key. The machine will then stop. When the red safety key magnet is not in place the screen will show “Err”. When the Red safety key magnet is in place, the display will show “OFF”.
- Press “STOP” to stop the machine after use.
Auto Mode:

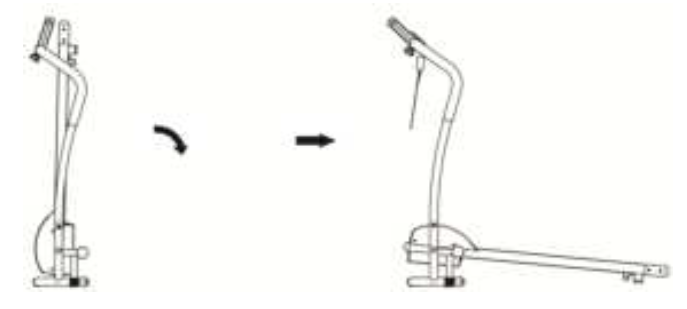
TRANSPORTING
Unfolding
- Pull out the tension knob then carefully lower the running board.
- Secure the treadmill using the fixed knob.
- Connect the treadmill to a power outlet.
- The treadmill is ready for operation.
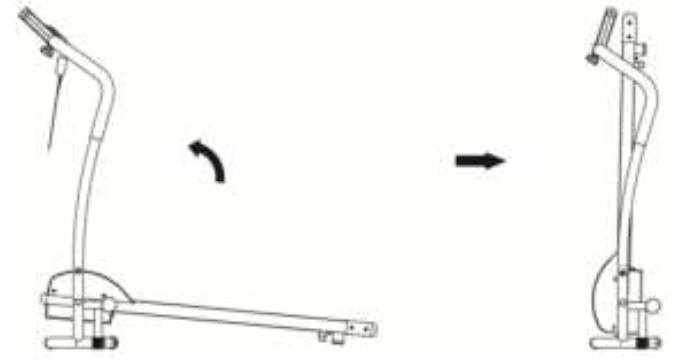
Fold & Move:
- Turn the fixed knob then lift the running board to fold the treadmill.
- Pull out the tension knob, aimed at the platform then release the knob to fix the treadmill in place.
- The treadmill can be moved and stored safely.
CLEANING & CARE
Always disconnect the unit’s power before performing any maintenance or cleaning.
- Clean the belt and dial plate using a slightly damp, clean cloth.
- Check and tighten the screws and spines at fixing point.
- Do not hang clothes or other objects on the machine.
Lubrication
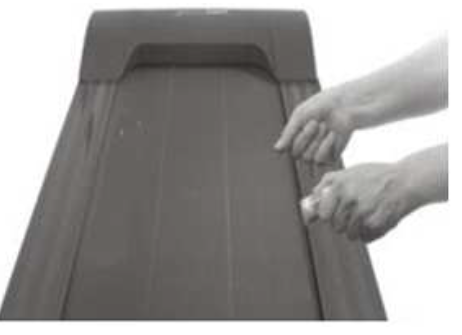
- Pull up the running belt carefully.
- Apply silicone oil to running board.
- Start the machine and let it run for 3 minutes without any weight applied.
- This should be completed after every 30 hours of use and will increase the lifespan for your unit.
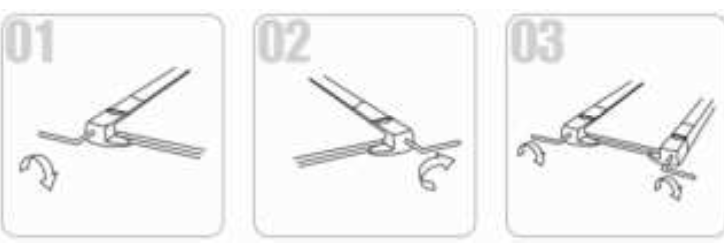
Adjusting the Belt
- If the belt is deviating to the left:
- Start the machine and adjust to 2-3km/h without loading, use a hex key to tighten 1/4 of a rotation.
- Let the unit run without loading for 1-2 minutes.
- Repeat this process until the belt is centred.
- If the belt is deviating to the right:
- Start the machine and adjust to 2-3km/h without loading, use a hex key to tighten 1/4 of a rotation.
- Let the unit run without loading for 1-2 minutes.
- Repeat this process until the belt is centred.
- Running belt has jammed:If the running belt is unable to move, use a hex key to tighten 1/2 a rotation on the left and right until the unit is able to move.
TROUBLESHOOTING
If any error codes appear on the screen, please attempt the following:
| ERR | Error without safety key – Please make sure the safety key is inserted. |
| ERR | If the safety key is already on, but there ERR still shows or there is no function, then change the computer screen/display monitor. |
| E2 | Motherboard Error – Contact Kogan.com for support. |
| E4 | Motherboard Error – Contact Kogan.com for support. |
| E5 | Over current protection. Motherboard Error – Contact Kogan.com for support. |
| E6 | Motor error – Motherboard or motor connection issue – Contact Kogan.com for support. |
| E7 | Communication interruption – Connection error – Contact Kogan.com for support. |
| E8 | Overload error – May have exceeded maximum weight. |
Need more information?We hope that this user guide has given youthe assistance needed for a simple set-up.For the most up-to-date guide for your product,as well as any additional assistance you may require, head online to help.kogan.com

[xyz-ips snippet=”download-snippet”]