USER GUIDEFREERUNNER CURVEDMANUAL TREADMILLFSMNTRDL40A
SAFETY & WARNINGS
Read all of the instructions in this guide before using this product. Retain this guide for future reference. Do not skip, substitute or modify any steps or procedures in this guide, as doing so could result in personal injury or product damage.
- Before starting any exercise program, consult your physician to determine if you have any medical or physical conditions that could put your health and safety at risk or prevent you from using the equipment properly. Your physician’s advice is essential if you are taking any medication that may affect your heart rate, blood pressure, or cholesterol level.
- Incorrect or excessive exercise can damage your health. Stop exercising if you experience any of the following symptoms: pain, tightness in your chest, irregular heartbeat, shortness of breath, lightheadedness, dizziness, or feelings of nausea. If you experience any of these conditions, you should consult your physician before continuing with your exercise program.
- Always wear comfortable properly fitting sports shoes and clothing while using the treadmill. If you experience any discomfort while exercising stop immediately and consult your physician.
- Never use this equipment with bare feet, socks or slippers as this may lead to serious personal injury.
- This equipment is intended for adult use only. Keep children and pets away from the machine. DO NOT leave children unattended in the same room with the equipment.Contact with the moving surface may result in severe friction burns.
- Always allow the treadmill to slow down before moving as this may result in serious injury and possible damage of the treadmill.
- This equipment is designed for consumer use. Follow directions and use only as described.
- Once fully assembled, inspect to ensure all hardware parts such as bolts, nuts and washers are positioned correctly and tightly secured.
- Dry after each use to remove moisture. Wipe regularly with a mild, non-abrasive cleaner and water solution.
- To ensure safety, the equipment should have at least 50 cm of free space on each side and 200cm behind.
- Prior to assembly, ensure you have all the components.
- Always use the equipment as intended. If you find any defective components while assembling or checking the equipment, or if you hear any unusual noises coming from the equipment during exercise, cease use immediately and contact help.kogan.com forsupport.
- Do not place fingers or any other objects into moving parts of the exercise equipment.Ensure care is taken while setting up and folding the treadmill.
- Keep hands clear of the hinges while setting up and folding the treadmill.
- Be careful when lifting and moving the equipment. Always use proper lifting techniques and seek assistance if moving long distances.
- Your equipment is intended for use in cool, dry conditions. You should avoid storage in extreme cold, hot or damp areas as this may lead to corrosion and other related problems.
- This appliance contains no user-serviceable parts. If it suffers any failure or damage, cease use immediately and contact help.kogan.com for support.
- This equipment is designed and intended for indoor use only.
IN THE BOX
OVERVIEW
ASSEMBLY
Step 1: Handrail
- Raise the handrail up into a vertical position.
- Secure the handrail in place by inserting the x2 handrail locks into the lower section of the handrail.
Note: Ensure the handrail locks are inserted straight.
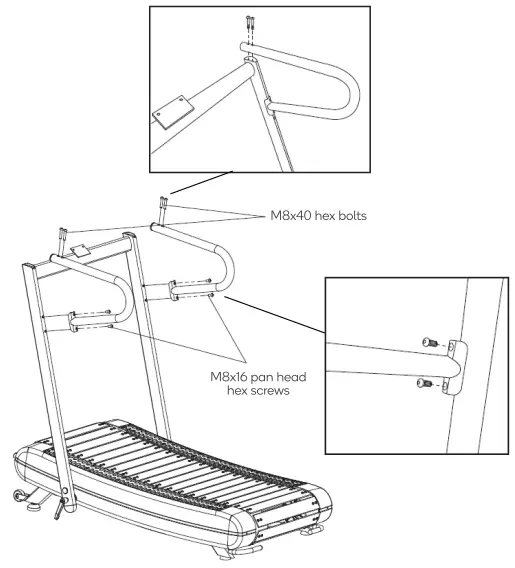
Step 2: Hand gripsAttach the x2 hand grips to the handrail and secure them in place using the x4 M8x40 hex bolts and x4 M8x16 pan head hex screws.
Step 3: Display
- Remove the battery compartment cover and insert x2 AAA batteries (not supplied).Ensure you pay attention ta the orientation of the polarity symbols.
- Remove the 2 M5x15 screws from the rear of the display.
- Route the display connector through the hole in the handrail.
- Attach display ta the bracket and the handrail using the x2 previously removed M515 screws.
- Connect the display connector ta the mating can nectar and the handrail.
OPERATION
Starting your workout
- Stand at the middle section of the running belt while holding onto the handrail for support.
- Start walking and the display will automatically turn on.
WARNING: Never stand or run on the front or rear rollers as this may cause an accident and serious personal injury.
- Slowly build up to a comfortable running speed.
- While exercising you can support yourself by holding onto the handrail on either side of the display or by holding the handgrips.
WARNING: Ensure your weight is shifted forward and you are not pulling the handrail backward as this may cause an accident and serious personal injury.
DISPLAY OPERATION
Mode: Press the mode button to cycle through and monitor the different functions. Press and hold the mode button for 3 seconds to reset the display unit back to factory settings.Reset: Press the rest button to clear the current data of the function that is currently being displayed.
FUNCTIONS
| Time: | Displays the total elapsed time of your workout (0-99:59). |
| Speed: | Displays your current running speed (0-99.99 ML/H). |
| Distance: | Counts the total elapsed distance of your workout (0-99.99 ML). |
| Odometer: (if available) | Displays the total accumulated distanced traveled (0-9999 ML) |
| Pulse: (if available) | By placing the palms of your hands on both of the contact pads for 30 seconds the monitor will display your heart rate in beats per minute during your workout (40-240 BMP). |
| Calories: | Counts the total calories burned during your workout (0-999.9 K/CAL). |
| Scan: | Automatic cycles through the following functions in the order shown:TIME-SPEED-DISTANCE- PULSE (if available)-CALORIES (repeat). |
AUTO ON/OFF
- The display will automatically turn on when any key is pressed or when it receives signal input from the speed sensor.
- The system turns off automatically when the sensor has no signal input or no buttons are pressed for approximately 4 minutes.
LOW BATTERYIf the display is not operating correctly, the batteries may be flat and will need to be replaced.
ADJUSTMENTS
Adjusting the running beltWhen you use a treadmill, the pressure on the running belt is not balanced due to the different forces used by the two feet during running, which causes the running belt to deviate from the center, This is completely normal and will require that you adjust the running belt back to the re-center it. First, observe which side the walking belt is skewed on while running.
- If it is biased to the left, use the 6mm Allen key to rotate the left adjustment screw clockwise by a /2Z turn.fits biased to the right, use the 6mm Allen key to rotate the right adjustment screw clockwise a1/2turn.
- Continue adjusting the two screws until the running belt is centered.
Belt tensionAfter adjusting the running belt ensure the lowest point of the running belt clears the ground.If the belt is making contact with the ground the belt tension will need to be adjusted.
- Rotate the left and right adjustment screws clockwise by a 1/4 turn at the same time.
- The running belt will raise up approximately 3cm.
- Ensure the running belt can still flex and isn’t too tight.
Note: If the tension is too tight it can reduce the life of the running belt.
Footpad AdjustmentIf the treadmill isn’t sitting level, the balance and height can be adjusted by rotating the footpads on the front of the treadmill.
- To increase the incline, rotate the footpad in a counter-clockwise direction.
- To decrease the incline, rotate the footpad in a clockwise direction.
Note: Increasing the incline will also increase running speed and make the treadmill feel smoother. Lowering the incline will subsequently reduce the running speed
TRANSPORT
Step 1.Remove the x2 handrail locks and carefully lower the handrail down.Note:Be careful to not pinch your hands or feet while folding the treadmill.
Step 2.
- Lift the rear of the treadmill until the transport wheels come into contact with the floor.
- Carefully move the treadmill into the desired position.
Note:Seek assistance from another person if you intend to move the treadmill o a long distance such as a different room.
- If lifting the treadmill into a vertical position during transport, take care to ensure the handrail does not fall.
- Do not leave the treadmill in a vertical position unattended.
- Do not store the treadmill in a vertical position.
NOTES_____________________________________
Need more information?We hope that this user guide has given you the assistance needed for a simple setup.For the most up-to-date guide for your product, as well as any additional assistance you may require, head online to help.kogan.com
report this ad[xyz-ips snippet=”download-snippet”]