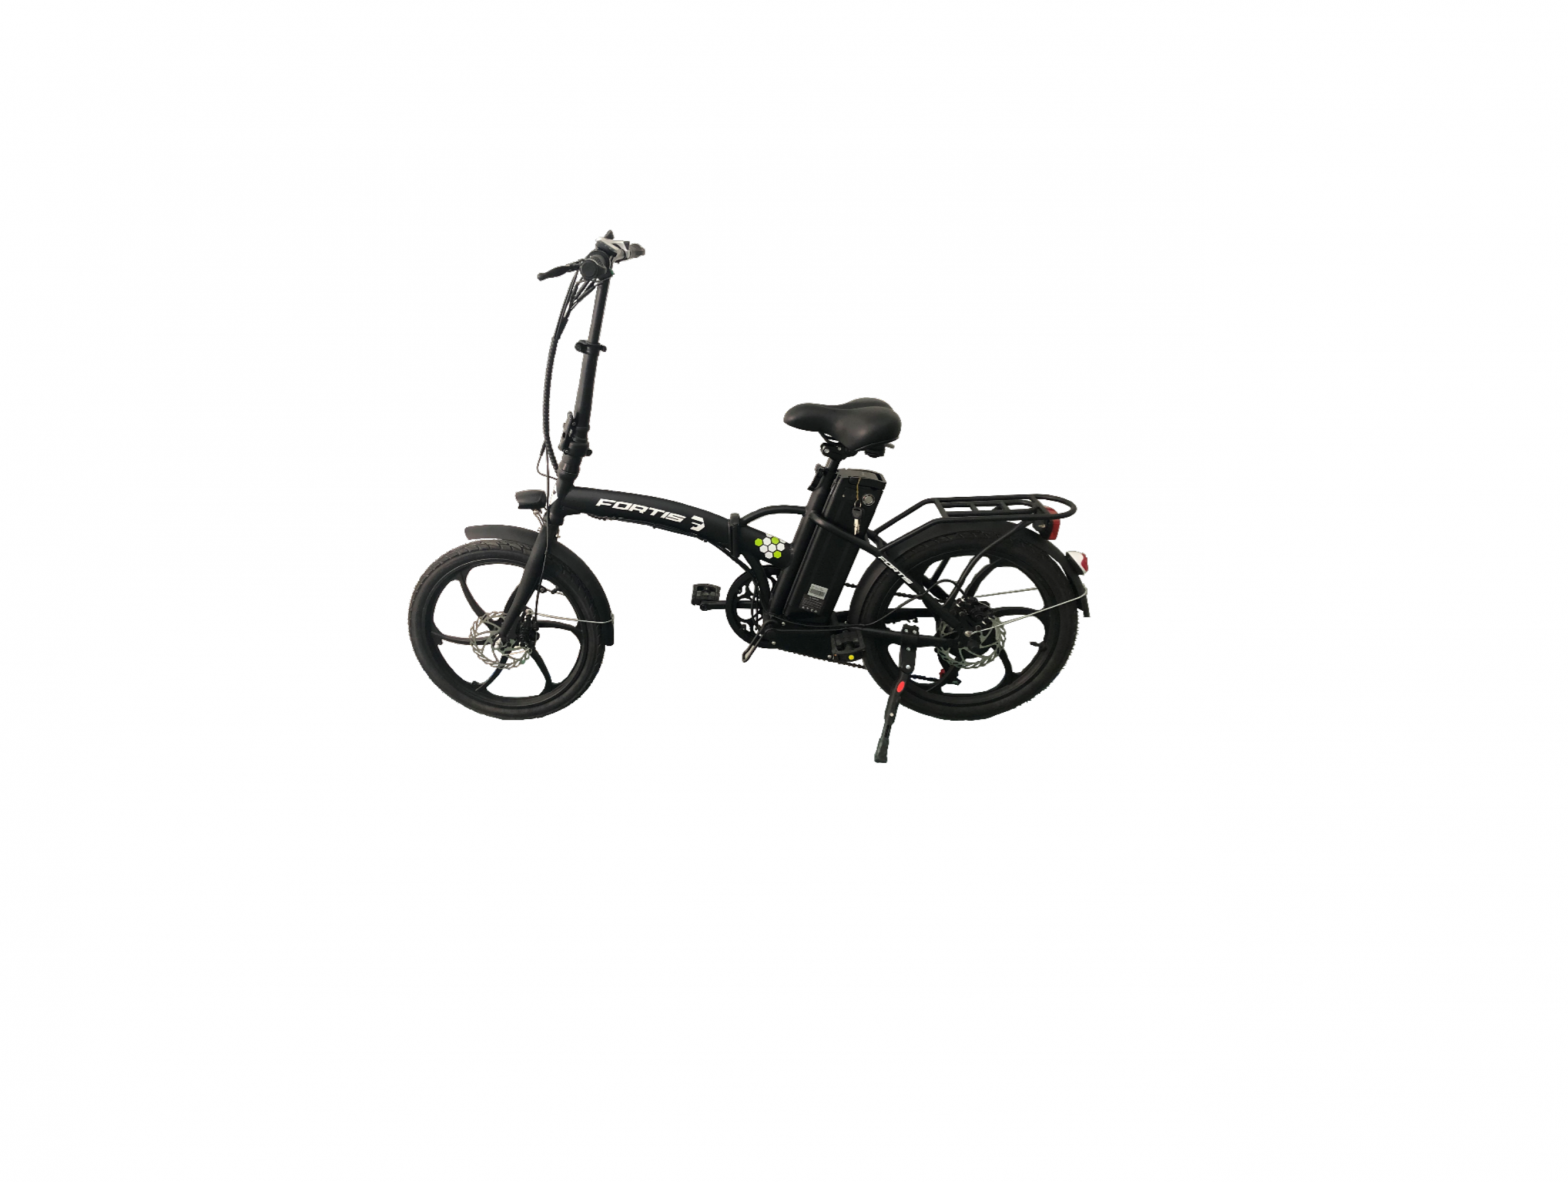
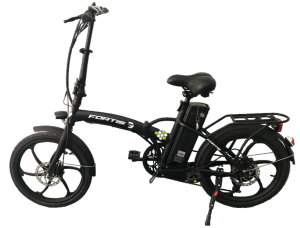
FORTIS FS20ELBIKEB 20″ Foldable Electric Bike
SAFETY & WARNINGS
- Read all of the following instructions before use. Keep this user guide for future reference. Do not skip, substitute or modify any steps or procedures in this guide, as doing so could result in personal injury or product damage.
- The illustrations in this user guide are used simply to provide examples; the components of your bicycle might differ. In addition, some of the parts shown might be optional and not part of your bicycle’s standard equipment.
- The following user guide is only a guide to assist you and is not a complete or comprehensive manual of all aspects of maintaining and repairing your bicycle. If you are not comfortable or lack the skills or tools to assemble the bicycle yourself, you should take it to a qualified mechanic at a bicycle shop. Additionally, you can contact Kogan.com for support.
- Respect local and national road traffic regulations.
- For your safety, it is highly recommended that you wear a certified helmet.
- Regularly check the tire pressure. This will make pedaling easier, minimize battery consumption, and reduce the likelihood of damage to your tyre.
- Always check the brakes prior to riding to make sure they are working correctly.Adjust the brake sensitivity if needed. Only ride at a speed that the conditions permit, for example, slow down on snowy or rainy days.
- Always hold the handlebars with both hands, except when you need to notify others you are turning.
- Use a light at night or when visibility is not good. If you are not able to see clearly with a light, do not attempt to ride your bike.
- Make sure your body and other objects do not come into contact with the chain or the wheels whilst they are moving.
- Never touch the charging connector on the battery case with your hands when they are wet or with keys or other metallic objects, in case they damage the battery pole and cause a short circuit.
- Wear bright clothing to help make you visible to others when you are riding at night.
- Do not lend the electric bicycle to anyone who does not know how to operate it or who has not read this user guide.
- Like other cycles, it can only carry one person, carrying a passenger is not permitted.
- To brake, the rider must action both brake levers to the correct degree.
- Never ride the electric bike under the influence of drugs or alcohol.
- Do not ride under bad conditions, such as on uneven, wet, or loose surfaces.
- If possible, do not ride in adverse weather conditions, low visibility or if you are very tired for your safety.
- This bike can be used in the rain; however, it must not be submerged in water or puddles. The controller, motor and other electrical devices may be short circuited, causing damage and creating possible dangerous situations.
- Never spray your bike directly and do not get the electrical components wet (the battery connector, motor, controller, cables, handlebar controls, etc.)
- Do not let children under the age of 10 ride the bike.
- Use the charger which was provided with this bike. Never use a charger from a different model.
- The charger is designed for indoor use only. Keep the charger away from water to avoid short circuit. Do not use it in a dampening, combustible, or explosive environment. Do not remove the plug by pulling the cord, always grip the charging port by its metal body.
- The EN 15194 EU standard or EPAC (Electric Power Assisted Cycle) conforms to the following characteristics for electric power-assisted bikes:
- Motor assistance only starts when the cyclist pedals.
- The assistance cuts out as soon as the cyclist stops pedaling.
- The assistance cuts out as soon as the speed exceeds 25km/h.
- The maximum power output is 250W
ASSEMBLY
Step 1: Getting StartedRemove the bike from the packaging. DO NOT dispose of the original packaging until assembly is complete. Check all packaging to ensure all necessary components are found before beginning assembly.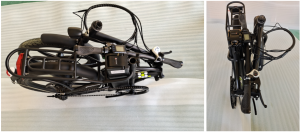
Tools required:
- Spanner
- Allen key
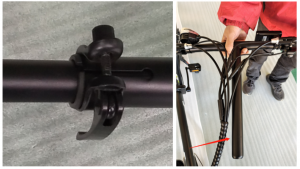
Step 2: Unfolding Bike
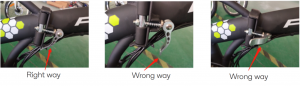
- Locate and unlock the folding buckle.
- Unfold the bike. Lock the folding buckle back into place to prevent the bike from collapsing. Follow the below images to understand the correct position for locking the folding buckle after unfolding the bike.


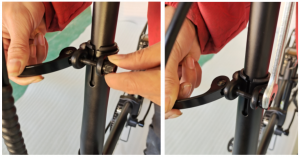
Step 3: Handlebar/Stem
- The handlebar and stem come pre-assembled. Unfold the quick release.
- Insert the handlebar and stem assembly into the bike frame, aligning with the body and adjust.
- Tighten until secure enough using the Allen key. Ensure it is completely inserted.
- Clamp the front wheels with your legs. Use the Allen key to tighten the screw, make sure the screw is securely fastened. It is recommended to secure the screw with a torque wrench. Ideally it should be tightened between 20N.m to 24N.m. Do not exceed 24N.m.Notes:
- Check the steering alignment prior to each ride.
- If the steering stem is loose, fasten the steering stem lock screw and make sure that it is securely fastened.
- Close the buckle to lock the handlebars in place.
- Using the quick release, adjust the handlebar up and down until it is at the correct height for you. Pay attention to the minimum insert depth of handlebar, insert as deep as possible. Ensure the cables are not damaged.
- During the quick release operation, you can either use hands or spanner to adjust handlebar.


 Notes:
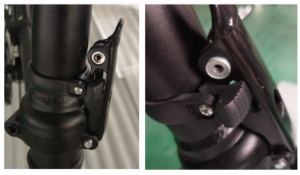
Step 4: Seat and Seat Post
- Unfold the release buckle. Insert the seat post into the bicycle frame. Press down on the seat to align.
- Tighten the buckle and ensure the seat is firmly fastened. During this operation, you either use hands or spanner to adjust seat.Note: Do not adjust the seat post beyond its maximum extension mark.
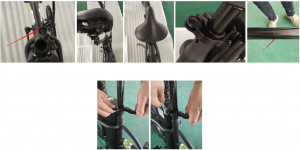
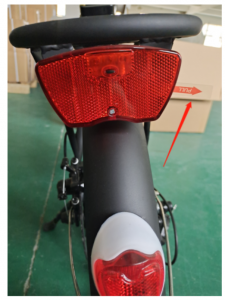
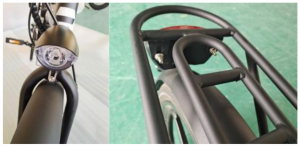
Step 5: Rear Reflector
- The rear seat light is pre-assembled on the electric bike. Before using the rear seat light, pull out the “PULL” sticker.
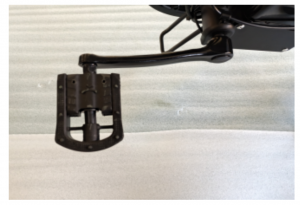
Step 6: Pedal
- Fit the right pedal (marked “R” on the pedal shaft) on the right-hand crank and tighten it firmly clockwise.
- Fit the left pedal (marked “L”) on the left-hand crank and tighten it firmly anticlockwise. Use a 15mm spanner.Note: The threads will be stripped if you mistake the left and right pedals.
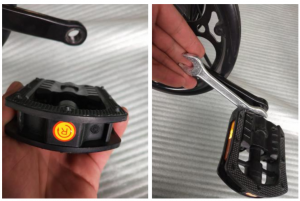 Note: The threads will be stripped if you mistake the left and right pedals.
OPERATION
ChargingBefore charging, you must turn off the power supply and pull out the key. Keep the charger in a dry and ventilated condition when it is being charged.
- Connect the charger output plug with the battery socket case properly and then insert the input plug into the electrical outlet. The charger’s indicator light will turn on, which means its charging. The charger is rated at 100~240V, 50-60HZ, 2.5A input and the charger output power is 42V 2A.
- When the light turns from red to green, it means the battery has been fully charged. Usually, it will take about 4-6 hours to recharge the battery depending on the batteries state of charge. However, it is recommended to charge it for additional 2 hours after the light has turned green, as it will extend the service life of the battery.
- Do not charge the battery for more than 10 hours to avoid overcharging and damaging the battery. After the light turns green, the charger is in the state of trickle electric current and will fill slowly to attempt to maintain the state of charge. If you are going to be out for a long time, you should disconnect the charger, especially in hot weather.
- The charger will become warm during charging, so keep charger away from any heat sources. Always keep the charger dry and clean. The electronics inside contain high voltages, so never disassemble the charger by yourself.
- While charging, keep it the charger and battery out of the reach of children. Do not place anything on top of the charger whilst in use and prevent any liquid, metal or metal fillings from coming into contact with the charger.
- After charging, pull the input plug out of the electrical outlet first and then pull out the output connecting plug from the battery case. Do not let the charger charge the battery or be left connected for a long time, as it may damage the charger and cause fire.
- You can also remove the battery from the bicycle and then charge it. You should lift the saddle with the lever that is underneath it, which will enable you to remove the battery. Before you do this, you will have to unlock the battery with the ignition key. When you finish charging, replace the battery. To replace the battery, insert the battery along the slide bracket and then lock the battery with the ignition key.
- Do not touch the two poles in the battery case with your hands when the battery is removed for charging. The charging connector poles cannot be touched with any metal or any other material that conducts electricity, otherwise it may cause short circuit.
- If you do not ride your electric bike for a long time, the battery should be charged at least once a month. This will ensure the battery life. Do not use in the state of low battery capacity. Do not leave your battery in a fully discharged state for long periods of time. The battery will continue to self-discharge, resulting in damage.
- Avoid any contact with water when charging your battery. If a plug or socket gets wet, dry it completely before using.Notes
- It is normal for the charger to be warm to the touch while charging. If there is an unusual odour or it is extremely hot, stop charging it immediately and contact www.Kogan.com.
- While charging make sure that the charger is placed at a well-ventilated area. and the charger itself should never be placed nearby or covered under flammable materials like fabrics.
Lithium Battery (36V 10AH):
- The battery will provide a working distance of between 30KM – 38KM per charge when fully charged for normal use.
- The maximum speed of the bike with electrical assistance is 25km/h. If the speed is held at approximately 25km/h, the unit will discharge in about 2-3 hours.
LCD DisplayThe bike is equipped with an LCD display.

- Before riding turn on the LCD display by holding the “B” button. Then press the “A” or “C” button to adjust the level of electronic assistance. The levels range from “0” to “5”.• When 0 is set, the bike will not provide electronic assistance.• When the level is set to “1”, the bike will provide the lowest assistance.When the level is set to “5” the assistance is highest and the speed of bike is highest.
- When riding at night press and hold the “A” button and the front light will turn on. When you no longer need the front light press and hold the “A” button to switch the light off.
- When you have finished riding, press and hold the “B” button. The LCD display will turn off.Note: Do not simultaneously press two or three buttons.
Riding InstructionsStep 1: Pre-Riding Check
Before every ride ensure you perform the following pre-ride safety checks
- Ensure the steering stem are securely fastened prior to each ride.
- Ensure Front and Rear lights are securely fastened/fully functional prior to each ride.
- Ensure Front and Rear mud guard, Rear Seat are securely fastened prior to each ride.
- Ensure Pedals and Crank are securely fastened/fully functional prior to each ride.
- Ensure Seat post/angle fastener are securely fastened prior to each ride.
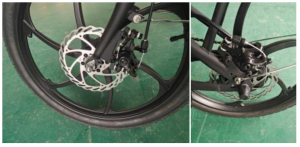
- Ensure Front and Rear brake discs are securely fastened/fully functional prior to each ride.
- Ensure Front and Rear tire alignment and pressure are fully functional prior to each ride.
- Ensure that the nuts for front and rear wheels are tightened prior to each ride.
- Ensure the battery is fully charged and locked.
- Ensure that the quick releases are locked, and all locknuts and screws are tightened.
- Check all cables and wirings on the bike prior to each ride. It is common that some cable fasteners may become a bit loose after a period of use. Ensure that all cables and wirings are safely and securely fastened prior to each ride.
- Ensure that the Folding Buckle is locked back into place to prevent the bike from collapsing prior to each ride. Note the correct position for the folding buckle.


Step 2: Riding
- Turn on the power switch, turn the ignition key to “ON” position. Turn on the LCD Display, the LCD DISPLAY will light ON, indicating the unit is powered.
- Like riding a normal bicycle, put up the stand and seat yourself on the seat. Put one foot on pedal and do a final check to see that everything is okay and working well, especially the front and rear brakes.
- Start pedalling and when you reach a certain speed, the motor will automatically be activated and start to move your electric bike. To stop the bicycle motor, stop pedalling and the motor will stop automatically. To bring the vehicle to a halt, use the brake.
- The brake will trigger the motor to stop. If either of the brake levers are pulled, the power will be cut off automatically and the motor will not work.
Motor Cable
If the motor isn’t turning on, check the motor cable for loose connection. If the motor cable is loose, turn off the power and re-connect the connectors firmly, ensuring the arrows are aligned.
Folding Buckle
- When you open the folding buckle, lift the handle up, then you can open it, as below.
- When you close the folding buckle, lock it back into place to prevent the bike from collapsing. The correct position for the folding buckle is as indicated below.

Front and Rear Brake DiscsIt is normal that the brake might become loose after a period of usage.It is important to check the brake disc/pads prior to each ride. If the brake pads are worn out, replace the brake pad. If the brake cable is loose, adjust the cable catcher/fastener and make sure that the brake levers have reasonable travel/respond distance.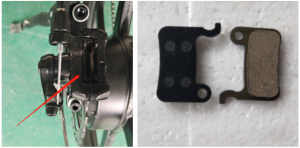
Rear DerailleurThe rear derailleur system will be pre-assembled. When you use the rear derailleur system, if the chain jumps in gears or cannot be switched in gears, turn the black button slightly and adjust.To make the adjustment of rear derailleur system, it is recommended to contact the experienced professional.
Battery Level GaugeThe battery indicator on the LCD display shows the battery level and will indicate when the charge is low. When this occurs, turn off the power switch and only use the pedals to ride, without assistance of the motor. You will have to charge the battery when you get to an electrical outlet and will be able to use the electric motor again once the unit is fully charged.
Self-Locking Nut for Front Mud GuardThe Self-Locking Nut for Front Mud Guard will be pre-assembled. Normally, this nut doesn’t need to be replaced, because it has been fixed firmly and it has a good self locking function.If there is a need to replace it, there are spare self-locking nuts (x2) for front mud guard in the package. Use the 10MM Spanner and Allen Key to replace it.
Note: It is not recommended to lock and unlock this Self-Locking Nut for Front Mud Guard for more than 3 times, because it might lose the Self-Locking function.
ParkingShut the power off and pull out the key to the battery case while parking. The power switch should be turned off when pushing so that you do not start up the motor by accident. Use a chain lock to further secure your bicycle when necessary
Notes
- Do not expose the electric bike to sunlight or rain for a long time. Otherwise, some electrical components may behave abnormally.
- While charging make sure that the charger is placed at a well-ventilated area. and the charger itself should never be placed nearby or covered under flammable materials like fabrics.
CLEANING & CARE
| WARNING: Before carrying out any sort of maintenance, turn off the power switch and remove the ignition key |
- Take a test ride to check the unit is riding normally and safely.
- Always keep your bike clean.
- For the battery poles, when dirty, clean them to prevent reduced efficiency or burnt poles. It is recommended to have an annual check-up of the bike. This will keep it in good working condition.
Adjust Chain TensionThe chain may loosen after using the bike for a certain period, adjust the chain when necessary. If required, contact bike specialist for adjusting the chain.
Adjusting the BrakesCorrect brake adjustment will make the controls easier and will keep you safe.The brakes are adjusted in a similar fashion to any standard bicycle. It is important for the brakes to work correctly and that the electric cut-off devices to be in working order (electric cable to the brake levers).Once the brakes have been adjusted, make the wheels turn to ensure there is no binding and check that when either of the brake levers are pulled, the motor stops working
LubricationFor a long service life, the following parts of your bike should be regularly lubricated every half year:
- Front axle
- Chain
- Rear axle
- Freewheel
- Front fork and other rotation parts.
For electrical parts, you do not need to lubricate them because they are lubricated in the factory. If you find anything wrong, go to a bicycle specialist or contact www.Kogan.com.
Cleaning
- The bike should be cleaned with a damp sponge, taking special care not to get electrical parts wet (battery connection, rear axle, electric cables, handlebar controls, etc.).
- Dry with a cloth.
- When cleaning your electric bike, do not use a steady direct stream of water from a hose. Use a cloth to avoid short circuiting any electrical components.
- This bike has a durable finish and does not need to be waxed. Clean with a mild detergent and buff to restore its original shine if needed.
TROUBLESHOOTING
| Problems | Possible causes | Solution |
| When the bike is powered on, the indicator light does not turn on, the motor does not work, the LCD display does not turn on and there is no electric power to the bike. | The battery is completely discharged. | Charge the battery. |
| The electric cable connecting the battery is loose. | Fix the cable firmly. | |
| The fuse has burnt. | Contact Kogan.com | |
| The traveling distance has been reduced. | Insufficient battery capacity. | Charge the battery fully. |
| The battery is getting old and needs replacement. | Change the battery. | |
| Braking frequently, riding uphill or running against the wind continuously. | Use more pedalling. | |
| The indicator light does not illuminate when charging | The connecting cable is loose. | Insert the socket firmly. |
| The fuse has burnt. | Contact Kogan.com | |
| The charger is damaged. | Change the charger. | |
| Other issues | Problems with electrical components | Contact Kogan.com |
NOTES
_____________________________________________________________________________________________________________________________________________________________________________________________________________________________________________________________________________________________________________________________________________________________________________________________________________________________________________________________________________________________________________________________________________________________________

[xyz-ips snippet=”download-snippet”]