
![]()
USER GUIDE
T2 ULTRA SLIM FOLDABLE 2-IN-1 WALKING & JOGGINGSMART TREADMILLFST2JOGPADA
SAFETY & WARNINGS
Note:Ensure you have read and fully understand the instructions for this device. Failure to do so could cause, damage or serious harm.
- When you start training with this product, please consider your physical condition, train properly and regularly to ensure that you have enough physical strength to train. Wrong or excessive training will not help your health.
- This product is not suitable for children. Children can use the product, but only under the supervision of adults. The device is not a toy.
- Only people who have a good understanding of the product and are very healthy should use the device.
- This product is suitable for home use, not suitable for professional training and testing, or medical purposes. If the power line is damaged, it must be replaced by the manufacturer or a qualified service person in order to avoid danger.
- Please check all parts before use. And make sure the screws and nuts are tightened.
- When running on a treadmill, wear comfortable tight clothes to avoid clothes being caught by the machine. Do not let children or pets play around the treadmill to avoid accidents.
- Place the treadmill on a smooth, clean, level surface. Make sure there are no sharp objects nearby. Do not use it near water and heat sources.
- Please keep your hands away from all moving parts. Do not place your hands and feet in the gap below the running belt.
- The treadmill must have only one user at a time.
- Make sure the screws and bolts are tightened after the treadmill is assembled.
- If the product is not in use, put the machine in a safe place to prevent the danger caused by children and those who are not suitable for using the treadmill.
- When in an emergency, quickly pull down the safety switch and step on the left and right sides of the treadmill.
- Place the treadmill well before use, the side of the left and right handrails need a one-meter safety distance, the back needs two meters. There hould be no obstacles in the safe distance.
- Please use the accessories provided by the original manufacturer and it is strictly forbidden to change it privately.
- The product is an HC-grade product with a maximum user weight of 100kgs.
- The running belt on this treadmill has a visible joint mark. This is completely normal and will not affect the performance or operation of your treadmill.
Important Notes
- Place the treadmill in a place where the plug can be plugged into the socket.
- Plug the device into a socket and ensure it is not loose.
- Ensure the socket has been installed professionally.
- If the plug and socket are not compatible, please do not change the plug by yourself. Ask an electrician to handle it.
- Please use a supply voltage of 240V.
- Please do not let the power cord touch the running belt roller, and do not use a damaged plug.
- Unplug the plug from the socket before cleaning and maintenance.
- WARNING: if the plug is not pulled out, it may lead to personal injury and equipment damage.
- Please check each part carefully before use.
- Please do not use this product outdoors, in high humidity and in the sun.
- Please turn off the machine and remove the plug when you leave.
- For your safety, the power plug of the machine must be grounded.

WARNING – KEEP BATTERIES OUT OF REACH OF CHILDREN
- Swallowing may lead to serious injury or death in as little as 2 hours, due to chemical burns and potential perforation of the esophagus.
- If you suspect your child has swallowed or inserted a button battery immediately call the 24-hour Poisons Information Centre on 13 11 26 (Australia) or 0800 764 766 (New Zealand) for fast, expert advice.
- Examine devices and make sure the battery compartment is correctly secured, e.g. that the screw or other mechanical fastener is tightened. Do not use if the compartment is not secure.
- Dispose of used button batteries immediately and safely. Flat batteries can still be dangerous.
- Tell others about the risk associated with button batteries and how to keep their children safe.
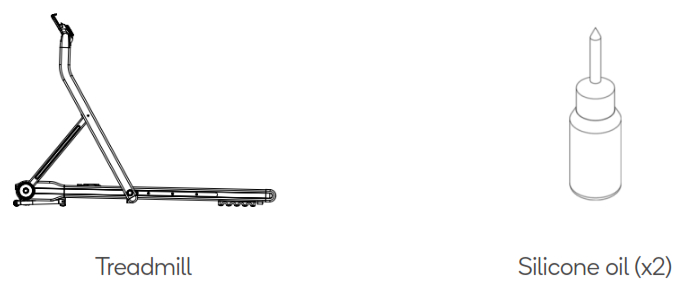
COMPONENTS

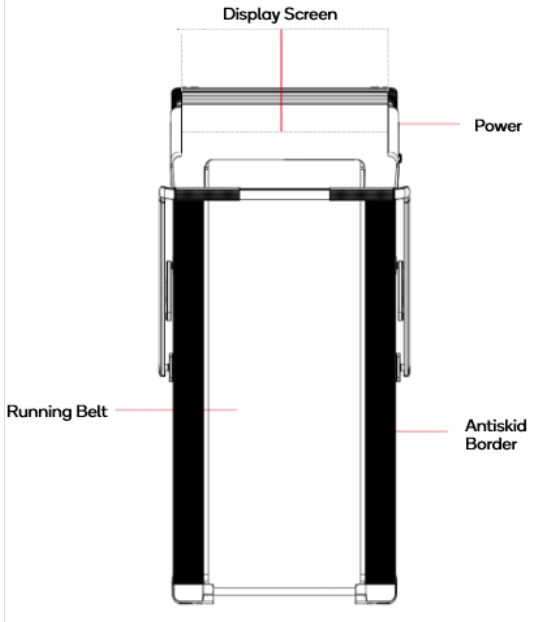
OVERVIEW
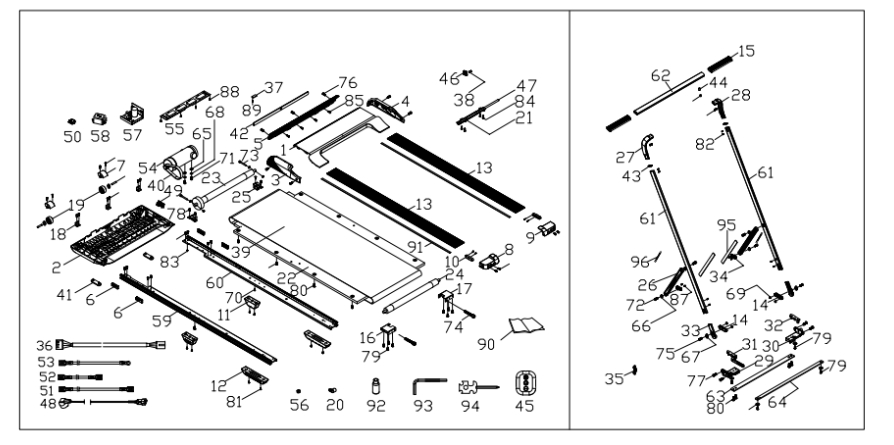
|
No. |
Name | Qty | No. | Name |
Qty |
| 1. | Motor Top Cover | 1 | 49. | Switch Group | 1 |
| 2. | Motor Bottom Cover | 1 | 50. | Overload Protector | 1 |
| 3. | Motor Side Cover L | 1 | 51. | AC Link Line 350 | 1 |
| 4. | Motor Side Cover R | 1 | 52. | AC Link Line 150 | 1 |
| 5. | Motor Front Cover | 1 | 53. | Ground Lead | 1 |
| 6. | Motor Cover Support Cover | 4 | 54. | DC Motor | 1 |
| 7. | Move Wheel Cover | 2 | 55. | Computer PCB | 1 |
| 8. | End Cover L | 1 | 56. | Magnet Ring | 1 |
| 9. | End Cover R | 1 | 57. | Controller | 1 |
| 10. | Rear Cover Modified Cover | 2 | 58. | Filter | 1 |
| 11. | Mid Foot Pad | 2 | 59. | Aluminium Rod L | 1 |
| 12. | Rear Foot Pad | 2 | 60. | Aluminium Rod R | 1 |
| 13. | Borders | 2 | 61. | Stand Column | 2 |
| 14. | Nylon Slider | 2 | 62. | Handle Bar | 1 |
| 15. | Rubber Cover For Handle | 2 | 63. | Linking Piece | 1 |
| 16. | Roller Fixing Block Left Rear | 1 | 64. | Linkage Plate | 1 |
| 17. | Roller Fixing Block Right Rear | 1 | 65. | Flat Gasket | 4 |
| 18. | Motor Cover Mounting Piece | 3 | 66. | Corrugated Gasket M8 | 6 |
| 19. | Move Wheel | 2 | 67. | Corrugated Gasket M10 | 2 |
| 20. | R Shape Clip | 4 | 68. | Spring Shim M8 | 2 |
| 21. | Oil Cap | 1 | 69. | Locknut M8 | 5 |
| 22. | Running Board | 1 | 70. | Socket Head Screw M6x10 | 2 |
| 23. | Front Roller | 1 | 71. | Socket Head Screw M8x12 | 2 |
| 24. | Rear Roller | 1 | 72. | Socket Head Screw M8x16 | 4 |
| 25. | Aluminium Roller Mounting Piece | 2 | 73. | Socket Head Screw M8x45 | 2 |
| 26. | Aluminium Rod Support | 2 | 74. | Socket Head Screw M8x70 | 2 |
| 27. | Aluminium Link Block Of L Hand Bar | 1 | 75. | Socket Head Screw M10x25 | 2 |
| 28. | Aluminium Link Block Of R Hand Bar | 1 | 76. | Cross Screw M6x20 | 7 |
| 29. | Support Of L Slider | 1 | 77. | Socket Head Screw M8x18 | 6 |
| 30. | Support Of R Slider | 1 | 78. | Socket Head Screw M6x20 | 4 |
| 31. | Left Limit Hand Bar | 1 | 79. | Socket Head Screw M6x15 | 20 |
| 32. | Right Limit Hook | 1 | 80. | Socket Head Screw M8x15 | 10 |
| 33. | Move The Aluminium Down | 2 | 81. | Cross Screw M4x20 | 8 |
| 34. | Front Aluminium Fixing Block | 2 | 82. | Cross Screw M4x10 | 8 |
| 35. | Handle Tension Spring | 1 | 83. | Cross Combination Screw M4x10 | 1 |
| 36. | Communication Line | 1 | 84. | Cross Tapping Screw ST4.0x12 | 8 |
| 37. | The Bluetooth Module | 1 | 85. | Cross Tapping Screw ST4.0x16 | 20 |
| 38. | Tube Bushing | 1 | 86. | Cross Tapping Screw ST4.0x10 | 6 |
| 39. | Running Belt | 1 | 87. | Cross Screw M4x10 | 16 |
| 40. | Poly V-Belt | 1 | 88. | Cross Tapping Screw ST3.0x8 | 12 |
| 41. | Front Foot Pad | 2 | 89. | Cross Tapping Screw ST2.2×6 | 1 |
| 42. | Front Support Mat | 90. | Manual | 1 | |
| 43. | Hand Bar Silicone Ring | 91. | Eva Sticker | 2 | |
| 44. | Magnetic Rubber Sleeve | 92. | Silicone Oil | 2 | |
| 45. | Remote Control | 93. | M6 Socket Wrench | 1 | |
| 46. | Silicone Oil Tank | 94. | Cross Open Spanner | 1 | |
| 47. | Silicone Tube For Oil Can | 95. | Acrylic Inner Sticker | 2 | |
| 48. | Power Line | 96. | Acrylic Inner Sticker | 2 |
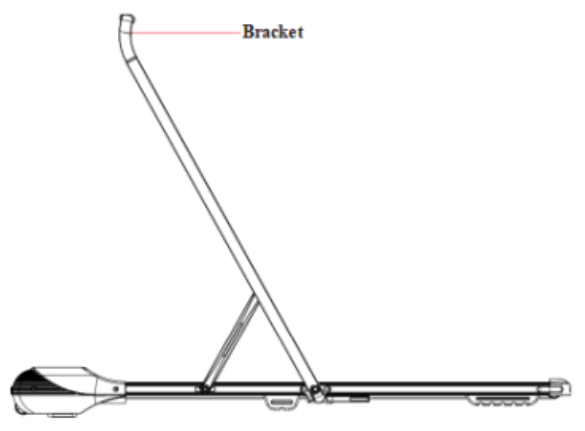
INSTALLATION
The main structure of the treadmill you purchased has already been assembled in the factory. It can simply be used when plugged in. The following operations are how to use handrails and how to fold and unfold them.
- Lift the treadmill out of the box and place it on a level surface (Make sure there is a 50cm open space before and after the treadmill to fold and place the power cord. etc.)
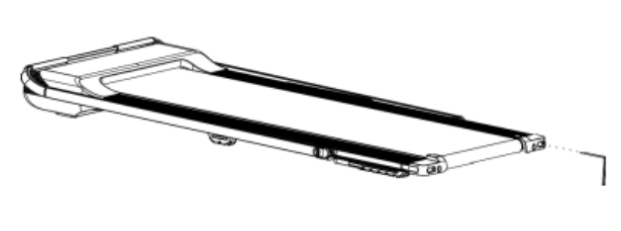
- Pull up the handle bar in the direction of the arrow until the foot switch hooks the handle bar.

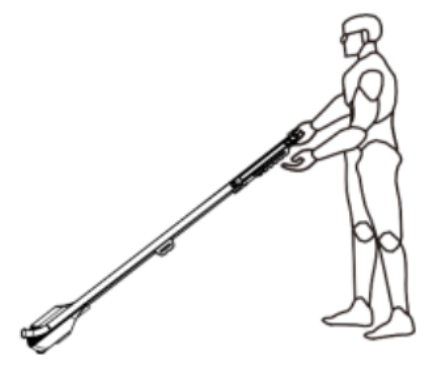
- As shown below, the tail of the treadmill can be raised with both hands to move forward and backward, which is only suitable for short-distance movement within the room.
- Tu r n on the power, turn on the switch and turn on the treadmill and enjoy the exercise.
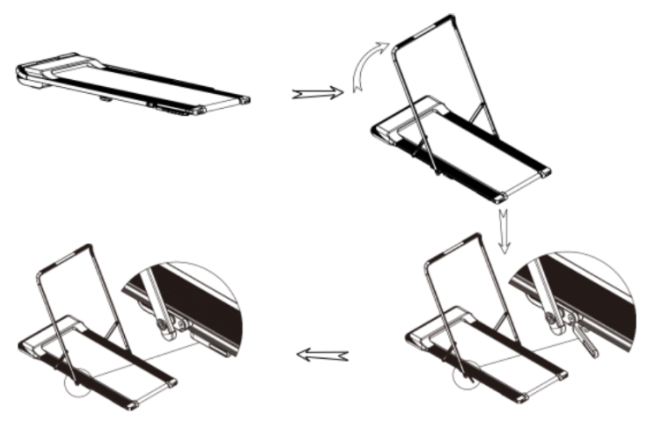
Folding the Treadmill Vertical
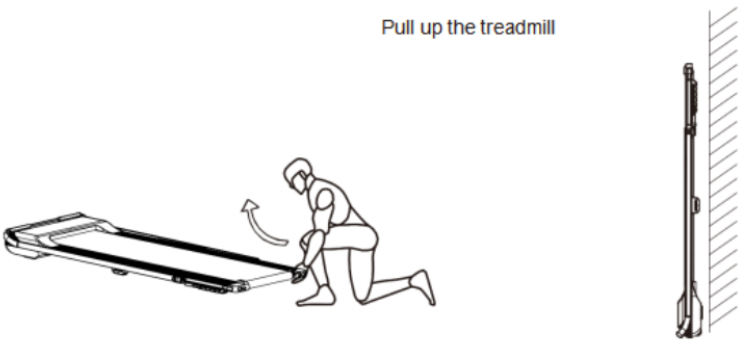
First put the column folded on the running platform, then grab the tail of the running platform with both hands and lift it up.(Note: Unplug the power cord when folding)
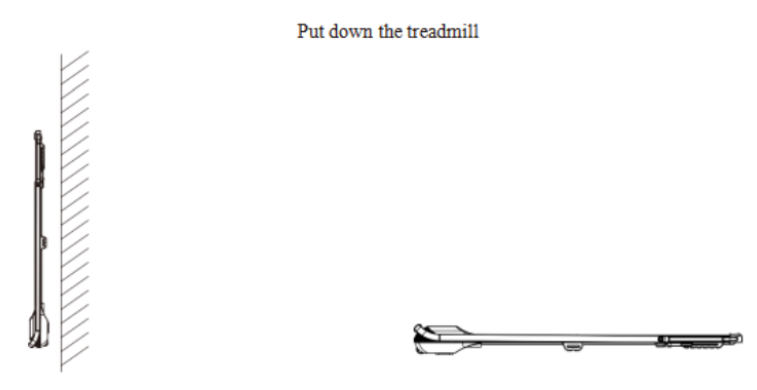 The treadmill is laid flat: Grab the tail of the treadmill with both hands, gently put it on the ground, and follow the installation steps.
OPERATION
Operating instructions in manual normal mode
- Place the treadmill horizontally on the ground.
- Tu m o n t h e p o w e r, t u r n o n t h e p o w e r s w i t c h . T h e p o w e r s w i t c h i n d i c a t o r l i g h t s u p and the buzzer will sound once.
- Check the screen to see if there is any abnormality in the data. Stand on the nonslip edge strip before clicking to prevent accidental fall.
- Press the start button on the remote control, the electronic watch window will display: 3 – 2 – 1 with buzzer sound and then the motor will start.
- The starting speed is: 0.8km/h. You can press the speed +, – keys to adjust the speed and select the appropriate speed for your needs.
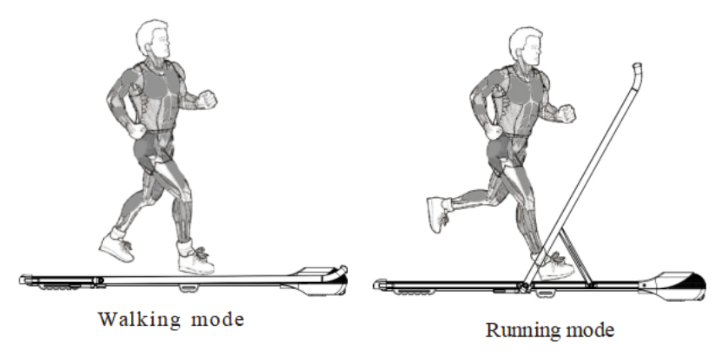
- When the handlebar is folded, the walker will function at a speed range of 0.86.0km/h.
- Expand the column for treadmill mode, speed range: 0.8-8.8km/h.
 Remote Button Function
- ” ” is start/stop button: This button can be used to stop the treadmill from running state and reset to zero during exercise. Use this button also as the start button when the power is on and the safety lock in its position.
- “+” is the speed increasing button: Adjust the speed after the treadmill starts, its adjustment range is 0.1km/time and it continues to increase when it is held for more than 1 second.
- “-” is the speed decreasing button: Adjust the speed after the treadmill starts, the adjustment range is 0.1km/time and continues to decrease when it is held for more than 1 second.
Note:If the remote control is not responding, the battery may be flat and will need to be replaced.
APP Guide Operation
- Download YPOO treadmill APP: Please enter “YPOO” in Apple APP Store or GooglePlay. Then you can download the treadmill app freely.
- Create your Account: Enter the necessary information to create your sport account.
- Select Training Plan: Select a training plan and create a customized plan on the app, then you can control your treadmill from your smartphone remotely and do your customized exercise!

Notes:
- You can choose your local language and set your local language. You can choose English, Chinese or Korean.
- This app will protect your privacy and will not collect any personal information
CLEANING & CARE
Once the treadmill has been run on for 50km cumulatively (about 3 months), maintenance is needed. Put the lubricating oil (about one third each time) squeezed into the silicone oil valve and then the running belt will be automatically maintained.

Tips:Do not use sandpaper or solvents to clean the treadmill. The controller part of the treadmill should not be exposed directly to the sun or moisture to avoid damage. Please check and tighten all accessories of the treadmill frequently. Damaged parts must be replaced immediately.
Proper maintenance is the only way to keep your treadmill at its best. Wrong maintenance can hurt or shorten the life of the treadmill.
Running belt adjustmentAdjusting the running belt has two functions: Tightening adjustment and the running belt center position adjustment. The running belt has been adjusted at the factory. However, after use, the running belt will be stretched or deviated from the center plate and cause damage to the running belt trim strip and the rear cover by friction. It is normal for the running belt to be stretched during use. When the running belt is slippery or not smoothduring use, you can improve it by adjusting the tightness of the belt.
How to adjust the running belt?
- Adjust the screw on the left side of the belt by Allen Key, turning 1/4 times clockwise to adjust the rear roller to tight the belt.
- Repeat step 1 to adjust the right screw. Check that the left and the right screw are adjusted to the same distance so that the rear roller can be paralleled to the treadmill frame.
- Repeat steps 1 and 2 until the running belt does not slip.
- Note: The running belt can’t be adjusted too tightly, which will break the running belt and increase the pressure of the front and rear rollers, causing problems such as roller bearing damage and abnormal noise. If you want to reduce the tension of the running belt, turn the wrench counterclockwise. Note that the left and right sides are rotated at the same distance.
Adjust the running belt to the middle positionWhen using the treadmill, the pressure on the running belt is unbalanced because the two feet exert different forces when running, which causes the belt to deviate from the center. This deviation is normal. When no one is using the treadmill, the belt goes back to the center automatically. If not, you need to adjust it to the center.
How to adjust the running belt to the middle?
- Run the treadmill with no-load at a speed of 6km/h.
- Observe the distance of the running belt to the left and right border. If the running belt deviates to the left side, turn the left screw clockwise for 1/4 by an inner hexagonal wrench. If the running belt deviates to the right side, turn the right screw clockwise for 1/4 by an inner hexagonal wrench. If the running belt is still not in the center, repeat the above step until it is adjusted to the center.
- After adjusting the running belt to the center, adjust the speed to 1km/h and observe the deviation of the running belt and check whether there is slipping during running. If still there is any deviation from the center, repeat the above steps.
- Warning! Do not over-tighten the roller! This will cause the bearing permanent damage! If the above steps do not work, you need to tighten the running belt again.
The left and right elastic latches are located behind the walking machine.
SPECIFICATION
With handle bar
| Colour | Silver & Black |
| Net weight | 30kg |
| Running belt | 420x1200mm |
| Folding size | 1430x690x125mm |
| Peak horsepower | 1.5hp |
| Speed | 0.8-6.0/8.8km/h |
| Shock absorption | Yes |
| Max user Weight | 100kgs |
Without handlebar
| Colour | Silver |
| Net weight | 25kg |
| Running belt | 420x1200mm |
| Folding size | 1430x620x125mm |
| Peak horsepower | 1.5hp |
| Speed | 0.8-6.0km/h |
| Shock absorption | Yes |
| Max user Weight | 100kg |
NOTES
Need more information?We hope that this user guide has given you the assistance needed for a simple setup. For the most up-to-date guide for your product, as well as any additional assistance you may require, head online to help.kogan.com
[xyz-ips snippet=”download-snippet”]