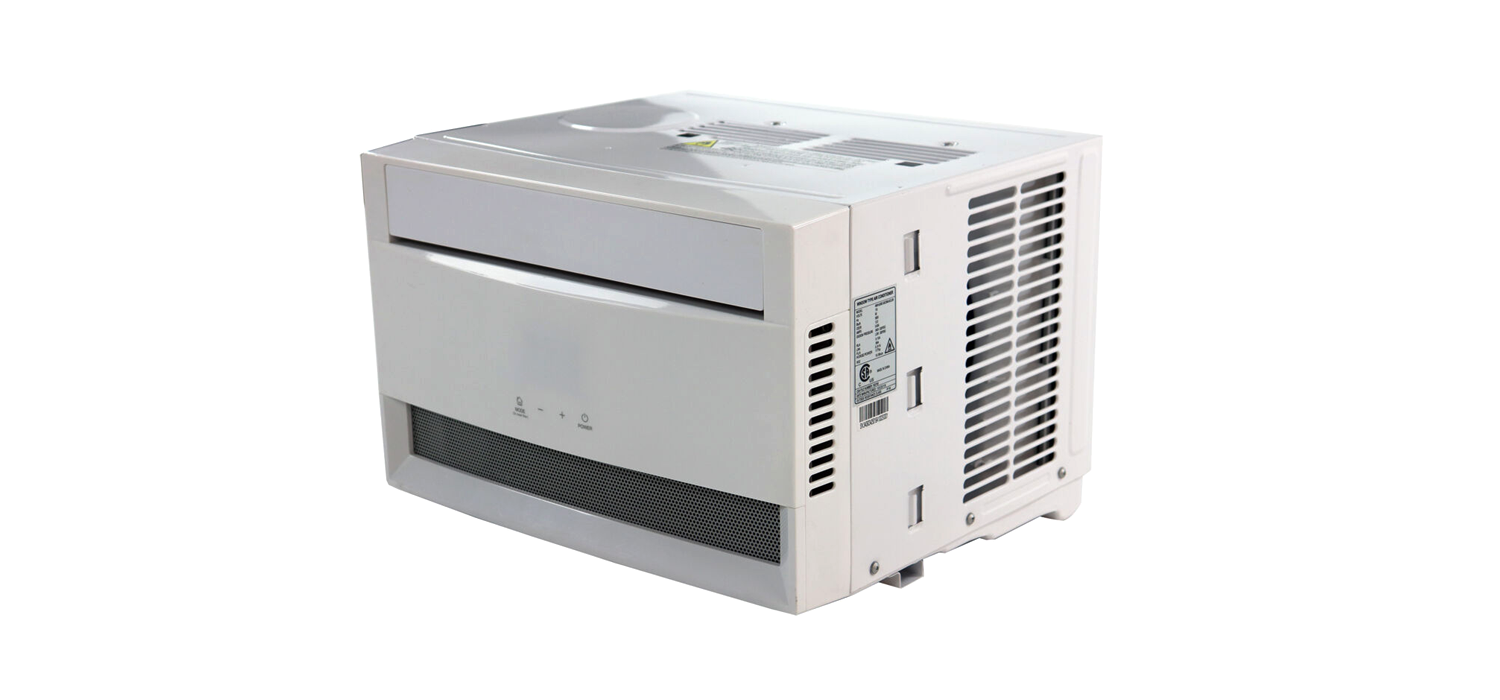
FREO Air Conditioner FHCW061 ABEUser Manual
FHCW061 ABEFHCW081 ABEFHCW101 ABEFHCW121ABE
www.FreoHome.comQuestions? We’re here to help!Contact us: 1-888-894-2755 or
Welcome to the Freo Family! Your life just got COOLER!Thank you for purchasing one of our innovative home climate products! We know that you will be thrilled by the features and functionality. If, for an reason, you are not completely satisfied, have a general question, or need further guidance on installation, please reach out to the Freo customer service team at 888-894-2755 or We’re here to help!
Inside this manual you will find many helpful tips on how to use and maintain your product properly. Before you attempt to install your air conditioner, please read this owner’s manual carefully. Your safety and the safety of others is very important to us. Please pay attention to all safety messages outlined in this manual and make sure to keep this manual for future reference.
IMPORTANT SAFETY INSTRUCTIONS
Inside you will and many helpful hints on how to use and maintain your air conditioner properly. Just a little preventive care on your part can save you a great deal of time and money over the life of your air conditioner. You’ll find many answers to common problems in the chart of troubleshooting tips. If you review our chart of Troubleshooting Tips first, you may not need to call for service at all.
Your safety and the safety of those around you is important to us. To prevent injury to the user or other people and property damage, the following instructions must be followed. Incorrect operation due to ignoring of instructions may cause harm or damage. The seriousness is classified by the following indications:

WARNING
- Plug into grounded 3-prong outlet only.
- Do not remove the ground prong from the plug.
- Do not use an extension cord.
- Do not disassemble for attempt to modify this unit or power cord.
- Unplug the unit before cleaning or servicing
- Always install a circuit breaker and a dedicated power circuit.
- This appliance is not intentded for use by persons (including children) with reduced physical, mental, or sensory capabilities, or who lack experience and knowledge, unless they have been given supervision or instruction concerning the use of the appliance by a person responsible for their safety.
CAUTION
- Do not attempt to disassemble this unit. Repairs or maintenance should be handled by an authorized service technician only!
- Do not attempt to repair or replace the power cord. Repairs or maintenance should be handled by an authorized service technical only!
- If you are unsure how to install this unit properly, please contact a licensed installer in your area.
- Electrical installation must be performed in accordance with national and local regulations and standards.
- When air filter is removed for cleaning, do not touch the internal parts of the unit.
- Turn off and unplug the unit when it needs cleaning. Clean the unit with a soft cloth and mild cleaner only. Do not soak with water or spray water into the unit.
- Use caution when unpacking and installing. Be careful around sharp edges and metal parts.
- Do not unplug the unit by pulling on the power cord. Always hold the plug by the head.
- Ensure that the unit is securely installed in the window, using screws and hardware provided.
- Do not drink or ingest any water drained from the unit.
CALIFORNIA PROPOSITION 65 (CA Residents Only)
CALIFORNIA RESIDENTS ONLY-WARNINGCancer and Reproductive Harm-www.P65Warmings.ca.gov
RÉSIOENTS DE LA CALIFORNIE SEULEMENT-AVERTISSEMENT:Cancer et anomalies de la reproduction-www.P65Warmings.ca.gov
SOLO RESIOENTES DE CALIFORNIA·ADVERTENCIA:Cancer y daiio reproductivo www.P65Warmings.ca.gov
NOTE:
Operation of Current Detecting Plug
The power supply cord contains a current device that senses damage to the power cord.To resets your power supply cord upon first use, do the following:
- Plug in the Air Conditioner.
- The power supply cord will have TWO buttons on the plug head. Press the TEST button, you will notice a click as the RESET button pops out.
- Press the RESET button, again you will notice a click as the button engages.
- The power supply cord is now supplying electricity to the unit. (On some products this it also indicated by a light on the plug head.)
Always make sure the RESET button is pushed in for correct operation.If power supply cord is damaged, it cannot be repaired. It MUST be replaced by one obtained from the product manufacturer.
WARNING: (for using R32 refrigerant only)
- Flammable refrigerant – R32 is used in air conditioner. Please follow the instruction carefully to avoid any hazard.
- Do not use means to accelerate the defrosting process or to clean, other than those recommended by the manufacturer.
- The appliance must be stored in a room without continuously operating ignition sources (for example: open flames, an operating gas appliance) and ignition sources (for example: an operating electric heater) close to the appliance.
- Be aware that leaking refrigerant might not contain an odor.
- Do not pierce or burn.
- Keep ventilation openings clear of any obstruction.
- Any person who is involved with working on or breaking into a refrigerant circuit should hold a current valid certificate from an industry-accredited assessment authority, which monitors their competence to handle refrigerants safely in accordance with an industry recognized assessment specification.
- Servicing must only be performed as recommended by the equipment manufacturer.Maintenance and repair requiring the assistance of other skilled personnel shall be carried out under the supervision of the person competent in the use of flammable refrigerants.
- Please follow the instruction carefully to handle, install, clear, service the air conditioner to avoid any damage or hazard. When maintaining or disposing the air conditioner, the refrigerant (R32) must be recovered properly and must not discharge directly into the air.
INSTALLATION INSTRUCTIONS
BEFORE YOU BEGIN
- Read these instructions completely and carefully.
- Note to Installer- Be sure to leave these instructions with the Consumer.
- Note to Consumer- Keep these instructions for futrue reference.
- Completion time- Approximately 1 hour.
- We recommend that two people install this product.
- Proper installation is the responsibility of the installer.
- Product failure due to improper installation may void the product warranty.
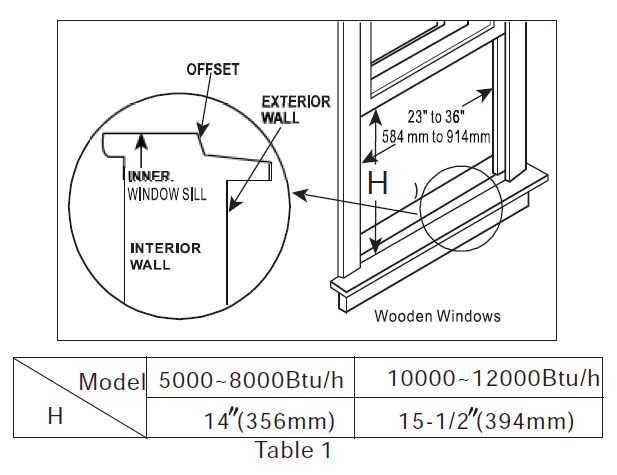
WINDOW REQUIREMENTS
Your air conditioner is designed to install in standard double hung windows with opening widths of 23 to 36 inches.
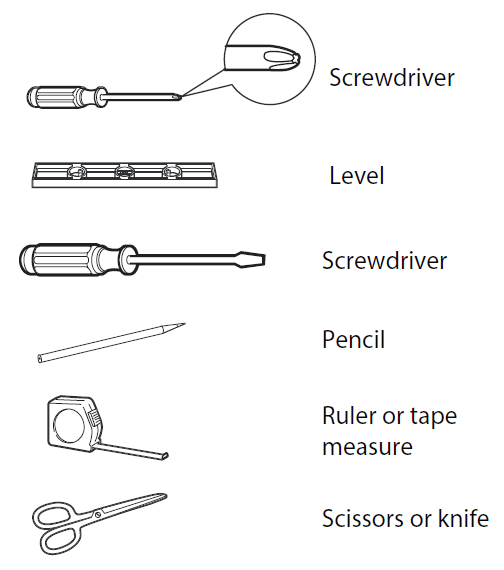
TOOLS YOU WILL NEED
1. PREPARE THE WINDOW
Side louvers and the rear of the AC must have clear air space to allow enough airflow through the condenser for heat removal. The rear of the unit must be outdoors, not inside a building or garage.
2. PREPARE AIR CONDITIONER
A: Remove the air conditioner from the carton and place on a at surface.
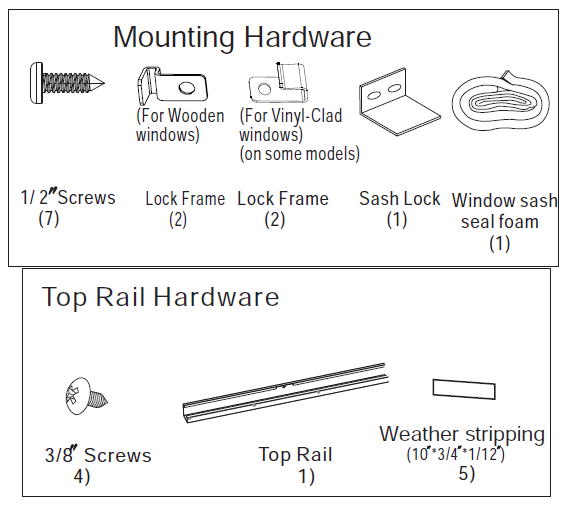
B: Remove top rail, insulation foam hardware and weather stripping from the packaging’ material. DO NOT DISCARD WITH STYROFOAM PACKAGING MATERIALS.
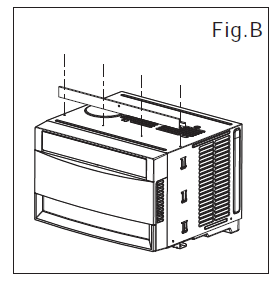
C: Align the holes on the top rail with those in the tpo of the unit, as shown in Fig. B.
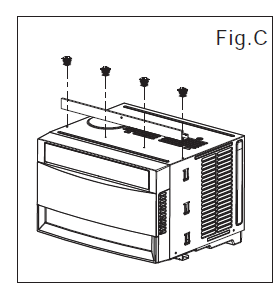
D: Secure the top rail to the unit with the 3/8” screws provided, as shown in Fig. C. For safety reasons, all four screws MUST be used.
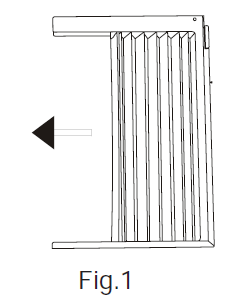
3. INSTALL THE ACCORDION PANELS
NOTE: The design of the top rail and side panels is offset slightly to provide the proper angle of installation (5/16” pitch to the rear). This is necessary for proper water drainage.
A: Grasp the solid end of one panel and pull the inner accordion shade towards the open end.See Fig. 1 for illustration.
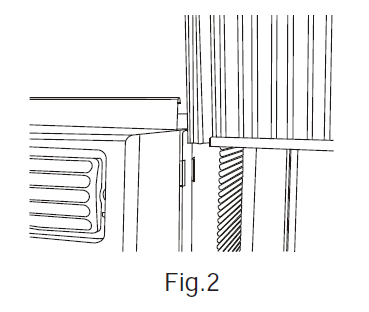
B. Slide the free ends of the accordion panel directly into the holding slot on the side of the air conditioner cabinet as shown in Fig. 2. Slide the panel down all the way and make sure it sits securely inside the channel.
C. Slide the top and bottom ends of the frame into the top and bottom rails of the cabinet, as shown in Fig. 3. The top of the frame slides into the top rail, and the bottom of the frame slides into the channel under the unit.

D. Repeat steps B and C to install the other side panel.

4. SECURE THE ACCORDION PANELS
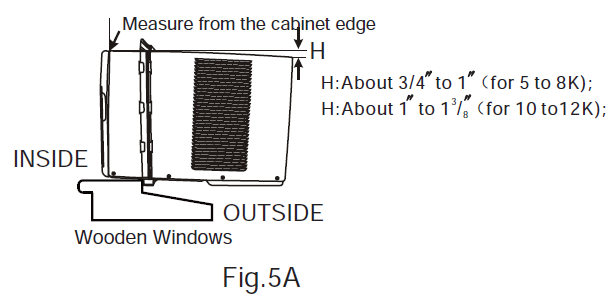
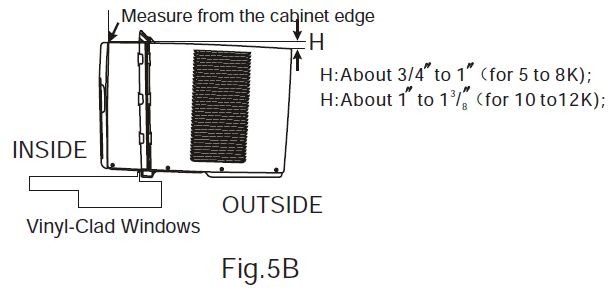
A. With the help of another person, carefully place the unit into the window so that the bottom of the air conditioner frame is against the window sill (Fig.5A for wood frame windows and Fig.5B for vinyl windows). Carefully close the window into the top rail on the unit.
NOTE: Proper installation of this air conditioner requires a downward slope to the outside of 3°to 4° for water drainage. If done correctly, water should not drain from the overflow drain hole during normal use.
B. Extend the side panels out against the window frame(Fig.6).
5. INSTALL SUPPORT BRACKET
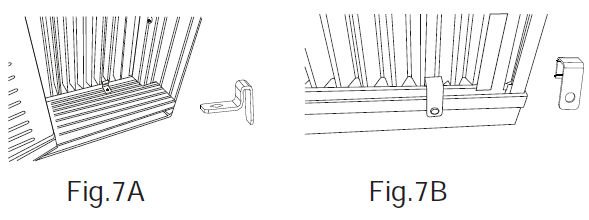
A. Select the appropriate frame lock and place between the window sill and the accordion panel frame as shown in Fig. 7A (for wooden windows) and Fig. 7B (for vinyl windows).
6. INSTALL LOCKING SCREWS
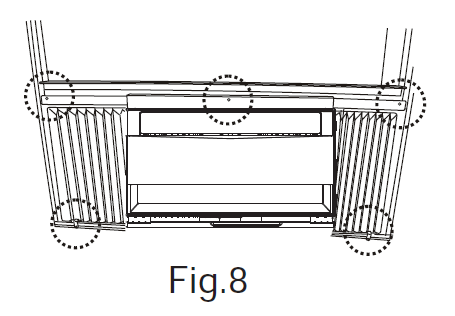
A: Drive 1/ 2″ locking screws through the support brackets, top channel, and accordion panel frames and into the window frame (Fig.8).
NOTE: To prevent frame from splitting, drill 1/8″ pilot holes before driving screws.
B. To eliminate the risk of the window being raised while the air conditioner is still installed, secure the right angle sash lock with 3/4” screw as shown in Fig. 9.

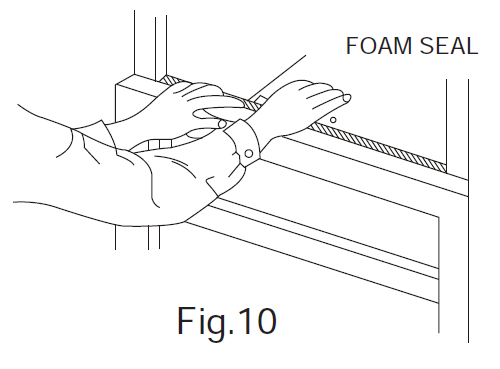
C. Cut the window sash sealing foam and insert into the space between the upper and lower sashes, as shown in Fig. 10.
8. INSTALL WEATHER STRIPPING
In order to minimize air leaks between the room air conditioner and the window opening, trim the weather stripping to the proper length, peel off the protective backing and plug any gaps if needed (Fig .14).

INSTALLATION WITH STORM WINDOW
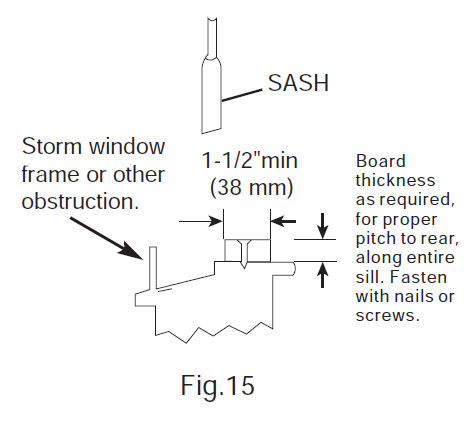
If installation of your air conditioner is blocked by a storm window, measure the amount of height necessary for the air conditioner to be raised to clear the obstruction. Securely screw a wood block into the window frame as shown in Fig. 15.
If storm window frame cannot be removed, be sure the drain holes or slots are not caulked or painted shut. Accumulated water must be allowed to drain out.
REMOVING AC FROM WINDOW
- Turn AC off, and disconnect power cord.
- Remove sash seal from between windows, and unscrew safety sash lock.
- Remove screws installed through frame and frame locks.
- Remove the R1 Panel and slide side panels into frame.
- Keeping a firm grip on air conditioner, raise window and carefully remove.
- Store parts WITH air conditioner.
NOTE: Be careful of residual water inside the air conditioner when removing from the window.Hold the unit flat when removing to avoid spilling inside the house. Make sure to drain thoroughly before packing away.
NORMAL OPERATING SOUNDS
- Sound of Rushing AirThe sound of rushing air might be heard from the front air exhaust, especially as the fan speed increases.
- Gurgle/HissThe sound of gurgling or hissing might be heard due to the movement of refrigerant through the evaporator during operation.
- VibrationThe sound of vibrations or rattling might be heard because of incorrect installation or poor wall or window construction.
- Pinging or DrippingThe sound of pinging or dripping might be heard as droplets of water hit the condenser during operation.
- High Pitched ChatterThe sound of high pitched chatter might be heard from the high eficiency compressor during the cooling cycle.
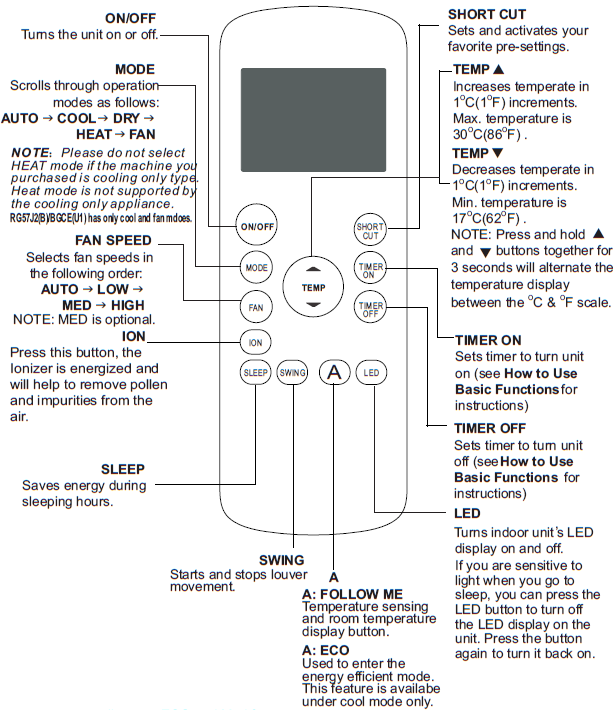
AIR CONDITIONER FEATURES
ELECTRONIC CONTROL OPERATING INSTRUCTIONS
Before you begin, thoroughly familiarize yourself with the control panel as shown below and all its functions.
NOTE: Some functions of this air conditioner are only accessible via remote control.

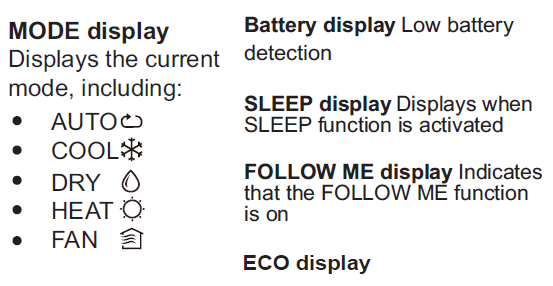
DISPLAYS:
Shows the set temperature in ” °C” or ” °F”. While on Fan only mode,it shows the room temperature.

REMOTE LED SCREEN INDICATORS
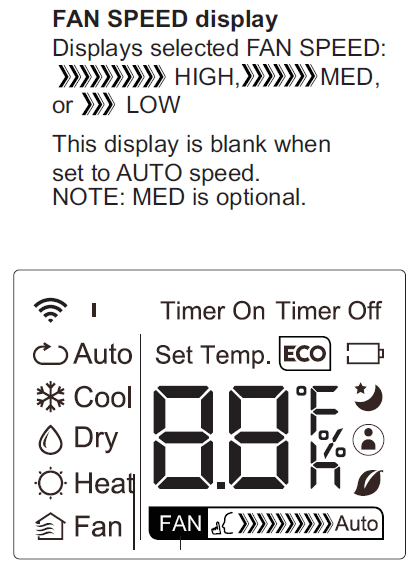
Transmission Indicator Lights up when remote sends signal to unit
Temperature/Timer displayDisplays the set temperature by default, or timer setting when using TIMER ON/OFF functionsTemperature range: 17-30oC(62OF-86OF)Timer setting range: 0-24 hoursThis display is blank when operating in FAN mode.
FUNCTIONALITY AND FEATURES
Press ![]() POWER button on unit or remote control to turn unit on or off. The unit will start automatically in Cool mode with Energy Saver functionality active.
POWER button on unit or remote control to turn unit on or off. The unit will start automatically in Cool mode with Energy Saver functionality active.
Press ![]() MODE button on unit or remote to select between cool and fan modes.
MODE button on unit or remote to select between cool and fan modes.
After 250 hours of operation, the filter indicator light illuminates. This feature is a reminder to clean the Air Filter for more efficient operation.Press the MODE button for 3 seconds to cancel the reminder.
Press + / – UP/DOWN buttons on unit or remote control to change temperature setting under cool mode. The set temperature will be automatically maintained anywhere between 62°F (17°C) and 86°F (30°C).On fan mode,the display will show the actual room temperature.NOTE: Press and hold + and – buttons together for 3 seconds will alternate the temperature display between the °C & °F scale.
Press the FAN SPEED button on the remote control to select between Low, Medium, High, or Auto fan speeds.
Press the SWING button on the remote control and hold for 2 seconds to turn on oscillation.To adjust the angle of air flow, press the SWING button repeatedly until the desired angle isreached.
Press the SLEEP button on the remote control to activate Sleep Mode. Sleep Mode allows the air conditioner to slowly raise the temperature of your room overnight to conserve energy.
Press the TIMER ON button on the remote control to set a specific time for the unit to come on. Press the TIMER OFF button on the remote control to set a specific ime for the unit to turn off.
If the air conditioner turns off unexpectedly due to loss of power, it will restart automatically with the previously set functions when power is restored.
If frost builds up on the evaporator coils, the unit will enter Auto Defrost mode. The compressor will cycle off and the fan will continue to run until the frost disappears.
Press the ENERGY SAVER button on the remote control to activate Energy Saver mode. This function allows the fan to run for 3 minutes after the compressor turns off at your desired set temperature.The fan will then cycle on every 10 minutes for 2 minutes to maintain the set temperature. If the room temperature rises, the compressor will turn back on and cooling will resume
This air conditioner features a shine-through plastic lighted display. The display will brighten when operations are selected or changed. It will automatically dim after 10 seconds of inactivity. To turn the display completely off, press the LED button on the remote control
Press the SHORTCUT button on your remote control to set the air conditioner to all of your favorite settings with the touch of one button.NOTE: One the unit is turned off, operation cannot be restarted for 3 minutes.
Before you begin using your new air conditioner, make sure to familiarize yourself with its remote control. The following is a brief introduction to the remote control itself. For instructions on how to operate your air conditioner, refer to the How to Use Basic Functions section of this manual.
Handling The Remote Control
NOT SURE WHAT A FUNCTION DOES?Refer to the How to Use Basic Functions and How to Use Advanced Functions sections of this manual for a detailed description of how to use your air conditioner.
SPECIAL NOTE
- Button designs on your unit may differ slightly from the example shown.
- If the unit does not have a particular function, pressing that function ,s button on the remote control will have no effect.
- When there are wide differences between “Remote control Illustrations” and USER’S MANUAL on function description, the description of USER’S MANUAL shall prevail.
Inserting and Replacing Batteries
Your air conditioning unit comes with two AAA batteries. Put the batteries in the remote control before use.
- Slide the back cover from the remote Control downward, exposing the battery compartment.
- Insert the batteries, paying attention to match up the (+) and (-) ends of the batteries with the symbols inside the battery compartment.
- Slide the battery cover back into place.
BATTERY NOTES
For optimum product performance:Do not mix old and new batteries, or batteries of different types.Do not lea, ve batteries in the remote control if you don t plan on using the device for more than 2 months

TIPS FOR USING REMOTE CONTROL
- The remote control must be used within 8 feet of the unit.
- The unit will beep when remote signal is received.
- Curtains, other materials and direct sunlight can interfere with the infrared signal receiver.
- Remove batteries if the remote will not be used more than 2 months.
Setting the TIMER function
Your air conditioning unit has two timer-related functions:TIMER ON- sets the amount of timer after which the unit will automatically turn on.TIMER OFF- sets the amount of time after which the unit will automatically turn off.
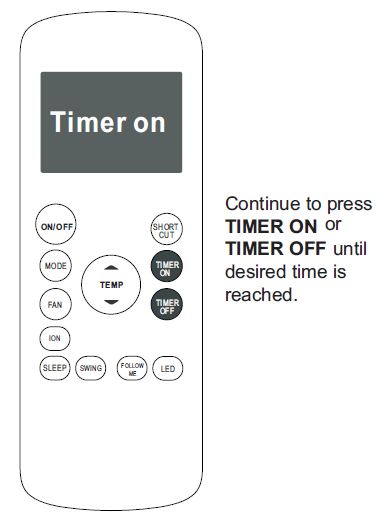
TIMER ON function
The TIMER ON function allows you to set a p eriod of time after which the unit will automatically turn on, such as when you come home from work.
- Press the TIMER ON button. By default, the last time period that you set and an “h” (indicating hours)will appear on the display.Note: This number indicates the amount of time after the current time that you want the unit to turn on.For example, if you set TIMER ON for 2 hours, ” 2.0h ” will appear on the screen, and the unit will turn on after 2 hours.
- Press the TIMER ON button repeatedly to set the time when you want the unit to turn on.
- Wait 2 seconds, then the TIMER ON function will be activated. The digital display on your remote control will then return to the temperature display

Example: Setting unit to turn on after 2.5 hours.
TIMER OFF function
The TIMER OFF function allows you to set a period of time after which the unit will automatically turn off, such as when you wake up.
- Press the TIMER OFF button. By default, the last time period that you set and an “h” (indicating hours)will appear on the display.Note: This number indicates the amount of time after the current time that you want the unit to turn off.For example, if you set TIMER OFF for 2 hours, ” 2.0h ” will appear on the screen, and the unit will turn off after 2 hours.
- Press the TIMER OFF button repeatedly to set the time when you want the unit to turn off.
- Wait 2 seconds, then the TIMER OFF function will be activated. The digital display on your remote control will then return to the temperature display.
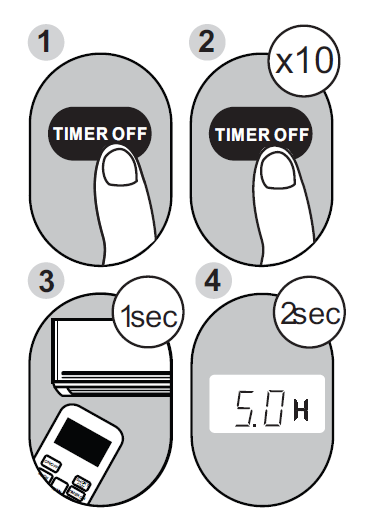
Example: Setting unit to turn off after 5 hours.
NOTE: When setting the TIMER ON or TIMER OFF functions, up to 10 hours, the time will increase in 30 minute increments with each press. After 10 hours and up to 24, it will increase in 1 hour increments. The timer will revert to zero after 24 hours.You can turn off either function by setting its timer to ” 0.0h ”
CARE AND CLEANING
CAUTION
Clean your air conditioner occasionally to keep it looking new. Be sure to unplug the unit before cleaning to prevent chock or fire hazards.
Air Filter Cleaning
The air filter should be cleaned at least once a month. Trapped particles in the filter can build up, causing reduced performance, frost accumulation on the coils, and shortening the lifespan of your air conditioner.
To Remove the Filter:
- Pull the lower front panel toward you and slide down the filter as shown.
- Wash the filter using liquid dishwashing detergent and warm water. Rinse and dry thoroughly before replacing. If washing is not available, the filter can also be vacuumed.
NOTE: Never use hot water over 104°F to clean the filter. Never attempt to operate the unit without the air filter installed.
Cabinet Cleaning
Always unplug the air conditioner before cleaning to prevent shock or fire hazard. The cabinet and front can be dusted with an oil-free cloth or washed with warm water and mild liquid dishwashing detergent. Always wipe dry before plugging the unit back in and turning it on.
Never use harsh cleaners, wax or dangerous chemicals to clean the cabinet.
Winter Storage
If you plan to store the air conditioner during the winter, remove it carefully from the window according to the installation instructions. Cover it with plastic or return it to the original carton.
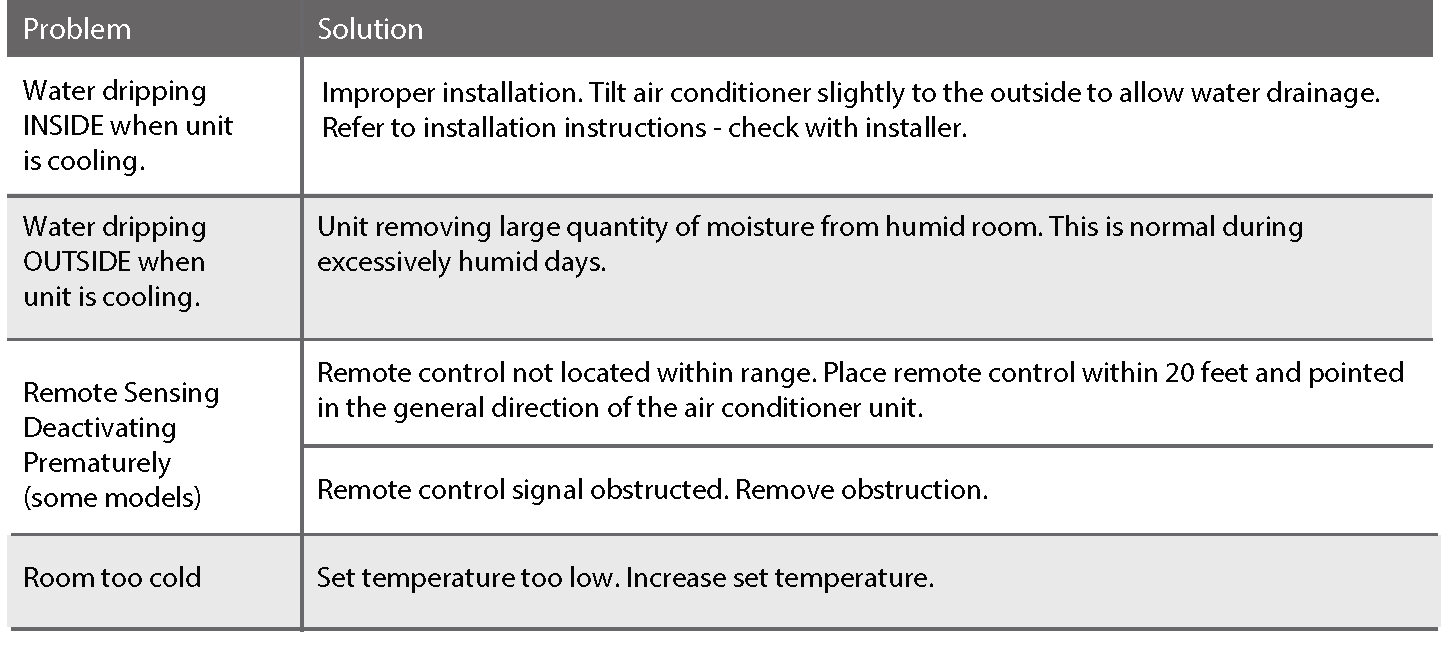
TROUBLESHOOTING TIPS
Before calling for service, review this list. It may save your time and expense. This list includes common occurrences that are not the result of defective workman-ship or materials in this appliance.
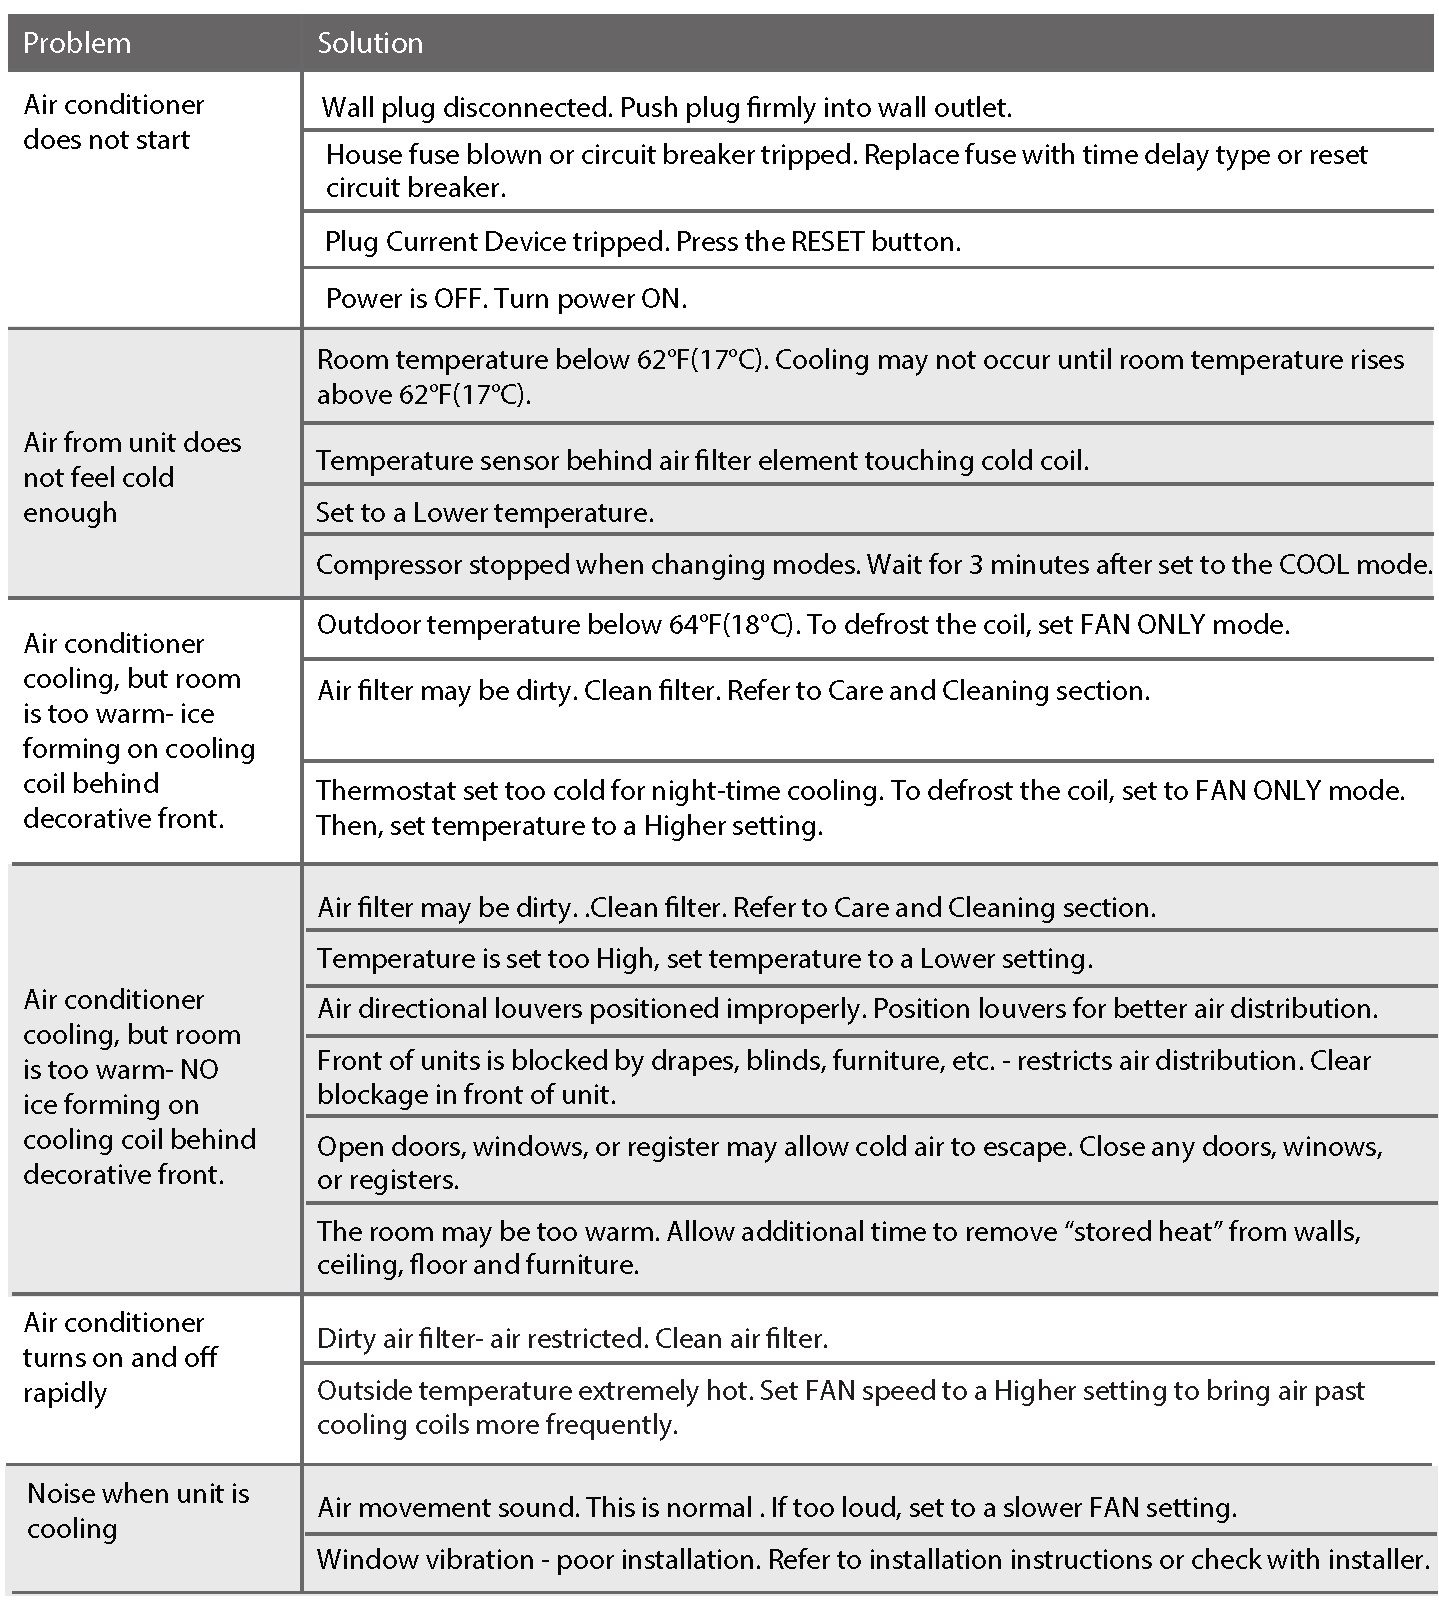
Error codes:AS-Room temperature sensor error-Unplug the unit and plug it back in.If error repeats, call for service.ES-Evaporator temperature sensor error-Unplug the unit and plug it back in. If error repeats, call for service.
The design and specifications are subject to change without prior notice for product improvement. Consult with the sales agency or manufacturer for details.Any updates to the manual will be uploaded to: www.FreoHome.comPlease check for the latest version.
References
[xyz-ips snippet=”download-snippet”]