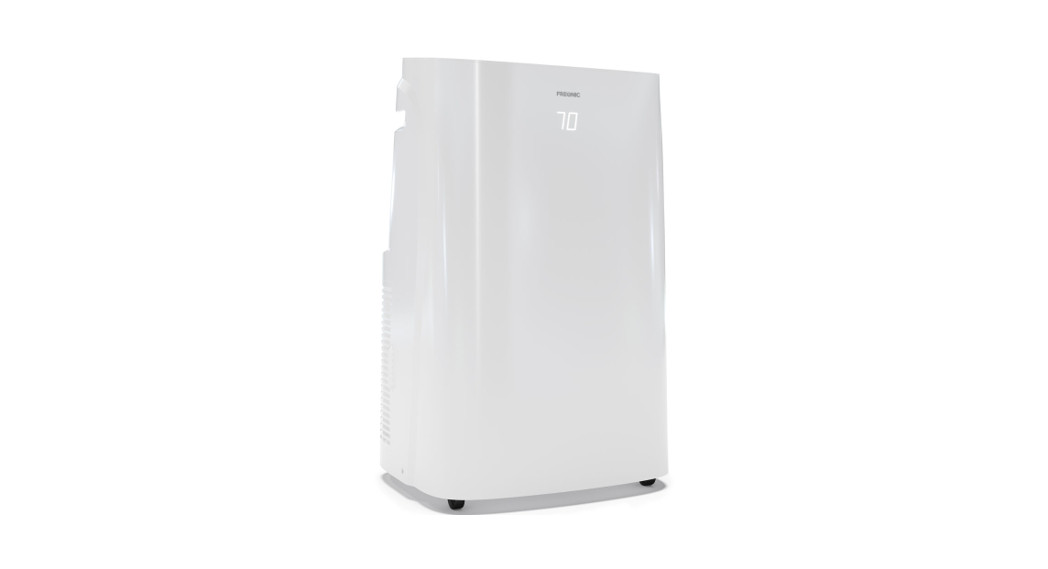
![]() USER MANUALPortable Air ConditionerFHCP101AKRFHCP101HKR
USER MANUALPortable Air ConditionerFHCP101AKRFHCP101HKR

www.FREONIC.comQuestions? We’re here to help!Contact us: 1-888-984-2755 or [email protected]
Welcome to the French Family! Your life just got COOLER! Thank you for purchasing one of our innovative home climate products! We know that you will be thrilled by the features and functionality. If, for any reason, you are not completely satisfied, have a general question, or need further guidance on installation, please reach out to the French customer service team at 888-984-2755 or [email protected]. We’re here to help!Inside this manual, you will find many helpful tips on how to use and maintain your product properly. Before you attempt to install your air conditioner, please read this owner’s manual carefully. Your safety and the safety of others is very important to us. Please pay attention to all safety messages outlined in this manual and make sure to keep this manual for future reference.
Notes
- The air conditioner is only suitable for indoor use, and is not suitable for other applications.
- Follow local grid interconnection rules while installing the air conditioner and ensure that it is properly grounded. If you have any questions on electrical installation, follow the instructions of the manufacturer, and if necessary, ask a professional electrician to install it.
- Place the machine in a flat and dry place and keep a distance of above 19 inches between the machine and the surrounding objects or walls.
- After the air conditioner is installed, ensure that the power plug is intact and firmly plugged into the power outlet, and place the power cord orderly to prevent someone from being tripped or pulling out the plug.
- Do not put any object into the air inlet and outlet of the air conditioner. Keep the air inlet and outlet free from obstructions.
- When drainage pipes are installed, ensure that the drainage pipes are properly connected, and are not distorted or bent.
- While adjusting the upper and lower wind-guide strips of the air outlet, pluck it with hands gently to avoid damaging wind-guide strips.
- When moving the machine, make sure that it is in an upright position.
- The machine should stay away from gasoline, flammable gas, stoves, and other heat sources.
- Don’t disassemble, overhaul and modify the machine arbitrarily, otherwise, it will cause a machine malfunction or even bring harm to persons and properties. To avoid danger, if a machine failure occurs, ask the manufacturer or professionals to repair it.
- Do not install and use the air conditioner in the bathroom or other humid environments.
- Do not pull the plug to turn off the machine.
- Do not place cups or other objects on the body to prevent water or other liquids from spilling into the air conditioner.
- Do not use insecticide sprays or other flammable substances near the air conditioner.
- Do not wipe or wash the air conditioner with chemical solvents such as gasoline and alcohol.When you need to clean the air conditioner, you must disconnect the power supply, and clean it with a half-wet soft cloth. If the machine is really dirty, scrub with a mild detergent.
- The appliance can be used by children aged 8 years and above and persons with reduced physical, sensory or mental capabilities if they have been given supervision or instruction concerning the use of the appliance in a safe way and understand the hazards involved. Children shall not play with the appliance. Cleaning and maintenance shall not be made by children without supervision.
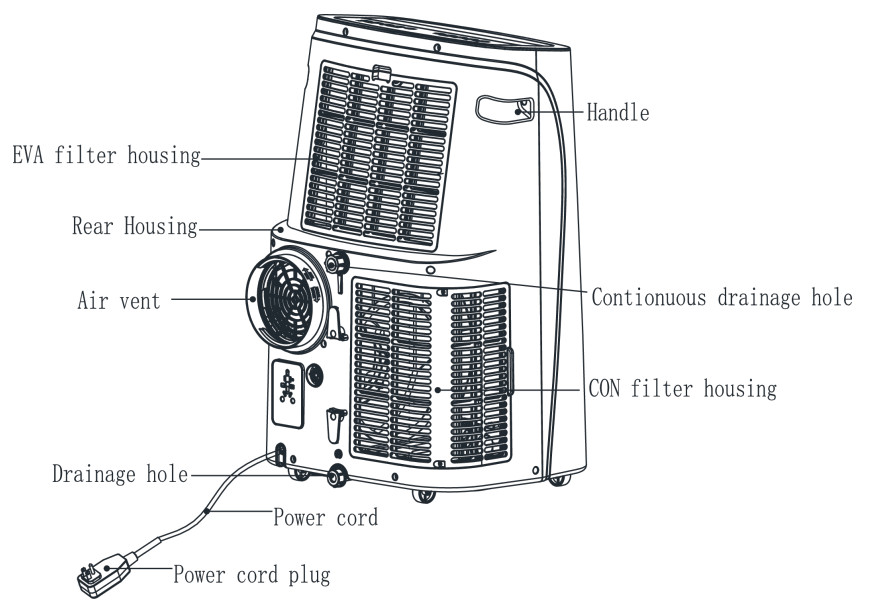
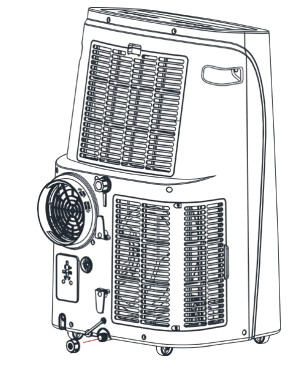
Components

Control Setting
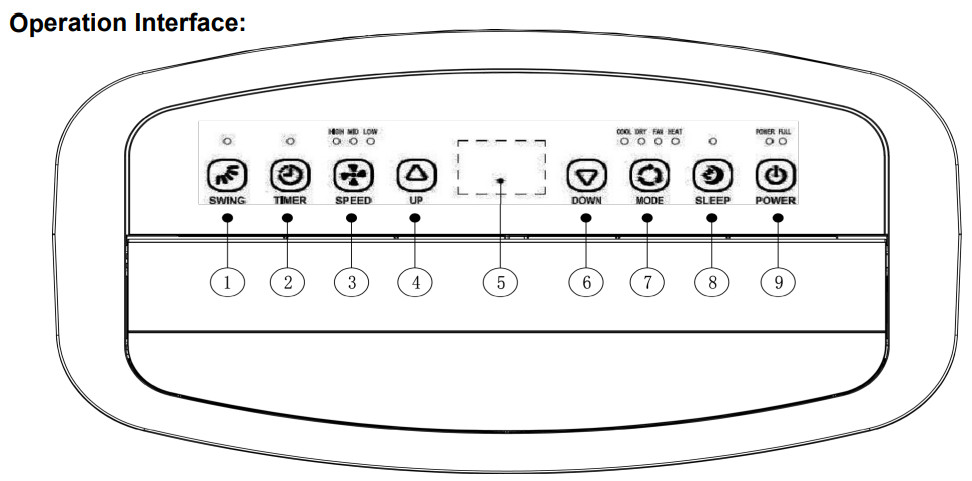
- SWING: The louver on the portable air conditioner will open automatically, Press the auto swing button to fix the louver in your desired position.
- TIMER: Press the TIMER button to set the unit automatically to turn ON or OFF. Use the + and buttons to program the hour increment.
- FAN SPEED: In cooling, heating, and fan mode, pressing the key to select high, middle, low fan speed. This function is not available in SLEEP mode and DEHUMIDIFYING mode.
- UP: Press this button to increase the temperature setting or set up the timer to the required timer setting. This function is not available under FAN mode and DEHUMIDIFYING mode.Simultaneously press UP and DOWN keys to switch between Celsius (℃) and Fahrenheit (℉).
- DISPLAY WINDOW
- DOWN: Pressing this button to decrease the temperature setting or set down the timer to the required timer setting. This function is not available under FAN mode and DEHUMIDIFYING mode.
- MODE: In the case of power on, press this key to switch between cooling → heating→ fan → dehumidifying mode.
- SLEEP: When the power is on and in the cooling mode (or heating mode), press the ‘SLEEP’ button to start the sleep mode. Under sleep mode, the FAN speed is set to LOW speed and not adjustable. The SLEEP mode can be canceled by pressing the button.
- POWER: Press the button to turn on and turn off the unit.
Remote Control Operation Instructions:

Protection Functions
- Frost Protection Function: In cooling mode, if the temperature of the exhaust pipe is too low, the machine will automatically enter protection status; if the temperature of the exhaust pipe rises to a certain temperature, it can automatically revert to normal operation.
- Overflow Protection Function: When the water in the water pan exceeds the warning level, the machine will automatically sound an alarm, and the “FULL” indicator light will flash. At this point, you need to move the drainage pipe connecting the machine or the water outlet to the sewer or another drainage area to empty the water (details see Drainage Instructions at the end of this chapter). After the water is emptied, the machine will automatically return to its original state.
- Automatic Defrosting (cooling models have this function): The machine has an automatic defrosting function. Defrosting can be achieved through four-way valve reversing.
- Protection Function of the Compressor: To increase the service life of the compressor, it has a 3-minute delay booting protection function after the compressor is turned off.
Installation and adjustment
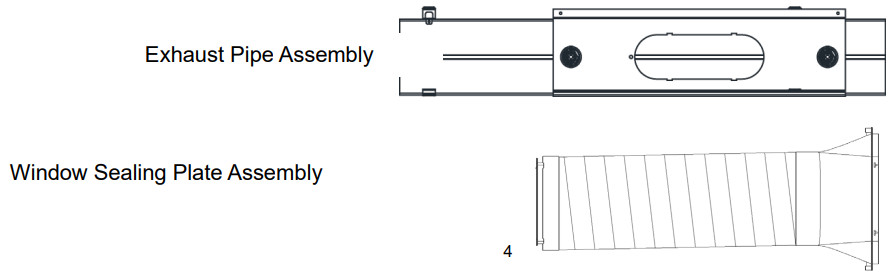
InstallationWarning: Before using the mobile air conditioner, keep it upright for at least two hours.The air conditioner can be easily moved in the room. In the moving process, ensure that the air conditioner is in the upright position and the air conditioner should be placed on a flat surface. Do not install and use the air conditioner in the bathroom or other humid environments.Install the heat pipe (as shown in Figure 1):
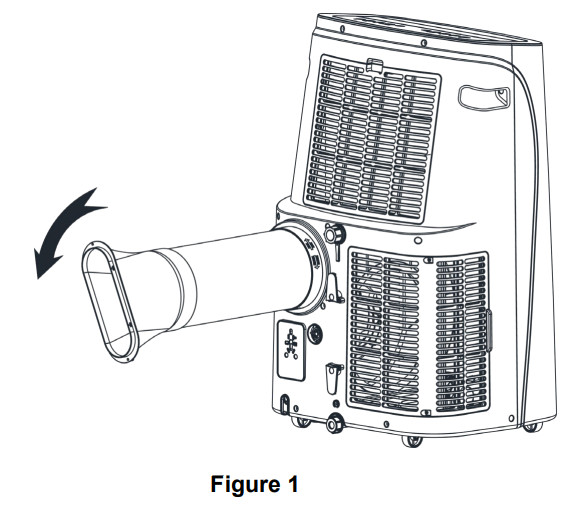
- Take out the outer connector assembly and the exhaust pipe assembly, and remove the plastic bags.
- Insert the heat pipe assembly (the end of the exhaust joint) into the back panel vent slot (push to the left) and complete the assembly (as shown in Figure 1).
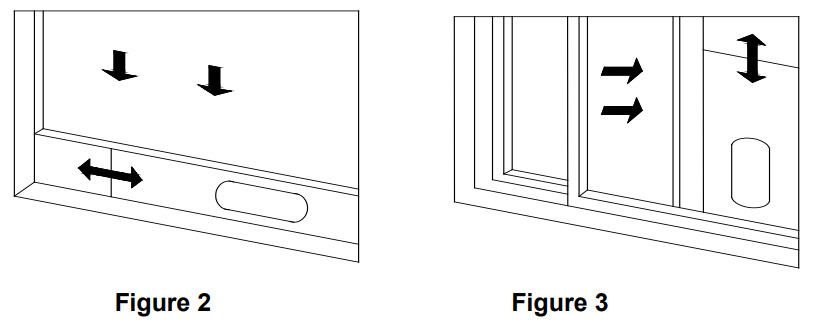
Installation of Window Sealing Plate Components:
- Half-open the window and mount the window sealing plate assembly to the window (as shown in Figure 2 and Figure 3). Components can be placed in horizontal and vertical directions.
- Pull various components of the window sealing plate assembly open, adjust their opening distance to bring both ends of the assembly into contact with the window frame, and fix various components of the assembly.
- Install the window sealing plate assemblyNotes:• The flat end of the exhaust pipe joints must be snapped into place.• The pipe cannot be distorted nor has substantial turning (greater than 45 °).• Keep the ventilation of the exhaust pipe not blocked.
Install the Body:
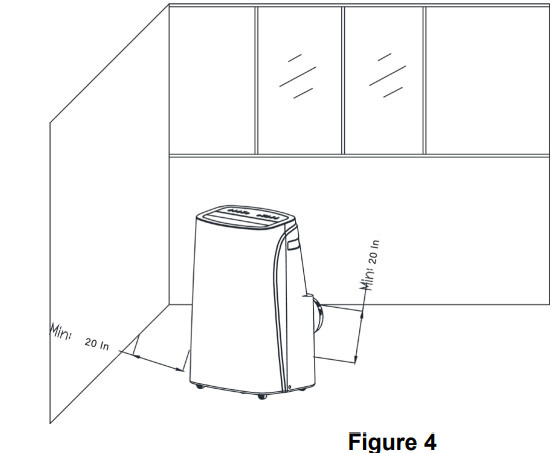
- Move the machine with the installed heat pipe and fittings before the window. The distance between the body and walls or other objects shall be at least 19 inches.

- Elongate the exhaust pipe and snap the flat end of the exhaust pipe joints into the hole of the window sealing plate assembly (as shown in Figure 5 and Figure 6).• Notes:o The flat end of the exhaust pipe joints must be snapped into place.o The pipe cannot be distorted nor has substantial turning (greater than 45 °). Keep the ventilation of the exhaust pipe not blocked.
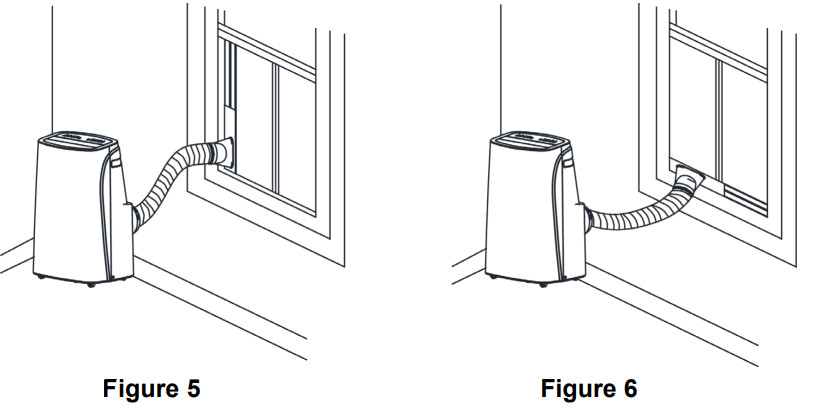
Important Notice: The length of the exhaust hose shall be 11-59 inches, and this length is based on the specifications of the air conditioner. Do not use extension tubes or replace it with other different hoses, or this may cause a malfunction. The exhaust host must be not blocked; otherwise, it may cause overheating.
Drainage Instructions
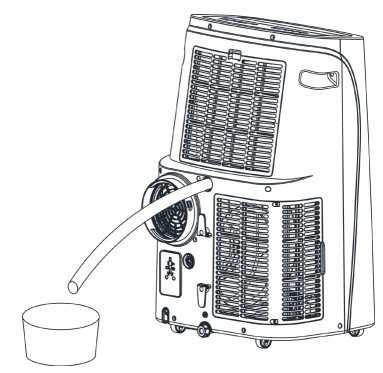
This machine has two drainage methods: manual drainage and continuous drainage.1. Manual Drainage:
a. When the machine stops after the water is full, turn off the machine power and unplug the power plug.i. Notes:1. Please move the machine carefully, so as not to spill the water in the water pan at the bottom of the body.b. Place the water container below the side water outlet behind the body.c. Unplug the water plug, the water will automatically flow into the water container.i. Notes:
- Keep the drainage cover and the water plug properly.
- During drainage, the body can be tilted slightly backward.
- If the water container cannot hold all the water before the water container is full, stuff the water outlet with the water plug as soon as possible to prevent water from flowing to the floor or the carpet.
- When the water is discharged, stuff the water plug, and tighten the drainage cover.
2. Continuous Drainage (only applicable to dehumidifying mode), as shown in the figure:a. Unplug the water plug.b. Set the drainage pipe into the water outlet.c. Connect the drainage pipe to the bucket.
Maintenance
Cleaning: before cleaning and maintenance, turn off the machine and unplug the plug.
- Clean the surface: Clean the surface of the machine with a wet soft cloth. Don’t use chemicals, such as benzene, alcohol, gasoline, etc; otherwise, the surface of the air conditioner will be damaged or even the whole machine will be damaged.
- Clean the filter screen: If the filter screen is clogged with dust, and the effectiveness of the air conditioner is reduced, be sure to clean the filter screen once every two weeks.
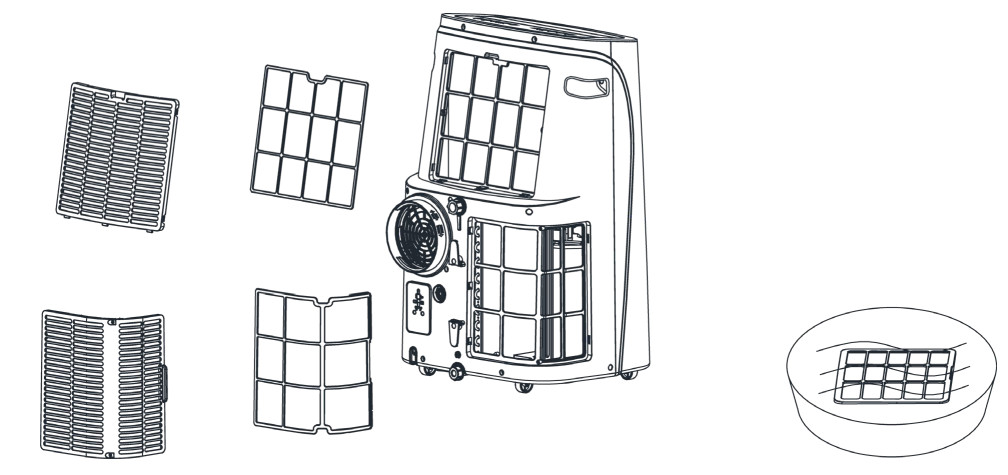
3. Clean the upper filter screen frame: Unscrew one screw fixed by EVA filter net and back shell with a screwdriver, and take out EVA filter net. Put the EVA filter screen into warm water with neutral detergent (about 40℃ / 104℉) and dry it in the shade after rinsing clean.
Unit Storage
- Unscrew the drainage cover, unplug the water plug, and discharge the water in the water pan into other water containers or directly tilt the body to discharge the water into other containers.
- Turn on the machine, adjust it to low-wind ventilation mode, and maintain this state until the drainage pipe becomes dry, so as to keep the inside of the body in a dry state and prevent it from mildewing.
- Turn off the machine, unplug the power plug, and wrap the power cord around the wrapping post; install the water plug and the drainage cover.
- Remove the exhaust pipe.
- Cover the air conditioner with a plastic bag. Put the air conditioner in a dry place, keep it out of the reach of children, and take dust control measures.
- Remove batteries of the remote control and keep them properly.
Note: Ensure that the body is placed in a dry place and keep all machine components together.
Troubleshooting
Do not repair or disassemble the air conditioner by yourself. The unqualified repair will lead to the failure of the warranty card and may cause damage to you or your property.
| Problems | Reasons | Solutions |
| The air conditioner
does not work. |
There is no electricity. | Turn it on after connecting it to a socket with electricity. |
| The overflow indicator displays “FL”. | Discharge the water inside. | |
| The ambient temperature is too low or too high | Recommend to use the machine in at the temperature of 7-35 °C/44-95 °F. | |
| In cooling mode, the room temperature is lower than the set temperature; in heating mode, the room temperature is higher than the set temperature. | Change the set temperature. | |
| In dehumidification mode, the ambient temperature is low. | The machine is placed in a room with an ambient temperature of greater than 17 °C/ 62 °F. | |
| The cooling effect is not good | There is direct sunlight. | Pull the Curtain. |
| Doors or windows are open; there are a lot of people; or in cooling mode, there are other sources of heat. | Close doors and windows, and add new air conditioner. | |
| The filter screen is dirty. | Clean or replace the filter screen. | |
| The air inlet or outlet is blocked. | Clear obstructions. | |
| Loud Noise | The air conditioner is not placed on a flat surface. | Put the air conditioner on a flat and hard place (to reduce noise). |
| compressor does not work. | Overheat protection starts. | Wait for 3 minutes until the temperature is lowered, and then restart the machine. |
| The remote control does not work. | The distance between the machine and the remote control is too far. | Let the remote control get close to the air conditioner, and make sure that the remote control directly faces to the direction of the remote control receiver. |
| The remote control is not aligned with the direction of the remote control receiver. | ||
| Batteries are dead. | Replace batteries. | |
| Displays ‘E2’. | The pipe temperature sensor is abnormal. | Check the pipe temperature sensor and related circuitry. |
| Displays ‘El’ | The room temperature sensor is abnormal. | Check the room temperature sensor and related circuitry. |
Note: If problems not listed in the table occur or recommended solutions do not work, please contact the professional service organization.
References
[xyz-ips snippet=”download-snippet”]