![]()

RECHARGEABLEDOG TRAINING COLLARINSTRUCTION MANUAL
Please read this manual carefully before using it.SKU # 245959
Important Safety Information
WARNING:Not for use with aggressive dogs. Do not use this product if your dog is aggressive, or if your dog is prone to aggressive behavior.If you are unsure whether this product is appropriate for your dog, please consult your veterinarian or a certified trainer.
- For use with dogs over 6 months of age and over 8 lbs.
- DO NOT use when the dog or the collar is/are wet.
- DO NOT press and hold shock or vibrate for more than 10 seconds to avoid physical or psychological hurt to your pet.
- Your pet should not vocalize or panic when receiving stimulation. If this happens, the stimulation level is too high and you need to go back to the previous level and repeat the process.
- DO NOT charge the device near any flammable substances.
- For pet use only. Not for use on children.
- This is not a toy, and should only be operated by responsible adults.
CAUTION:For on-leash training. Do not attach a leash to the training collar. Use a regular collar in addition to the training collar.Risk of skin damage. Please read and follow the instructions in this manual. Proper fit of the collar is important. A collar worn for too long or made too tight on the pet’s neck may cause skin damage. Ranging from redness to pressure ulcers; this condition is commonly known as bed sores.
- Do NOT leave the collar on the dog for more than 12 hours per day.
- When possible reposition the collar on the pet’s neck every 1 to 2 hours.
- Check the fit to prevent excessive pressure; follow the instructions in this manual.
- Never connect a lead to the electronic collar; it will cause excessive pressure on the contacts.
- Wash the dog’s neck area and the contact probes of the collar weekly with a damp cloth.
- Examine the contact area daily for signs of a rash or a sore.
- If a rash or sore is found, discontinue use of the collar until the skin has healed. If the condition persists beyond 48 hours, see your veterinarian.
- The receiver collar meets IP67 waterproof rating, it can be submerged into water up to 1 meter for up to 30 minutes. If submerged and wet, please do not use it.
- This product comes with conductive silicone covers, please ensure they are worn on the contact points before putting the receiver on your dog and check for the presence of silicone cover every hour.
These steps will help keep your pet safe and comfortable. Some pets are comfortable while they wear stainless steel contacts. Some pets are sensitive to contact pressure. You may find some pets are sensitive to the collar. If so, you may relax some of these precautions. It is important to continue daily checks of the contact area. If redness or sores are found, discontinue use until the skin has fully healed.
Rechargeable Lithium-Ion Battery Warning:
- Do not disassemble the battery compartment.
- The product contains a non-replaceable battery. If the battery is exposed or removed, please ensure that the batteries are properly disposed of in accordance with your local waste rules regulations.
- Discontinue use if the product is damaged.
- Please ensure that products with batteries is properly disposed of in accordance with your local waste rules regulations.
- If you think batteries might have been swallowed or placed inside any part of the body, seek immediate medical attention.
- Batteries should be charged prior to use. Charge only with specified
- Don’t store product with battery in temperature over 60°C.
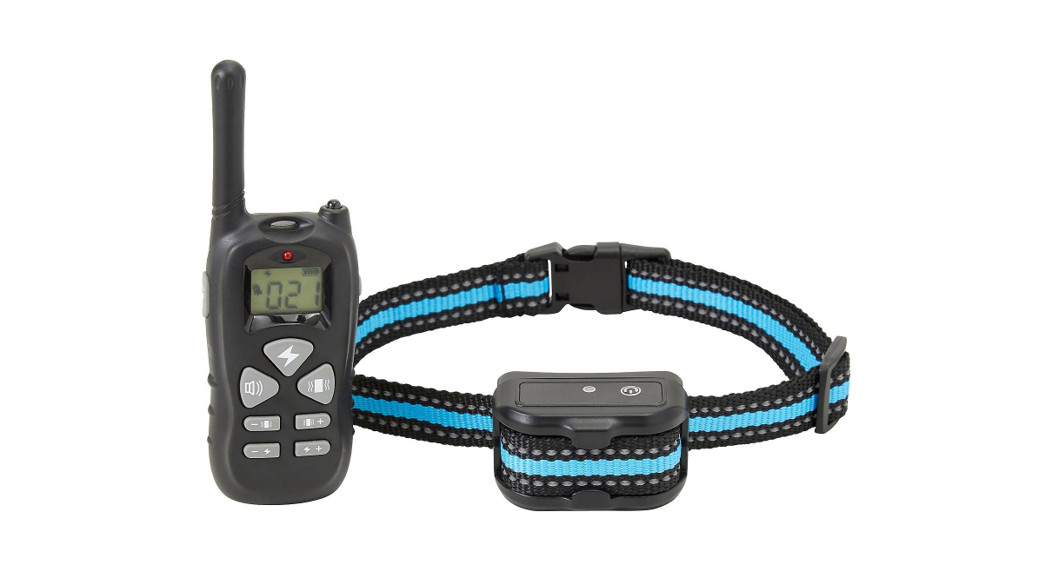
Components
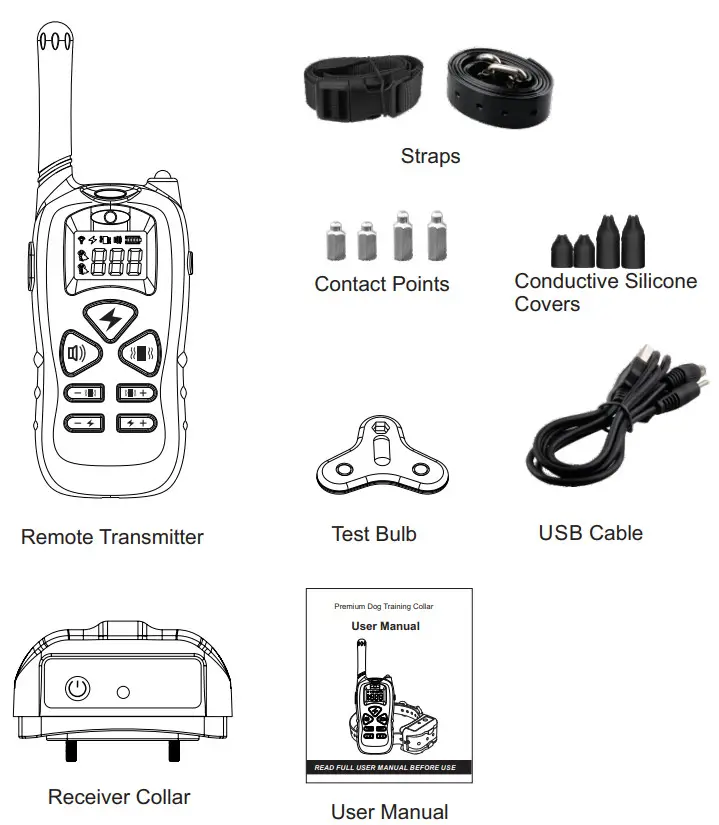
Other Items You May Need
- Scissors
- Lighter
How the System Works
The Remote Training Collar is easy to use with an advanced digital display that tells you exactly what level of stimulation you are using.The Remote Training Collar can assist you in controlling your pet without a leash in an unobstructed range of up to 1000FT. At the push of a button, your remote sends a signal activating your dog’s Receiver Collar. He receives a safe but annoying stimulation. He’ll quickly learn the association between his behavior and your correction; in no time, you’ll have a better-behaved pet. The Remote Training Collar has been proven safe, comfortable, and effective for both small and large dog breeds at least 6 months of age and over 8 lbs. Using the Remote Trainer consistently and correctly, any basic obedience commands can be taught and will help to correct many misbehaviors that your pet exhibits.
Key Features
- Separated function buttons on Remote Transmitter, easy for
- The receiver collar is IP67 Waterproof rated, it can be submerged into water up to 1 meter for up to 30 minutes.
- 100 level shock & vibration helps to provide behavior correction for
- Receiver collar low battery & charging
- Rechargeable with High-Quality Lithium Battery, with work time twice Increased.
- The maximum amount of time you can press the Simulation Button and deliver stimulation to your pet continuously is 10 After this, the remote transmitter will time-out, and the stimulation button must be released and pressed again.
Definition of the Product
Remote Transmitter![]() Receiver Collar
Receiver Collar

Operating Guide
Note: Fully charge receiver and remote for a minimum of 3 hours before first use.How to Turn the Remote Training Collar On/OffTo turn the Remote Transmitter on
- Press and hold the channel button for 3 seconds to power on the Remote Transmitter. The backlight will be on.
- The backlight will be off at 10 seconds if there is no operation.
- The LCD display will be turned off at 2 minutes if there is no operation. Any button on the Remote The transmitter will activate the Remote Transmitter.
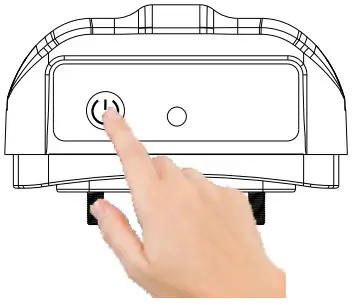
To turn the Remote Transmitter offPress and hold the channel button ![]() for 3 seconds to power off the Remote Transmitter.To turn the Receiver Collar onPress and hold the power button
for 3 seconds to power off the Remote Transmitter.To turn the Receiver Collar onPress and hold the power button![]() for 3 seconds, the Receiver Collar will vibrate and the BLUE LED indicator becomes solid then blinking.The Receiver Collar will be in sleep mode if there is no movement within 2 minutes. Any movement will activate the Receiver Collar.To turn the Receiver Collar offPress and hold the power button
for 3 seconds, the Receiver Collar will vibrate and the BLUE LED indicator becomes solid then blinking.The Receiver Collar will be in sleep mode if there is no movement within 2 minutes. Any movement will activate the Receiver Collar.To turn the Receiver Collar offPress and hold the power button ![]() for 3 seconds, the Receiver Collar will beep and the BLUE LED indicator turns off.Notes: To extend the life of the batteries, turn off the Remote Transmitter and Receiver Collar when they are not in use.
for 3 seconds, the Receiver Collar will beep and the BLUE LED indicator turns off.Notes: To extend the life of the batteries, turn off the Remote Transmitter and Receiver Collar when they are not in use.
- Press once to send a beep, shock, and vibration command to Receiver Collar.
- Press and Hold Receiver Collar will have a consecutive beep, shock, and vibration and stop after 10 seconds.Notes: Do not suggest pressing and hold for a long time to avoid physical or psychological hurt to your pet.
- Adjust the Shock Level UP Button and Shock Level DOWN Button to select the shock level.Adjust the Mt: ration Level UP Button and vibration Level DOWN Button to select the vibration level.
How to Fit the Receiver Collar
Important: The proper fit and placement of your Receiver Collar are important for effective training. The Contact Points must have direct contact with your pet’s skin on the underside of his neck. To assure a proper fit, please follow these steps:
- Make sure that the Receiver Collar is turned off.
- Have your pet standing comfortably (Refer to picture 3A).
- Place the Receiver Collar on your dog’s neck close to the ears. Center the Contact Points underneath your dog’s neck, touching the skin (Refer to picture 3B).
Notes: It is sometimes necessary to trim the fur around the skin Contact Points to make sure that contact is consistent.
CAUTION:
Do not shave the pet’s neck as this may increase the risk of skin irritation.
- The Receiver Collar should fit snugly, yet loose enough to allow one finger to fit between the strap and your pet’s neck (Refer to picture 3C).
- Allow your pet to wear the collar for several minutes then recheck the fit. Check the fit again as your pet becomes more comfortable with the Receiver Collar.
- How to attach the strap o the Receiver Collar’ Follow the 1-2-3-4 steps instructed to thread the strap.Notes: In case you have the TPU collar in your package, mark the desired length of the collar, leaving some extra inches(if your dog is still growing or for the thicker winter coat), and cut off the excess. Seal the cut edge of the strap using a lighter for a few seconds to allow the edge to smoothen.

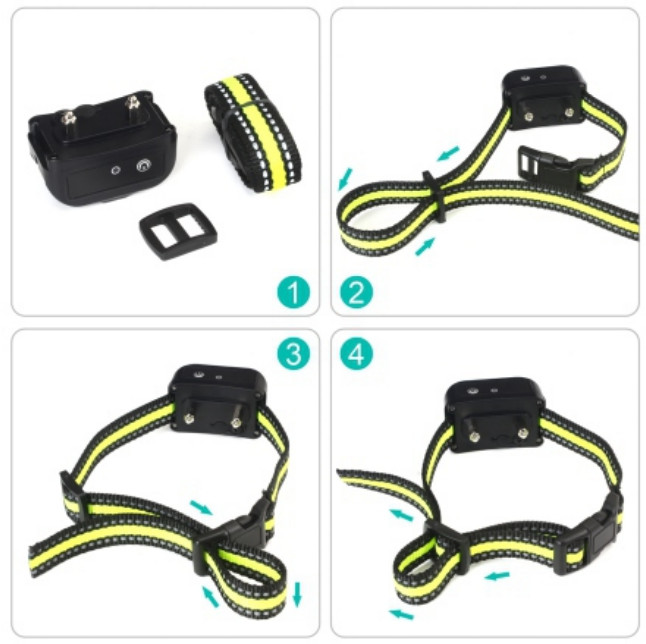 Notes: In case you have the TPU collar in your package, mark the desired length of the collar, leaving some extra inches(if your dog is still growing or for the thicker winter coat), and cut off the excess. Seal the cut edge of the strap using a lighter for a few seconds to allow the edge to smoothen.
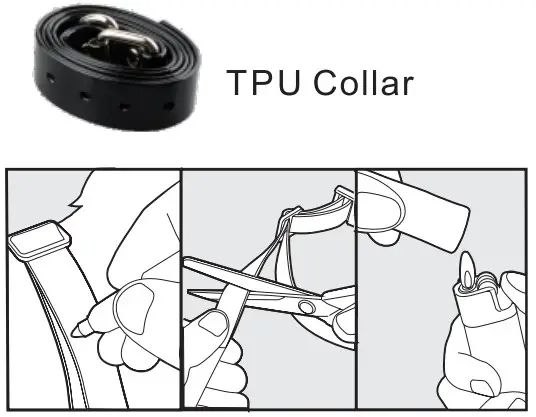
How to Find the Best Vibration/Shock Level for Your Pet
Important: Always start at the lowest level and work your way up. The Remote Training Collar has 100 Stimulation Levels for vibration and static shock, with level 1 being the lowest level and level 100 being the highest. This allows you to choose the Stimulation level that is best for your pet. Once you have placed the Receiver Collar on your pet, it is time to find the Stimulation Level that is best for him. This is called the Recognition Level. A slight change in your pet’s behavior, such as looking around in curiosity, scratching at his collar, or flicking his ears, indicates the Recognition Level that is best for him.Follow the steps below to find your pet’s Recognition Level:
- Starting at Level 1 on the Digital Display, press the Vibration/Shock Button continuously for 1 to 2 seconds. Note: When the Vibration/Shock Button is held down for 10 consecutive seconds, the Transmitter will “time-out”, and you must release and press the button again before additional stimulation can be delivered.
- If your pet shows no reaction, repeat the Stimulation Level several times before moving up to the next level.
- YOUR PET SHOULD NOT VOCALIZE OR PANIC WHEN RECEIVING STIMULATION. IF THIS HAPPENS, THE STIMULATION LEVEL IS TOO HIGH AND YOU NEED TO GO BACK TO THE PREVIOUS LEVEL AND REPEAT THE PROCESS.
- Move up through the Stimulation Levels until your pet reliably responds to the stimulation.
- If your pet continues to show no response at Level 100, check the fit of the Receiver Collar. If your pet has long or thick hair, please use the longer set of Contact Points in the package. Then go back to #1 and repeat the process.
If this still does not yield any results, your pet’s hair will need to be trimmed around the Contact completing all of these steps, your dog still does not indicate he is feeling the stimulation, please contact our customer service.
How to Maximize the Distance
The Remote Training Collar has a range of up to 1000FT. Terrain, weather, vegetation, transmission from other radio devices, and other factors may affect the maximum range. Hold the Remote Transmitter in a horizontal position away from your body to achieve optimum range. For maximum signal strength, keep the device properly charged.
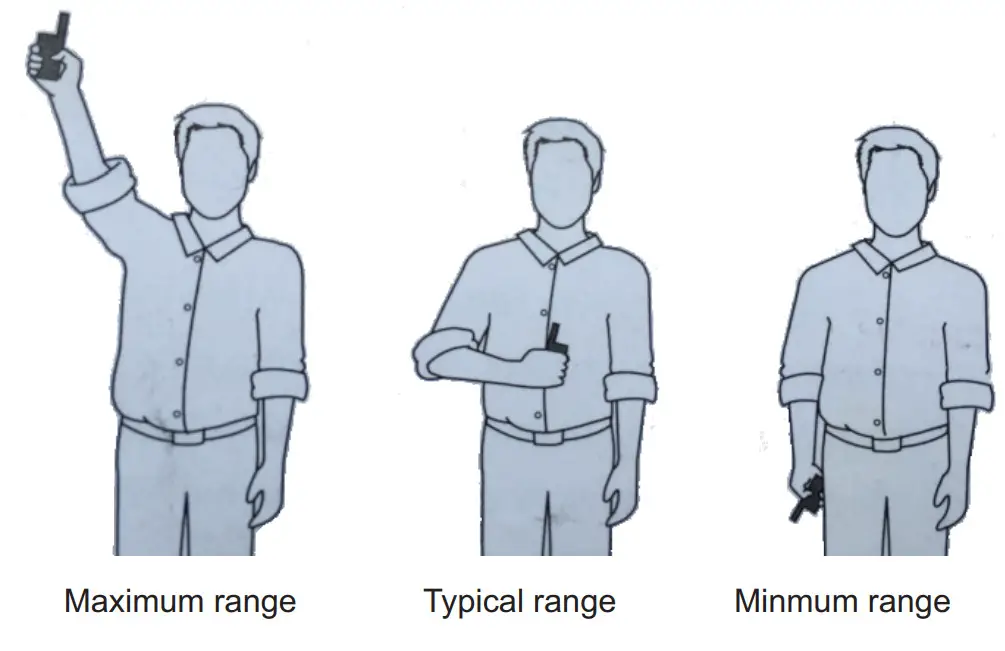 *Avoid touching the antenna or the range may decrease substantially.
The LCD Display & LED Indicator
*LCD Display on Remote Transmitter
| Indicates LED light is on | |
| Indicates Shock Mode is on | |
| Indicates Beep Mode is on | |
| Indicates Vibration Mode is on | |
| Indicates battery level | |
| Indicates the 1 to 100 stimulation level of ShockNibration |
*Remote Transmitter Indicator Light Definitions
| Remote Transmitter Function | Remote Transmitter Indicator Light Response |
| Press |
Red LED on when pressing the button |
| Press |
Red LED on when pressing the button |
| Press |
Red LED on when pressing the button |
| Charging the Remote Transmitter | Red LED blinks |
| Remote Transmitter is fully charged | Red LED is on |
*Receiver Collar Indicator Light Definitions
| Receiver Collar Function | Receiver Collar Indicator Light Response |
| System Running | Slow Blinking. 1 blink every 3 seconds |
| Low Battery | Fast Blinking.2 blinks every 1 second |
| Fully charged/Pairing Mode | Indicator light become Solid |
| On charging | Slow Blinking. 1 blink every 1 second |
Charging the Device
The Remote Training Collar uses Lithium-Polymer batteries, DO NOT charge the device near any flammable substances. Fully charge the Remote Transmitter and Receiver Collar before use.Charge the Remote Training Collar if:
- The indicator light on the Receiver Collar is blinking rapidly.
- There is only 1 battery level bar left on the Remote Transmitter LCD display.
- The indicator light on the Remote Transmitter and Receiver collar will not come on.
Charging Steps:
- Plug the adaptor into a standard wall outlet.
- Lift the rubber cover on the Receiver Collar charging jack.
- Connect the USB cable connectors to the charging jack on Receiver Collar and Remote Transmitter.
- Connect the USB cable port to the power adapter, power bank or your PC.
Notes: Remote Transmitter. Fully charged, the Red LED indicator will become solid.Receiver Collar: Fully charged, the Blue LED indicator will become solid.The charging time takes 2-3 hours, Red indicator light on Remote Transmitter and Blue indicator light on the Receiver Collar will blink slowly when charging.Warning: In case you have to use chargers for charging please use those with 5V output voltage. Improper chargers vnl cause change damage to the device.Receiver Collar will deliver Warning Beeping Tone Conanously if ifs on a charge with improper chargers.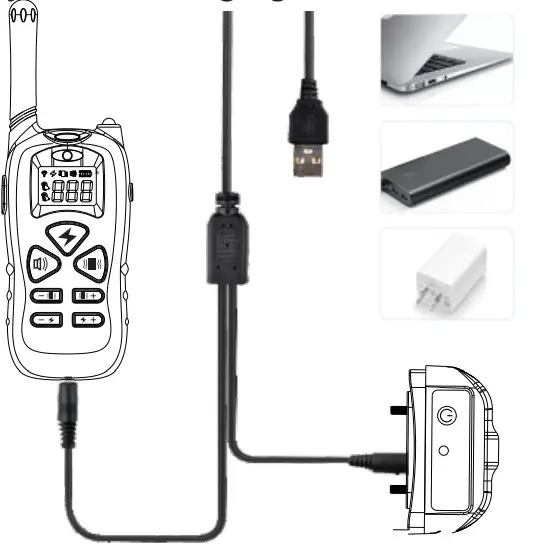 Notes:
- Improper chargers mean those with output voltage over 5V.
- Output Voltage usually can be seen on the surface Of a charger.
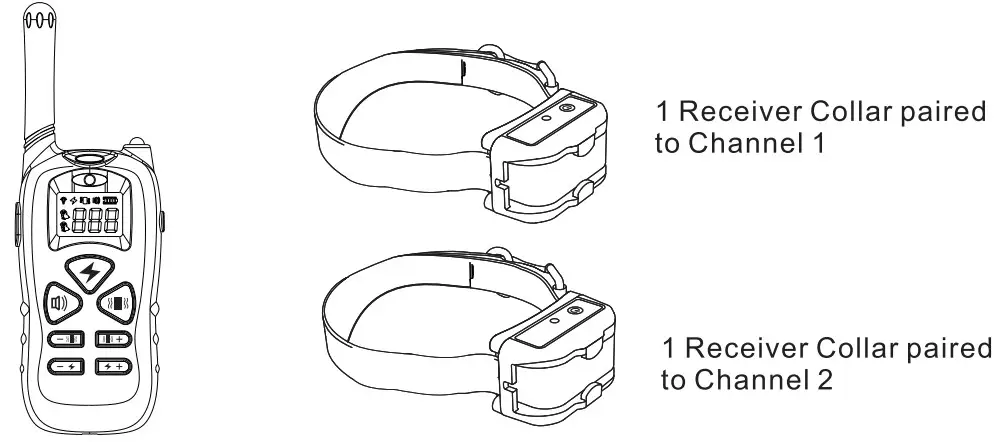
How to Pair the Remote Transmitter & Receiver Collar
Your receiver and remote should come already paired. But, If your Receiver Collars does not beep when you press the Beep Button on the Remote Transmitter, or you feel the Receiver Collar is not responding to the Remote Transmitter, follow these steps to pair.
- Press and hold the power button on the Receiver Collar for 3 seconds to turn on the Receiver Collar.
- Press the power button 3 times to enter the pairing mode. You will hear a beep and the indicator become solid. You will now have 10 seconds to finish the pairing.
- Press the or oroon the Remote Transmitter, and you will hear a beep indicating that pairing is completed.
Tips: You can choose channel 1 or channel 2 to pair the Remote Transmitter & Receiver Collar. The system can pair 2 Receiver Collars at the same time. If you can not pair the device successfully, it may be caused by signal interference Please change to another place to try or contact our service center.Notes: The Remote Transmitter and Receiver Collar will only work on the channel you have paired. For example, if you have paired Remote Transmitter to Receiver Collar on Channel 1, Remote Transmitter can control Receiver Collar only on Channel 1, and it will not work on Channel 2.The system can pair 2 Receiver Collars to 2 different channels at the same time.lf you bought the dual Receiver Collars version, follow “Step 8” above to pair the other receiver (Choose the other channel by pressing the Channel Button ![]() on Remote Transmitter.)
on Remote Transmitter.)
How to Test the Functions
Beeping Test-Press the ![]() button to test the Beeping function.-The Receiver Collar will beep indicating that the beeping function works.Vibration Test-Press the
button to test the Beeping function.-The Receiver Collar will beep indicating that the beeping function works.Vibration Test-Press the ![]() button to test the Vibration function.-The Receiver Collar will vibrate indicating that the Vibration function works.Shock Test-Secure the Test Bulb on the Receiver Collars’ Contact Points.-Press the
button to test the Vibration function.-The Receiver Collar will vibrate indicating that the Vibration function works.Shock Test-Secure the Test Bulb on the Receiver Collars’ Contact Points.-Press the ![]() button to test the shock function.-The Test Bulb will light up indicating the static shock stimulation works, Test Bulb becomes brighter at higher shock levels.
button to test the shock function.-The Test Bulb will light up indicating the static shock stimulation works, Test Bulb becomes brighter at higher shock levels.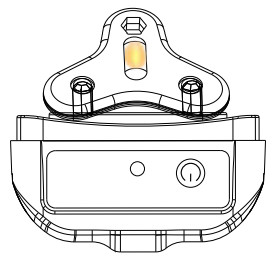
Notes: For your dog’s comfort and safety, please ensure the conductive silicone covers are worn on the contact points before putting the Receiver Collar on your dog. The conductive silicone covers can deliver static shock.

General Training Guide
 report this ad
General Tips
- Eliminate one misbehavior or teach one obedience command at a If you move too fast with training, your pet may become confused.
- Be consistent. Correct your pet every time he misbehaves.
- Unless you can supervise him, it is recommended that you restrict your pet from situations in which he has a history of misbehaving. However, setting up a situation as a training session can dramatically improve your chances of success.
- If your pet reacts to the beeps by hiding or acting fearful, redirect his attention to a simple and appropriate behavior, such as the ‘sit” command.
- Pets should be at least 6 months old before using the Trainer.
- Only let responsible family members use the Trainer. It is not a toy!
- Other pets in the hearing range will be affected by the training beeps. Therefore, training sessions should be conducted out of hearing range of other pets.
CAUTION:
Never use the Remote Trainer to correct or eliminate any form of aggressive behavior. We recommend you contact your local veterinarian or a professional trainer to determine if your pet might be aggressive. See page 1 for more information.
Frequently Asked Questions
| Is the Stimulation safe for my pet? | •While the Stimulation is unpleasant. it is harmless to your pet Electronic training devices require interaction and training from the owner to achieve desired results. |
| How old does my pet have to be before using the Remote Training Collar? | •Your pet should be able to recognize basic obedience commands such as .sit- or “Stay”. Pets should be at least 6 months old before using the Trainer. |
| Once my pet is trained and has been obeying my commands, will he have to continue to wear the Receiver Collar? | •Probably not. You may need to reinforce training with the Receiver Collar from time to time. |
| Is the Receiver Cedar water-resistant7 | •Yes. The receiver Collar is IP67 Water Proof rated. it can be used for up to 30 minutes up to 1 meter. but make sure to keep the area dry when charging. Notes. The remote Transmitter is not waterproof. |
| Will I get exactly 1000F T of range with the Remote Training Collar? | •The range of the Remote Training Cedar will vary according to the terrain. weather, vegetation, as well as transmission from other radio devices. See•How the System Works’ for tips on maximizing your range. |
| How long can I continuously deliver stimulation to my pet? | •The maximum amount of time you can press the Stimulation Button and deliver stimulation to your pet continuously is 10 seconds.After this, the Remote Transmitter will time-out. and the Stimulation Button must be released and pressed again. |
Trouble Shooting
| My pet does not respond when I press | • Make sure the Receiver Collar has been turned on.• If your range has reduced from the first time you used the Remote Training Collar. the battery(s) may be low in either the Remote Transmitter or Receiver Collar.• Many factors can impact the amount of range you have with the Remote Trainer. For a list of these factors. see ‘How the System Works.• Test the Receiver Collar. See ‘How to a button. test the functions’ for details.• Increase the Stimulation Level. Refer to ‘How to find the best Vibration/ Shock Level for your pet’ for more information.• Make sure the Receiver Collar’s Contact Points are placed snugly against your pet’s skin. Refer to “How to Fit the Receiver Collar for more information. |
| The Receiver Collar will not turn on. | • Make sure the Receiver Collar has been charged. For the initial charge. be size to charge it for 4 hours. Subsequent charges only take 2-3 hours. |
| The Receiver Collar is not responding | • Verify the Receiver Collar is on.• If the indicator light is blinking rapidly. fully charged the Receiver Collar. If the first two solutions did not resolve to the Remote Transmitter. your problem. see ‘How to pair the Remote Transmitter & Receiver Collar.” |
FCC
USAThis device complies with part 15 of the FCC Rules. Operation is subject to the following two conditions: (1) This device may not cause harmful interference, and (2) this device must accept any interference received, including interference that may cause undesired operation.NOTE: This equipment has been tested and found to comply with the limits for a Class B digital device, pursuant to part 15 of the FCC Rules. These limits are designed to provide reasonable protection against harmful interference in a residential installation. This equipment generates, uses, and can radiate radio frequency energy and, if not installed and used in accordance with the instructions, may cause harmful interference to radio communications. However, there is no guarantee that interference will not occur in a specific installation. If interference does occur to radio or television reception, which can be determined by turning the equipment off and on, the user is encouraged to try to correct the interference by one or more of the following measures:
- Reorient or relocate the receiving antenna.
- Increase the separation between the equipment and the receiver.
- Connect the equipment to an outlet on a circuit different from that to which the receiver is connected.
- Consult customer care, the dealer, or an experienced radio/TV technician for help.
[xyz-ips snippet=”download-snippet”]