
frisco™better pet goods
Pet Gate 3 PanelINSTRUCTION MANUAL
FOR PET USE ONLY
SKU# 250606,250607,250608
CLEANING TIP
- Wash with mild detergent. Don’t use any abrasive cleaners or bleach.
WARNINGS AND CAUTIONS
Please read all warnings and instructions thoroughly before assembling.
- FOR PET USE ONLY. NOT FOR USE WITH CHILDREN.
- This product will not necessarily prevent all accidents.
- Only assemble as directed and using all required parts. If installed improperly, the gate could become unstable or dislodged from the doorway.
- Never leave pet unattended. Stop using if/once your pet can climb over or push the gate loose.
- Use only with the locking/latching mechanism securely engaged.
- Never use at top of stairs.
- Do not use as a barrier to pool.
- Additional or replacement parts should only be obtained from the manufacturer or distributor.
- Always ensure the gate is resting against the floor before beginning installation.
- If assembling onto a surface other than drywall or wood, please consult with a professional for proper installation.
- Do not assemble or use if any components are missing or damaged.
- Check the gate regularly to ensure all hardware and mountings are tightened.
- Keep these instructions handy for further use.
QUESTIONS?CALL OUR FRIENDLY CUSTOMER SERVICE TEAM ANYTIME. WE’RE HERE 24/7! 1-800-67-CHEWY (672-4399)
For questions, please call 1-800-672-4399.
GET SET
Prior to assembly, please be sure to identify all parts shown below.
 A. Gate Frame (1)B. Screws (10)
THE TOOLS FOR THE JOB
Aside from the included parts, you’ll also need: C. A Phillips head screwdriver* D. A buddy (optional)![]() No power tools allowed!
No power tools allowed!
FIRST GOES THE GATE INSTALLING THE GATE


STEP 1 Bring the gate to the installation area. Loosen the locknuts on both sides of the door panel to allow the gate to unfoldfreely. Do not fully remove the lock nuts. Unfold the gate and setit up in the installation area. Pat yourself on the back!
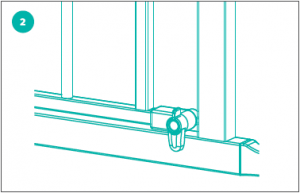
STEP 2 Fix one of the top wall mounting brackets (attachedto the gate) to the wall using a Phillips head screwdriver and twoscrews. Repeat for the other top wall mounting bracket, makingsure the gate is even across the opening.
NOTE: The bottom of the gate should be no more than 1/8 of an inch from the floor.

STEP 3 Straighten the bottom of the gate to make sure itisn’t leaning, i.e. tipping forward or backward, then repeat theinstallation process for both bottom wall mounting brackets.
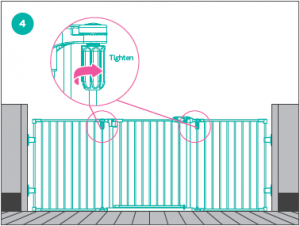
STEP 4 Tighten both lock nuts on either side of the door panelto lock the gate in place. Time for a treat break!
OPEN DOOR POLICY (OR NOT)OPERATING THE DOOR, LATCH AND BASE LOCKS
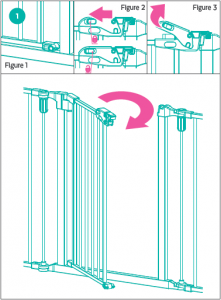
TO OPEN Make sure the base locks are in the horizontal position (figure #1). Pull the spring lock away from the easy open latch (figure #2) and lift the lock lever upwards (figure #3) at the same time to release it. Then, pull the gate open. Neat, amirite?
TO CLOSE Pull the door shut and make sure the top latch closes. Move the bottom lock on the side occupied by your pet (aka their new chill spot) to the down position.NOTE: If one of the base locks is in the down position, the gate will only swing open toward the lock. If both are down, the gate will not open in either direction.NOTE: The gate will automatically close if left open less than 90°. Now isn’t that handy!
For questions, please call 1-800-672-4399.
[xyz-ips snippet=”download-snippet”]