
DIVA DroneQuick Start Guide V1.0
Product profile
IntroductionDeveloped by FUNSNAP Technology™, DIVA, the consumer drone has inherited reliable flight control systems from its predecessor iDol.The system facilitates a smooth flight experience with its excellent position hold and altitude hold capabilities both indoors and outdoors.DIVA’s intelligent battery system gives a flight time of up to 30 minutes.The 13MP high-definition camera shoots videos up to 4k (UHD), supporting up to 60 FPS frame rate (only under 1080P). On DIVA, stabilization of videos is enhanced with the electronic image stabilization (EIS) system on top of the mechanical gimbal. Equipped with functions such as map view and panorama view, the DIVA App will deliver a high-quality filming experience.
Product Documentation
- DIVA User Manual
- DIVA Package Checklist
- DIVA Disclaimer and Safety Information
- DIVA Battery Safety Instructions
Download FUNSNAP 2 APP
System requirements: iOS 9.0 and above, or Android 5.0 and above.
 |
 |
 |
| https://sj.qq.com/myapp/detail.htm?apkName=com.funsnap.idol | https://apps.apple.com/cn/app/funsnap2/id1498580541 | https://play.google.com/store/apps/details?id=com.funsnap.idol |
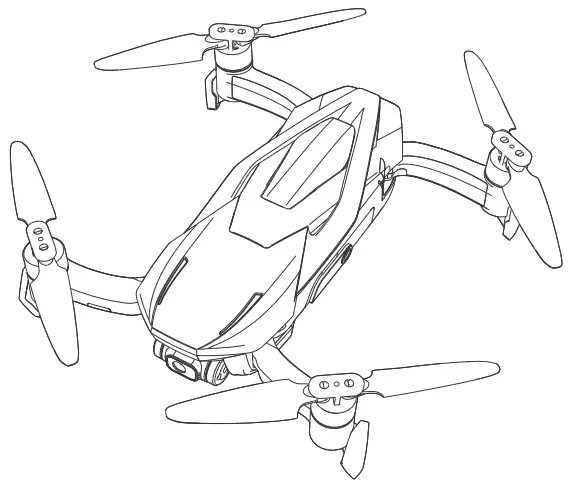
Aircraft
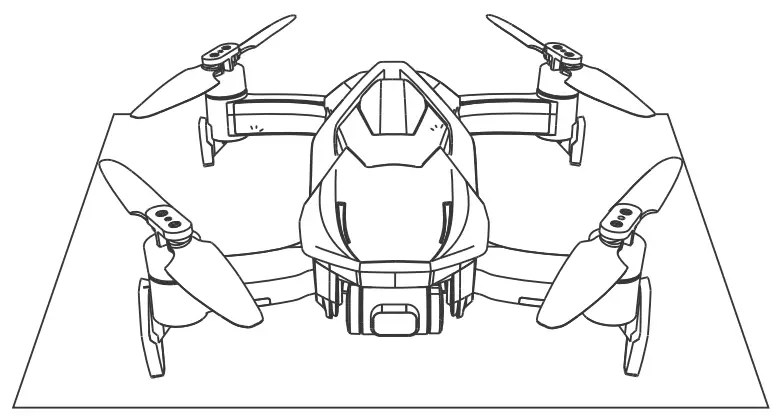
Components
| 1. Power Button2. Intelligent Battery3. Battery Level Indicator4. Gimbal and Camera5. Motors6. Propellers7. Foldable Arms | 8. Foldable landing Supports9. Front Aircraft Status Indicator (Front LEDs)10. Rear Aircraft Status Indicator (Rear LEDs)11. MicroSD Card Slot12. MicroUSB Port13. Sona Sensor14. Vision Positioning Sensor |
Intelligent Battery

- Power Button
- Battery Level Indicator
- Charging Slot
Powering on / offTo turn on/off the intelligent battery, first press the power button once, then press and hold the power button for 3 seconds. Battery level will be displayed through the battery level indicators after the battery is powered on.
Checking Battery LevelTo check the battery level when the battery is off, short press the power button. Then the battery level indicator will display the current battery level. Refer to the following table for more information about the battery level indicator states:
| LED1 | LED2 | LED3 | LED4 | The Current Power |
| 75%~100% | ||||
| 50%~75% | ||||
| 25%~50% | ||||
| 0%~25% |
Charging BatteryEnsure the batteries are fully charged before flights. Intelligent batteries should only be charged using the official power adapters provided by FUNSNAP™.
- Connect the power adapter to AC power (110V – 240V, 50 / 60 Hz).
- Connect the Intelligent battery to the power adapter.
- When charging is normal, the battery level indicator blinks in cycles.
- When the battery is fully charged, all battery indicator LEDs will light off.
- Under normal ambient temperature (15 – 45 degrees C), it takes about 45 minutes to fully charge the battery;
- At low temperature (10 – 15 degrees C) it takes about 90 minutes.
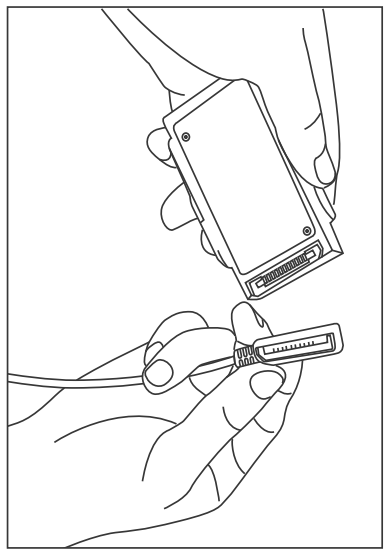
Install / Remove Battery
- To install: Insert the battery in to the battery bay from the direction as indicated in the illustration below. The battery is secured when a click is heard from both sides of the battery.
- To remove: Press both sides of the battery and pull the battery out of the battery bay.
*Battery Safety Instructions
- Before charging the battery, allow it to cool down to room temperature.
- Keep the ambient temperature in the range of 10 – 45 °C when charging the battery.
Aircraft Status Indicator
![]() Front LEDsBelow are the 7 states that can be displayed through the red LEDs at the front of the aircraft:
Front LEDsBelow are the 7 states that can be displayed through the red LEDs at the front of the aircraft:
| 1 | No Wi-Fi connection (connection failure or connection loss) | Blinking quickly |
| 2 | Low battery voltage | Blinking slowly |
| 3 | IMU horizontal calibration in progress | Blinking quickly |
| 4 | Compass calibration Phase 1 | Blinking slowly |
| 5 | Compass calibration Phase 2 | Blinking quickly |
| 6 | Confirmation after calibration in all 6 directions | Blinking quickly |
| 7 | Normal status | Solid |
![]() Rear LEDsBelow are the 2 states that can be displayed through the green LEDs at the rear of the aircraft:
Rear LEDsBelow are the 2 states that can be displayed through the green LEDs at the rear of the aircraft:
| 1 | GPS position not locked – blinking slowly | Blinking slowly |
| 2 | GPS position locked – solid | Solid |
![]() Joint Indication by Front and Rear LEDs
Joint Indication by Front and Rear LEDs
| 1 | Start-up initialization anomaly | Alternated blinking between the front and rear LEDs |
Propellers
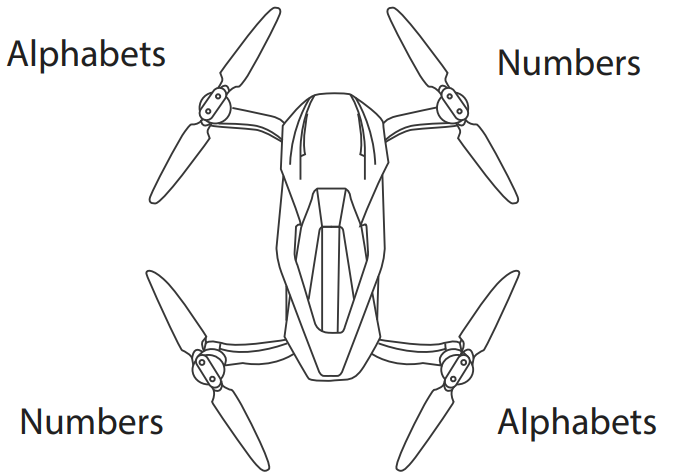
The four propellers on DIVA are located at the front left side, front right side, rear left side, and rear right side of the main body respectively. The front left propeller and the rear right propeller are clockwise (CW) propellers, while the front right propeller and the rear left propeller are counter-clockwise (CCW) propellers. Marks on the propellers indicate whether it is a CW propeller (labeled with alphabets) or a CCW propeller (labelled with numbers).A complete propeller consists of a pair of blades with the same label, a blade clamp, and corresponding screws. Make sure propellers aresecured before flights.
Gimbal and Camera
With the gimbal, the camera can stably capture images and videos even when the aircraft is flying at high speed. The tilt angle of the the camera can be adjusted via the gimbal dial on the remote controller.Alternatively, the tilt angle can be adjusted from the FUNSNAP 2 APP.The tilt angle of the camera ranges from -90 deg to 0 deg.
If the gimbal fails to stabilize due to slanted gimbal horizon, conduct IMU calibration and gimbal motor calibration in the “Settings” menu on the DIVA APP.Gimbal Operation ModesTwo gimbal operation modes are available:
| ① Stabilized mode | ② FPV mode |
| In Stabilized mode the gimbal remains horizontal in the roll direction. The pitch angle of thethe camera can be adjusted remotely.This mode is used for shooting stable videos | FPV mode the roll angle of the gimbal follows the roll movement of the aircraft. This mode is used for first-person view (FPV) flight experiences. |
![]() Gimbal Operation PrecautionsWhen the aircraft is powered on, do not tap or knock the gimbal.Before a flight, deploy the aircraft landing supports and place them on flat surfaces to protect the gimbal.If the aircraft is placed on an uneven surface or on grass, gimbal movements could be obstructed. Huge impacts or collisions could also result in the malfunction of the gimbal.Flying amid heavy fog or clouds may result in temporary failure when the gimbal becomes frosted. The gimbal will restore its full functionality once dried.
Gimbal Operation PrecautionsWhen the aircraft is powered on, do not tap or knock the gimbal.Before a flight, deploy the aircraft landing supports and place them on flat surfaces to protect the gimbal.If the aircraft is placed on an uneven surface or on grass, gimbal movements could be obstructed. Huge impacts or collisions could also result in the malfunction of the gimbal.Flying amid heavy fog or clouds may result in temporary failure when the gimbal becomes frosted. The gimbal will restore its full functionality once dried.
CameraThe camera features a 1/3-inch 13MP CMOS sensor and a 28mm (35mm equivalent) low distortion lens. It is capable of shooting up to 4k (UHD) videos, supporting up to 60 FPS frame rate (only under 1080P). It also supports 12MP photos as well as time-lapse, panorama view, and earth view. Photos and videos can be previewed from the FUNSNAP 2 APP.
![]() Supported SD Cards
Supported SD Cards
- 16GBSanDisk Extreme, Lexar 633x.
- 32GBSanDisk Industrial, Sandisk Extreme V30 A1, SanDisk Extreme V30 A2, SanDisk Extreme Pro V30 A1, SanDisk Extreme Pro V30 A2, Lexar 633x, Lexar 667x.
- 64GBSanDisk Extreme V30 A1, SanDisk Extreme V30 A2, Lexar 633x, Lexar 667x, Lexar 1000x, Lexar High Endurance, EXCERIA M303 V30 A1.
- 128GBSanDisk Extreme V30 A1, SanDisk Extreme V30 A2, SanDisk Extreme Plus V30 A1, SanDisk Extreme Plus V30 A2, Lexar 633x, Lexar 667x, Lexar 1000x, Lexar High Endurance, EXCERIA M303 V30 A1.
Supported USB interfaceFor file transfer, the connection between the aircraft and PC through Micro-USB cables is supported.
Remote Controller
Components
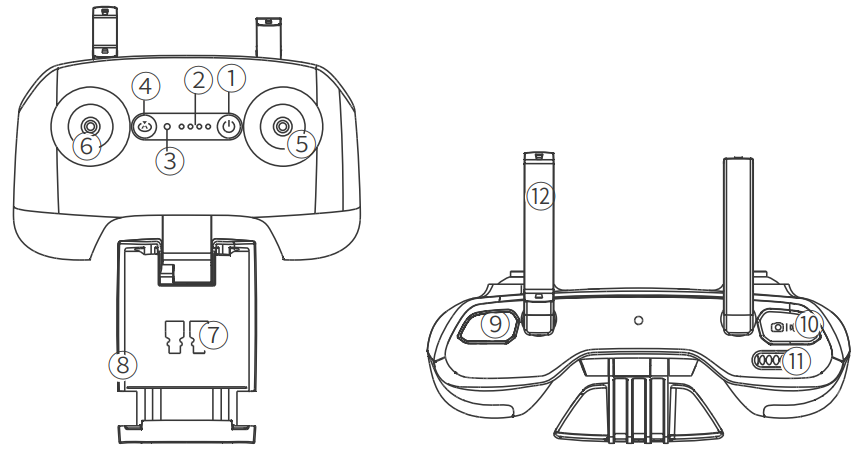
| 1. Power Button2. Battery Level Indicator3. Status Indicator4. Return to Home (RTH) Button5. Right Control Stick6. Left Control Stick | 7. Control Stick Protection Cap8. Mobile Device Clamps9. Take-off / Land Button10. Shutter / Record Button11. Gimbal Dial12. Antennas |
Charging
To charge the remote controller, connect the controller to the power adapter (5V2A) through a Micro-USB cable. The battery level indicator on the remote controller blinks while charging. It takes approximately 3 hours to fully charge the remote controller.

Powering On / Off
To power on/off the remote controller, first press the power button once, then press again and hold the power button for 3 seconds.
Remote Controller Status Indicator
To check the battery level when the battery is off, short press the power button, then the battery level indicator will display the current battery level. Refer to the following table for more information about the battery level indicator states:
| LED1 | LED2 | LED3 | LED4 | The Current Power |
| 75%~100% | ||||
| 50%~75% | ||||
| 25%~50% | ||||
| 0%~25% |
Using the Remote Controller
Auto Take-off / LandPress the take-off/land button on the right side of the remote controller for automatic take-off or landing.
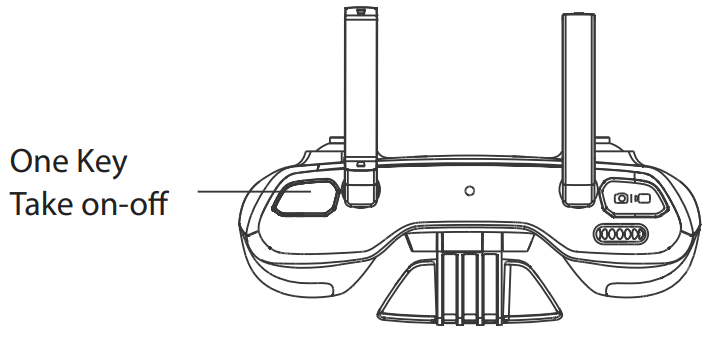
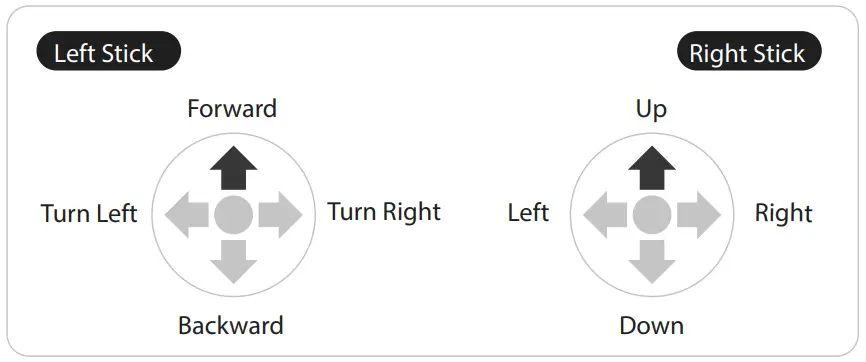
Controlling the AircraftTwo pre-programmed modes (Mode 1, Mode 2) are available as shown in the illustration below.
- Mode 1

- Mode 2
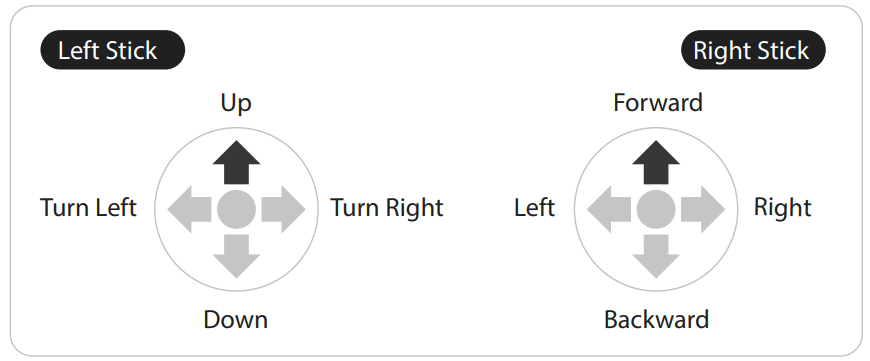
Neutral position: The center position of the stroke of the sticks.Amount of Deflection: The amount of deflection of the control stick with respect to the neutral position.Using mode 1 as an example (nose facing forward):
- The throttle channel controls the aircraft’s altitude. Move the left stick up to ascend and down to descend. The larger the amount of reflection, the higher the rate of altitude change. The altitude of the aircraft remains constant when the stick returns to its neutral position.
- The yaw channel controls the aircraft’s yaw (orientation). Move the left stick to the left to rotate the aircraft counter-clockwise and right to rotate the aircraft clockwise. The larger the deflection, the faster the rotation. If the stick stays in the neutral position, the aircraft will not change its orientation.
- The pitch channel controls the aircraft’s pitch. Move the right stick up to fly forward and down to fly backward. The larger the amount of deflection, the faster the aircraft will move forward / backward. If the stick stays in the neutral position, the aircraft will not move forward / backward.The roll channel controls the aircraft’s roll. Move the right stick left to fly left
- and right to fly right. The larger the deflection amount, the faster the aircraft will move left / right. If the stick stays in the neutral position, the aircraft will not move sideways.
Auto Return to Home (RTH)Auto RTH works only when the GPS position of the home point is acquired. To activate auto RTH, press the Return to Home (RTH) button once. The aircraft will then return to its last updated home point position. During the RTH process, manual adjustments to the aircraft can be made with the control sticks.Controlling the Camera TiltThe camera dial wheel on the remote controller allows consistent adjustments on the camera tilt angle.Taking Pictures / VideosPress and hold the shutter/record button to switch between photo mode and video mode. Short press the shutter/record button to take a photo when in photo mode or record a video when in video mode.
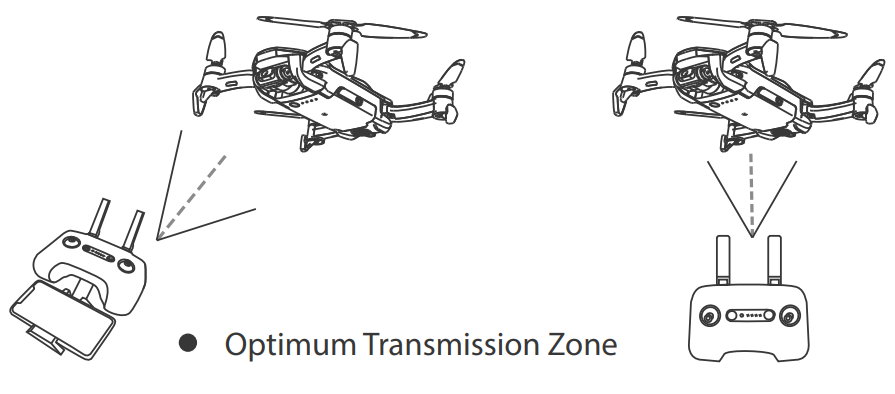
Using the Remote Controller
Optimal signal transmission between the remote controller and the aircraft can be achieved when the antennas and the aircraft are positioned as shown below. Adjust the antenna positions to ensure the aircraft is always within the best reception range.
FUNSNAP 2 APP
Activating Device
The DIVA devices should be activated before use for the first time. To activate the DIVA devices, connect DIVA App to the devices. Upon successful connection, an activation prompt will pop up on the DIVA APP. Follow the on-screen instructions to activate the devices before use.

Connecting Device
Power on the aircraft and the remote controller. The remote controller will search for the aircraft automatically. The remote controller beeps until the connection is successfully established.On the mobile device, open the WIFI settings and locate the hotspot with SSID: STA-DIVA_XXXXXXXX. Key in the password 1234567890 to establish a WIFI connection with the DIVA devices.Finally, open FUNSNAP 2 App and enter the ‘Device’ page. Swipe to choose DIVA. Tap ‘connect device’ to enter the flight screen. If the app prompts that the aircraft is not found, follow the guide in the app to connect to the aircraft before re-entering the flight screen.
Flight Screen

- Back to the home screen Tap to go back to the home screen.
- Aircraft status indicator Displays flight status and various warning information.
- Flight parameters Displays aircraft altitude, distance (under GPS mode) and speed.
- Wi-Fi signal strengthDisplays the Wi-Fi strength between the aircraft and remote controller.
- GPS status Displays the current GPS signal strength.
- SD card storage Displays the available storage on the SD card.
- Aircraft battery level Displays the current battery level of the aircraft.
- System settings… Tap to enter system settings to set geofencing, control stick rates or firmware updates.
- Shooting modes Tap to switch between photo mode and video mode.
- Shutter/record button Tap to start/stop shooting photos or recording videos.
- Camera settings Tap to set ISO, shutter, EV, and other parameters under photo mode; set video resolution, filter, and other parameters in video mode.
- Playback Tap to enter playback and preview photos and videos as soon they are captured.
- Gimbal tilt adjustment Slide up and down to adjust the gimbal tilt angle.
- Emergency stop Tap to trigger a confirmation prompt for emergency stop. Slide to confirm and the motors on the aircraft will stop immediately. Use only during emergency
- Intelligent flight modes Tap to choose flyaway, orbit, follow or other intelligent flight modes.
- Return to home (RTH) Tap to automatically return the aircraft to the last updated home position (only valid in GPS mode).
- Take-off/land Tap to trigger the aircraft to take off or land automatically.
- Maps Tap to switch between map screen and preview screen.
Map screen

- Mobile device location Displays the current location of the mobile device.
- Aircraft location Displays the current location of the aircraft.
- Waypoint The number indicates the sequence of the waypoint. The arrow indicates the heading of the aircraft over that waypoint. To relocate the waypoint, long press and drag it to the desired position. Tap the waypoint to change its heading and altitude.
- Geofencing Displays the area with geofencing.
- Compass Tap to rotate the map such that the north direction is pointing vertically upward.
- Re-center Tap to re-center the map to the mobile device location.
- Display mode Tap to change the display mode of the map.
- Add waypoint Tap to enter add waypoint mode. Draw lines within geofencing zones to add waypoints.
- Waypoint tracking Tap to enter waypoint tracking after all waypoints are set.
Using Camera
Camera ModeThree camera modes are available: photo, video, and time-lapse. Photo mode and video mode can be selected via the camera mode button on the flight screen. The time-lapse mode can be selected from the camera setting page when in video mode.Photo / VideoPhoto taking and video recording can be done on the FUNSNAP 2 APP flight screen.Camera SettingsWhen taking videos, the resolution can be changed at the settings menu. When taking photos, ISO and EV can be adjusted under auto exposure mode. Under manual exposure mode, the shutter speed, ISO, white balance and filter effects can be adjusted. All settings can beaccessed from the camera settings.PlaybackVideos and photos can be previewed from the playback screen.
Firmware update
The firmware of the camera, aircraft, and gimbal are updated on the FUNSNAP 2 APP. Connect the aircraft to the remote controller and follow the instructions on the app to conduct firmware updates.
Firmware Update Precautions*Ensure the battery levels of the aircraft and the remote controller are both above 50% before updates.*Do not switch off the remote controller/app/aircraft, or operate the remote controller while the update is in progress.*A prompt will appear on the APP upon successful firmware update.Follow further instructions on the APP to reboot the device*When updating firmware for the camera, wait for one minute after the APP prompts, then reboot the device.*Do not conduct firmware updates during flights.
Flight
Flight Environment Requirement
Do not fly above grounds that are monochromatic without any textures.
Calibration
IMU Horizontal CalibrationExtend all arms and landing supports. Place the aircraft on a still and level surface. Tap ‘horizontal calibration’ on the APP. The red LEDs will start blinking until calibration is completed.
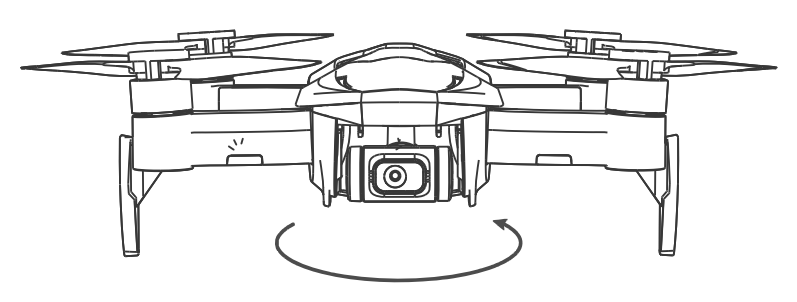
Compass calibrationKeep the aircraft away from any metal objects and electrical device, then tap “Compass calibration” on the APP.
- Phase 1: When the front LEDs are blinking slowly, rotate the aircraft horizontally by 3 turns.
- Phase 2: When the front LEDs start to blink quickly, keep the aircraft nose pointing upward and rotate the aircraft by 3 turns until the front LEDs become solid. Then the calibration process is complete.*Note: If the front LEDs start to blink slowly during phase 2, it means that the calibration does not pass. Calibration should restart all over.

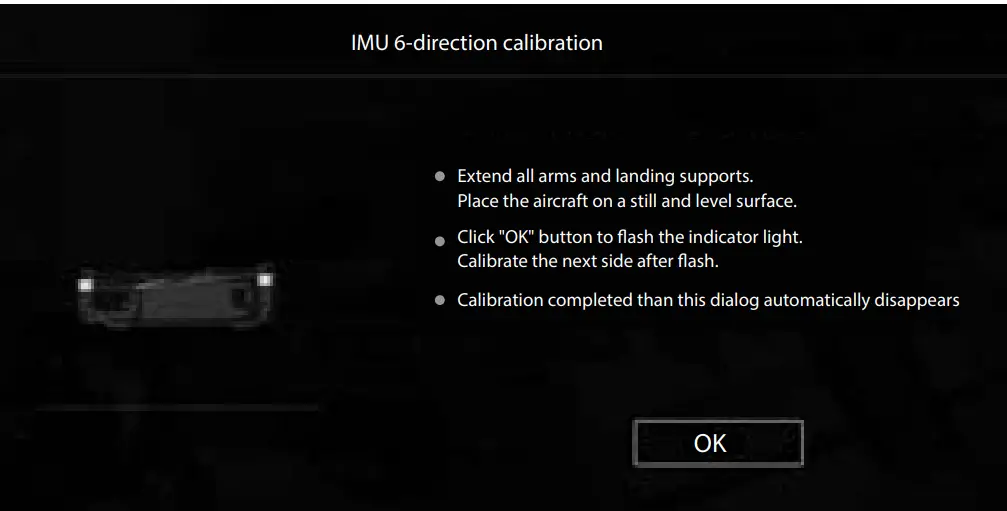
IMU 6-direction calibrationFollow the instructions on the app for IMU 6-direction calibration.
Hover Flight Modes
There are three flight modes during aircraft hover:A. Optical flow mode: Enabled when aircraft altitude is below 3 meters.
Adequate lighting and grounds with clearly visible textures are required.B. GPS mode: Enabled when aircraft receives sufficiently strong satellite signal with adequate positional accuracy. The app will give a prompt when the aircraft enters GPS mode, while the aircraft tail light becomes solid.C. Attitude mode: Under poor GPS signal and ground visibility, the aircraft will enter attitude mode. The aircraft will keep itself level, but its position will not be fixed at one point automatically. Manual control is needed to keep the aircraft in a fixed position.
Taking off / Landing
Take off
- Auto take-off: press the take-off/land button when the aircraft is ready. The aircraft will hover at 1.2m altitude after take-off.
- Manual take-off: Push both sticks to the bottom outer corners to start the motors. Move the throttle stick up to command the aircraft to take off and hover at 1.2m altitudes.
LandAutoland:
- Press the take-off/land button while the aircraft is in the air, the aircraft will start to descend at a vertical speed of 2.5 m/s when the altitude is above 10m, or at 0.6 m/s when the altitude is below 10m. Auto landing can be canceled anytime by moving the throttle stick up unless the battery level is down to level 2 warning. Or it can also be canceled by pressing the take-off/land button again.
Manual land:
- Reduce the throttle gently to manually land. The maximum descend rate is 2.5 m/s until the altitude is reduced to 1m. When the altitude is less than 1 m, the vertical speed is reduced to 0. Next, keep the throttle low for 3 seconds to trigger auto land.
Forced land:
- When the battery is critically low, the aircraft will be forced to land. Forced landing cannot be canceled by any means.
Basic flight operations
Stick ControlsUnder optical flow mode, the stick controls the aircraft roll/pitch angle. (The maximum tilt angle is limited to 18 degrees).Under GPS mode, the stick controls the aircraft’s flight speed. (The maximum flight speed is 10 m/s under sport mode, 4 m /s under normal mode and 2 m/s under tripod mode).Return to Home (RTH)When RTH is triggered, the aircraft will automatically turn its heading towards the home direction and start to fly back. If the aircraft is more than 100m away from the home point and the aircraft is below the RTH altitude, it will ascend to the RTH altitude before flying back. If the RTH altitude is higher than the geofencing altitude limit, the RTH altitude will be set to the geofencing altitude. The aircraft will hover when it reaches the home point location before entering auto-landing mode.Intervention via stick control is allowed during RTH flight.Trigger method 1: Press the RTH button. To cancel the RTH operation, press the RTH button again.Trigger method 2: Failsafe RTH due to loss of control link. The RTH operation can be canceled by pressing the RTH button after the control link is regained.Trigger method 3: Failsafe RTH due to low battery level. When the battery level falls below the RTH battery level, a prompt for RTH will appear on the APP.
Intelligent flight modes
![]()
Rocket: the aircraft ascends vertically with constant speed.Rotate: the aircraft rotates itself with the constant angular speed.Dronie: the aircraft flies back and up with constant speed.Orbit: the aircraft uses its current position as the center of the circle, flies back by a set radius, and starts orbiting around the circle center.Pitch sticks can be used to increase or decrease the orbiting radius.
![]() Follow: the aircraft points its head towards the location of the mobile device and starts following the mobile device with a constant position relative to the followed object.
Follow: the aircraft points its head towards the location of the mobile device and starts following the mobile device with a constant position relative to the followed object.![]() Waypoint: the aircraft follows a series of waypoints planned in the APP. Note that when planning the waypoints, obstacles along the waypoints must be avoided.
Waypoint: the aircraft follows a series of waypoints planned in the APP. Note that when planning the waypoints, obstacles along the waypoints must be avoided.
Exiting intelligent flight modes:Tap the exit icon on the APP.Manually move the control sticks to exit (Except orbit mode).When a geofence is reached. (intelligent flight modes cannot be entered near geofences).Higher priority tasks such as landing or RTH are triggered.
Appendix
Technical Specifications
| Camera | Sensor | 1/3” CMOS |
| Camera Lens | FOV: 81.5°Format Equivalent: 28 mmAperture: f/2.0Shooting Range: 1.2 m to ∞ | |
| Image Size | 4000 x 3000 pix | |
| Video RecordingModes | 4K(UHD 3840 x 2160)/15FPS2.7K(2704X1520)/30FPS1080P/30FPS,1080P/60FPS | |
| Max Video Bitrate | 100Mbps | |
| Supported File System | FAT32 | |
| Photo | JPEG | |
| Video | MP4 | |
| Aircraft | APP | iOS/Android |
| Weight | 430g | |
| Size | 168*184*64mm | |
| Propeller Size | 5.3inch | |
| Diagonal Distance | 220mm | |
| Max Flying Speed | 10m/s | |
| Maximum TakeoffAltitude | 4000m | |
| Max Flight Time | 30min(Hover withour wind) | |
| Operating Temperature | 0 ~ 40° | |
| Working frequency | 5.8GHz | |
| Transmission power | 5.8GHz < 27dBm | |
| GPS Mode | GPS + GLONASS | |
| Hovering AccuracyRange | Vertical:±0.1m / VIO,±0.5m /GPSHorizontal:±0.1m / VIO,±1.5m /GPS | |
| Gimbal | Pitch | 0º~ -90º |
| Roll | 120°/s | |
| Max Control Speed (tilt) | 30º~ -30º | |
| Battery | Capacity | 2250mAh |
| Voltage | 13.0V | |
| Battery Type | LiPo 3S | |
| Max Charging Voltage | 13.05V | |
| Energy | 27Wh | |
| Weight | 140 g | |
| Charging TemperatureRange | 10 ~ 45° | |
| Max Charging Power | 60W | |
| Charger | Input | 100~240V,50/60HZ |
| Output | 13V,3A | |
| Image transmission | Video Transmission | 5.8G WIFI |
| Max Flying Distance | 2km | |
| Real-time image transmission | 720p/30fps | |
| Delays | Less Than 300ms |
Inventory

Battery Safety
Instructions
Read the Battery Safety Instructions carefully before charging the iDol rechargeable lithium-polymer battery.Follow the instructions herein strictly.Warning
- The lithium polymer cells in this battery use volatile materials. Improper use of this battery may cause fire, damage to property or personal injury.
- The liquid in the battery is highly corrosive. If the battery leaks, do not touch the liquid.If the liquid touches skin or eyes, rinse with water and seek medical attention immediately.
- Never allow the battery to come into contact with liquids. Do not use the battery in rain or humid conditions. Contact with water may cause arunaway reaction leading to extreme heat, fire, or an explosion.
- Lithium polymer batteries are sensitive to temperature and temperature changes. Make sure the battery is stored in an environment within the recommended temperature range.
Before charging check the following:
- Before use check the battery for any surface damage, swelling or leaks. If any defects are found do not charge the battery.
- Check the charger regularly to make sure it is working as expected and has not sustained any damage.Never use a damaged charger.
- . Only charge the battery using the charger and adaptor recommended by the company. If the incorrect adapters or chargers are used, the user is responsible for any problems, damage, or injury that may occur.
Charging Precautions
- Wait for the battery to cool down after a flight before charging. Charging the battery while hot will decrease the battery’s life and may cause serious damage. Chargers also have a thermal throttling mechanism which will kick in increasing charge time if the battery is overheated.
- If the battery level is low, charge it as soon as possible once it has returned to a normal temperature. Failure to charge in time could cause overcharging later which would cause damage to the battery.
- Do not charge the battery close to combustible or flammable materials or liquids.
- Never leave charging batteries unattended to prevent accidents.
- If there is a fire, disconnect the charger’s power immediately and extinguish the fire following the correct method.
- The charger has a thermal throttling function, if the battery is within the temperature range of 5 ° C – 40 ° it will charge normally. However, if the battery temperature is outside of this range the battery will not charge. If the temperature range is between 5 ° C – 15 ° C, it will take longer to charge, if the battery temperature is between 15° C – 40° C the battery will charge faster.
- It takes about 1.5 hours to fully charge the battery. Do not charge the battery for too long to prevent overcharging.
Precautions
- Only charge the battery using the charger and adaptors recommended by the company. If the incorrect adapters or chargers use the user is responsible for any problems, damage, or injury that may occur.
- 1t is forbidden to dismantle, hit or crush the battery in any way. This can lead to damage, bulging, leaks, fires, or an explosion.
- If the battery is deformed, bulging, leaking, or has any other obvious abnormalities’ (connectors burned black for example), discontinue use immediately.
- under no circumstances short the battery.
- Do not store the battery in temperatures above 60° C. This may result in shorter battery life. Do not store close to water, fire, or corrosive materials.
- Keep the battery out of reach of children and pets.
- The normal operating temperature range of the battery is 5 ° C -40 ° C.Exrteme temperatures may cause the battery to catch fire or explode. Low temperatures can seriously affect battery life. When the battery temperature is outside this range the battery may not be able to output a reliable power supply leading to issues when flying.
- Unless in exceptional circumstances do not insert or remove the battery when the iDol is powered on. This may cause loss of video, photos, or even damage electrical components.
- If the battery is submerged in water place it in a safe open area and stay away from it until the battery is air-dried. The battery may not be used again and as such and should be discarded. Follow the proper recycling method and local laws & regulations for your district.
- If the battery catches fire use CO2 (or another electrical safe method) to extinguish the fire.
- If the battery interface is dirty, wipe it with a dry cloth, otherwise, it may cause issues with the battery contacts, resulting in a loss of power or inability to charge.
- If iDol accidentally falls or suffers an impact, check the battery immediately to make sure there is no damage. If the battery is damaged, cracking, bulging, or has any other abnormalities, discontinue use immediately. The battery may not be used again andas such should be discarded. Follow the recycling method and local laws and regulations for your district.
Storage and Transportation
- Do not store the battery in any environment that is subject to moisture, water leakage, sand, dust and dirt, close to anything flammable, explosive, with heat sources or direct sunlight.
- If you do not use the product for a long time remove the battery from the body and store it separately to prevent overcharging. If a battery is overcharged, it may not be used again and as such should be discarded. Follow the recycling method and local laws and regulations for your district.
- When the battery is stored for a long period of time, it is recommended to charge the battery once every two months to maintain the health of the battery.This will help maintain the battery health and as such the life of the battery.You can check the remaining battery through the app.
- If the battery is stored for a long period of time, it is recommended that the battery be stored when it is holding approximately half of its full charge.
- The battery storage temperature range: Short-term storage (less than 1 month): -10° C -40° C Long-term storage (more than 1 month): -10° C -30° C
- Do not store or transport the battery together with glasses, watches, metal necklaces or other metal objects.
- Transport the battery within the temperature range of 23 ± 5 ° C.
- Do not transport damaged batteries. When you need to transport the battery make sure to discharge the battery until it is around 50%capacity.
- Do not hit, crush or pierce the battery. Do not drop or short-circuit the battery.
- In hot weather the temperature inside a car will rise quickly. Do not leave batteries in cars or other vehicles in hot weather which may cause the battery to overheat, catch fire or explode resulting in personal injury or property damage.
- Before boarding a flight, discharge the battery to below 5% capacity then charge again up to full capacity. Be sure to keep the battery away from fire.
Battery Maintenance
- Do not use the charger in an environment where the temperature is too high or low.
- Do not store the battery in an environment where the room temperature exceeds 60° C.
- Recharge and discharge the battery once every 3 months to maintain the battery’s health.
Battery Disposal and RecyclingDo not throw away used batteries. Store the battery in a suitable recovery box and then dispose of the battery in compliance with locallaws and regulations.
Disclaimer and Safety Information
Disclaimer and Warning The user promises to be responsible for their own behavior and all the consequences arising therefrom. The user will use the product only for legal and legitimate purposes and agrees to the terms and any related policies or guidelines that may be made by Funsnap Technology. While the product adopts advanced technology, inappropriate use of the product could result in personal injury or property damages. Please read the materials associated with the product before your first use of the product. These documents are included in the product package and are also available online on the FUNSNAP website at http://www.-fun-snap.com.The information in this document affects your safety and your legal rights and responsibilities. Read this entire document carefully to ensure proper configuration before use. Failure to read and follow the instructions and warnings in this document may result in product loss, serious injury to you, or damage to your aircraft.By using this product, you hereby signify that you have read this disclaimer carefully and that you understand and agree to abide by the terms and conditions herein. You assume all risks for any damage that may result from your use of or access to the product, product accessories, and any materials. you understand and agree that you use the product at your own discretion and risk and that you are solely responsible for any personal injury, death, damage to your property (including your computer system or mobile device or FUNSNAP hardware used in connection with the product) or third party property, or the loss of data that results from your use of or inability to use the product.FUNSNAP accepts no liability for damage, injury, or any legal responsibility incurred directly or indirectly from the use of this product. The user shall observe safe and lawful practices including, but not limited to, those set forth in these Safety Guidelines.
Warning
- This product meets the requirements for class B digital products in part 15 of the FCC guidelines:(1)This product will not cause harmful interference.(2) This product can withstand harmful interference that may cause abnormal operation or unintended operation of the product. At the sb same time, this product complies with the basic requirements stipulated in 1999/5/EC and other related directives. It is forbidden to modify or change this product without permission so as to avoid harmful interference being emitted from the product. The manufacture is not responsible for any consequences or problems that may arise due to modifications made to this product.
- It is forbidden to modify or change this product without permission so as not to affect the normal operation of the product.
- It is forbidden to use third-party accessories or modify the product without permission.
- Do not operate this product while under the influence of drugs, alcohol, medical, or otherwise, including but not limited to illegal drugs, anesthesia, etc. Do not use this product when afflicted by medical conditions that may inhibit judgment, reaction time, or hand-eye coordination such as dizziness, fatigue, nausea, or mental health issues.
- Before flight make sure to understand the local flight policies and related regulations to ensure that drones can be flown in that area and what restrictions on drone flight exist.
- The battery temperature may be high after use, do not touch the battery until it has cooled down after use.
- Improperly folding the drone may cause scratches, damage, etc. Follow the instructions carefully to avoid this kind of damage.
- Do not place the product or accessories within the reach of minors under the age of 16. The product contains small parts that may cause choking in younger children.
- Do not use this product for the following activities (Including but not limited to):(1) Taking videos or pictures of people without their permission or taking videos or pictures in a private area without permission.(2) Violation of any laws, administrative regulations, public order, and good practices in the area where the product is used.(3) Defame, harass, abuse, threaten, track, or otherwise violate the legal rights of others, such as privacy rights.(4) Use this product for any unlawful or illegal use, such as for authorized investigations, spying, military activities, etc.
Safety Instructions
- This product is not suitable for persons under the age of 16 and other persons who do not have full civil capacity.
- When the product is in operation, the propeller will rotate at high sb speeds. When running there is a certain level of danger that must be taken into account. Failure to do so may lead to personal injury or property damage.
- When using this product, stay away from dangerous environments such as airports, railways, highways, high-rise buildings, and suspended wires.
- When using this product, please stay away from mobile phone base stations, high-power transmission equipment, and other high electromagnetic interference environments.
- Do not use this product in rain, lightning, sand, fog, snow, wind, low temperature, and other harsh weather conditions.
- At altitudes above 4000 meters, use this product with caution. High altitude environmental factors, such as wind, can cause difficulty controlling the drone.
- This product is not waterproof and cannot land on water.
- When using this drone in populated areas always keep the drone in line of sight.
- When around crowds of people use carefully in order to avoid accidents.
- When the product is flying, do not turn off the motor unless it is absolutely necessary.
- Please check the product before each use, including but not limited to the firmness of the parts, cracks and abrasions of the body and propeller, battery power, and the validity of the indicator lights. When you find an abnormality, stop using it immediately and replace the corresponding accessories.
- When the product is working abnormally, start the propellers or fly.
- Make sure that the heat dissipation slots are not blocked, otherwise, the high temperature may cause the aircraft to fail, operate abnormally, or be damaged and may even cause burns.
- This product cannot lift other objects.
- Please follow the product manual carefully.
- Please use spare parts provided by the company for maintenance and replacement.
- When lending to other personnel, please ensure that the operator understands and complies with the safety instructions.
Warranty Card
| Product Name |
| Product Serial Number |
| Dealer |
| Contact number |
| User Name |
| Contact Phone Number |
| Date of purchase |
Maintenance Records
| Repair Date | Fault and Repair Conditions |
The following conditions are not covered by the warranty:
- Failure or damage due to transportation, loading, and unloading the product after purchase.
- Any alterations, disassembly, repairs, or repairs not authorized by the manufacturer.
- Product damage is caused by accidental factors or subjective behavior such as water damage, loss or improper input voltages, crushing, mainboard deformation, etc. For the power adapter, if there are any obvious signs of impact damage, cracks, broken feet, severe deformation, wire damage, worn cord, etc.
- Failure or damage to the product caused by a failure to install, use, maintain or store the product in accordance with the instructions.
- Failure to provide valid proof of purchase or documents that have been forged or altered.
- The label, serial number, or waterproof tamper marks are torn, altered, fuzzy, unclear, or unrecognizable.
- Due to irresistible factors (such as fire, earthquake, flood, etc.) causing failure or damage.
- Other failures are caused by non-product quality-related events.
User Notice
- Data BackupBefore you accept this service, please back up all data separately. The company does not take any responsibility for lost or damaged data that may occur.
- Ownership of parts requiring repair or maintenanceReplacement parts or any other parts that are repaired and replaced during the company, the repair process will be serviced by the company.Parts removed during repair or maintenance shall become the property of the company.
- Paid maintenance costsFor products that have exceeded the warranty period and free maintenance services period, the company will strictly follow theproduct’s paid services charges. Paid services are implemented and at the same time, you are requested to pay for service payments that are within the scope of the work/service needed. Fees: If you refuse to pay fees in advance the company reserves the right to suspend the service, the consequences of which will be borne by you.
For repairs, please contact your dealer or contact customer service:Email:[email protected]Phone Number:0755-86533095Facebook ID: FUNSNAP droneTwitter ID: FUNSNAP-dronePlease visit www.fun-snap.com to get detailed warranty terms and after-sales service policies.Funsnap Technology Co., Ltd., reserves the right to modify the contents of the above policies and articles without prior announcement. For the latest version please visit the official website.
For more details, please scan the official WeChat QR code
report this ad
http://weixin.qq.com/r/PyiTi_-ErrLRravo930t
FCC Warning
This device complies with part 15 of the FCC rules. Operation is subject to the following two conditions: (1) this device may not cause harmful interference, and (2) this device must accept any reference received, including interference that may cause undesired operation.Changes or modifications not expressly approved by the party responsible for compliance could void the user’s authority to operate the equipment.NOTE: This equipment has been tested and found to comply with the limits for a Class B digital device, pursuant to part 15 of the FCC Rules. These limits are designed to provide reasonable protection against harmful interference in a residential installation. This equipment generates uses and can radiate radio frequency energy and, if not installed and used in accordance with the instructions, may cause harmful interference to radio communications. However, there is no guarantee that interference will not occur in a particular installation. If this equipment does cause harmful interference to radio or television reception, which can be determined by turning the equipment off and on, the user is encouraged to try to correct the interference by one or more of the following measures:
- Reorient or relocate the receiving antenna.
- Increase the separation between the equipment and receiver.
- Connect the equipment into an outlet on a circuit different from that to which the receiver is connected.
- Consult the dealer or an experienced radio/TV technician for help.
For Smart aircraft:Radiation Exposure StatementThis equipment complies with FCC radiation exposure limits set forth for an uncontrolled environment. This equipment should be installed and operated with a minimum distance of 20cm between the radiator and your body.
For Remote control:The device has been evaluated to meet general RF exposure requirements. The device can be used in portable exposure conditions without restriction.
References
[xyz-ips snippet=”download-snippet”]