![]()
Single Zone Premium Wall ThermostatInstruction ManualModel: FACW12PA-BL

Welcome
Thank you for purchasing this Furrion® Single Zone Premium Wall Thermostat.Before operating your new product, please read these instructions carefully. This instruction manual contains information for safe use, installation and maintenance of the product.Please keep this instruction manual in a safe place for future reference. This will ensure safe use and reduce the risk of injury. Be sure to pass on this manual to new owners of this product.The manufacturer does not accept responsibility for any damages due to not observing these instructions.If you have any further questions regarding our products, please contact us at [email protected]
About your Thermostat
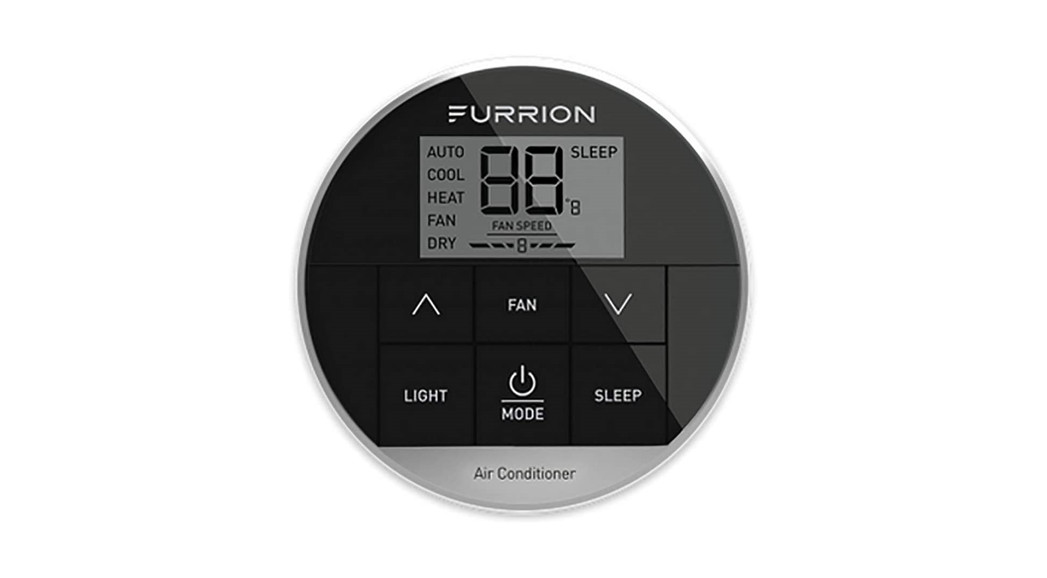
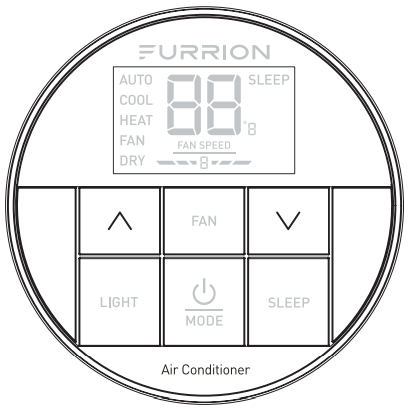
Product Features
Your Single Zone LCD thermostat is equipped with a liquid crystal display (LCD) to indicate the temperature set-point in Fahrenheit(°F)/Centigrade(°C) and fan speed. It is also equipped with an LCD to indicate the system’s available operation modes.NOTE: The available operation modes will be different depending on the system installed in your RV.
- Liquid Crystal Display and Mode Indicators
- Auto Fan
- Room Temperature Display
- Fahrenheit(°F)/Centigrade(°C) Display
- Sleep Mode
- LED Mood Light

LCD Icons
![]()
Installation
What’s in the Box
Make sure you have all the following items included in the packaging. If any item is damaged or missing, contact your dealer.– Thermostat x 1– Instruction Manual x 1– Warranty Card x 1– Self-tapping Screw x 2
Thermostat Installation
- Select a suitable location that is not under direct influence from light, sun or other heat sources.
- Rotate the thermostat cover counterclockwise and pull out the base plate. (Fig. 1)

- Use the base plate as a template and drill a hole on the vehicle wall. Extend the four-wire cables from the cutout area. Refer to the cable tag label for each cable definition. (Fig. 2)
- Fix the base plate on the wall using 2 screws. (Fig. 3)NOTE: Make sure the base plate is not covering the hole and squeezing the thermostat cables.
- Connect the cables to the thermostat.Rotate the thermostat clockwise until it clips into place. (Fig. 4 and Fig. 5)


Operation
Your Furrion wall thermostat has been preprogrammed with factory default settings. Review the settings below and adjust to your comfort level.
| FACTORY DEFAULT SETTINGS | |
| HEATING | 68ºF / 20ºC |
| COOLING | 72ºF / 22ºC |
| FAN SPEED | AUTO |
| MODE | AUTO |
| FURNACE DIFFERENTIAL | 2ºF |
Turn On/Off the Thermostat

To turn OnPress and hold the ![]() button for 3 seconds to turn on the thermostat. The thermostat LCD will be illuminated and the factory settings will be displayed on the LCD for first-time use.NOTE: The LCD will display the last setting if you have changed the parameters.
button for 3 seconds to turn on the thermostat. The thermostat LCD will be illuminated and the factory settings will be displayed on the LCD for first-time use.NOTE: The LCD will display the last setting if you have changed the parameters.
To turn OffPress and hold ![]() the button for 3 seconds to turn off the thermostat. Only the current room temperature will be displayed on the LCD.
the button for 3 seconds to turn off the thermostat. Only the current room temperature will be displayed on the LCD.
Temperature Format
Simultaneously press both ∧ and ∨ buttons for 3 seconds to toggle the temperature format between Centigrade and Fahrenheit.NOTE: ºF indicates Fahrenheit and ºC indicate Centigrade.
Operation Mode

After the thermostat is turned on, press the ![]() button repeatedly to toggle through the available modes. The activated mode icon and temperature set-point will be displayed on the LCD.The thermostat will transmit the last selected operation mode command to the control box after 2 seconds without any operation.Depending on the system installed, there are 5 available modes (AUTO, COOL, HEAT, FAN, and DRY) for you to select. See the following tables for detailed information on each mode.NOTE: The HEAT mode is only available after the furnace is enabled.
button repeatedly to toggle through the available modes. The activated mode icon and temperature set-point will be displayed on the LCD.The thermostat will transmit the last selected operation mode command to the control box after 2 seconds without any operation.Depending on the system installed, there are 5 available modes (AUTO, COOL, HEAT, FAN, and DRY) for you to select. See the following tables for detailed information on each mode.NOTE: The HEAT mode is only available after the furnace is enabled.
AUTO MODE
- The system will change over between COOL and HEAT mode according to the room temperature.
- For example, when the room temperature is below 68ºF (20ºC), the system will operate in HEAT mode. In contrast, when the roomtemperature is above 77ºF (25ºC), the system will operate in COOL mode. It operates the Dry Mode in comfort temperature between 68ºF (20ºC) to 77ºF (25ºC).
- The AUTO icon and the current temperature set-point display on the LCD.
| COOL MODE | |
|
|
| Low | The fan operates continuously at low speed and the |
| Med | The fan operates continuously at medium speed and the |
| High | The fan operates continuously at high speed and the |
| Auto | The fan speed varies depending on the difference between the temperature set-point and room temperature. The |
| HEAT MODE | |
NOTE: The HEAT mode is only available when the furnace is enabled.
|
|
| Low | The fan operates continuously at low speed and the |
| Med | The fan operates continuously at medium speed and the |
| High | The fan operates continuously at high speed and the |
| Auto | The fan speed varies depending on the difference between the temperature set-point and room temperature. The |
| OFF | The fan is off. The |
| FAN MODE | |
|
|
| Low | The fan operates continuously at low speed and the |
| Med | The fan operates continuously at low speed and the |
| High | The fan operates continuously at high speed and the |
DRY MODE
- The compressor runs continuously when the room temperature is higher than set point.
- Compressor cycles ON for 10 minutes and OFF for 6 minutes when the room temperature is lower than the set-point.
- The fan speed runs continuously at low speed.
Set the Temperature

The temperature set-point ranges from 60ºF~86ºF (16ºC~30ºC).
- Press the button to toggle to your desired mode.
- Press ∧ or ∨ button to increase or decrease the temperature set-point to your comfort level.NOTE: The temperature set-point is not available in FAN mode.
Set the Fan Speed

- Press the button repeatedly to toggle to your desired mode.
- Press the FAN button to select AUTO, HIGH, MEDIUM or LOW fan speed.NOTE: The fan speed selection is not available in DRY mode.
Mood Light
 The thermostat is designed with 7
predefined colors of LED light in the air distribution box.
- Press the LIGHT button on the thermostat to turn on the mood light.
- Press the LIGHT button to toggle to your desired mood light.
- To turn off the mood light, press the LIGHT button repeatedly until the mood light turns off.
Sleep Mode

- Press the SLEEP button on the thermostat to turn on SLEEP mode.The SLEEP icon and the current temperature set-point will be displayed on the LCD.
- After meeting the desired temperature.In Cool Mode:The temperature set-point will increase 2ºF after running for 1 hour and increase 2ºF after running for 2 hours, then the fan speed will be fixed to LOW speed.In Heat mode:The temperature set-point will decrease 2ºF after running for 1 hour and decrease 2ºF after running for 2 hours, then the fan speed will be fixed to LOW speed.
Special Features
Auto Fan
When the auto fan mode is selected, the fan speed will vary depending on the temperature difference between the temperature set-point and the room temperature.
| TemperatureDifference | Fan Speed |
| >3ºF | The fan operates on High level |
| >1ºF | The fan operates on Med level |
| <-1ºF | The fan operates on Low level |
Compressor Time Delay
A time delay of approximately three minutes occurs any time the compressor is required to begin the cooling cycle.NOTE: The time delay occurs automatically after a mode is selected or a power event occurs to ensure the pressure in the compressor is equalized appropriately, to prevent damage.Power InterruptionIn the event the power to the air conditioner or controller is interrupted, the system will restart automatically with the last status and operational parameter set-points once the power is restored.
LCD Error Code
The following error code will be displayed on the LCD when the system detects one of the following faults has occurred.
| LCD Error Code | |
| E1 | Indoor temperature sensor out of order. The system will shut down. |
| E2 | Evaporator temperature sensor out of order. The system will shut down. |
| E3 | Loss of communication between the thermostat and control box. Systemwill shut down. |
| E4 | Condenser temperature sensor out of order. The system will shut down. |
| E5 | Outdoor temperature sensor out of order. The system will shut down. |
| lo | Outdoor temperature sensor out of order. The system will shut down. |
Wiring Diagram


Specifications
| DC Input Power | DC 12V |
| Power Consumption | <0.5W |
| Baud Rate | 9600bps |
| Dimension | 3 x 3 x 15/16” (75 x 75 x 22.5mm) |
| Weight | 0.06kg |
| LCD Viewing angle | 12 o’clock |
Warranty
FURRION WARRANTS FOR A PERIOD OF 1 YEAR FROM THE DATE OF RETAIL PURCHASE BY THE ORIGINAL END-USER PURCHASER, THAT THIS PRODUCT, WHEN DELIVERED TO YOU IN NEW CONDITION, IN ORIGINAL ACKAGING, FROM A FURRION AUTHORIZED RESELLER AND USED IN NORMAL CONDITIONS, IS FREE FROM ANY DEFECTS IN MANUFACTURING, MATERIALS, AND WORKMANSHIP. IN CASE OF SUCH A DEFECT, THE VERSION SHALL REPLACE OR REPAIR THE PRODUCT AT NO CHARGE TO YOU. THIS WARRANTY DOES NOT COVER: PRODUCTS WHERE THE ORIGINAL SERIAL NUMBERS HAVE BEEN REMOVED, ALTERED, OR CANNOT READILY BE DETERMINED; DAMAGE OR LOSS CAUSED BY ACCIDENT, MISUSE, ABUSE, NEGLECT, PRODUCT MODIFICATION, FAILURE TO FOLLOW INSTRUCTIONS IN INSTRUCTION MANUAL, COMMERCIAL OR INDUSTRIAL USE; DAMAGE OR LOSS CAUSED TO THE DECORATIVE SURFACE OF PRODUCT; TO ANY DATA, SOFTWARE OR INFORMATION; AND NORMAL WEAR AND TEAR. THIS WARRANTY ONLY PROTECTS THE ORIGINAL END-USER (“YOU”) AND IS NOT TRANSFERABLE; ANY ATTEMPT TO TRANSFER THIS WARRANTY SHALL MAKE IT IMMEDIATELY VOID. THIS WARRANTY IS ONLY VALID IN THE COUNTRY OF PURCHASE.THIS WARRANTY AND REMEDIES SET FORTH ABOVE ARE EXCLUSIVE AND IN LIEU OF ALL OTHER WARRANTIES, REMEDIES, AND CONDITIONS, WHETHER ORAL OR WRITTEN, EXPRESS OR IMPLIED. FURRION SPECIFICALLY DISCLAIMS ANY AND ALL IMPLIED WARRANTIES, INCLUDING, WITHOUT LIMITATION, WARRANTIES OF MERCHANTABILITY AND FITNESS FOR A PARTICULAR PURPOSE.IF FURRION CANNOT LAWFULLY DISCLAIM IMPLIED WARRANTIES UNDER THIS LIMITED WARRANTY, ALL SUCH WARRANTIES, INCLUDING WARRANTIES OF MERCHANTABILITY AND FITNESS FOR A PARTICULAR PURPOSE ARE LIMITED TO THE DURATION OF THIS WARRANTY.No Furrion reseller, agent, or employee is authorized to make any modification, extension, or addition to this warranty.
FURRION IS NOT RESPONSIBLE FOR DIRECT, INDIRECT, SPECIAL, INCIDENTAL OR CONSEQUENTIAL DAMAGES RESULTING FROM ANY BREACH OF WARRANTY OR CONDITION, OR UNDER ANY OTHER LEGAL THEORY, INCLUDING BUT NOT LIMITED TO LOST PROFITS, DOWNTIME, GOODWILL, DAMAGE TO OR REPLACEMENT OF ANY EQUIPMENT OR PROPERTY, ANY COSTS OF RECOVERING, REPROGRAMMING, OR REPRODUCING ANY PROGRAM OR DATA STORED IN OR USED WITH FURRING PRODUCTS. FURRION’S TOTAL LIABILITY IS LIMITED TO THE REPAIR OR REPLACEMENT OF THIS PRODUCT PURSUANT TO THE TERMS OF THIS WARRANTY.SOME STATES DO NOT ALLOW THE EXCLUSION OR LIMITATION OF INCIDENTAL OR CONSEQUENTIAL DAMAGES OR EXCLUSIONS OR LIMITATIONS ON THE DURATION OF IMPLIED WARRANTIES OR CONDITIONS, SO THE ABOVE LIMITATIONS OR EXCLUSIONS MAY NOT APPLY TO YOU. THIS WARRANTY GIVES YOU SPECIFIC LEGALRIGHTS, AND YOU MAY ALSO HAVE OTHER RIGHTS THAT VARY BY STATE OR (WHERE APPLICABLE IN THE COUNTRIES WHERE FURRION HAS NON-US/CANADIAN AUTHORIZED DEALERS) COUNTRY. NO ACTION OR CLAIM TO ENFORCE THIS WARRANTY SHALL BE COMMENCED AFTER THE EXPIRATION OF THE WARRANTYPERIOD.Keep your receipt, delivery slip, or another appropriate payment record to establish the warranty period. Service under this warranty must be obtained by contacting Furrion at [email protected]Product features or specifications as described or illustrated are subject to change without notice.
 report this ad
![]()
Furrion Innovation Center & Institute of Technology● 52567 Independence Ct., Elkhart, IN 46514, USA ● Toll free:1-888-354-5792● Email: [email protected]©2007-2018 Furrion Ltd. Furrion®and the Furrion logo are trademarks licensed for use by Furrion Ltd. and registered in the U.S. and other countries.FURRION.COM
IM-FHA00028 V1.0
References
[xyz-ips snippet=”download-snippet”]