![]() FUSION®Apollo™ MS-SRX400O W N E R ’ S M A N U A L
FUSION®Apollo™ MS-SRX400O W N E R ’ S M A N U A L
© 2019 Garmin Ltd. or its subsidiariesAll rights reserved. Under copyright laws, this manual may not be copied, in whole or in part, without the written consent of Garmin. Garmin reserves the right to change or improve its products and to make changes in the content of this manual without the obligation to notify any person or organization of such changes or improvements. Go to www.fusionentertainment.com for current updates and supplemental information concerning the use of this product.Garmin®, Fusion®, and the Fusion logo are trademarks of Garmin Ltd. or its subsidiaries, registered in the USA and other countries. Apollo™, Fusion-Link™, Fusion PartyBus™, and True-Marine™ are trademarks of Garmin. These trademarks may not be used without the express permission of Garmin. Apple®, AirPlay®, and App Store SM are trademarks of Apple Inc. Android™ and Google Play™ are trademarks of Google Inc. Bluetooth® word mark and logos are owned by the Bluetooth SIG, Inc. and any use of such marks by Garmin is under license. Wi‑Fi® is a registered mark of Wi-Fi Alliance Corporation. Other trademarks and trade names are those of their respective owners.
Getting Started
![]() WARNINGSee the Important Safety and Product Information guide in the product box for product warnings and other important information.
WARNINGSee the Important Safety and Product Information guide in the product box for product warnings and other important information.
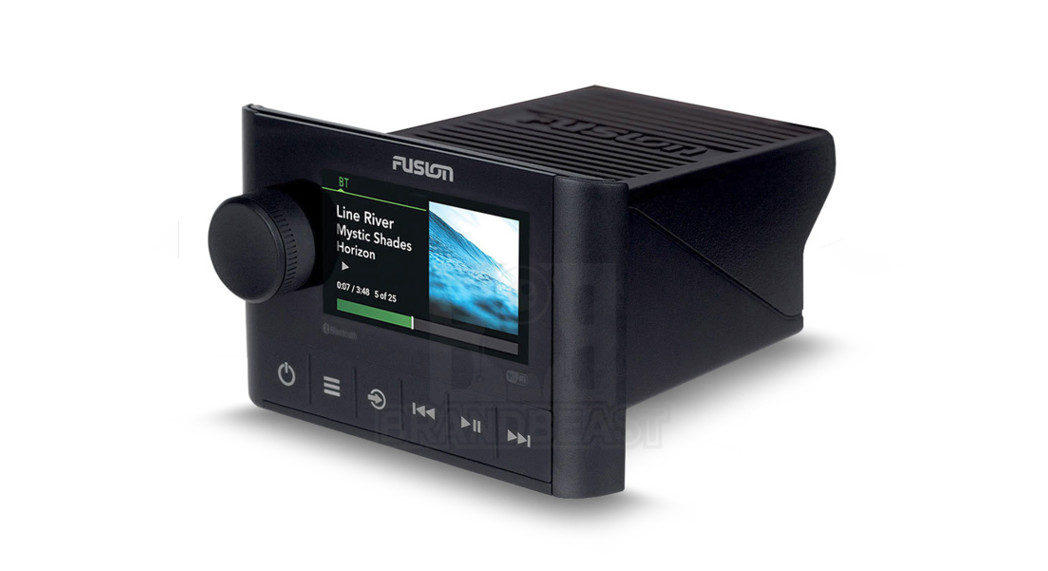
Stereo Controls
| Dial |
|
|
|
 |
|
| Press to change the source.TIP: You can turn the dial to browse, and press the dial to select the source.Press and hold to open the GROUPS menu when connected to a Fusion PartyBus™ network (FusionPartyBus Networking, page 9). | |
|
|
|
|
|
For information about controlling sources from a grouped stereo, see that stereo’s owner’s manual.
Entering Text
- In a field that allows you to enter text, select
 to erase the existing characters.
 - If necessary, select or use numerals, symbols, lower-case letters when available.
- Turn the dial to choose a character, and press the dial to select it.
- Select to save the new text.
Using the Dial to Select ItemsYou can use the dial to highlight and select items on the screen.
- Turn the dial to highlight an item on the screen.
- Press the dial to select the highlighted option.
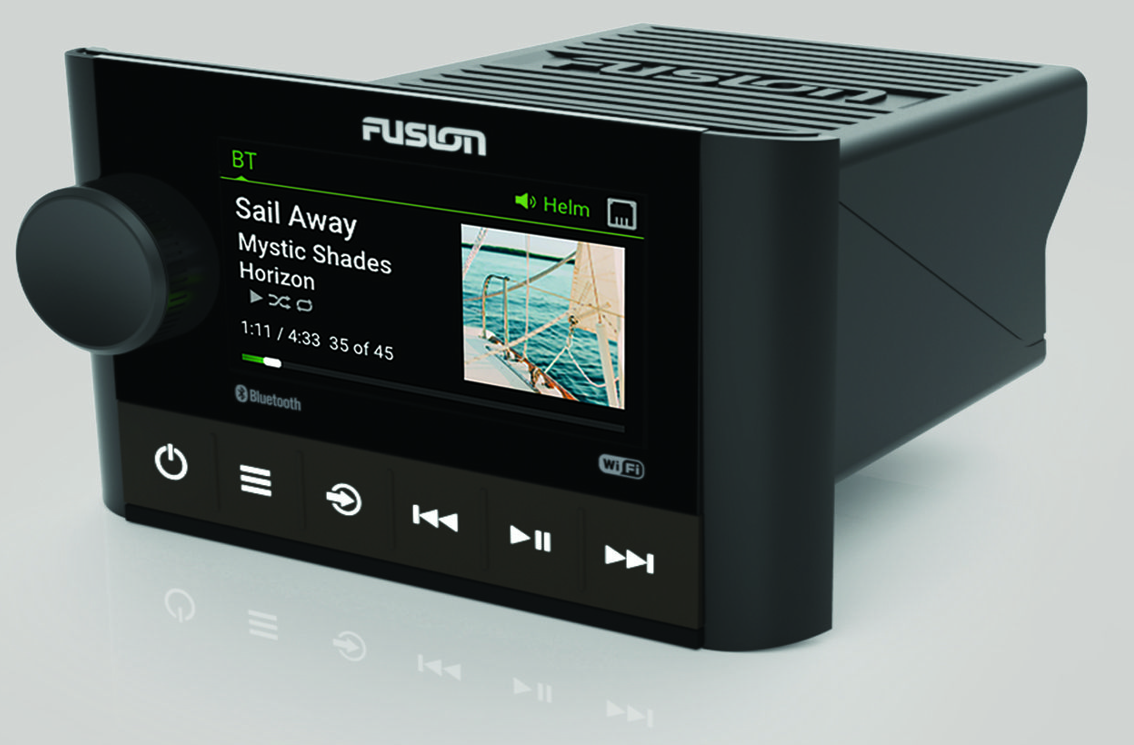
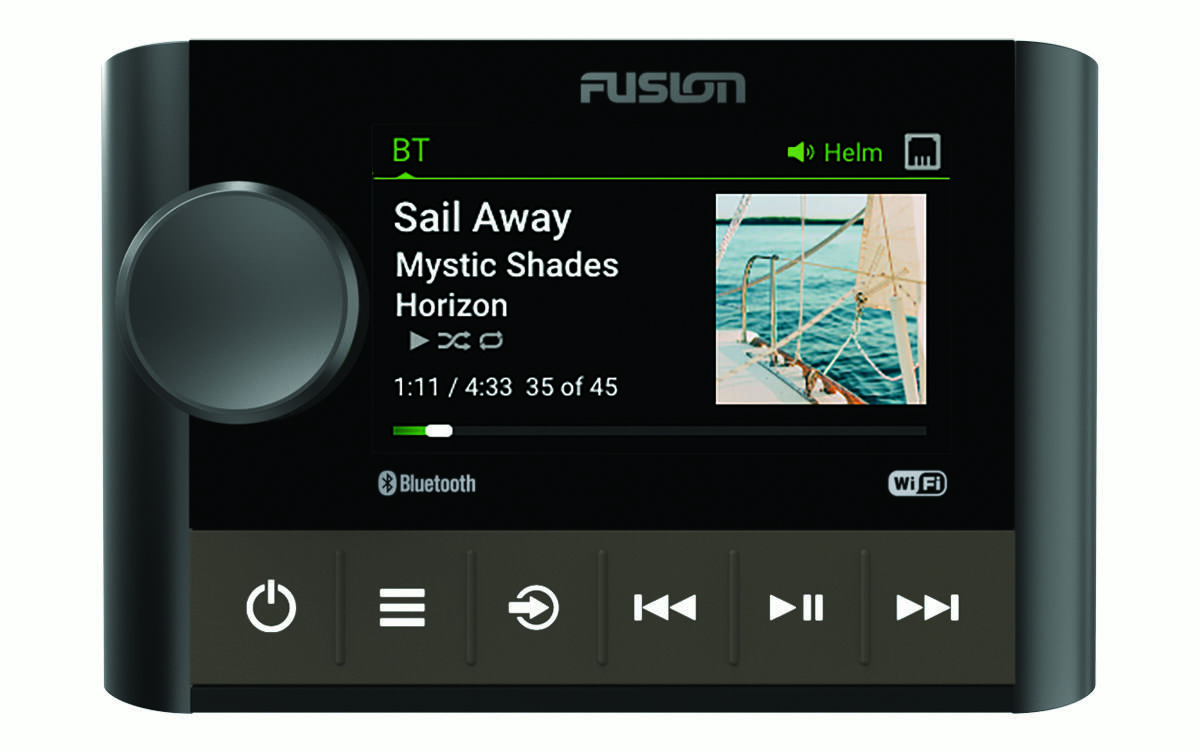
Stereo ScreenThe information displayed on the screen varies depending on the source selected. This example shows a track playing on a device connected using Bluetooth® wireless technology.
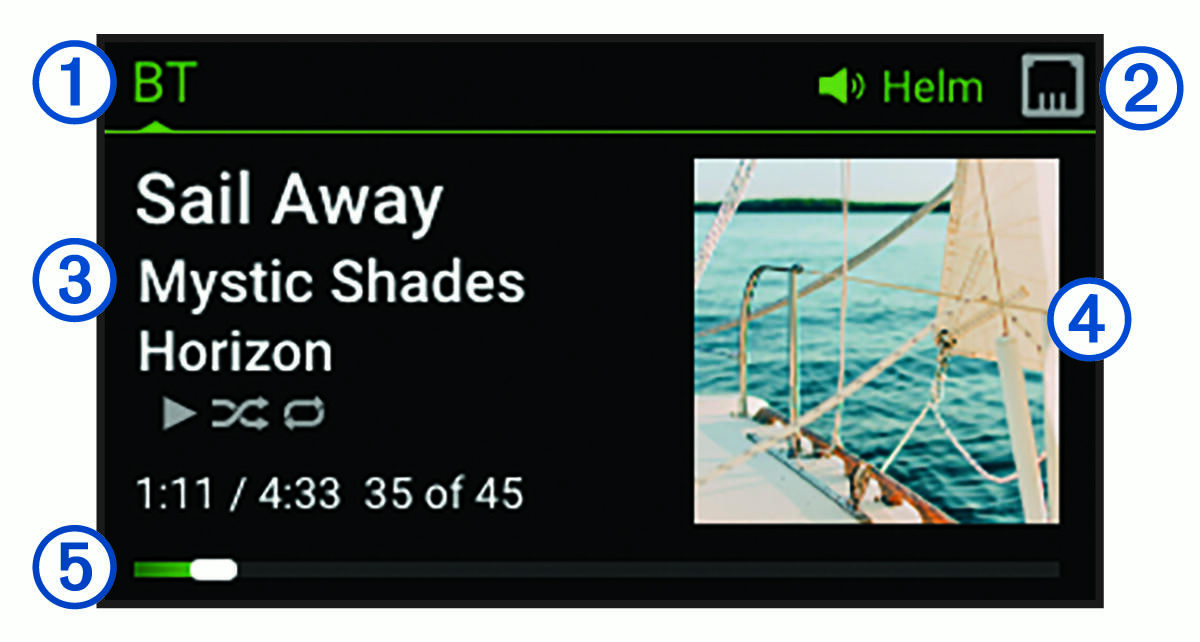
- Source name
- Active zone and status icons (Network Status Icons, page 19)
- Track details (if available)
- Album art (if available from a compatible source)
- Elapsed time, track duration, and the current track number out of the total number of tracks in the playlist (if available)
Naming the DeviceYou should enter a unique name for this device so you can easily identify it when viewing devices on the Fusion PartyBus network.NOTE: You should provide unique names to all of the devices and zones on the network to avoid confusion when grouping, controlling and setting up stereos and zones.For further customization, you can provide unique names for the sources on each stereo and turn off unused sources (General Settings, page 11).
- Select > SETTINGS.
- Select DEVICE NAME, and enter a unique name for the device.
Selecting a Source
- Select
- Turn the dial to highlight a source.NOTE: If the device is part of a group, continue turning the dial to access the sources on other devices in the group (Creating a Group, page 9).If a source cannot be shared with the group, it will appear gray and you cannot select it.
- Press the dial to select the source.
Adjusting the Backlight BrightnessNOTE: If you connected the dim wire on the wiring harness to the boat’s illumination wire, the backlight dimsautomatically when the boat lights are on. This may affect how you adjust the brightness setting.
- Select > BRIGHTNESS.
- Adjust the brightness level.
Audio Control
Adjusting the VolumeUsing this stereo, you can control the volume of any zone on any stereo connected to the Fusion PartyBus network.1 Turn the dial to adjust the volume for the home zone on the stereo.2 If necessary, press the dial to switch between zones.NOTE: If this stereo is part of a group, you can adjust the volume of all stereos in the group or individual zones on each stereo (Creating a Group, page 9).Muting all Connected StereosYou can quickly mute the audio from this stereo or from all stereos connected to the Fusion PartyBus network (Fusion PartyBus Networking, page 9).
- From any source, press.The mute symbol appears and audio from this stereo is silenced.NOTE: If the stereo is part of a group, the audio from all grouped stereos is silenced.
- Press and hold the dial to select MUTE SYSTEM.Audio from all connected stereos is silenced.
- Press and hold the dial to select UNMUTE SYSTEM.Audio is restored to all connected stereos.
Adjusting the Subwoofer LevelYou can adjust the subwoofer level for each zone.
- Press the dial, and select a zone with a connected subwoofer.
- Press and hold the dial.The SUB LEVEL adjustment for the zone appears.
- Adjust the subwoofer level and press the dial to set it.
Adjusting the Tone
- Select> AUDIO > ZONE 1.
- Press the dial to select a tone.
- Adjust the tone level and press the dial to set it.
Disabling the Loud SettingThe LOUD setting maintains frequency response at low volumes and increases perceived loudness at high volumes. This setting is enabled by default.
- Select > AUDIO > ZONE 1.
- Select LOUD to clear the check box.
DSP SettingsThis stereo features digital signal processing (DSP). You can select pre-configured DSP settings for Fusion® speakers and amplifiers to optimize audio reproduction in their installed locations.The stereo uses the same DSP setting for the speakers connected to the internal amplifier and for the line-out connection. If you connected speakers to the internal amplifier and are using the line out, the DSP setting might cause the speaker output to be more limited than necessary. All DSP settings are configured using the Fusion-Link™ remote control app (Fusion-Link Wireless Remote Control App, page 16).Configuring the DSP SettingsYou must download and install the Fusion-Link remote control app on your compatible Apple® or Android™ device before you can configure the DSP settings (Fusion-Link Wireless Remote Control App, page 16).You can configure the DSP settings to optimize the sound on each zone with the installed speakers, amplifiers, and environment.
- From the settings menu on your Apple or Android device, connect to the stereo using Bluetooth technology, or connect to the same wireless network as the stereo.
- Open the Fusion-Link remote control app on your compatible Apple or Android device.
- If necessary, select the stereo you want to configure.
- Select.
- If necessary, select the MUSIC tab.
- Select a zone.
- Select DSP SETTINGS.
- Configure the DSP settings as needed, depending on the models of Fusion speakers and amplifiers connected to the zone.
- Repeat these steps for each zone.
- After you have finished configuring the DSP settings for all zones, select an option:• On an Apple device, select > SEND DSP SETTINGS• On an Android device, select > Zone > SEND DSP SETTINGS.
Bluetooth Device Playback
You can pair the stereo to up to eight Bluetooth media devices.You can control the playback using the stereo controls on all Bluetooth devices, and on some devices, you can browse the music collection from the menu on the stereo.On Bluetooth devices that do not support media browsing, you should select the song or playlist on the media device.The availability of song information such as song title, artist name, track duration, and album art depends on the capability of the media player and music application.
Connecting a Compatible Bluetooth DeviceYou can play media from a compatible Bluetooth device using the Bluetooth wireless connection.You can control the music playback with the media app on a Bluetooth device or using the Fusion-Link remote control app (Fusion-Link Wireless Remote Control App, page 16).
- Select the BT source.
- Select > BT > CONNECTIONS > DISCOVERABLE to make the stereo visible to your compatible Bluetooth device.
- Enable Bluetooth on your compatible Bluetooth device.
- Bring the compatible Bluetooth device within 10 m (33 ft.) of the stereo.
- On your compatible Bluetooth device, search for Bluetooth devices.
- On your compatible Bluetooth device, select the stereo from the list of detected devices.NOTE: The stereo appears in the Bluetooth device list as the device name (the default name is MS-SRX400 unless it was changed in the settings).
- On your compatible Bluetooth device, follow the on-screen instructions to pair and connect to the discovered stereo.When pairing, your compatible Bluetooth device may ask you to confirm a code on the stereo. The stereo does not display a code, but it does connect correctly when you confirm the message on the Bluetooth device.
- If your compatible Bluetooth device does not immediately connect to the stereo, repeat steps 1 through 7.NOTE: If another Bluetooth device is already playing music on the stereo, connecting a new device will not interrupt playback. You must select the newly-added device if you want to use it instead (Selecting a Different Bluetooth Device, page 6).
The DISCOVERABLE setting is disabled automatically after two minutes.NOTE: On some Bluetooth devices, adjusting the volume on the device affects the volume level on the stereo.Bluetooth Range InformationThe stereo and Bluetooth wireless devices have a range of 10 m (33 ft.). For optimal performance, theBluetooth wireless devices should also have a clear line of sight to the stereo.NOTE: Wi‑Fi® signals may interfere with Bluetooth device connections. You should turn off the Wi‑Fi setting on your stereo if you are not using it.Selecting a Different Bluetooth DeviceWhen you have more than one Bluetooth device paired to the stereo, you can select a different device whenneeded. You can pair the stereo with up to eight Bluetooth devices.
- With the BT source selected, select > BT > CONNECTIONS > PAIRED DEVICES.
- Select a Bluetooth device.
Bluetooth Source Menu and SettingsWith the BT source selected, select ![]() > BT.NOTE: The options in this menu vary based on the connected device.CONNECTIONS > DISCOVERABLE: This allows the stereo to be visible to Bluetooth devices. You can turn off this setting to prevent possible interruption to the audio after pairing a Bluetooth device to the stereo.CONNECTIONS > PAIRED DEVICES: This shows a list of Bluetooth devices paired with the stereo. You can select a device in the list to connect it to the stereo if it is in range.CONNECTIONS > REMOVE DEVICE: Removes the Bluetooth device from the stereo. To listen to audio from this Bluetooth device again, you must pair the device again.NOTE: You should also remove the stereo from the list of paired devices on your Bluetooth device to avoid connection issues when pairing the device again.REPEAT: Sets the repeat mode for the current selection (Apple devices only). You can repeat the current selection by selecting the REPEAT ONE option. You can repeat all items in the selection by selecting the REPEAT ALL options.SHUFFLE: Shuffles the tracks in the folder, album, or playlist (Apple devices only).PLAYLIST: Displays the playlists on the device (Apple devices only).ARTISTS: Displays the artists on the device (Apple devices only).ALBUMS: Displays the albums on the device (Apple devices only).GENRES: Displays the genres of music on the device (Apple devices only).SONGS: Displays the songs on the device (Apple devices only).Disabling Bluetooth Auto ConnectionBy default, the stereo automatically reconnects to the last connected Bluetooth device when you turn it on. Youcan disable this setting.Select
> BT.NOTE: The options in this menu vary based on the connected device.CONNECTIONS > DISCOVERABLE: This allows the stereo to be visible to Bluetooth devices. You can turn off this setting to prevent possible interruption to the audio after pairing a Bluetooth device to the stereo.CONNECTIONS > PAIRED DEVICES: This shows a list of Bluetooth devices paired with the stereo. You can select a device in the list to connect it to the stereo if it is in range.CONNECTIONS > REMOVE DEVICE: Removes the Bluetooth device from the stereo. To listen to audio from this Bluetooth device again, you must pair the device again.NOTE: You should also remove the stereo from the list of paired devices on your Bluetooth device to avoid connection issues when pairing the device again.REPEAT: Sets the repeat mode for the current selection (Apple devices only). You can repeat the current selection by selecting the REPEAT ONE option. You can repeat all items in the selection by selecting the REPEAT ALL options.SHUFFLE: Shuffles the tracks in the folder, album, or playlist (Apple devices only).PLAYLIST: Displays the playlists on the device (Apple devices only).ARTISTS: Displays the artists on the device (Apple devices only).ALBUMS: Displays the albums on the device (Apple devices only).GENRES: Displays the genres of music on the device (Apple devices only).SONGS: Displays the songs on the device (Apple devices only).Disabling Bluetooth Auto ConnectionBy default, the stereo automatically reconnects to the last connected Bluetooth device when you turn it on. Youcan disable this setting.Select![]() > SETTINGS > SOURCE > BT > AUTO CONNECT.When the AUTO CONNECT checkbox is clear, the stereo will not attempt to automatically reconnect to aBluetooth device. When this feature is disabled, you must select a Bluetooth device manually to connect it(Selecting a Different Bluetooth Device, page 6).
> SETTINGS > SOURCE > BT > AUTO CONNECT.When the AUTO CONNECT checkbox is clear, the stereo will not attempt to automatically reconnect to aBluetooth device. When this feature is disabled, you must select a Bluetooth device manually to connect it(Selecting a Different Bluetooth Device, page 6).
Radio
To listen to AM or FM radio, you must have a suitable marine AM/FM antenna properly connected to the stereo and be within range of a broadcasting station. For instructions on connecting an AM/FM antenna, see the stereo installation instructions.Setting the Tuner RegionYou must select the region you are in to receive AM and FM stations properly.
- Select > SETTINGS.
- Select TUNER REGION.
- Select the region you are in.
Changing the Radio Station
- Select an applicable source, such as FM.
- Select repeatedly to move through the tuning modes, and select an option:• Select AUTO to scan and stop at the next available station.• Select MANUAL to select a station manually.• Select PRESET to select a saved station preset.
- Select tune to the station.When in MANUAL tuning mode, you can hold quickly advance through the stations.
Apple AirPlay ®
Connecting an Apple Device Using AirPlay
- From the settings menu on your Apple device, connect to the same wireless network as your compatible Fusion stereo.NOTE: You can connect some Apple devices to the network using a wired Ethernet connection, if applicable. Go to the Apple website for more information.
- On your Apple device, open the music app you want to stream to the stereo.
- From the music app or program, selector, and select the name of the stereo.
- If necessary, start playing music on the app.The stereo changes to the AIRPLAY source automatically and plays audio from your Apple device.NOTE: If your Apple device is using AirPlay 2 software, you can connect to multiple stereos on the same network.NOTE: You cannot stream the AIRPLAY source to other stereos on the network using the Fusion PartyBus network (Fusion PartyBus Networking, page 9). Using AirPlay 2 software, you can play content on multiple stereos on the network, but the stereos must not be grouped.NOTE: On some AirPlay devices, adjusting the volume on the device affects the volume level on the stereo.
Setting an AirPlay PasswordYou can set a password that a user must enter when connecting to the stereo using the AirPlay feature.
- Select > SETTINGS > SOURCE > AIRPLAY > AirPlay PASSWORD.
- Enter a password.NOTE: The AirPlay password is case-sensitive.
When connecting to this stereo using the AirPlay feature, the user must enter the password on their Apple device.
UPnP Playback
This stereo can play content from Universal Plug and Play (UPnP) devices connected to the network, such as computers and media servers. You must connect your UPnP device to the same network as the stereo using a wired or wireless connection, and you must configure the device to share media over the network. See the owner’s manual from your UPnP device for more information.After you have connected your UPnP device to the network and configured it to share media, the UPNP source appears on the source selection screen of each stereo on the network (Selecting a Source, page 4).Connecting a UPnP DeviceYou must connect your stereo to a network to play media from a UPnP device, such as a NAS device.
- Connect your UPnP device to the same network as the stereo, referring to the instructions provided withyour UPnP device and router if necessary.
- Select the UPnP source on the stereo (Selecting a Source, page 4).You can browse and play media from the UPnP device.
Fusion PartyBus Networking
The Fusion PartyBus networking feature allows you to connect multiple compatible stereos together on a network, using a combination of wired or wireless connections.You can group a compatible stereo, such as the Apollo RA770 stereo, with other compatible stereos connected to the network. Grouped stereos can share available sources and control media playback on all of the stereos in the group, which allows for a synchronized audio experience across the vessel. You can quickly create, edit, and break up groups as needed from any compatible stereo or remote control on the network.You can use compatible stereos and remote controls, whether they are grouped or not, to adjust the volume of the available speaker zones for any stereo on the network.You should refer to the installation instructions provided with your stereo when constructing the Fusion PartyBus network.You can connect up to eight Fusion PartyBus stereos on a network wirelessly.Creating a GroupBefore you can create a group, you must connect multiple compatible stereos to the Fusion PartyBus network.See the installation instructions provided with your stereo for information about installing and configuring the network.NOTE: There are some limitations and other considerations when using stereos in groups. See GroupedStereo Source Considerations, page 10for more information.
- Select > GROUPS.TIP: You can hold from any screen to open the GROUPS menu.
- Select the name of the stereo you want to be the primary stereo in the group.
- Select the stereos you want to add to the group.
- Select DONE.
From the source screen, you can select a source from any stereo in the group except a zone stereo, such as the Apollo SRX400 stereo or any sources that are disabled for use on the Fusion PartyBus network (General Settings, page 11).Editing a Group
- Select > GROUPS.
- Select the name of an existing group.
- Select the stereos you want to add to or remove from the group.
- Select DONE.
Leaving a GroupYou can leave the Fusion PartyBus group to play local sources on the stereo.
- Select > GROUPS.
- Select the name of the existing group you want to leave.
- Select the stereos you want to remove from the group.
- Select DONE.
Grouped Stereo FunctionsAfter you create a group of stereos, additional functions and options are available to all stereos in the group.
- After you create a group, all of the stereos in the group share the same synchronized display.
- You can select a source from any stereo in the group, with a few limitations (Grouped Stereo Source Considerations, page 10), and the source will play simultaneously on all stereos in the group (Selecting a Source, page 4).
- You can control playback (such as pausing and skipping tracks) on any stereo in the group, and it will affect all stereos in the group.
- You can adjust the volume for any zone on any stereo in the group.TIP: When adjusting the volume, you can select ALL to adjust the volume of all the stereos in the group at the same time.
Grouped Stereo Source ConsiderationsWhen selecting sources to play over the network, you should observe these considerations.
- Because this stereo is a zone stereo, it can create or join a group to control and play sources from other stereos, but it cannot share its sources with the group.
- You cannot share an AirPlay source with grouped stereos. Using AirPlay 2 software, you can play content on multiple stereos on the network, but the stereos must not be grouped (Apple AirPlay®, page 8).
- You can disable sharing on most sources from other stereos on the network by changing the GROUP ENABLED setting for the sources on those stereos. When disabled, the source cannot be selected from a grouped stereo. See the owner’s manual for your multi-zone Fusion Apollo stereo for instructions.
- When audio sources are streamed over a data network, there is a slight delay in the synchronized audio that may be noticeable if you are also using an external audio source.◦ If you have a television with an Optical Out connection to a stereo and you continue to use the television speakers, there will be a delay between the audio from the television speakers and the optical audio streamed on the grouped stereos.◦ If you synchronize a radio station and tune that same radio station on a non-networked stereo, there will be a delay between the audio from the non-networked stereo and the audio from the radio station streamed on the grouped stereos.◦ You can remove this delay by changing the GROUP ENABLED setting for the source, but the source cannot be shared with grouped stereos.
NOTE: You cannot change the settings when a stereo is part of a group. You must remove the stereo from the group before you can change any settings.
General Settings
NOTE: When the stereo is in a group, you cannot change settings on that stereo. Select ![]() > SETTINGS.NOTE: When a check box is filled, the option is on. When the check box is clear, the option is off.DEVICE NAME: Sets a name for this device.LANGUAGE: Sets the language on the device.TUNER REGION: Sets the region used by the FM and AM sources.POWER OPTIONS: Adjusts power settings, such as the power-save mode (Power Options, page 12).SEARCHING: Enables Fusion Alpha Search Technology (FAST), which allows you to quickly search for tracks by letter or number. You can select a number to enable the FAST menu if your music device contains more than the selected number of items.ZONE: Enables you to configure the speaker zones (, ).SOURCE: This allows you to enable, disable, and name the sources on the stereo (Source Settings, page 13).NETWORK: Enables you to configure the Fusion PartyBus network settings (Network Settings, page 13).UPDATE > FACTORY RESET: Restores all settings to the factory default values.ABOUT: Shows the software version information for the stereo.Speaker Zone SettingsDisabling the Internal AmplifierIf you do not connect speakers directly to the stereo, you can disable the internal amplifier to reduce power consumption.
> SETTINGS.NOTE: When a check box is filled, the option is on. When the check box is clear, the option is off.DEVICE NAME: Sets a name for this device.LANGUAGE: Sets the language on the device.TUNER REGION: Sets the region used by the FM and AM sources.POWER OPTIONS: Adjusts power settings, such as the power-save mode (Power Options, page 12).SEARCHING: Enables Fusion Alpha Search Technology (FAST), which allows you to quickly search for tracks by letter or number. You can select a number to enable the FAST menu if your music device contains more than the selected number of items.ZONE: Enables you to configure the speaker zones (, ).SOURCE: This allows you to enable, disable, and name the sources on the stereo (Source Settings, page 13).NETWORK: Enables you to configure the Fusion PartyBus network settings (Network Settings, page 13).UPDATE > FACTORY RESET: Restores all settings to the factory default values.ABOUT: Shows the software version information for the stereo.Speaker Zone SettingsDisabling the Internal AmplifierIf you do not connect speakers directly to the stereo, you can disable the internal amplifier to reduce power consumption.
- Select > SETTINGS.
- Select ZONE.
- Select INTERNAL AMP ON to clear the check box.
Setting the Home ZoneThe home zone is the speaker zone that you adjust by default when you turn the dial.
- Select > SETTINGS.
- Select ZONE > ASSIGN HOME ZONE.
- Select a zone.
Adjusting the Power-On Volume LimitBy default, when you turn on the stereo, the system automatically reduces the volume to level 12 if it was louder than that when you turned it off. You can adjust this limit if you want to retain a louder volume or limit to a lower volume when you turn on the stereo.NOTE: This setting affects all zones on the stereo.
- Select > SETTINGS.
- Select ZONE > POWER ON VOLUME LIMIT.
- Adjust the volume limit.
Maintaining Individual Zone Volume LevelsIf you adjust the volume levels of individual zones so that some zones are louder than others, the individual zone volume settings are all affected when you adjust the volume for ALL zones. By default, if you adjust the volume for ALL to 00, this sets the volume levels for all zones to 00 and resets all individual zone volume adjustments. You can enable the KEEP VOLUME RATIOS option to retain individual zone volume adjustments when you adjust the volume for ALL to 00.NOTE: This setting applies to volume adjustments on the stereo or a connected ERX remote control only. If you adjust the volume on the stereo using a connected Chartplotter or NRX remote control, the volume levels will still be reset.TIP: For the best results when enabling this setting, you should set the power-on volume limit to 24 (Adjusting the Power-On Volume Limit, page 11).
- Select > SETTINGS.
- Select ZONE > KEEP VOLUME RATIOS.
Setting a Zone NameYou can set a name for a speaker zone to make it easier to identify.
- Select > SETTINGS.
- Select ZONE.
- Select a zone.
- Select ZONE NAME.
- Use the on-screen keyboard to enter a name, and select
Adjusting the Subwoofer FilterYou can use the subwoofer filter setting to control the subwoofer cutoff frequency, which can enhance the blend of the sound produced by the speakers and the subwoofer. Audio signals above the selected frequency are not passed to the subwoofer. The setting applies to both subwoofer outputs.NOTE: If a DSP setting has been applied using the Fusion-Link app, this setting cannot be changed on the stereo.
- Select > SETTINGS > ZONE > ZONE 1 > SUB. FREQ..
- Select a frequency.
Adjusting Additional Audio Settings for a Zone
- Select > SETTINGS.
- Select ZONE.
- Select a zone.
- Select one or more options:• To limit the maximum volume output of this zone, select VOLUME LIMIT, and adjust the level.• To adjust the right and left speaker balance of this zone, select BALANCE, and adjust the balance.
Power OptionsSelect ![]() > SETTINGS > POWER OPTIONS.POWER SAVE: Disables the LCD backlight after one minute of inactivity to save battery power.Source SettingsSelect
> SETTINGS > POWER OPTIONS.POWER SAVE: Disables the LCD backlight after one minute of inactivity to save battery power.Source SettingsSelect ![]() > SETTINGS > SOURCE, and select the name of the source you want to configure.NOTE: This menu contains system-wide source settings. Most sources also have source-specific settings. See the sections of this manual for each source for more information about source-specific settings.Not all options are available for every source on the stereo.SOURCE ENABLED: Enables and disables the source on this stereo. You may want to disable sources that will never be used on the stereo so they no longer appear on the source-selection screen.SOURCE NAME: Changes the name of the source as it appears on this stereo. This also affects how the source appears to other stereos in a group.Network SettingsSelect
> SETTINGS > SOURCE, and select the name of the source you want to configure.NOTE: This menu contains system-wide source settings. Most sources also have source-specific settings. See the sections of this manual for each source for more information about source-specific settings.Not all options are available for every source on the stereo.SOURCE ENABLED: Enables and disables the source on this stereo. You may want to disable sources that will never be used on the stereo so they no longer appear on the source-selection screen.SOURCE NAME: Changes the name of the source as it appears on this stereo. This also affects how the source appears to other stereos in a group.Network SettingsSelect![]() > SETTINGS > NETWORK.WI-FI OFF: Turns off all Wi‑Fi wireless functions.WI-FI CLIENT: Configures the stereo as the wireless client, allowing it to wirelessly connect to other devices.WI-FI ACCESS POINT: Configures the stereo as the wireless access point (Wireless Access Point Settings, page 14).ADVANCED: This allows you to set the advanced wireless and wired settings, such as DHCP and SSID (Advanced Network Configuration, page 15).RESET: Resets all network settings for this stereo to the factory default values.Connecting the Fusion PartyBus Device to a Wireless Access PointYou can connect this device to a wireless access point on a router or a compatible Fusion PartyBus device on the network. This device can connect using Wi‑Fi Protected Setup (WPS) if it is supported by your access point (Connecting the Device to a Wireless Access Point Using Wi‑Fi Protected Setup, page 13). This device can connect using Apple Accessory Configuration (WAC) using a supported Apple device (Connecting theDevice to a Wireless Access Point Using Apple Wireless Accessory Configuration, page 13).
> SETTINGS > NETWORK.WI-FI OFF: Turns off all Wi‑Fi wireless functions.WI-FI CLIENT: Configures the stereo as the wireless client, allowing it to wirelessly connect to other devices.WI-FI ACCESS POINT: Configures the stereo as the wireless access point (Wireless Access Point Settings, page 14).ADVANCED: This allows you to set the advanced wireless and wired settings, such as DHCP and SSID (Advanced Network Configuration, page 15).RESET: Resets all network settings for this stereo to the factory default values.Connecting the Fusion PartyBus Device to a Wireless Access PointYou can connect this device to a wireless access point on a router or a compatible Fusion PartyBus device on the network. This device can connect using Wi‑Fi Protected Setup (WPS) if it is supported by your access point (Connecting the Device to a Wireless Access Point Using Wi‑Fi Protected Setup, page 13). This device can connect using Apple Accessory Configuration (WAC) using a supported Apple device (Connecting theDevice to a Wireless Access Point Using Apple Wireless Accessory Configuration, page 13).
- Select > SETTINGS > NETWORK > WI-FI CLIENT > SSID.A list of wireless access points within rage appears.
- Select the Fusion PartyBus wireless access point.
- If necessary, select PASSWORD, enter the password and select
- Select SAVE.
NOTE: When you connect the stereo to a wireless access point, you cannot use the wired network connection.Connecting the Device to a Wireless Access Point Using Wi‑Fi Protected SetupIf it is supported by your wireless access point, you can connect this device using Wi‑Fi Protected Setup (WPS) instead of manually selecting the SSID and entering the password.NOTE: You may need to see the owner’s manual for your wireless access point for information about enabling WPS.
- Select > SETTINGS > NETWORK > WI-FI CLIENT > WPS.
- Enable the WPS connection on your wireless access point.
NOTE: When you connect the stereo to a wireless access point, you cannot use the wired network connection.Connecting the Device to a Wireless Access Point Using Apple Wireless Accessory ConfigurationIf it is supported by an Apple device, you can connect this device using Wireless Accessory Configuration (WAC) instead of manually selecting the SSID and entering the password.NOTE: You may need to see the owner’s manual for your Apple device for information about using WAC.
- Select > SETTINGS > NETWORK > WI-FI CLIENT > WAC.
- Use your compatible Apple device to complete the connection.
NOTE: When you connect the stereo to a wireless access point, you cannot use the wired network connection.
Setting the Fusion PartyBus Device as a Wireless Access PointBefore you can connect additional Fusion PartyBus devices or smartphones to a Fusion PartyBus device wirelessly, you must configure one device as a wireless access point. This is not necessary if you installed a wireless router or another wireless access point on the network.NOTE: You should not configure this device as a wireless access point if you have a router installed on the network. Doing so may introduce DHCP conflicts and result in poor network performance.
- Select > SETTINGS > NETWORK > WI-FI ACCESS POINT.
- Select an option:• To use factory-assigned default access point settings, select USE DEFAULTS, and wait for the device to save the network settings.NOTE: After the default settings are saved, you can scroll down to the bottom of the NETWORK menu to view the SSID and password assigned to the access point.• To customize the access point name and security settings, select ADVANCED, and proceed to the next step.
- Select SSID, and change the default SSID, or name, for the wireless access point.
- Select AP SECURITY and change the security type for the access point.NOTE: It is strongly recommended that you use the WPA2 PERSONAL AP SECURITY setting. It is the most widely-used and secure wireless security protocol.
- Select PASSWORD, and change the default password for the access point.
- If necessary, select COUNTRY, and select your region.
- Select CHANNEL, and select a channel range for the access point (optional).
- Select SAVE.You can adjust the wireless access point configuration at any time (Wireless Access Point Settings, page 14).NOTE: When you configure the stereo as a wireless access point, you can also use the wired network connection without changing any additional settings. The wired and wireless networks are bridged.
Wireless Access Point Settings
Select![]() > SETTINGS > NETWORK > ADVANCED > WI-FI ACCESS POINT.NOTE: You must configure the device to be a wireless access point before you can change the settings (Setting the Fusion PartyBus Device as a Wireless Access Point, page 14).SSID: Sets the SSID, or name, for the network.AP SECURITY: Sets the type of wireless security protocol used by the access point.NOTE: It is strongly recommended that you set the AP SECURITY using WPA2 PERSONAL. It is the most widely-used and secure wireless security protocol.PASSWORD: Sets the password for the access point. This is not available when the AP SECURITY setting is set to NONE.COUNTRY: Sets the region where the stereo is located. Different regions may use different channels on the wireless spectrum, so you should set this to best accommodate local wireless devices.CHANNEL: Sets the access point to use a group of channels in the high, low, or middle range of the available spectrum for your region. You may experience better performance if you set the channel in a range with fewer broadcasting access points.DHCP SERVER: Sets the device to act as a wireless access point and the DHCP server on the network.WPS: Initiates a Wi‑Fi Protected Setup (WPS) connection. Devices with a WPS button or setting can connect to the access point on this stereo when the WPS connection is active.NOTE: It can take up to two minutes to successfully connect to the access point after you select WPS.
> SETTINGS > NETWORK > ADVANCED > WI-FI ACCESS POINT.NOTE: You must configure the device to be a wireless access point before you can change the settings (Setting the Fusion PartyBus Device as a Wireless Access Point, page 14).SSID: Sets the SSID, or name, for the network.AP SECURITY: Sets the type of wireless security protocol used by the access point.NOTE: It is strongly recommended that you set the AP SECURITY using WPA2 PERSONAL. It is the most widely-used and secure wireless security protocol.PASSWORD: Sets the password for the access point. This is not available when the AP SECURITY setting is set to NONE.COUNTRY: Sets the region where the stereo is located. Different regions may use different channels on the wireless spectrum, so you should set this to best accommodate local wireless devices.CHANNEL: Sets the access point to use a group of channels in the high, low, or middle range of the available spectrum for your region. You may experience better performance if you set the channel in a range with fewer broadcasting access points.DHCP SERVER: Sets the device to act as a wireless access point and the DHCP server on the network.WPS: Initiates a Wi‑Fi Protected Setup (WPS) connection. Devices with a WPS button or setting can connect to the access point on this stereo when the WPS connection is active.NOTE: It can take up to two minutes to successfully connect to the access point after you select WPS.
Advanced Network ConfigurationYou can perform advanced networking tasks on a Fusion PartyBus device, such as defining DHCP ranges and setting static IP addresses.Select![]() > SETTINGS > NETWORK > ADVANCED.DHCP CLIENT: Sets the device as a DHCP client. This is the default setting for all devices that are notconfigured to be a DHCP server or wireless access point.STATIC IP: This allows you to set a static IP address for the device (Setting a Static IP Address, page 16).GARMIN MARINE NETWORK: Allows the device to be used on a Garmin® Marine Network so it can be viewed and controlled by connected Garmin chart plotters (Configuring the Stereo for use with a Garmin Marine Network, page 15).DETAILS: Shows information about the network configuration.Setting the Fusion PartyBus Device as the DHCP ServerIf you connected more than two network devices together using a network switch or wireless access point but you did not install a router, you should configure only one Fusion PartyBus stereo to be a DHCP server.NOTICEHaving more than one DHCP server on the network causes instability and poor performance for all devices on the network.NOTE: If you have set up this stereo as a WI-FI ACCESS POINT, it is configured as a DHCP server by default, and no further settings changes are needed (Setting the Fusion PartyBus Device as a Wireless Access Point, page 14).NOTE: Although the Fusion PartyBus devices can communicate with each other without a DHCP server on the network, the devices take longer to connect to each other when you first turn them on. It is highly recommended to have one properly configured DHCP server on the network for the best results.
> SETTINGS > NETWORK > ADVANCED.DHCP CLIENT: Sets the device as a DHCP client. This is the default setting for all devices that are notconfigured to be a DHCP server or wireless access point.STATIC IP: This allows you to set a static IP address for the device (Setting a Static IP Address, page 16).GARMIN MARINE NETWORK: Allows the device to be used on a Garmin® Marine Network so it can be viewed and controlled by connected Garmin chart plotters (Configuring the Stereo for use with a Garmin Marine Network, page 15).DETAILS: Shows information about the network configuration.Setting the Fusion PartyBus Device as the DHCP ServerIf you connected more than two network devices together using a network switch or wireless access point but you did not install a router, you should configure only one Fusion PartyBus stereo to be a DHCP server.NOTICEHaving more than one DHCP server on the network causes instability and poor performance for all devices on the network.NOTE: If you have set up this stereo as a WI-FI ACCESS POINT, it is configured as a DHCP server by default, and no further settings changes are needed (Setting the Fusion PartyBus Device as a Wireless Access Point, page 14).NOTE: Although the Fusion PartyBus devices can communicate with each other without a DHCP server on the network, the devices take longer to connect to each other when you first turn them on. It is highly recommended to have one properly configured DHCP server on the network for the best results.
- If the device is connected to the network using an Ethernet cable, select> SETTINGS > NETWORK > WI-FI OFF.You must turn off Wi‑Fi before you can set the stereo as a wired DHCP server.
- If the device is connected to the network using an Ethernet cable, select STATIC IP > SAVE.You must set the stereo to use a static IP address before you can set it as a wired DHCP server.
- Select ADVANCED > DHCP SERVER > DHCP ENABLED > SAVE.You can configure the IP address range of the DHCP server.
DHCP SettingsSelect![]() > SETTINGS > NETWORK > ADVANCED > DHCP SERVER.DHCP ENABLED: Sets the device as the DHCP server on the network.START IP: Sets the first IP address in the IP-address range of the DHCP server.END IP: Sets the final IP address in the IP-address range of the DHCP server.Configuring the Stereo for use with a Garmin Marine NetworkYou can connect this stereo to a Garmin Marine Network in order to view and control the stereo using a compatible Garmin Chartplotter.NOTE: When you configure the stereo for use with a Garmin Marine Network, you are limited to using only Garmin and Fusion devices. You may not be able to use third-party routers, storage devices, or other network products with this stereo directly.When the stereo is connected to a Garmin Marine Network, you can connect a smartphone to a wireless access point on a connected Garmin Chartplotter and use the Fusion-Link app to control the stereo. You cannot use Wi‑Fi networking on a stereo configured for use with a Garmin Marine Network. This functionality is compatible with wired network connections only.Select
> SETTINGS > NETWORK > ADVANCED > DHCP SERVER.DHCP ENABLED: Sets the device as the DHCP server on the network.START IP: Sets the first IP address in the IP-address range of the DHCP server.END IP: Sets the final IP address in the IP-address range of the DHCP server.Configuring the Stereo for use with a Garmin Marine NetworkYou can connect this stereo to a Garmin Marine Network in order to view and control the stereo using a compatible Garmin Chartplotter.NOTE: When you configure the stereo for use with a Garmin Marine Network, you are limited to using only Garmin and Fusion devices. You may not be able to use third-party routers, storage devices, or other network products with this stereo directly.When the stereo is connected to a Garmin Marine Network, you can connect a smartphone to a wireless access point on a connected Garmin Chartplotter and use the Fusion-Link app to control the stereo. You cannot use Wi‑Fi networking on a stereo configured for use with a Garmin Marine Network. This functionality is compatible with wired network connections only.Select![]() > SETTINGS > NETWORK > WI-FI OFF > GARMIN MARINE NETWORK.
> SETTINGS > NETWORK > WI-FI OFF > GARMIN MARINE NETWORK.
Setting a Static IP AddressIf the stereo is configured as a DHCP server, it is automatically assigned the IP address of 192.168.0.1. You can change this IP address.If the stereo is a client on the network and you do not want the DHCP server to automatically assign an IP address to the stereo, you can set a static IP address.NOTE: Every device on the network must have a unique IP address. If you select a static IP address that is the same as the IP address on the network, the devices will not work properly.
- Select> SETTINGS > NETWORK > ADVANCED.
- Select an option:• If the stereo is connected using an Ethernet cable, select ETHERNET IP > STATIC IP.• If the stereo is set as a wireless access point or wireless client, select WI-FI IP.
- Select an option:• To set the IP address, select IP, and enter the IP address.• To set the subnet mask, select MASK, and enter the subnet mask.NOTE: The subnet mask must match all other devices on the network to work properly. A typical subnet mask is 255.255.255.0.• To set the default gateway IP address, select GATEWAY, and enter the gateway IP address.NOTE: The default gateway is typically set as the IP address of the DHCP server on the network.
- Select SAVE.
Resetting Network SettingsYou can reset all network settings for this stereo to the factory default values.
- Select> SETTINGS.
- Select NETWORK > ADVANCED > RESET > YES.
Additional Stereo Control Options
Fusion-Link Wireless Remote Control AppYou can use the Fusion-Link remote control app on your compatible Apple or Android device to adjust the stereo volume, change the source, control playback, select and manage radio presets, and adjust some stereo settings. You can use the app to set up and configure DSP profiles on the stereo. You can use the app to update the stereo software.The app communicates with the stereo using a wireless connection to the mobile device. You must connect your compatible device to the stereo using Bluetooth or Wi‑Fi technology to use the app.If the stereo is connected to a network with a Wi‑Fi access point, the app can communicate with the stereo using the network for a greater range than a Bluetooth connection.NOTE: You cannot update the stereo software using a Bluetooth connection. You must connect the app using a Wi‑Fi connection to update the stereo software wirelessly.For information about the Fusion-Link remote control app for compatible Apple or Android devices, go to the Apple App Store^SM or the Google Play ™ store.
FUSION-Link™ Network TechnologyFUSION-Link network technology allows you to fully control compatible Fusion entertainment systems on compatible multi-function displays installed at the helm, flybridge, or navigation station of the vessel. This provides integrated entertainment control and a less cluttered console.The partnered multi-function display becomes the portal on which you can control all audio on the vessel, no matter where on the vessel the connected stereo is installed. The FUSION-Link-equipped stereo can be installed out of sight if space is an issue and users need to access the stereo only to replace removable media.FUSION-Link technology on this device can communicate using existing industry-standard network connections including Ethernet and Wi‑Fi wireless technology.
Appendix
Registering Your Fusion DeviceHelp us better support you by completing our online registration today.
- Go to garmin.com/account/register/.
- Keep the original sales receipt, or a photocopy, in a safe place.
Cleaning the Device
- Dampen a soft, clean, lint-free cloth with fresh water.
- Gently wipe the device.
Software UpdatesFor best results, you should update the software in all Fusion devices at the time of installation to ensure compatibility.You can update the software using the Fusion-Link remote control app on your compatible Apple or Android device. To download the app and update the device software, go to the Apple App Store or the Google Play store.
Updating the Software Using the Fusion-Link AppYou must connect the Fusion-Link app to the network using a wireless router or wireless access point to update the software. You cannot update the software using a Bluetooth connection.NOTE: If the stereo you want to update is in a group, you must remove it from the group (Leaving a Group, age 9).If the Fusion PartyBus network has a wireless router or wireless access point, you can update the stereo software using the Fusion-Link app, available for compatible Apple or Android on the Apple App Store or the Google Play store.NOTICEDo not turn off the device or disconnect the power during a software update. Turning off the power during a software update may cause the device to become unresponsive.NOTE:
- The device may restart a few times while updating the software. This is expected behavior.
- You can program only newer versions of software on the device.1 Connect your mobile device to a wireless router or wireless access point on the Fusion PartyBus network.2 Open the Fusion-Link app and verify that you can see the stereo in the app.3 If the Fusion PartyBus network is not connected to the internet, disconnect the mobile device from thewireless router or access point.4 In the Fusion-Link app, select > CHECK FOR UPDATES.5 Select the stereo.6 Select Download.The app downloads the software update file.7 If the Fusion PartyBus network is not connected to the internet after the app finishes downloading the update file, reconnect the mobile device to the wireless router or access point on the Fusion PartyBus network.8 In the Fusion-Link app, reconnect to the stereo.9 Select > GENERAL > Software Updates > Online Software Update.The app transfers the software update to the stereo over the Wi‑Fi network, the stereo updates the software, and then it restarts.
Troubleshooting
The stereo does not respond to keypresses
- Press and hold for at least 10 seconds to reset the stereo.My Bluetooth audio is interrupted by short breaks
- Ensure the media player is not covered or obstructed.Bluetooth technology performs best with the line-of-sight operation.
- Bring the media player within 10 m (33 ft.) of the stereo.
- Turn off the DISCOVERABLE setting after pairing a Bluetooth device to the stereo.
- Wi‑Fi signals may interfere with Bluetooth device connections. You should turn off the Wi‑Fi setting on your stereo if you are not using it.
The stereo does not display all song information from my Bluetooth sourceThe availability of song information such as song title, artist name, track duration, and album cover artwork depends on the capability of the media player and music application.
Network TroubleshootingIf you cannot see or connect to Fusion PartyBus devices on the network, check the following:
- Verify that only one device, either a stereo or a router, is configured as a DHCP server.
- Verify that all Fusion PartyBus devices, network switches, routers, and wireless access points are connected to the network and turned on.
- Verify that wireless Fusion PartyBus devices are connected to a wireless router or wireless access point on the network.NOTE: Wired connections are more reliable than wireless connections. If possible, you should connect devices to the network using an Ethernet cable.
- You may experience wireless interference if there are many nearby wireless access points. Change the channel on your router or wireless access point to test for and correct interference.
- Connecting a Bluetooth device to a stereo configured as a wireless access point or client may reduce wireless performance. Disconnect Bluetooth devices to test for and correct interference.
- If you configured static IP addresses, verify that every device has a unique IP address, that the first three sets of numbers in the IP addresses match, and that the subnet masks on every device are identical.
- If you have made configuration changes that might be causing networking issues, reset all network settings to the factory default values.
Network Status IconsA network-status icon is shown on some screens of the stereo. You can refer to this table to understand the appearance of the icon and help diagnose issues with the Fusion PartyBus network.
 |
The stereo is configured for a wired network connection and connected to a wired network using an Ethernet cable. |
| The stereo is configured for a wired network connection, but cannot detect the wired network. An Ethernet cable may not be connected or there may be other problems with the network. | |
| The stereo is in Wi‑Fi accessory configuration (WAC) mode, which allows for an easy connection to Apple devices. | |
| The stereo is configured as a wireless access point. | |
| The stereo is configured as a wireless client and connected to a wireless access point. The number of bars indicates the signal strength. | |
| The stereo is configured as a wireless client but is not connected to a wireless access point. There may be a problem with the connection settings or with the wireless access point. |
The stereo keeps locking up when connected to an Apple device
- Press and hold the power button to reset the stereo.
- Reset the Apple device. Go to www.apple.com for more information.
- Make sure you have the latest version of iTunes® and the latest operating software on your Apple device.
The stereo is not finding my connected Apple device
- Make sure your Apple device supports Interface Accessory Protocol 2 (iAP2). This stereo is not compatible with iAP1 devices.
- Make sure you have the latest version of iTunes and the latest operating software on your Apple device.
- Make sure you have the latest version of the Fusion-Link application on your Apple device.
- Reset the Apple device.Go to apple.com for more information.
- Contact your Fusion dealer or go to support.garmin.com.
My Apple AirPlay audio is interrupted by short breaks
- Make sure the Apple device is not covered or obstructed.
- Make sure the Apple device has a good connection to the same Wi‑Fi network as the stereo.
- Make sure the Apple device is not connected to the stereo using Bluetooth technology and Wi‑Fi.Using both a Bluetooth and a Wi‑Fi connection may cause playback interruptions.
Specifications
General
| Weight | 340 g (12.0 oz.) |
| Water resistance | IEC 60529 IPX7 (front of stereo only, when properly installed) |
| Operating temperature range | From 0 to 50°C (from 32 to 122°F) |
| Storage temperature range | From -20 to 70°C (from -4 to 158°F) |
| Input voltage | From 10.8 to 16 Vdc |
| Current (max.) | 8:00 AM |
| Current (muted) | Less than 400 mA |
| Current (off) | Less than 200 mA |
| Fuse | 15 A blade type |
| Wi‑Fi wireless range | Up to 32 m (105 ft.) |
| Bluetooth wireless range | Up to 10 m (30 ft.) |
| Wireless frequencies/protocols | Wi‑Fi 2.4 GHz @ 15 dBm nominal Bluetooth 2.4 GHz @ 10 dBm nominal |
| Compass-safe distance | 10 cm (3.9 in.) |
| On-board, Class D Amplifier | |
| Output music power per channel | 70 W max. x 2 at 2 ohm per channel |
| Total output peak power | 140 W max. |
| Output power per channel¹ | 2 x 43 W RMS at 14.4 Vdc input, 2 ohm, 10% THD2 x 26 W RMS at 14.4 Vdc input, 4 ohm, 10% THD |
Tuner frequencies
| Tuner | Europe and Australasia | USA | Japan |
| FM radio frequency range | 87.5 to 108 MHz | 87.5 to 107.9 MHz | 76 to 95 MHz |
| FM frequency step | 50 kHz | 200 kHz | 50 kHz |
| AM radio frequency range | 522 to 1620 kHz | 530 to 1710 kHz | 522 to 1620 kHz |
| AM frequency step | 9 kHz | 10 kHz | 9 kHz |
¹The stereo may limit the output power to prevent the amplifier from overheating and to maintain the audio dynamics.
Stereo Dimension DrawingsSide Dimensions
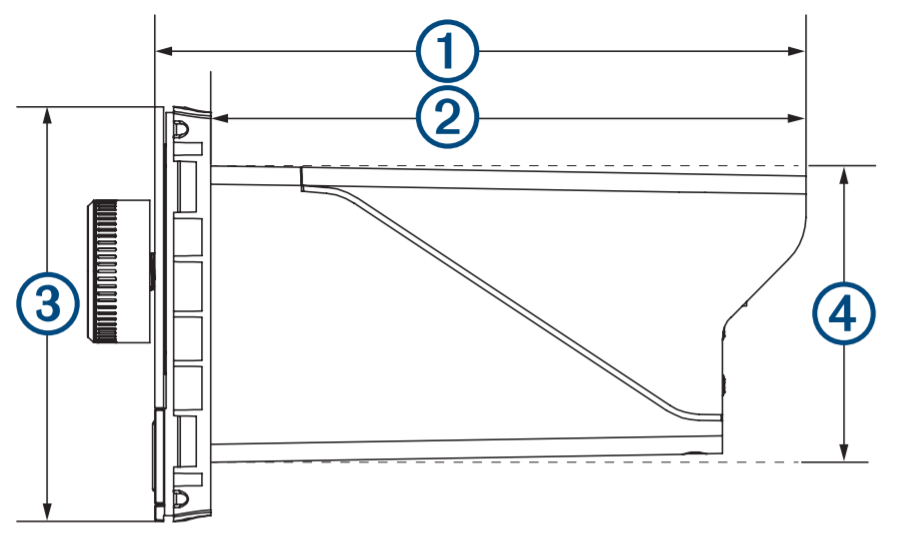
|
1 |
110 mm (4.33 in.) |
|
2 |
100 mm (3.94 in.) |
|
3 |
70 mm (2.76 in.) |
|
4 |
50 mm (1.97 in.) |
Top Dimensions
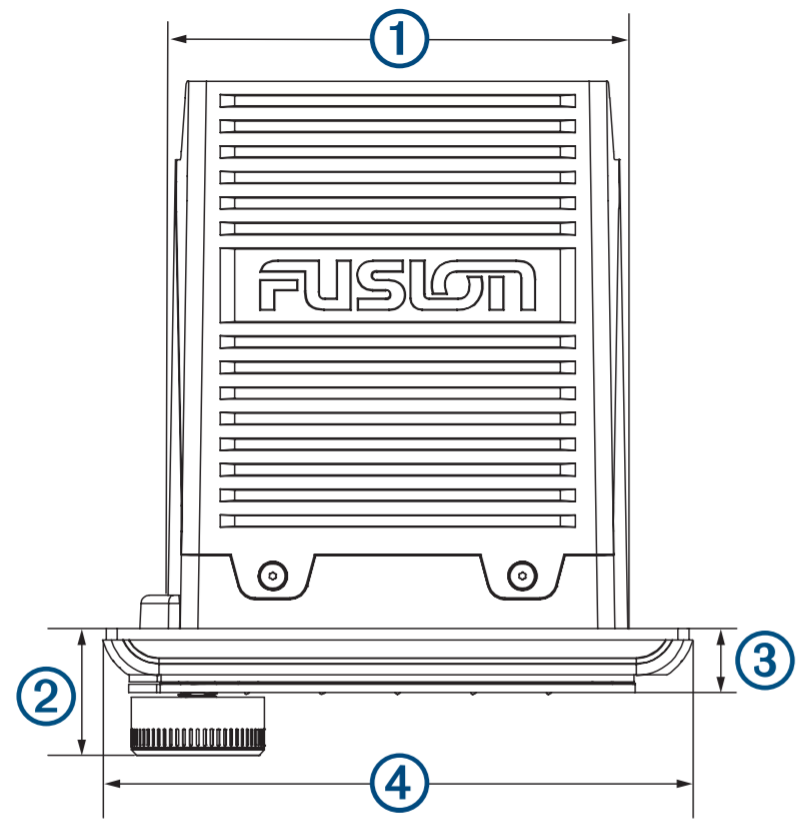
|
1 |
83 mm (3.27 in.) |
|
2 |
22 mm (0.87 in.) |
|
3 |
10 mm (0.39 in.) |
|
4 |
110 mm (4.33 in.) |
FUSION SUPPORTNew Zealand09 369 2900Australia1300 736 012Europe+44 (0) 370 850 1244USA623 580 9000Pacific+64 9 369 2900

![]() SUPPORT.GARMIN.COMGUID-FE4984BF-37E5-4873-9A57-75A9FE8CA097 v6July 2021Printed in Taiwan
SUPPORT.GARMIN.COMGUID-FE4984BF-37E5-4873-9A57-75A9FE8CA097 v6July 2021Printed in Taiwan
References
[xyz-ips snippet=”download-snippet”]