MODEL: GLSCX608S1A15MULTI-FUNCTIONAL AIR FRYER / GRILL AND ROASTERUSER MANUAL
Thank you for purchasing a Galanz product. Please read this manual carefully for correct usage and safety, and keep it for future reference. For service, support, and warranty information, call 800-562-0738.
IMPORTANT SAFETY INSTRUCTIONS
When using electrical appliances, basic safety precautions should always be followed, including the following:READ ALL INSTRUCTIONS BEFORE USING YOUR GALANZ MULTI-COOKER.
- Do not touch hot surfaces. Use handles. Close supervision is necessary when any appliance is used by or near children.
- To protect against electric shock, DO NOT PLACE ANY PART OF MULTI-COOKER IN WATER OR ANY OTHER LIQUID.
- Do not let the cord hang over the edge of the table or counter, or touch hot surfaces.
- Do not operate any appliance with a damaged cord and/or plug, after the appliance malfunctions or after it has been damaged in any manner. Return appliance to the nearest Authorized Service Center for examination, repair, or adjustment.
- The use of accessory attachments not recommended by the appliance manufacturer may cause hazards or injury.
- When operating the multi-cooker, keep at least four inches of space on all sides of the cooker to allow for adequate air circulation.
- Unplug from outlet when not in use, or before cleaning. Allow the appliance to cool completely before putting on or taking off any parts and before cleaning.
- To disconnect, press the START/STOP button to return to the standby mode, and then unplug the plug. When unplugging the appliance always hold the plug to remove it from the outlet, do not pull the cord.
- Do not use this appliance for deep frying or roasting with oil.
- Do not lean over or place your hands or face over the appliance while it is in operation. Do not touch the lid when the appliance is in operation, this could result in injury.
- Spilled food can cause serious burns. Keep appliances and cords away from children. Never drape the cord over the edge of the courter, never use an outlet below the counter and never use it with an extension cord.
- To avoid spill or splatter, do not fill the inner pot with food more than 3/4 full of the inner pot capacity.
- Do not place any of the following materials in the pot: cardboard, plastic, paper, or anything similar.
- Do not store any materials, other than the manufacturer’s recommended accessories, except the inner pot, in this multifunctional cooker when not in use.
- The delay cooking program is not recommended for porridge, oatmeal, or other foamy and thick liquids. The cooking process should be monitored when cooking these kinds of foods.
- Be aware that certain foods, such as applesauce, cranberries, pear, barley, oatmeal or other cereals, split peas, noodles, macaroni, rhubarb, or spaghetti can foam, froth and splatter. The cooking process should be monitored when cooking these kinds of foods.
- Be careful not to be scalded by the hot steam when opening the lid or when placing the food inside the cooking pot.
- Do not use outdoors. Do not use appliances other than intended use.
- This appliance is for HOUSEHOLD USE ONLY.
- The temperature of the lid and the outer surface may be higher when the appliance is working.
- Temperature of accessible surfaces may be high when the appliance is operating.
- This appliance is not intended for use by persons (including children) with reduced physical, sensory or mental capabilities or lack of experience and knowledge unless they have been given supervision or instruction concerning the use of the appliance by a person responsible for their safety.
- Children should be supervised to ensure that they do not play with the appliance.
- For appliances with type Y attachment, if the supply cord is damaged, it must be replaced by the manufacturer, its services agent or similarly qualified persons in order to avoid a hazard.
- WARNING: This appliance includes a heating function. Surfaces, other than the functional surfaces may develop high temperatures.
- Hold the appliance only by the handles and use heat protection measures like potholders when the appliance is on or still hot.Allow the housing to cool completely before touching. Do not place on or near a hot gas or electric burner or in a heated oven.
- Extreme caution must be used when moving an appliance containing hot oil or other hot liquids.
- Cleaning and maintenance shall not be made by children without supervision.
- If there is a foreign object between the inner pot and heating plate, remove it before use. Keep the heating plate dry and clean.
- To prevent deformation of the inner pot do not hit it or drop it on the ground. Only the manufacture provided pot should be used with the appliance. Do not use the inner pot with any other appliances or to heat on the stove.
- The inner pot has a non-stick coating, do not use sharp or metal utensils to remove food from the multi-cooker. Please use silicone, plastic, or wooden tools.
- To prevent damage to countertops, do not place the interior of the air fryer lid directly on counters. Place the lid on its side on a pot holder to protect counters. Appliances are not intended to be operated by means of an external timer or separate remote-control system.
- INTENDED FOR COUNTERTOP USE ONLY.
- A SHORT POWER-SUPPLY CORD IS USED TO REDUCE THE RISK OF IT BEING GRABBED, ENTANGLED IN, OR TRIPPED OVER.
CAUTION:
- RISK OF ELECTRIC SHOCK. ONLY COOK IN THE REMOVABLE COOKING POT.
- APPLIANCE SURFACES ARE HOT DURING AND AFTER COOKING. ALWAYS
SPECIFICATION
| Model | GLSCX608S1A15 |
| Power Consumption | 120V, 60Hz |
| Watts | 1500W |
| Capacity | 8 Quart |
| Weight | 8.8 kgs / 19.4 lbs |
| Dimensions ( WxDxH) | 18.07 x 13.78 x 15.47 inches 45.9 x 35.0 x 39.3 cm |
HOUSEHOLD USE ONLY SAVE THESE INSTRUCTIONS
WHAT’S IN THE BOX
BEFORE FIRST USE
Before using your electric multi-cooker for the first time, be sure to:
- Unpack the product. Remove all packaging materials from in and around the product and accessories. Do not remove safety and identification stickers from the multi- cooker.
- Read all warning cards, stickers, and tips on the User Manual.Please familiarize yourself with the following multi-cooker functions and accessories prior to the first use.
- Wash before first use. Clean the cooking pot, glass lid, and accessories in the dishwasher or with water and dish soap.Rinse with clean water and dry thoroughly prior to use. Please note that the air fry lid can not go in the dishwasher and care should be used when hand washing it so that the heating element is not immersed in water.
- Before cooking with the cooking pot for the first time make sure the cooker base is empty and that the heating element is clean, free of debris, and in good condition. Insert your clean, dry cooking pot into the cooker base. Always use the cooking pot when cooking in the multi-cooker.WARNING: The cooking pot will be hot during and after cooking. To avoid injury always use oven mitts or a heat-resistant pot holder when handling a hot cooking pot.
- This unit has a grounded 3-prong plug. Grounding protects the person using the multi-cooker from electric shock, as the casing is connected directly to the ground prong. It also protects the multi-cooker from power surges. Secure the 3-prong plug into a 120V outlet. When plugged in but not in operation the multi-cooker will remain in STANDBY mode. To disconnect, remove the plug from the wall outlet.CAUTION: Do not remove the grounding prong from the power cord.
GETTING TO KNOW YOUR GALANZ MULTI-COOKER
CONTROL PANEL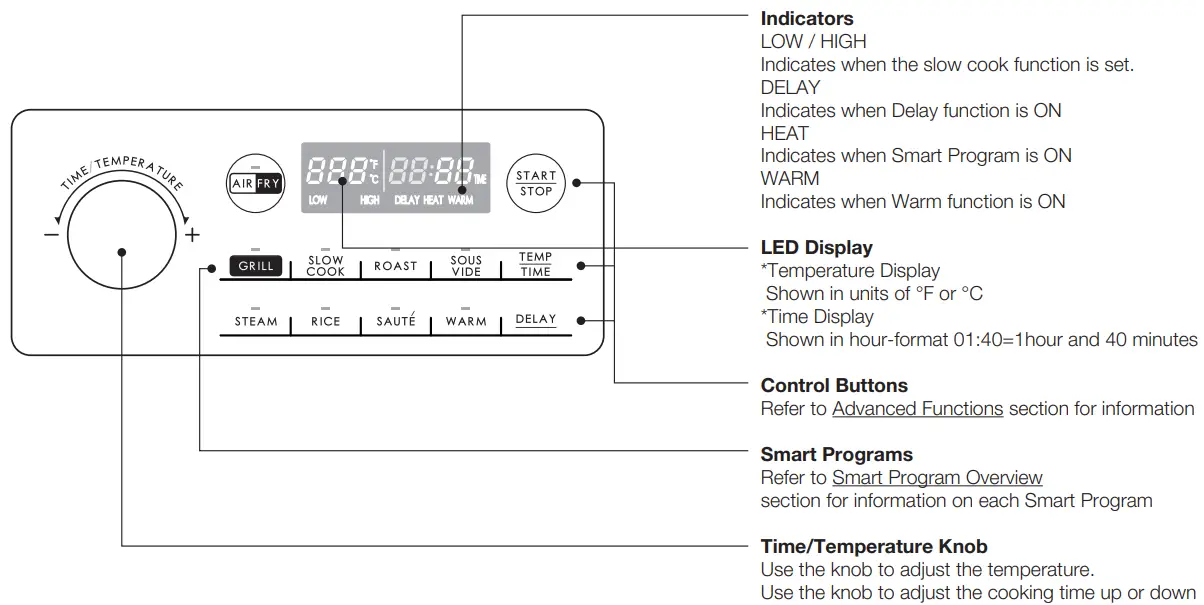
GETTING TO KNOW YOUR GALANZ MULTI-COOKER
ADVANCED FUNCTIONSStop & Standby ModeWhen the cooker is plugged in but not in operation, the display will show the 4 lines inside the timer and 3 lines inside the temperature to indicate that it is in Standby mode and ready.Long press Start/Stop to stop a Smart Program at any time; the cooker will go back to Standby mode.Temperature / Time AdjustmentPress the TEMP/TIME button and then turn the Knob left or right to set the desired cooking temperature and time.
- For the Temperature setting, turn the knob to select the desired cooking temperature and the temperature will flash in the LED display. Press the Knob once to confirm the Temperature setting.
- For the Time setting, press the TEMP/TIME button, then the LED will be switched to Time setting mode. Turn the knob to the desired cooking time and the time will flash in the LED display. Press the knob or Start/Stop button once to confirm the Time setting.
- To toggle between the Temperature setting and the Time setting, press the TEMP/TIME button repeatedly.
Keep WarmThe Keep Warm setting will come on automatically for the slow cook, roast, steam, and rice functions. Choose a Smart Program and set your desired cook time and temperature.NOTE:The LED above the button will light up to indicate when the setting is ON.
- If the Keep Warm function is ON after cooking has completed, the display will show “WARM”, and count up to let you know how long the cooker kept your meal warm.
- If the Keep Warm function is OFF after cooking has finished, the cooker will go into Standby mode.
You may use the Keep Warm function by selecting WARM when in Standby Mode.
- Press the TEMP/TIME button and the time will flash in the LED display. Turn the TIME/TEMPERATURE knob to set the desired time.
- Once set, press the START/STOP button to begin the cooking process. The display will count down.
NOTE:The temperature setting on Warm is pre-set, and cannot be modified. Only time can be adjusted.
| Smart Program | Max Time for Automatic Keep Warm Setting | Max Time for Manual Keep Warm Setting |
| Slow Cook | Max 08W hours | Max 12:00 hours |
| Roast, Steam, Floe | Max 01:00 hour | Max 12:00 hours |
| Sal rte, Sous Vice, Pk Ry, Grill | Cannot be kept warm |
START USING YOUR MULTI-COOKER
ADVANCED FUNCTIONS
Delayed StartDelayed Start can be used with all Smart Programs with the exception of Sauté, Grill, and Warm. Use the following as a guideline for how to use the Delayed Start program.
- Select your desired Smart Program by pressing the button.
- Turn the knob left or right to set the temperature
- Press the TEMP/TIME button to toggle between time adjustment and temperature adjustment mode, then turn the knob left or right to set the time.Note:You will not be able to return to this screen without canceling the program entirely, so it is important to remember to input your cooking time before setting the Delayed Start timer.
- Press the DELAY button to turn the setting on, The LED above the button will light up.
- Turn the knob left or right to set the time.
- Press the START/STOP button and the Delayed Start countdown will begin. The number displayed on the screen represents the amount of time before your meal will start cooking.Note:Changes to the Delayed Start time may not be made once the timer has started.To adjust the time, Long press Start/Stop to stop the program and enter your new selections.Temperature: Fahrenheit & CelsiusPress the TEMP/TIME button for 5 seconds to toggle between °F and °C.
SMART PROGRAM OVERVIEW
| Smart Program | Default Temp | Temp Range | Default Time | Time Range |
| Grill | 410°F210°C | 355-410°F180-210°C | 00:12 | 00:01-01:00 |
| Slow Cook | High | N/A | 04:00 | 00:30-06:00 |
| Low | N/A | 08:00 | 00:30-12:00 | |
| Roast | 350°F180°C | 250-410°F120-210°C | 00:45 | 00:10-03:00 |
| Sous Vide | 135°F 58°C | 100-185°F 43-85°C | 04:00 | 00:10-24:00 |
| Steam | N/A | N/A | 00:08 | 00:05-02:00 |
| Rice | High | N/A | Auto | N/A |
| Low | N/A | Auto | N/A | |
| Sauté | 400°F 205°C | 250-410°F120-210°C | 00:30 | 00:05-01:00 |
| Air Fry | 360°F 185°C | 265-410°F130-210°C | 00:25 | 00:10-01:00 |
WARNING:Cooking pot will be hot during and after cooking. To avoid injury, Always use heat-resistant pot-holders or oven mitts when handling a hot cooking pot.
USING SMART PROGRAM WITH AIR FRY LIDSelect a recipe and use the following steps as a guide to help you start cooking. For more specific cooking instructions, please refer to your recipe.How to Use Air Fry, Grill & Roast
- Connect the power cord to a 120V outlet. The cooker will enter Standby mode.
- Select your desired Smart Program, for example, Grill.
- Customize the temperature: Press the TEMP/TIME button and when the temperature will flash in the LED display, turn the TIME/TEMPERATURE knob to raise or lower the temperature, as required.
- Customize the time: press the TEMP/TIME button again and the time will flash in the LED display. Turn the TIME/TEMPERATURE knob to set the desired cooking time.
- Press the knob or the START/STOP button to begin the cooking process.
- The display will show PRE while the multi-cooker preheats, with the exception of the Air Fry program which displays the cook time countdown immediately. The lid needs to be on the cooking pot during pre-heating.
- Remove the air fry lid and place ingredients in the cooking pot when the pre-heating is done. Put the air fry lid in place again and press the START/STOP button to begin the cooking.
USING SMART PROGRAM WITH GLASS LIDSelect a recipe and use the following steps as a guide to help you start cooking. For more specific cooking instructions, please refer to your recipe.How to Slow Cook
- Place ingredients in the cooking pot.
- Connect the power cord to a 120V outlet. The cooker will enter Standby mode.
- Press the TEMP/TIME button and when the temperature will flash in the LED display, turn the TIME/TEMPERATURE knob to toggle between Low and High cooking settings.
- Press the START/STOP button to begin the cooking process.The countdown will begin immediately.
The display will show the LOW or HIGH to the corresponding setting.Note:The default temperature setting for the Slow Cook program is low.
How to Use SOUS VIDE
- Connect the power cord to a 120V outlet. The cooker will enter Standby mode.
- Place the sous vide rack at the bottom of the cooking pot, and ensure the sous vide wire separators are in the upright position.
- Fill the cooking pot with enough water to cover the sealed pouches once added; approximately 3/4 full.Caution: Do not overfill the cooking pot.
- Select SOUS VIDE button.
- Customize the temperature: press the TEMP/TIME button and when the temperature will flash in the LED display, turn the TIME/TEMPERATURE knob to raise or lower the temperature, as required.
- Customize the time: press the TEMP/TIME button again and the time will flash in the LED display. Turn the TIME/TEMPERATURE knob to set the desired cooking time.
- While the cooker heats the water, season your food as desired and place the ingredients into air-tight pouches. Separate single servings of food within individual pouches. Remove air from the pouches and seal tightly.
- Once the set water temperature has been reached, place the sealed pouches in the water, within the slots of the sous vide rack.The contents of the pouches should be submerged below the water level.
- Cover your cooker with the glass lid and let the cooking begin!NOTE:For long cooking times, check periodically to make sure the water level remains above the food pouches. If you need to add water, first heat it to approximately the same temperature as the water in the cooking pot to avoid cooling the cooking water.
- Once the Smart Program has finished, uncover the cooker and carefully remove the pouches from the water. Next, remove the contents from the pouches and use a thermometer to check for doneness.TIP:If you want your food to be browned or have more color on the outside you can quickly sear the outside in a hot pan once the food is removed from the cooker.This is a common practice in Sous Vide cooking to finish the food.
How to Use Steam & Sauté
- Connect the power cord to a 120V outlet. The cooker will enter Standby mode.
- Select your desired Smart Program, for example, Sauté.
- Customize the temperature: Press the TEMP/TIME button and when the temperature will flash in the LED display, turn the TIME/TEMPERATURE knob to raise or lower the temperature, as required.
- Customize the time: press the TEMP/TIME button again and the time will flash in the LED display. Turn the TIME/TEMPERATURE knob to set the desired cooking time.
- Press the TEMPERATURE/TIME knob to confirm the setting.
- Press the START/STOP button to begin the cooking process. The countdown will begin immediately.NOTE:The temperature setting on Steam is pre-set, and cannot be modified. Only the cooking time can be adjusted
How to Use Rice
- Place ingredients in the cooking pot.
- Connect the power cord to a 120V outlet. The cooker will enter Standby mode.
- Select Rice.
- Press the TEMP/TIME button and when the temperature will flash in the LED display, turn the TIME/TEMPERATURE knob to toggle between Low and High cooking settings.
- Press the START/STOP button to begin the cooking process. You will see AUTO on the display.
- Once the Smart Program has finished, the cooker will beep and the display will show DONE.
Rice Cooking ChartRice to water ratios were developed for cooking medium or long-grain white rice. Do not add more than 8 cups of uncooked rice – the volume of water and rice in the cooking pot should not exceed 3/4 full.
|
White Rice (cups) |
Water (cups) |
| 1 | 1 |
| 2 | 2 |
| 3 | 3 |
| 4 | 4 |
| 5 | 5 |
| 6 | 6 ½ |
| 7 | 7 ½ |
| 8 | 9 |
STATUS MESSAGE
|
This indicates it is in the preheating mode. |
|
This indicates that the user can add the ingredients into the cooking pot. |
| Indicates the air fry lid is not properly secured or missing. | |
| Indicates the rice program is ON. |
CARE & MAINTENANCE
CLEANINGUnplug your Galanz cooker and let it cool to room temperature before cleaning. For regular maintenance, ensure that the cooking pot’s interior and exteriorsurfaces are clean and dry before use or storing.
- The cooker should be cleaned regularly for best performance and longer service life. Regular cleaning could reduce the risk of fire hazards.
- Clean the inner pot and accessories with a soft cloth with a neutral detergent. And then rinse with clean water.
CAUTION:To protect against electrical shock, do not immerse the cooker base in water or any other liquids, and do not attempt to cycle through the dishwasher.
| Part | Dish was -her Safe (top rack) | Hand Wash | Wipe Clean (damp cloth) | Cleaning Tip |
| Glass Lid | 1. Wash after each use2. Never use abrasive cleaners or metal scouring pads.3. In dishwasher, place on top rack | |||
| Air Fry Lid | Wipe the air fry lid with a damp cloth and be careful for the metal parts. | |||
| Inner Pot | 1. Wash after each use2. Never use abrasive cleaners or metal scouring pads on the inner pot. | |||
| Cooker Base | Clean the exterior stainless steel housing and LCD with a soft, barely -damp cloth or sponge, and wipe dry to avoid streaking.Caution: Do not wet the prongs of the power cord. | |||
| Sous vide &steam rack Grill GrateAir Fry Basket | 1. Wash after each use.2. In the dishwasher, place on the top rack. |
STORAGEUnplug your Galanz cooker and let it cool to room temperature, then clean it before storing. Store the appliance in a clean, dry place. Never store appliancewhile it is hot or still plugged in. Never wrap the cord tightly around the appliance. Do not put any stress on the cord where it enters the unit, as it could cause the cord to fray and break.
- Ensure the cooker is turned OFF then remove the power plug from Allow the cooker and all accessories to cool completely.
- Ensure the cooker and all accessories are clean and dry.
- Store the appliance in an upright position standing level on its support legs. Do not store anything on top.
- Store the multi-functional cooker in a dry location such as on a table or countertop or cupboard shelf. Other than the recommended cleaning, no further user maintenance should be necessary.
- Any other servicing should be performed by an authorized service representative.
TROUBLESHOOTING GUIDE
The topics covered in the following table do not always indicate a faulty cooker. Please examine the cooker carefully. If you should have any further inquiries about the cooker, need technical assistance, or require product return information, contact the Customer Care Team at: 800-562-0738.
| Problem | Possible Reason | Possible Solution |
| Smell and minimal smoke on initial use | Packing material still present in a cooker base | Ensure all packing material has been removed from in and around the cooker |
| Unable to change Smart Program during cooking | Once the Smart Program has started, it cannot be switched to another program | Press Cancel to stop the Smart program, then select a new cooking program |
| Error Code on Screen | Lid – The air fry lid is not in place or open | Close the air fry lid again.
If the error code remains, contact the Customer Care Team |
PRODUCT WARRANTY
This warranty applies to products sold by Galanz Americas in the U.S. This warranty is in lieu of any other warranty and expressly applies to the individual product only.Galanz product is warrantied for one year following purchase for defects in material and workmanship. Please save your receipt as proof of purchase is required to make a warranty claim. During this warranty period, we will provide the replacement cost of this product, a replacement or the equivalent, or repair per our discretion.The warranty cannot be transferred through resale, including the resale through a 3rd party unauthorized retailer, and is only bestowed upon the original consumer purchaser upon purchase from an authorized retailer.
- This warranty does not cover and excludes damage or defects caused by:—Consumer misuse—Abuse—Neglect including the failure to clean and/or provide adequate regular maintenance as outlined in the user manual—Commercial use—Subjecting the product to any voltage outside the specified—rangeLoss of parts—The affixing of any attachments not provided with the product—Accident, or—Use in a manner not intended and outlined in the user manual.—Any subsequent damages caused by the above-listed exclusions will not be covered and any claims determined to meet the above exclusions will be denied. All liability is limited to the purchase price and does not include any: Retail offered extended warranties Tax Other charges(including postage to send required materials) Incidental and/or consequential damages associated with the product in question.
Every implied warranty, including any statutory warranty of merchantability or fitness for a particular purpose, is disclaimed except to the extent prohibited by law, in which case such warranty is limited to the duration of this written warranty. This warranty gives you specific legal rights. You may have other legal rights that vary depending on where you live. Some states do not allow limitations on implied warranties or special, incidental, or consequential damage, so the above limitations may not apply to you.If you have a claim under this warranty, please call our Customer Service number: 1-800-562-0738.For faster service, please have the model number, serial number, and receipt ready for the operator to assist you.
TROUBLESHOOTING GUIDE
Please mail this warranty card to the address below within 30 days of purchase.Galanz Americas, 55 Challenger Road, Suite 503, Ridgefield Park, NJ 07660.PLEASE PRINT CLEARLY.
Name_________________________________________________________Address_______________________________________________________City_______________________State_________Zip____________________Phone___________________Email_________________________________Model Number_____________________Serial Number__________________Purchase Location________________________________________________
You must attach a copy of your purchase receipt to validate your registration.
@2021 Galanz Americas Limited Company
[xyz-ips snippet=”download-snippet”]