
Galanz Refrigerator

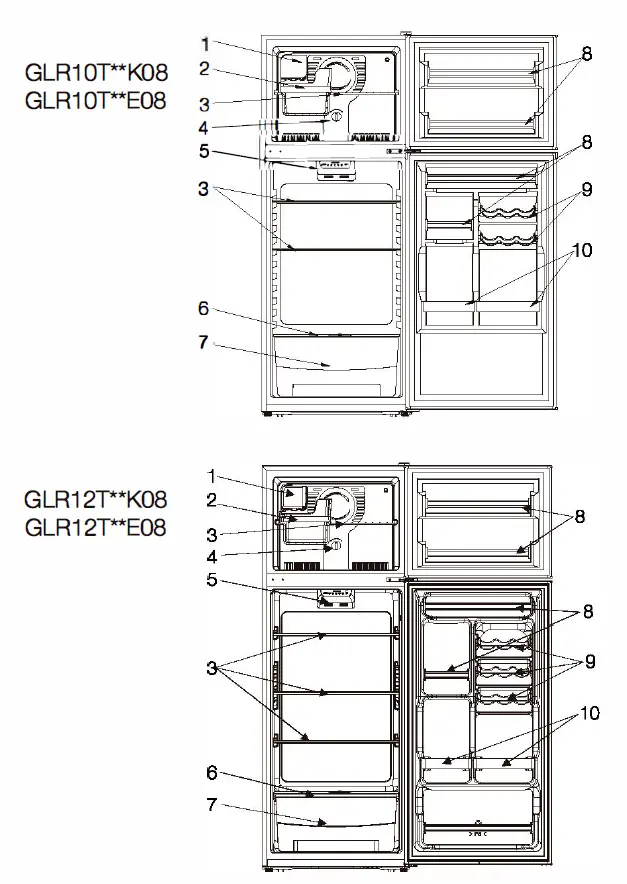
NAMES OF THE PARTS
- The refrigerator you purchased may be improved, which maybe not completely consistent with the manual, However the functions and operating methods will not change. Please feel free to use!
- If you use the refrigerator for the first time, remove the adhesive tapes of the drawers, door bins, egg tray, and the drain tube plug.
- Do not pull or push the drawers and door bins fiercely during use in case of damage.
- Adjusted the temperature control as higher as you could accept, which will save the energy consumption of the refrigerator and your money.Don’t open the refrigerator door continually if it is in the normal working situation.
- Keep the combination of drawers, baskets and shelves of the refrigerator is consistent with its original standard.
- Ice maker (GLR1 OT’*K08, GLR12T’*K08)
- Ice bucket (GLR1 OT’*K08, GLR12T’*K08)
- Shelve
- Freezer control
- Lamp and refrigerator control
- Crisper cover
- Crisper drawer
- Door rack
- Can rack
- Door rack
SAFETY WARNINGS
For ensure your personal safety, please follow the points below:
- The circuitry for refrigerator must be isolated. The area of cross section of wire must be larger than 0.75mm2• The power plug should have its own socket, the socket must be ground as adapter may cause the socket to overheat.
- The voltage and frequency of this product should be 115VAC/60Hz.
- Do stop the power only by pulling the power plug out of the socket directly but not by the wire.
- Do not damage the refrigerant circuit.
- This appliance is not intended for use by persons (including children) with reduced physical, sensory or mental capabilities, or lack of experience and knowledge.unless they have been given supervision or instruction concerning use of the appliance by a person responsible for their safety.
- Children should be supervised to ensure that they do not play with the appliance.
- Keep ventilation opening, in the appliance enclosure or in the built in structure. clear of obstruction.
- Before you throw away your old refrigerator or freezer.— Take off the doors;— Leave the shelves in place so that children may not easily climb inside.
- Do not store explosive substances such as aerosol cans with a flammable propellant in this appliance.This appliance is intended to be used in household and similar applications such as— staff kitchen areas in shops, offices and other working environments;— farm houses and by clients in hotels, motels and other residential type environments;— bed and breakfast type environments;— catering and similar non-retail applications.
- Do not use electrical appliance inside the food storage compartments of the appliance, unless they are of the type recommended by the manufacture.
- This appliance can be used by children aged from 8 years and above and persons with reduced physical, sensory or mental capabilities or Jack of experience and knowledge if they have been given supervision or instruction concerning use of the appliance in a safe way and understand the hazards involved.Children shall not play with the appliance. Cleaning and user maintenance shall not be made by children without supervision. Children aged from 3 to 8 years are allowed to load and unload refrigerating appliances.
To avoid contamination of food, please respect the following instructions:— Clean water tanks if they have not been used for 48 h; flush the water system connected to a water supply if water has not been drawn for 5 days.— Store raw meat and fish in suitable containers in the refrigerator, so that it is not in contact with or drip onto other food.— Two-star frozen-food compartments are suitable for storing pre-frozen food, storing or making icecream and making ice cubes.— One-, two- and three-star compartments are not suitable for the freezing of fresh food.— If the refrigerating appliance is left empty for long periods, switch off, defrost, clean, dry, and leave the door open to prevent mould developing within the appliance.
WARNING:
When positioning the appliance, ensure the supply cord is not trapped or damaged.Do not locate multiple portable socket-outlets or portable power supplies at the rear of the appliance.NOTICE:
- When gas leaks from its container, don’t pull the plug, out or in, for it may arouse sparks and fire calamities.
- Don’t splash water on the rear of the appliance, for it may cause malfunction or electric shock.
- Don’t place bottled and canned beverages in the freeze so as to prevent from bursting.
- Don’t stir inflammable materials such as ether, benzene, LP gas and glue etc in the refrigerator .
- It is better not place object on the top of appliance which is magnetic, heavy, or be filled with water. Electronic components may not work steadily if water gets inside. Do not store object which is costly or impressible to temperature and e. g. serum, bacterin and so on.
- The refrigerant of this product is R600a, which is inflammable. So.make sure not to damage the cooling system during the transportation and installation.
- DISPOSAL: Do not dispose this product as unsorted municipal waste. Collection of such waste separately for special treatment is necessary.
USE METHOD AND PRECAUTIONS OF DIFFERENT COMPARTMENTS
TIPS FOR USE OF REFRIGERATOR COMPARTMENT
- The common refrigerating temperature of food stored in refrigerator is from 39-46°F.ln this environment, cooked meat can not be stored for more than 4 days, and fruits and vegetables should not exceed one week at most.
- The common temperature of the chilling room is from 30 -39°F, and meat can not be stored for more than? days.
- Meat and seafood need to be packed in different containers and stored for not more than 3 days.
- Raw food and cooked food need to stored in different containers. In order to prevent bacterial contamination, raw vegetables and fruits should not be exposed to raw meat or fish. Vegetables and fruits should be wrapped by film and stored in the crisper.
- Before freezing, the food, separated from raw and ripe,should be wrapped tightly with fresh-keeping film, and placed in different containers. The temperature of freezing room is O °F Meat should be kept in fresh and fish in deep-frozen. In order to make the taste fresh and delicious, and to lock up the nutrition of food, the food in the refrigerator should not be stored for more than three months.
INSTALLATION INSTRUCTIONS
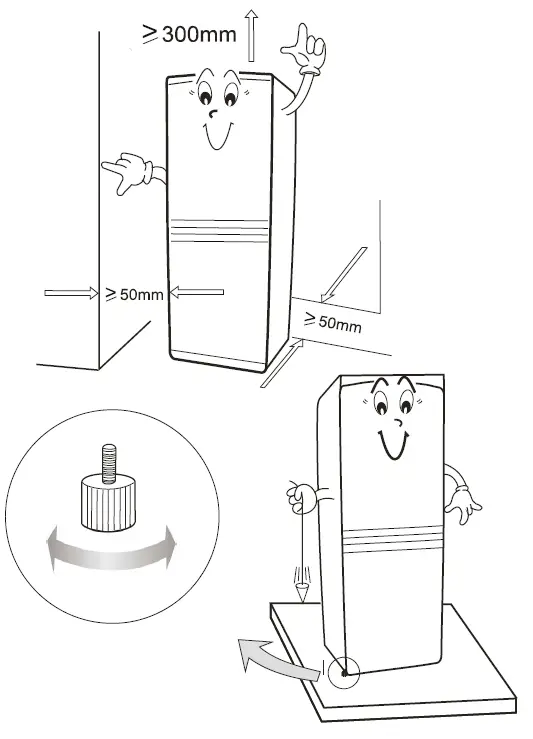
- The refrigerator should be located in a completely flat surface , Leave 2-4 inch(5-1 0 cm) between each side of the appliance and the wall, and leave 12 inch(30 cm) leave 12 inch(30 cm) top of the appliance and the ceiling.
- Choose a location which is not exposed to sunlight, high temperature or humid, as humidity may cause stain.
- Pull out the bottom panel before installation.
- The appliance can be adjusted by rolling its two legs in front the bottom when it is unstable. Rolling in clockwise can rise up the machine.
- The location should be firm and flat. An unsecured position may cause noise and vibration:(a) The noise may be increased if the floor is not firm.(b) Put a sheet under the appliance for solving the heat emission if you need to locate it onto a carpet.
- Make sure the adjustable legs are clung to the floor, and set the appliance slope backward slightly for keeping the doors closed tightly.
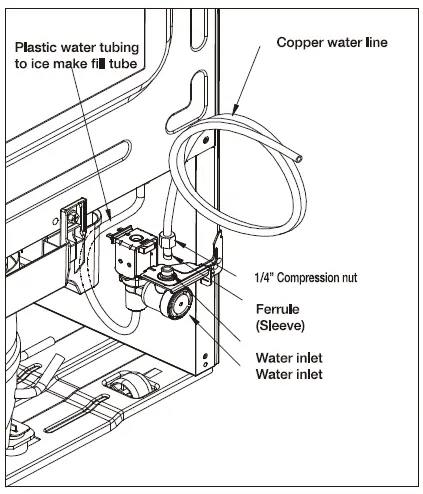
CONNECT WATER SUPPLY(GLR1 OT**K08 GLR12T**K08)
What you need:
1. Basic tools:adjustable wrench,flat blade screwdriver.and Phillips TM screwdriver.2. Access to a household cold water line with water pressure between 20 and 120 psi.3. A water supply line made of 1/4inch(6.4mm)OD, copper tubing. To determine the length of copper tubing needed,you will need to measure the distance from the ice maker inlet valve at the back of4. the refrigerator to your cold water pipe. Then add approximately 7 feet (2.1 meters), so the refrigerator can be moved out for cleaning.5. A shutoff valve to connect the water supply line to your household water system. DO NOT use a self-piercing type shutoff valve.6. A compression nut and ferrule (sleeve) for connecting the water supply line to the ice maker inlet valve.
NOTE: Before making the connection to the refrigerator, be sure that the refrigerator power cord is not plugged into the wall outlet.
1 . Place end of water supply line into sink or bucket. Turn On water supply and flush supply line until water is clear. Turn OFF water supply at shut off valve.2. Remove the plastic flexible cap from the water valve inlet.
WARNING: Connect to potable water supply only.
REVERSE AND INSTALL THE DOORS
You can choose to open your refrigerator by the right side or the left one. To change the way of opening, please follow the below instructionsImportant safety warning: before doing so please unplug and disconnect the applianceExcept the Accessories packed, you still need:Medium-sized cross screwdriverSmall screwdriverA solid line
One more person who can help you would be better.
- Firstly, you need to check if the power connect or not.
- Open the upper door, and close the bottom door.

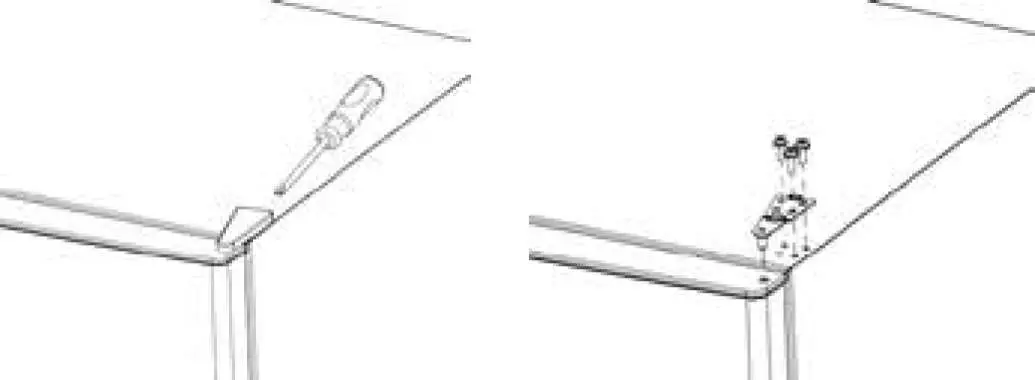
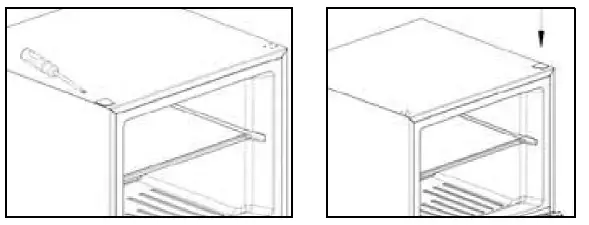
- Take off the protective covers with a Phillips screwdriver through the back side, and save the protective covers.
- Take off the 3 shelf-tapping screws, and save them.
- Push the top hinge forward, remove the door and save it aside.
- Pry off the screw cover on the top left side of the refrigerator to uncover the screws holes.
- Replace screw cover on the top left side of the refrigerator to the right top to cover the holes. Cover is also force-fitted.
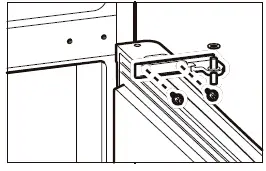
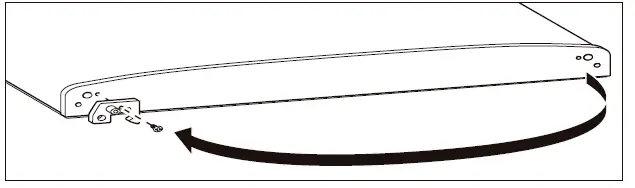
- Open the bottom door.
- Take off the 2 screws and save them.
- Remove the middle hinge.
- Take out the bottom door and save it
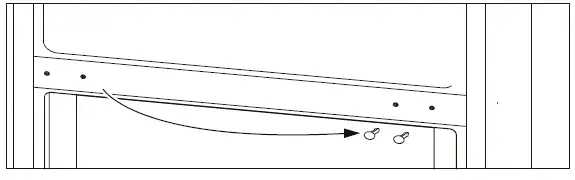
- Pry of off refrigerator and remove housing. the cover Attach over cover the on screw the right holes side. on the Cover left is force-fitted.
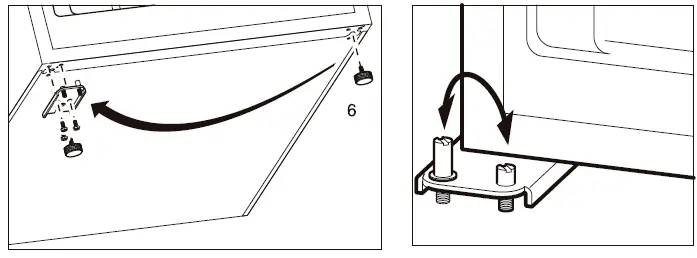
- slightly backward the machine against the wall.
- Take off the 2 bottom fixed feet hinge.
- Assemble the bottom hinge in the other side of the machine.
- Fixed up the feet.
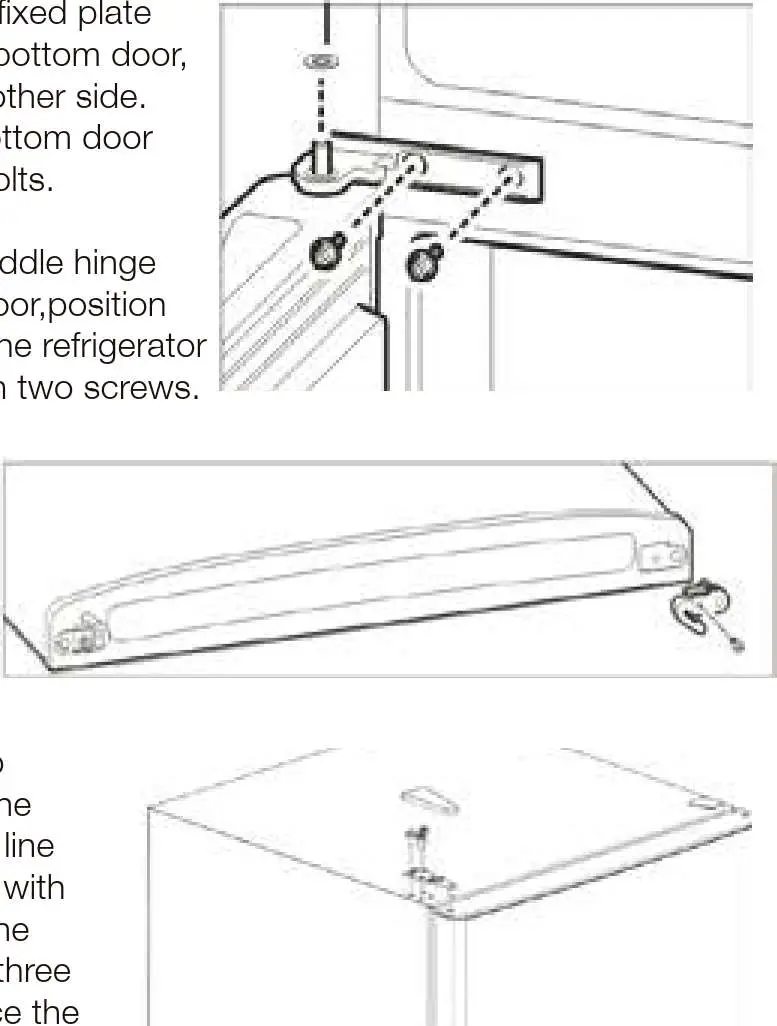
- Take off the er I and right fix door the closer and other closer inside the of the upper door.
- hinge freezer Place on door top the of and top the lineup the top hinge with e holes on top of the refrigerscrews ator. to Use replace three the hinge. Then tighten the screws. Force-fit protective covers over top hinge.
OPERATION INSTRUCTIONS
PLACEMENT OF FOOD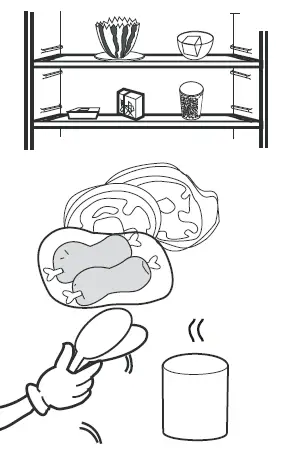
- There should always be some space between items inside for air circulation
- Food should be kept in sealed package to avoid becoming dry or with odour.
- Hot food should be cooled down before placing into the appliance. Otherwise, interior temperature and electronic consumption will increase.
- Reduce the frequency of door opening can efficiently low down the electronic consumption.
INSTRUCTION FOR USAGE
REFRIGERATOR CONTROLThe temperature of the refrigerator can be controlled manually by the display. However, the number shown on the display does not directly represent the temperature. Instead, the larger the number is the lower the interior temperature will be. Initially set the refrigerator control on the middle setting (number 3). If you want to set the refrigerator temperature to a colder temperature pressing the set button until the state on 4 or5 each time the set button is pressed, the state increases TEMP. . When the state is in the highest state, press the button again and return to the first state.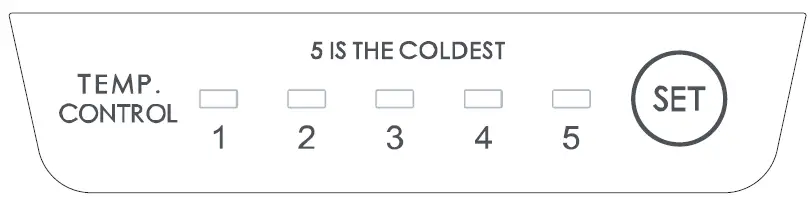
FREEZER CONTROL
If the refrigerator’s lower temperature is needed, please regulate the knob along the “COLDER” direction contrarily, regulate the knob along the “COLD” direction.Note: Regulate the knob to set the freezer temperature as you desire. Always wait 24 hours after any adjustment to reach the desired temperature 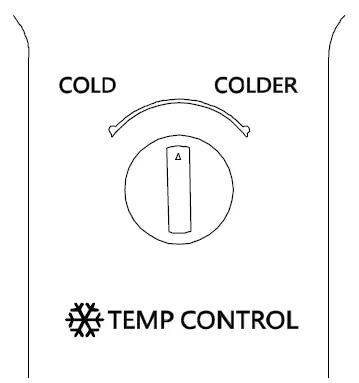
ICE MAKER (on some models)After turning on your refrigerator, the ice will start to be made between 12and 24 hours. 
The ice maker produces 3.5 lbs ice per day, depending on the temperature of the freezer, the times in which the door opens, and other using conditions (amount of food in the freezer, etc).
In order to turn on/off the ice maker, press the power button for 2 seconds.The ice maker will fill up (and start making ice) between 12 and 24 hours after the refrigerator is turned on. Throw away the first batch of ice. Make sure that nothing interferes with the sensor. When the ice reaches the sensor, the ice maker will stop to make ice immediately. It’s normal that some ice gets stuck. If the ice is not used frequently, the older cubes of ice will be opaque in color, smaller, and with a strange flavor.
PACKING AND MOVING
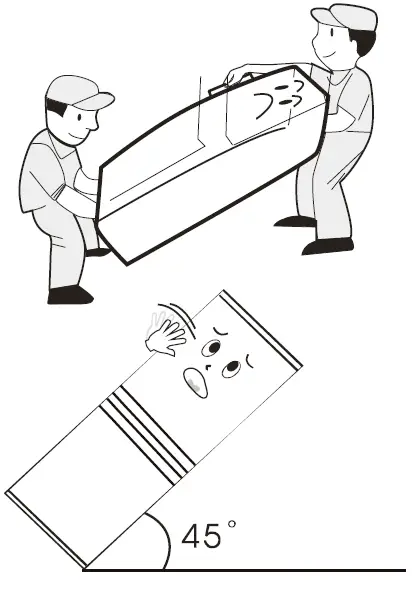
- Please Unpack, repack memorize and the carry position of each accessory of the appliance when unpacks it, carefully repack the before product transportation.
- Do handle not lift during or pull the transportation. door or the door.
- When sloped vertical over moving, direction). 45 the degrees Please appliance (the avoid can angle strong not to be the vibration and hit.
MAINTENANCE
The safety.do appliance please should pull the be plug maintained out of the and socket cleaned before frequently.
- Clean lnterior the interior maintenance of the appliance with clean water or neutral cloth. abluent. Scour it with clean water and wipe it with a piece of dry
- Maintenance of door gasket tain It likes is oil, easy sauce to and damage etc., if the so it door is better gaskets to are clean polluted them by carefully.the s
- Outer maintenance
TROUBLESHOOTING TIPS
- The refrigerator does not work It may not be connected to the power supply(plug, power cut or fuse); Voltage is too low.
- The refrigerator does not work efficiently as expected It may be caused by heavy frost, or by warm temperature setting or by frequently door operating.
- lt makes an unusual noiseIt may be caused by an imbalance or loose ground locating the appliance, or by resonation between the appliance and other ambient objects.
- The compressor keeps working for a long periodThe environment temperature may be too high. The doors may be opened frequently or even they are left open. The temperature control knob setting in (4-5) state may increase the working time of compressor.
- Disgusting odour happensFood with strong odour should be packed tightly before being put inside the appliance. Please check whether there is any deteriorated item or whether the liners are left dirty for a long time.
- Water leaks from the bottom of the refrigeratorThe drain tube is jammed. Please use a proper tool to solve it.
- Heavy frost occurs on the rear of the appliancePutting humid or hot food into the appliance may cause this problem. Or it may be caused by the heavy environment moisture.
- The ice maker is not producing ice or not enough ice.
- If it is new installation. Wait 12 to 24 hours after icemaker installation for ice production to begin. It will take 72 hours for full ice production.
- Check if the refrigerator is connected to a water supply or the supply shut off valve is turned on.
- Reverse osmosis filtration systems can reduce the water pressure below the minimum amount and result in icemaker issues.
- A kink in the line can reduce water flow. Straighten the water source line.
- Confirm ice maker is in the ON position.
- The recommended temperature for the freezer compartment for normal ice production is 0°F. If the freezer temperature is warmer, ice production will be affected.
- If the doors are not properly closed, ice production will be affected.
The follow cases are not malfunction
1. Moisture may form dew on the outside of the product during the humid season, just get it wiped.2. The flow of refrigerant through the pipeline coil can cause a bicker.3. lt is normal that the sides of product get warm as a result of the cooling pipeline working.4. The frame of the appliance will be warm during working by the defrost pipeline inside it.
Please check the points above first.If the supply cord is damaged, it must be replaced by the manufacturer, its service agent or similarly qualified persons in order to avoid a hazard.
SPECIFICATIONS AND PARAMETERS
| Model | GLR1OT**K08
(with icemaker) |
GLR12T**K08
(with icemaker) |
|
| Climate class | T | ||
| Electric shock protection type | I | ||
|
Capacity (cu.ft) |
Freezer
Refrigerator |
2.6 | |
| 9.4 | |||
| VoltageM | 110-120 | ||
| Frequency (Hz) | 60 | ||
| Current (A) | 1.2 | 1.2 | |
| Sound rating [dB(A)] | |||
| Refrigerant | R600a/1.41oz | ||
| Weight (lbs) | 123.46 | 138.89 | |
| Interior
0 temperature ( F) |
Freezer | <5 | |
| Refrigerator | 32 – 46.4 | ||
|
Dimension (inch) |
Width | 23.58 | 23.58 |
| Depth | 25.71 | 27.68 | |
| Height | 59.72 | 64.84 |
| Model Climate class | GLR10T**E08
(without icemaker) |
GLR12T**E08
(without icemaker) |
|
| T | |||
| Electric shock protection type | I | ||
| I Freezer
Capacity (cu.ft) I Refrigerator |
2.5 | 2.6 | |
| VoltageM | 110-120 | ||
| Frequency (Hz) | 60 | ||
| Current (A) | 1.2 | 1.2 | |
| Sound rating [dB(A)] | |||
| Refrigerant | R600a/1.41oz | ||
| Weight (lbs) | 119.05 | 134.48 | |
| Interior temperature (0F) | Freezer | <5 | |
| Refrigerator | 32 – 46.4 | ||
|
Dimension Onch) |
Width | 23.58 | 23.58 |
| Depth | 25.71 | 27.68 | |
| Height | 59.72 | 64.84 |
PACKING LIST
|
Number |
GLR1OT**K08
(with icemaker) |
GLR12T**K08
(with icemaker) |
|
Shelve |
3 pcs |
4 pcs |
|
Crisper cover |
1pcs |
1 pcs |
|
Door rack |
6 pcs |
7 pcs |
|
Can rack |
2 pcs |
3 pcs |
|
Crisper drawer |
1 pcs |
1 pcs |
|
Owner’s manual |
1 copy |
1 copy |
|
Number |
GLR1OT**E08
(without icemaker) |
GLR12T**E08
(without icemaker) |
|
Shelve |
3 pcs |
4 pcs |
|
Crisper cover |
1pcs |
1 pcs |
|
Door rack |
4 pcs |
5 pcs |
|
Can rack |
2 pcs |
3 pcs |
|
Crisper drawer |
2 pcs |
2 pcs |
|
Owner’s manual |
1 copy |
1 copy |
LIMITED WARRANTY
IN-HOME SERVICE FULL ONE YEAR WARRANTYFor 12 months from the date of original retail purchase, Galanz will repair or replace any part free of charge including labor that fails due to a defect in materials or workmanship. Galanz may replace or repair at their sole discretion any part, or sub system including the entire product. Product must be accessible, without encumbrance and installed properly to receive warranty repair service.
LIMITED WARRANTYNOTE: This warranty commences on the date the item was purchased, or ownership assumed from a builder and the original purchase receipt must be presented to the authorized service representative before warranty repairs are rendered.Exceptions: Commercial Use Warranty90 days labor from date of original purchase90 days parts from date of original purchaseNo other warranty applies.
FOR WARRANTY SERVICEAll service must be performed by a Galanz authorized service.For service, please call 1-800-562-0738.please have available the following information: (a) Model number and serial number of your appliance. (b) The name and address of the dealer you purchased the unit from and the date of purchase. (c) A clear description of the problem. (d) A proof of purchase (sales receipt).This warranty covers home appliance services within the contiguous United States and where available in Alaska, Hawaii and Puerto Rico.
What is not covered by this warranty:Replacement or repair of household fuses, circuit breakers, wiring or plumbing. A product whose original serial number has been removed or altered. Any service charges not specifically identified as normal such as normal service area or hours.
Replacement of light bulbs.Damage to clothing.Damage incurred in shipping.Damage caused by improper installation or maintenance.Damage from misuse, abuse accident, fire, flood, or acts of nature. Damage from service other than an authorized Galanz dealer or service center.Damage from incorrect electrical current, voltage or supply. Damage resulting from any product modification, alteration or adjustment not authorized by Galanz.Adjustment of consumer operated controls as identified in the owner’s manual.Hoses, knobs, lint trays and all attachments, accessories and disposable parts.Labor, service transportation, and shipping charges for the removal and replacement of defective parts beyond the initial 12-month period.Damage from other than normal household use.Any transportation and shipping charges.
THIS LIMITED WARRANTY IS GIVEN IN LIEU OF ALL OTHER WARRANTIES, EXPRESS ED OR IMPLIED, INCLUDING BUT NOT LIMITED TO, THE WARRANTIES OF MERCHANTABILITY AND FITNESS FOR A PARTICULAR PURPOSEThe remedy provided in this warranty is exclusive and is granted in lieu of all other remedies.This warranty does not cover incidental or consequential damages, so the above limitations may not apply to you.Some states do not allow limitations on how long an implied warranty lasts, so the above limitations may not apply to you.This warranty gives you specific legal rights, and you may have other rights, which vary from state to state.
FAQS
It is suggested to use the soft cloth to clean it. If there are some stubborn stains, you can use a soft brush with warm water.
The refrigerator should be cleaned regularly. Please clean the dust on the surface of the refrigerator regularly. If there is any food stain on the surface of the refrigerator, please clean it immediately with a damp cloth and then dry it.
Please put some hot water in the freezer, which will help defrosting frozen food easily. If you have any questions about our products, please contact our customer service center at any time. We will reply you as soon as possible!
Yes
No, this product design does not require a panel as there are no moving parts in the machine compartment.
The Galanz 10 cu ft. Retro refrigerator comes with a 1 year manufacturer’s warranty that covers any manufacturing defects. For additional questions, please contact Galanz Americas at or 1-800-562-0738.
The Galanz 10 cu ft. Retro Refrigerator requires 110-120V, 60 Hz A/C ad 1.2 Amps. Operating Wattage requirements are 138 Watts. For additional questions, please contact Galanz Americas at or 1-800-562-0738.
They carried mine downstairs two flights
They are usually in good shape, just add the extended warranty to the purchase. It is worth the peace of mind.
The Galanz 12 cu ft. Retro refrigerator is not configured to support an ice maker, lacking mounting holes and water lines. For additional questions, please contact Galanz Americas at or 1-800-562-0738.
The Galanz 10 and 12 cu ft. Retro refrigerators are frost free. For additional questions, please contact Galanz Americas at or 1-800-562-0738.
The outside of the fridge gets pretty warm sometimes. But the fridge works fine.
No, only with the product.
Yes you have to pay $20.00 for inside placement.
The Galanz 12 cu ft. Retro Refrigerator weighs ~143 lbs. when unpacked. For additional questions, please contact Galanz Americas at or 1-800-562-0738.
The operating wattage of the 12 cu ft. Retro refrigerator is144 Watts. For additional questions, please contact Galanz Americas at or 1-800-562-0738.
That is a feature of most modren freezers and friges. The doors are not locked just sealed well.
If the hinge side of the 12 cu ft. Retro is to be placed against a wall, it is recommended that the unit be positioned so that the front of the door sticks out past the wall. Otherwise, to reach the full 130 degree opening, ~12″ is needed. For additional questions, please contact Galanz Americas at or 1-800-562-0738.
VIDEO
 report this ad
[xyz-ips snippet=”download-snippet”]