
Galanz Wine Cooler

WINE COOLER SAFETY
Your safety and the safety of others are very important.We have provided many important safety messages in this manual and on your appliance. Always read and obey all safety messages.
 This is the safety alert symbol.This symbol alerts you to potential hazards that can kill or hurt you and others.All safety messages will follow the safety alert symbol and either the word “DANGER” or “WARNING.”
These words mean:
![]() You can be killed or seriously injured if you don’t immediately follow instructions.
You can be killed or seriously injured if you don’t immediately follow instructions.
![]() You can be killed or seriously injured if you WARNING don’t follow instructions.
You can be killed or seriously injured if you WARNING don’t follow instructions.
All safety messages will tell you what the potential hazard is, tell you how to reduce the chance of injury, and tell you what can happen if the instructions are not followed.
IMPORTANT SAFETY INSTRUCTIONS
When using electrical appliances, basic safety precautions should always be followed to reduce the risk of explosion, fire, electrical shock, and/or injury to persons, including the following: Read all instructions before using the appliance.
- This appliance must be grounded. Connect only to properly grounded plug See Important Grounding Instructions on page 3.
- Install or locate this wine cooler only in accordance with the provided Installation Instructions.
- To protect against electric shock, do not place cord, plug, or wine cooler in water or other liquid.
- The refrigerant of this product is R600a, which is flammable. Make sure not to damage the cooling system during the transportation and installation.
- Please note that servicing shall be done by factory authorized service personnel, to minimize the risk of possible ignition due to incorrect parts or improper service.
SAVE THESE INSTRUCTIONS
DISPOSAL OF THE WINE COOLER
 |
|
Suffocation Hazard Remove door from your old wine cooler. Failure to do so can result in death or brain damage. |
Before you throw away your old wine cooler:
- Take off the doors.
- Leave the shelf racks in place so that children may noteasily climb inside.
RefrigerantsAll refrigeration products contain refrigerants, which under federal law must be removed prior to product disposal. If you are getting rid of an old refrigeration product, check with a qualified disposal company for instructions.
GROUNDING INSTRUCTIONS
|
|
|
Electrical Shock Hazard Plug into a grounded 3 prong outlet.Do not remove ground prong.Do not use an adapter.Do not use an extension cord.Failure to follow these instructions can result in death, fire, or electrical shock. |

This appliance must be grounded due to the event of an electrical short circuit.This appliance is equipped with a grounded wire and a grounded plug. Wine cooler must be plugged into a properly installed grounded 3 prong outlet. Consult a qualified electrician or service technician if the grounding instructions are not completely understood or if doubt exists as to whether the appliance is properly grounded.
LOCATION REQUIREMENTS
|
|
|
Explosion Hazard Keep flammable materials and vapors, such as gasoline, away from wine cooler. Failure to do so can result in death, explosion, or fire |

- It is recommended not to install the wine cooler near an oven, radiator, or other heat source.
- Do not install in a location where the temperature will fall below 55 °F (13 °C). For best performance, do not install the wine cooler behind a cabinet door.
- The wine cooler should be located on a firm, flat surface that is strong enough to support the wine cooler when it is fully loaded.
- Leave a minimum of 1/2″ (1.27 cm) between each side of the appliance and the wall. The top and back of the appliance should have a minimum 1 ½” (3.81 cm) clearance. This allows for proper air circulation. This appliance is intended to be free-standing and should not be built-in or placed in a recessed area.
- The wine cooler legs must be adjusted during installation in order to function properly. The leveling legs on the front corners can be adjusted by turning clockwise to raise the appliance, and counter-clockwise to lower it. Be sure to have the appliance sloped slightly backward to ensure that the door closes tightly.
- Do not put the unit in a place where it is subjected to sunlight.
- Do not put the unit in a place where the ambient temperature is more than 90 °F (32 °C).
INSTALLATION INSTRUCTIONS
|
|
Excessive Weight Hazard Use two or more people to move and install wine cooler. Failure to do so can result in back or other injury. |
Before using the wine cooler for the first time, remove all of the packing materials, including the foam base and adhesive tape holding accessories in place.Before loading bottle, recommend to cool the unit to the setting temperature, and not to load many bottles at the same time.
WINE STORAGE
- The maximum capacity of GLW57MS2B16 is 47 wine bottles (750ml).
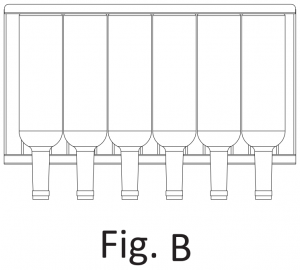
- To achieve the maximum capacity, place 7 bottles in the top 5 racks as shown below in Figure A.

- Next, place 6 bottles in the bottom 2 racks as shown below in Figure B.
- Store wine in sealed bottles only.


Please see the above image which shows you five popular dimensions of wine bottles.The maximum capacity is based on “Typical Bordeaux” bottle dimension.If storing larger bottles, the capacity will be reduced.
OPERATING INSTRUCTIONS
|
|
|
Electrical Shock Hazard Plug into a grounded 3 prong outlet.Do not remove ground prong.Do not use an adapter.Do not use an extension cord.Failure to follow these instructions can result in death, fire, or electrical shock. |
- Allow wine cooler to stand upright for 4 hours before using.
- Plug wine cooler into a grounded 3 prong outlet. (See “Grounding instructions”).
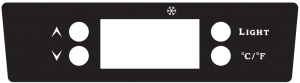
- Operate the wine cooler by adjusting the temperature control buttons (up and down arrows) to various settings. The adjusting temperature range is 39 °F to 64 °F (4 °C to 18 °C).Touch this pad once ( ) and the temperature will increase 1 °F (1 °C).Touch this pad once ( ) and the temperature will decrease 1 °F (1 °C).The new desired temperature will flash on the display for five seconds and then back to the actual temperature which will gradually change until the set point is reached.Touch this pad (°C/°F) and the temperature display will switch between °C & °F.For red wine the suggested temperature range is 53 °F to 61 °F (11 °C to 16 °C).For white wine the suggested temperature range is 43 °F to 50 °F (6 °C to 10 °C).
- It is recommended not to open the door frequently to minimize the power consumption.
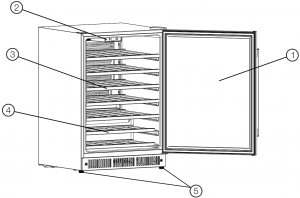
PARTS AND FEATURES
- Glass Door
- Electronic Control
- Shelf Racks
- Base Rack
- Leveling Legs
SPECIFICATIONS
|
Model |
GLW57MS2B16 |
|
|
Electric shock protection type |
I |
|
|
Capacity (cu.ft) |
5.7 |
|
|
Voltage (V) |
120 |
|
|
Frequency (Hz) |
60 |
|
|
Current (A) |
1.6 |
|
|
Sound [dB] |
42 |
|
|
Refrigerant |
R60 0 a/ 2. 04oz |
|
|
Net weight (lbs) |
90.2 |
|
|
Interior temperature (F) |
33~50 |
|
|
Dimension (Inches) |
Width | 23.66 |
| Depth |
24.76 |
|
|
Height |
34.37 |
CLEANING
|
|
Explosion Hazard Use non-flammable cleaner.Failure to do so can result in death, explosion, or fire. |
Interior
- Clean the interior of the appliance with a mixture of warm water and baking soda, use about 1-2 tablespoons per quart of water.
- Use a sponge or soft cloth and make sure to wipe excess moisture out before cleaning around the controls.
- Rinse thoroughly with warm water and dry with a clean soft cloth
Exterior
Clean the exterior surface with warm water and mild detergent. Rinse thoroughly and dry with a clean, soft cloth.
Door Gasket
The door gasket must be kept clean to ensure a proper seal.Make sure to clean the gasket frequently with the method as described above for exterior cleaning.
POWER FAILUREWhen a power failure occurs, the wine cooler can normally keep food cool for several hours. Do not put additional food into the appliance during a power failure, and avoid opening the door. Disconnect the plug from the outlet, and reconnect when the power has been restored.
VACATIONBefore leaving on any vacation, remove all open wine while you are gone. If you plan to be gone for an extended period of time, it´s recommended that all of the wine should be removed from the appliance and it should be turned off and unplugged from the outlet. Clean the interior according to the directions provided in the Cleaning section of this manual, and leave the door open.
MOVING THE WINE COOLER
|
|
Excessive Weight Hazard Use two or more people to move and install wine cooler.Failure to do so can result in back or other injury. |
- Turn off the wine cooler and unplug from the outlet.
- Remove all wine and securely tape down all loose items inside.
- Tape the door shut.
- Do not lift or pull the door or door handle during transportation.
- When moving, the appliance can not be tilted over 45 degrees as possible damage to the sealed system could occur.
- Take care to avoid strong vibration or impact to the appliance.
REVERSING THE DOOR
- Top hinge cover
- Top hinge screw
- Top hinge
- Cabinet plug
- Door seal
- Handle screw
- Door plug
- Handle
- Door handle plug
- Baffle screw
- Baffle
- Bottom hinge screw
- Bottom hinge

NOTE: Do not tilt the appliance over 45 degree when reversing the door as possible damage to the sealed system may occur.
- Remove top hinge cover and 3 top hinge screws which are below it. Then remove top hinge.
- Remove 1 cabinet plug ,1 door plug and 2 door handle plugs.
- Remove the door seal and 2 handle screws inside. Then remove the handle.
- Remove the door.
- Remove the 2 baffle screws and then remove the baffle.
- Remove the bottom hinge and 2 bottom hinge screws.
- Install the bottom hinge on the other side with 2 bottom hinge screws. Then install the baffle with 2 baffle screws.
- Install the handle on the other side with 2 handle screws, and then Install the door seal.
- Install the door.
- Install the top hinge on the other side with 3 top hinge screws.
- Install top cover above the top hinge and install 1 cabinet plugs on the other side.
TROUBLESHOOTING TIPS
|
|
Electrical Shock Hazard Plug into a grounded 3 prong outlet.Do not remove ground prong.Do not use an adapter.Do not use an extension cord.Failure to follow these instructions can resultin death, fire, or electrical shock. |
|
Problem |
Possible Cause |
What to do |
| Wine cooler does not operate |
|
|
|
|
|
|
|
|
| Wine cooler seems too warm/wine does not seem to cool |
|
|
|
|
|
|
|
|
|
|
|
| Compressor runs too long, or cycle on and off frequently |
|
|
|
|
|
|
|
|
|
|
|
|
|
|
| Moisture forms on the outside of the appliance |
|
|
|
|
|
|
Moisture forms or the inside of the appliance |
|
|
|
|
|
|
Vibration noise |
|
|
|
|
|
| “HH” on the display |
|
|
|
|
|
|
|
|
| “LL” on the display |
|
|
|
|
|
|
|
|
| “EF” on the display |
|
|
| “EE” on the display |
|
|
The following are normal conditions that can be encountered during the operation of this appliance:
- The flow of refrigerant through the coils can cause a noise.
- The sides of the appliance may become warm as a result of the cooling
- function.
LIMITED WARRANTY
IN-HOME SERVICE FULL ONE YEAR WARRANTYFor 12 months from the date of original retail purchase, Galanz will repair or replace any part free of charge including labor that fails due to a defect in materials or workmanship. Galanz may replace or repair at their sole discretion any part, or sub system including the entire product. Product must be accessible, without encumbrance and installed properly to receive warranty repair service.
LIMITED WARRANTYNOTE: This warranty commences on the date the item was purchased, or ownership assumed from a builder and the original purchase receipt must be presented to the authorized service representative before warranty repairs are rendered.Exceptions: Commercial Use Warranty90 days labor from date of original purchase90 days parts from date of original purchaseNo other warranty applies.
FOR WARRANTY SERVICEAll service must be performed by a Galanz authorized service .For service, please call 1-800-562-0738. Before calling please have available the following information: (a) Model number and serial number of your appliance. (b) The name and address of the dealer you purchased the unit from and the date of purchase. (c) A clear description of the problem. (d) A proof of purchase (sales receipt).This warranty covers home appliance services within the contiguous United States and where available in Alaska, Hawaii and Puerto Rico.
What is not covered by this warranty:Replacement or repair of household fuses, circuit breakers, wiring or plumbing. A product whose original serial number has been removed or altered. Any service charges not specifically identified as normal such as normal service area or hours.Replacement of light bulbs.Damage to clothing.Damage incurred in shipping.Damage caused by improper installation or maintenance.Damage from misuse, abuse accident, fire, flood, or acts of nature.Damage from service other than an authorized Galanz dealer or service center.Damage from incorrect electrical current, voltage or supply.Damage resulting from any product modification, alteration or adjustment not authorized by Galanz.Adjustment of consumer operated controls as identified in the owner’s manual.Hoses, knobs, lint trays and all attachments, accessories and disposable parts.Labor, service transportation, and shipping charges for the removal and replacement of defective parts beyond the initial 12-month period.Damage from other than normal !household use.Any transportation and shipping charges.
THIS LIMITED WARRANTY IS GIVEN IN LIEU OF ALL OTHER WARRANTIES, EXPRESS ED OR IMPLIED, INCLUDING BUT NOT LIMITED TO, THE WARRANTIES OF MERCHANTABILITY AND FITNESS FOR A PARTICULAR PURPOSE
The remedy provided in this warranty is exclusive and is granted in lieu of all other remedies.This warranty does not cover incidental or consequential damages, so the above limitations may not apply to you.Some states do not allow limitations on how long an implied warranty lasts, so the above limitations may not apply to you.This warranty gives you specific legal rights, and you may have other rights, which vary from state to state.
WARRANTY REGISTRATION
Please mail this warranty card to the address below within 30 days of purchase. Galanz Americas, 55 Challenger Road, Suite 503, Ridgefield Park, NJ 07660.
PLEASE PRINT CLEARLY.
Name _______________________________________Address ______________________________________City _________________ State __ ZIP ______________Phone ________ Email __________________________Model Number __________ Serial Number __________Purchase Location ______________________________
You must attach a copy of your purchase receipt to validate your registration.

[xyz-ips snippet=”download-snippet”]