
GARDENA Battery Submersible Pump User Manual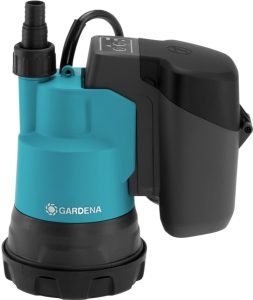
Product Overview


GARDENA Battery Submersible Pump 2000/2 Clear 18V P4A/Battery Rain Water Tank Pump 2000/2 18V P4A
![]() This product may be used under supervision, or if instruction regarding the safe use of the product has been provided and the resulting dangers have been understood, by children aged 8 and above, as well as by persons with physical, sensory or mental disabilities or a lack of experience and knowledge. Children must not be allowed to play with the product. Cleaning and user maintenance must not be performed by children without supervision. The use of this product by young people under the age of 16 is not recommended.
This product may be used under supervision, or if instruction regarding the safe use of the product has been provided and the resulting dangers have been understood, by children aged 8 and above, as well as by persons with physical, sensory or mental disabilities or a lack of experience and knowledge. Children must not be allowed to play with the product. Cleaning and user maintenance must not be performed by children without supervision. The use of this product by young people under the age of 16 is not recommended.
Intended useThe GARDENA Battery Pump is intended for removing water from containers such as paddling pools, from rain barrels such as the GARDENA Rain Collector or for irrigation with a shower or a small Irrigation System.The pump is completely submersible (watertight encapsulation) and is submerged in the water (to a max. depth of see 7. TECHNICAL DATA).The battery unit (battery and battery holder) must not be immersed.The product is not intended for continuous operation.
![]() DANGER!The pump should not be used for the delivery of salt water, muddy water, corrosive, easily inflammable or explosive liquids (e.g. petrol, paraffin, thinners), oil, heating oil or foodstuffs.
DANGER!The pump should not be used for the delivery of salt water, muddy water, corrosive, easily inflammable or explosive liquids (e.g. petrol, paraffin, thinners), oil, heating oil or foodstuffs.
SAFETY
IMPORTANT!Read the operator’s manual carefully before use and keep for future reference.
Symbols on the product
![]()
![]() Read operator’s manual.
Read operator’s manual.
![]() Do not immerse the battery unit in water.
Do not immerse the battery unit in water.
![]() Remove the battery before cleaning or maintenance.
Remove the battery before cleaning or maintenance.
![]() For the charger:Remove plug from the mains immediately if the cable is damaged or cut.
For the charger:Remove plug from the mains immediately if the cable is damaged or cut.
General safety warningsElectrical safety for the charger
![]() DANGER! Electric shock!Risk of injury due to electric shock.
DANGER! Electric shock!Risk of injury due to electric shock.
- The product must be supplied through a residual current device (RCD) having a rated residual operating current not exceeding 30 mA.
Safe operating practicesThe water temperature should not exceed 35 °C.The pump must not be used when people are in the water.Pollution of the liquid could occur due to leakage of lubricants.
Circuit breakersDry-running protection: If no water is pumped (undercurrent) the pump switches off automatically.If the pump does not deliver water after several suction attempts, there is probably air in the hose.
- Start the pump once briefly in water without a hose.
Anti-lock protection: If the motor is blocked (overcurrent), the pump switches off automatically.
- Contact the GARDENA Service.
Automatic venting: This pump is equipped with a vent valve which eliminates any air pockets in the pump. Depending on the function, a small amount of water can escape above the type plate.
Additional safety warningsBattery safety
![]() Read all the safety and general instructions.
Read all the safety and general instructions.
Failure to observe the safety and general instructions may result in electric shock, fire and/or serious injury.Store these instructions in a safe place. Only use the charger if you can fully evaluate all functions and carry them out without restrictions, or if you have received corresponding instructions.
- Supervise children during use, cleaning andmaintenance. This will ensure that children do not play with the charger.
- Charge only lithium-ion batteries of the POWER FOR ALL system type PBA 18V with a capacity of 1.5 Ah or more (5 battery cells or more). The battery voltage must match the battery charging voltage of the charger. Do not charge any non rechargeable batteries.Otherwise there is a risk of fire and explosion.
 Do not expose the charger to rain or wet conditions. Water entering a power tool will increase the risk of electric shock.
- Keep the charger clean.Dirt poses a risk of electric shock.
- Always check the charger, cable and plug before use. Stop using the charger if you discover any damage. Do not open the charger yourself, and have it repaired only by a qualified specialist using only original replacement parts.Damaged chargers, cables and plugs increase the riskof electric shock.
- Do not operate the charger on an easily ignitedsurface (e.g. paper, textiles, etc.) or in a flammable environment. There is a risk of fire due to the charger heating up during operation.
- In order to avoid safety hazards, if the power supply cord needs to be replaced, this must be done by GARDENA or by a customer service centre that is authorised to repair GARDENA power tools.
- Do not operate the product while it is charging. Products sold in GB only: Your product is fitted withan BS 1363/A approved electric plug with internal fuse (ASTA approved to BS 1362). If the plug is not suitable for your socket outlets, it should be cut off and an appropriate plug fitted in its place by an authorised customer service agent. The replacement plug should have the same fuse rating as the original plug. The severed plug must be disposed of to avoid a possible shock hazard and should never be inserted into a mains socket elsewhere.
- These safety warnings apply only for lithium-ion batteries of the POWER FOR ALL system PBA 18V.
- Only use the battery with products of the POWER FOR ALL system manufacturers.This is the only way in which you can protect the battery against dangerous overload.
- Recharge only with the charger specified by the manufacturer. A charger that is suitable for one type of battery pack may create a risk of fire when used with another battery pack.
- The battery is supplied partially charged.To ensure full battery capacity, fully charge the battery in the charger before using your power tool for the first time.
- Keep battery packs out of the reach of children.
- Do not open the battery.There is a risk of short-circuiting.
- In case of damage and improper use of the battery, vapours may be emitted. The battery can set alight or explode.Ensure the area is well ventilated and seek medical attention should you experience any adverse effects. The vapours may irritate the respiratory system.
- If used incorrectly or if the battery is damaged, flammable liquid may be ejected from the battery. Contact with this liquid should be avoided.If contact accidentally occurs, rinse off with water. If the liquid comes into contact with your eyes, seek additional medical attention.Liquid ejected from the battery may cause irritation or burns.
- If the battery is damaged liquid can be ejected and cover nearby surfaces. Check affected parts.Clean these parts or change them if necessary.
- Do not short-circuit the battery pack. When the battery pack is not in use, keep it away from other metal objects, like paper clips, coins, keys, nails, screws or other small metal objects, that can make a connection from one terminal to another.Shorting the battery terminals together may cause burns or a fire.
- The battery can be damaged by pointed objects such as nails or screwdrivers or by force applied externally.An internal short circuit may occur, causing the battery to burn, smoke, explode or overheat.
- Never service damaged battery packs.Service of battery packs should only be performed by the manufacturer or authorized service providers.
- Protect the battery against heat, e.g. against continuous intense sunlight, fire, dirt, water and moisture.There is a risk of explosion and short-circuiting.
- Only operate and store the battery at an ambienttemperature between –20 °C and +50 °C.Do not leave the battery in your car in the summer, for example. At temperatures of <0 °C some devices may experience a loss of power.
- Only charge the battery at an ambient temperature which is between 0 °C and +45 °C.Charging outside of this temperature range can increase the risk of damage to the battery and pose a fire hazard.
Electrical safety
![]() DANGER! Cardiac arrest!This product makes an electromagnetic field while it operates. This field may under some conditions interfere with active or passive medical implants. To decrease the risk of conditions that can possibly injure or kill, we recommend persons with medical implants to speak with their physician and the medical implant manufacturer before you operate the product.
DANGER! Cardiac arrest!This product makes an electromagnetic field while it operates. This field may under some conditions interfere with active or passive medical implants. To decrease the risk of conditions that can possibly injure or kill, we recommend persons with medical implants to speak with their physician and the medical implant manufacturer before you operate the product.
Please regularly check the connecting line.Before using, always subject the pump to a visual inspection.A pump which is damaged should not be used. In the event of damage, have the pump checked by GARDENA Service.Protect the battery contacts from moisture.
Personal safety![]() DANGER! Risk of suffocation!Small parts can be easily swallowed. There is also a risk that the polybag can suffocate toddlers. Keep toddlers away when you assemble the product.
DANGER! Risk of suffocation!Small parts can be easily swallowed. There is also a risk that the polybag can suffocate toddlers. Keep toddlers away when you assemble the product.
Submerge the pump in the water with a rope at the eyelet. Pull the pump up as well.
Type 14602: Alternatively, the pump can be submerged or pulled up via the telescopic pipe.
Observe the minimum water level in accordance with the Technical Data given for the pump.Allow the pump to run no longer than 10 minutes against a closed pressure side (e.g. closed regulating valve).
Do not use the product while you are tired or under the influence of drugs, alcohol or medication. A moment of inattention while you operate the product may result in serious personal injury.
Do not open the pump further than delivery status (only exception: the filter and the foot).
If dirty water has been pumped, the foot and the filter can only be loosened with great force and the vent valve can become stuck.
- If necessary, loosen the vent valve with compressed airor a wire.
ASSEMBLY
![]() DANGER! Risk of injury!Injury when the product starts accidentally.
DANGER! Risk of injury!Injury when the product starts accidentally.
- Remove the battery before you assemble the product.
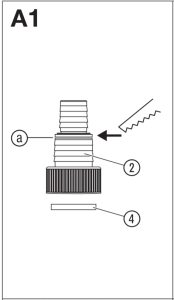
To connect the hose (Art. 14600):The hose can be connected to the pump connection (1) via the connection nipple (2) [19 mm (3/4″)/25 mm (1″)] or via the GARDENA Connection System [13 mm (1/2″)/ 15 mm (5/8″)/19 mm (3/4″)].
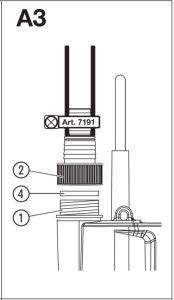
To connect the hose via the connection nipple [Fig. A1/A2/A3]:When using a 25 mm (1″) hose, the pump has the maximum delivery capacity. 25 mm (1″) and 19 mm (3/4″) hoses connected with a connection nipple (2) must be fastened, for example with a GARDENA Hose Clamp Art. 7192/7191.
|
Hose diameter |
25 mm (1″) | 19 mm (3/4″) |
| GARDENA Hose Clamp [ Fig. A1 ] | Art. 7192 [ Fig. A2 ] |
Art. 7191 [ Fig. A3 ] |
|
Hose connection |
Detach nipple at (@) |
Do not detach nippel |
- Screw the connection nipple (2) with the washer (4) onto the pump. (With 25 mm (1″) hoses, first detach the connection nipple (2) at (a).)
- Slide the hose onto the connection nipple (2) and secure it e.g. with a GARDENA Hose Clamp Art. 7192/7191.
To connect the hose via the GARDENA Connection System [Fig. A4]:19 mm (3/4″)/15 mm (5/8″) and 13 mm (1/2″) hoses can be connected via the GARDENA Connection System.
|
Hose diameter |
Pump connection | |
| 13 mm (1/2″) | GARDENA Pump
Connection Set |
Art. 1750 |
|
15 mm (5/8″) |
GARDENA Pump
Connection Set |
Art. 1750 |
| 19 mm (3/4″) | GARDENA Pump
Connection Set |
Art. 1752 |
- Connect the hose via the relevant GARDENA Connection.
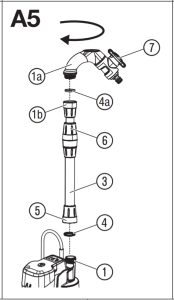
To connect the telescopic pipe (Art. 14602) [Fig. A5]:We recommend the use of a GARDENA Hose Connector for connecting a garden hose:
- Art. 18215 for 13 mm (1/2″) and 15 mm (5/8″) or
- Art. 18216 for 19 mm (3/4″). With the use of 19-mm (3/4″)-hose line, the pumping quantity is the greatest.
- The telescopic pipe can be adjusted between 57 – 77 cm.The telescopic pipe can be extended several times by 21 cm with the GARDENA Extension Pipe Art. 1420.
- Screw the telescopic pipe (3) onto the pump connector (1). Make sure that the washer (4) lies in the connecting thread (5) of the telescopic pipe (3).
- Loosen the threaded collar (6) of the telescopic pipe (3).
- Adjust the telescopic pipe (3) to the desired height.
- Tighten the threaded collar (6) again.
OPERATION
![]() DANGER! Risk of injury!Injury when the product starts accidentally.
DANGER! Risk of injury!Injury when the product starts accidentally.
- Remove the battery before you adjust or transport the product.
To charge the battery [Fig. O1/O2/O3]:
![]() CAUTION!
CAUTION!
- Note the mains voltage! The voltage of the power source must match the voltage specified on the ratingplate of the charger.
For the GARDENA Battery Pumps Art. 14600-20/ -61 and 14602-20/ -61 there is a battery and a charger in the scope of delivery.
Thanks to the intelligent charging process, the charge condition of the battery is automatically detected and then charged up with the optimal charge current depending on battery temperature and voltage.In this way, the battery is treated with care and remains permanently fully charged when it is stored in the charger.
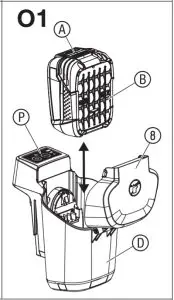
- Open the cover (8).
- Push the locking button (A) and remove the battery (B) from the battery container (D).
- Connect the battery charger (C) into a mains socket.
- Slide the battery charger (C) onto the battery (B).When the battery charge indicator (Lc) at the charger flashes green the battery is being charged. When the battery charge indicator (Lc) at the charger illuminates permanently green the battery is completely charged (Charging time, see 7. TECHNICAL DATA).
- Examine the charge status regularly while you charge.
- When the battery (B) is completely charged, you candisconnect the battery (B) from the charger (C).
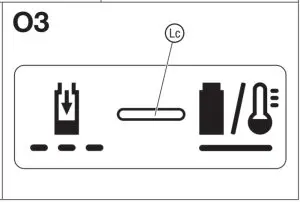
Meaning of the Indication Elements: Indication on the charger [Fig. O3]:
![]() Flashing of the Battery Charge Indicator (Lc)The charging procedure is indicated by flashing of the battery charge indicator (Lc).Note: The charging procedure is only possible when the battery temperature is within the allowable charging temperature range, see 7. TECHNICAL DATA.
Flashing of the Battery Charge Indicator (Lc)The charging procedure is indicated by flashing of the battery charge indicator (Lc).Note: The charging procedure is only possible when the battery temperature is within the allowable charging temperature range, see 7. TECHNICAL DATA.
![]() Continuous Lighting of the Battery Charge Indicator (Lc)
Continuous Lighting of the Battery Charge Indicator (Lc)
Continuous lighting of the battery charge indicator (Lc) indicates that the battery is fully charged or that the temperature of the battery is not within the allowable charging temperature range and can therefore not be charged.When the battery is not inserted, continuous lighting of the battery charge indicator (Lc) indicates that the mains plug is inserted in the socket outlet and that the battery charger is ready for operation.
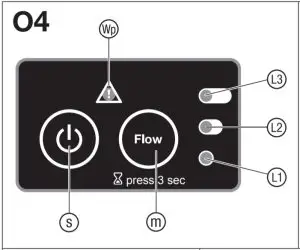
Battery charge status indication on the product [Fig. O1/O4]:After starting the product, the battery charge status indication [(L1), (L2) and (L3)] is displayed.
|
Battery charge status |
Battery charge status indication |
| 67 – 100 % charged |
(L1), (L2) and (L3) illuminate green |
|
34 – 66 % charged |
(L1) and (L2) illuminate green |
| 11 – 33 % charged |
(L1) illuminates green |
|
0 – 10 % charged |
(L1) flashes green |
If the LED (L1) flashes green, the battery must be charged.If the error LED (Wp) is illuminated or flashing, see 6. TROUBLESHOOTING.
Control panel [Fig. O4]:
On/Off button (s):
- Push the On/Off button (s) on the control panel. The pump starts with the previously selected power level.After the pump is switched on, the battery charge status indication ((L1), (L2), (L3)) is displayed with green LEDs.
(m) Power levels (Flow button)/Timer Function:The pump has 3 power levels, which can be called up one after the other with the Flow button. To do this, the Flow button must be pressed briefly (approx. 0.5 sec.).According to the power level the LEDs ((L1), (L2), (L3)) illuminate blue for 5 seconds.If the flow button is pressed for 3 seconds, the timer function is activated.
Power levels:Mode 1 [(L1) illuminates blue]: Pumping capacity: max. 1100 l/h – max. 0.4 barBattery life: approx. 70 minutes (with 2.5 Ah battery).Ideal for dewatering with short hoses, suction of foils, filling watering cans or irrigation of sensitive plants.
Mode 2 [(L1) and (L2) illuminate blue]:Pumping capacity: max. 1700 l/h – max. 1.3 bar Battery life: approx. 35 minutes (with 2.5 Ah battery). Ideal for dewatering with longer hoses, irrigation with watering spray
Mode 3 [(L1), (L2) and (L3) illuminate blue]:Pumping capacity: max. 2000 l/h – max. 2.0 barBattery life: approx. 18 minutes (with 2.5 Ah battery).Ideal for drainage with height differences or long hoses, irrigation with shower or sprinkler, cleaning or feeding a garden shower.
- Push the Flow button (m) on the control panel.The current power level is displayed for 5 seconds.
- Push the Flow button (m) on the control panel repeatedly until the desired power level is displayed. Depending on environmental conditions (e.g. direct sunlight), the pump can activate the overheating protection. A short cooling phase may then be necessary before restarting.
Timer-Function:With the timer function the pump can be switched off automatically after 5, 10 or 15 minutes.
Displays when selecting the timer time
|
(L1) flashes green and blue alternately |
Timer to 5 minutes |
| (L1) and (L2) flashes green and blue alternately |
Timer to 10 minutes |
|
(L1), (L2) and (L3) flashes green and blue alternately |
Timer to 15 minutes |
- Push and hold the Flow button (m) for 3 seconds. LED (L1) flashes green and blue alternately.
- Push the Flow button (m) on the control panel repeatedly until the desired timer time is displayed.If no button is pressed for 5 seconds, the timer function will start. The pump runs according to the selected timer time and then switches off automatically.
Displays after starting the timer function:
|
Timer-Time 15 min. |
Timer-Time 10 min. | Timer-Time 5 min. |
Timer display in blue LEDs |
|
Approx. 15 – 10 min. |
Approx. 10 – 7 min. | Approx. 5 – 3 min. | (L1), (L2) and (L3) go out sequentially |
| Approx. 10 – 5 min. | Approx. 7 – 3 min. | Approx. 3 – 1 min. |
(L1) and (L2) go out sequentially |
|
Approx. 5 – 0 min. |
Approx. 3 – 0 min. | Approx. 1 – 0 min. | (L1) goes out |
For the last 5 seconds the blue LED (L1) flashes rapidly.After starting the timer function, first the timer time is displayed 5 times in blue LEDs and then 1 time the batterycharge status in green LEDs for one second.
NotesThe timer function can be cancelled at any time by pressing the On/Off button.If the battery runs out during the timer function, the pump switches off early.
Applications![]() CAUTION! Destruction of the battery!The battery unit is destroyed when they are immersed in water.
CAUTION! Destruction of the battery!The battery unit is destroyed when they are immersed in water.
- Do not immerse the battery unit in the water.
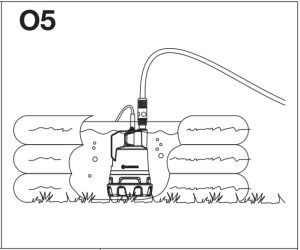
Observe the minimum water level (see 7. TECHNICAL DATA) Use in flat containers [Fig. O5]
Art. 14600: The pump is equipped with a hose connector which allows high flow rates.Art. 14602: If the rain water tank pump is placed in flat containers, e.g. to empty a paddling pool, the telescopic pipe can be removed and replaced with the 33.3-mm (G1) GARDENA Tap Connector Art. 18202.
- Place the battery unit (D) in a place protected from water.
- Place the pump in the container.
- Start the pump.
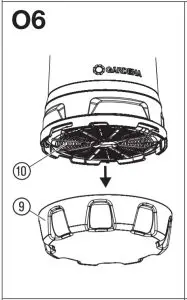
Flat suction [Fig. O6]In normal operation (with foot (9)), a residual water level of approx. 25 mm is achieved. With flat suction (without foot (9)) a residual water level of approx. 5 mm is achieved.
- Turn the foot (9) anti-clockwise and remove the foot (9) (bayonet lock).
- Make sure that the filter (10) is inserted correctly.
- For reassembling the suction foot, see 4. MAINTENANCE.The pump must not be operated without the filter (10).
To pump water from container [Fig. O7]:For Art. 14602: The length of the telescopic pipe (3) should be adjusted in such a manner that the pump does not touch the bottom of the container; this way, dirt in the container is kept away from the pump.The pump should hang approx. 10 cm above the bottom of the container to prevent excessive contamination.
- Open the bracket on the battery container (D).
- Hang the battery unit (D) on the outside, on the side of the container or place it in a suitable, flood-proof place.
- For Art. 14600: Hang the pump into the container using a rope (do not hang it with the cable).
- For Art. 14602: Hang the pump with the telescopic tube (3) into the container.
- Start the pump.
To start the pump [Fig. O1/O4]:To start:
- Open the cover (8).
- Put the battery (B) into the battery holder (D) until it audibly engages.
- Close the cover (8) until it engages noticeably. Make sure that the cover (8) of the battery container is properly closed.
- Push the On/Off button (s) on the control panel (P).The Pump starts and the battery charge status indication is displayed.
NOTES:Depending on the length of the hose and the type of installation, it may take some time for the pump to deliver the water.If the pump does not deliver water after several suction attempts, there is probably air in the hose.
- Start the pump once briefly in water without a hose.
To stop:
- Push the On/Off button (s) on the control panel (P). The Pump stops.
MAINTENANCE
![]() DANGER! Risk of injury!Injury when the product starts accidentally.
DANGER! Risk of injury!Injury when the product starts accidentally.
- Remove the battery before you maintain the product.
To clean the pump:![]() DANGER! Risk of injury!Risk of injury and risk of damage to the product.
DANGER! Risk of injury!Risk of injury and risk of damage to the product.
- Do not clean the product with a water jet (in particular high-pressure water jet).
- Do not clean with chemicals including petrol or solvents. Some can destroy critical plastic parts.
- Clean the pump with a damp cloth.
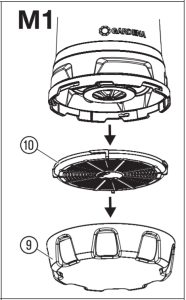
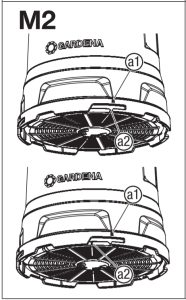
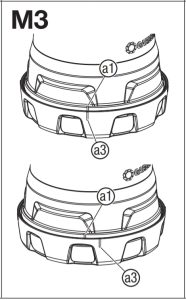
To clean the filter [Fig. M1/M2/M3]:In order to ensure continuous trouble-free operation, the filter (10) should be cleaned at regular intervals.After pumping dirty water, the filter (10) must be cleaned immediately.
- Turn the foot (9) anti-clockwise and remove the foot (9) (bayonet lock).
- Turn the filter (10) anti-clockwise and remove the filter (10) (bayonet lock).
- Clean the filter (10) and the foot (9) under running water.
- Push the filter (10) into the pump so that the lines ßa1 /ßa2 are opposite.
- Turn the filter (10) anti-clockwise (bayonet lock).
- Push the foot (9) onto the pump so that the lines ßa1 ßa3 are opposite.
- Turn the foot clockwise (bayonet lock).The pump must not be operated without the filter (10).
To clean the battery and the battery charger:Make sure that the surface and the contacts of the battery and the battery charger always are clean and dry before you connect the battery charger.
Do not use running water.
- Battery charger: Clean the contacts and the plasticparts with a soft and dry cloth.
- Battery: Occasionally clean the ventilation slots and the terminals on the battery using a soft brush that is clean and dry.
STORAGE
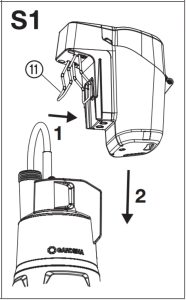
To put into storage [Fig. S1]:The product must be stored away from children.
- Remove the battery.
- Charge the battery.
- Turn the pump upside down to allow residual water to flow out.
- Clean the pump, the battery holder, the battery and the battery charger (see 4. MAINTENANCE).
- To save storage space, fold in the bracket and slide the battery holder (11) from above onto the intended holder on the pump.
- Store the pump, the battery and the battery charger in a dry, enclosed and frost-free place.
Disposal: (in accordance with RL2012/19/EC)
![]() The product must not be disposed of to normal household waste. It must be disposed of in line with local environmental regulations.
The product must not be disposed of to normal household waste. It must be disposed of in line with local environmental regulations.
IMPORTANT!
- Dispose of the product through or via your municipal recycling collection centre.
Disposal of the battery:
![]() The GARDENA battery contains lithium-ion cells that should not be disposed of with normal household waste at the end of its life.
The GARDENA battery contains lithium-ion cells that should not be disposed of with normal household waste at the end of its life.
IMPORTANT!
- Dispose of the batteries through or via your municipal recycling collection centre.
- Discharge the lithium-ion cells completely (contact the GARDENA Service).
- Protect the contacts on the lithium-ion cells against short circuits.
- Dispose of the lithium-ion cells properly.
TROUBLESHOOTING
![]() DANGER! Risk of injury!Injury when the product starts accidentally.
DANGER! Risk of injury!Injury when the product starts accidentally.
- Remove the battery before you troubleshoot the product.
| Problem | Possible Cause | Remedy |
Pump is running, but doesn’t deliver |
Air cannot escape, because the pressure line is closed.
(Possible kink in the pressure hose.)
|
|
| Air in suction foot |
|
|
| Foot / Filter is clogged. |
|
|
| Water level below minimum water level when put into operation. |
|
|
| Pump is running but the delivery drops suddenly | Foot / Filter is clogged |
|
| Pump does not start or stops. LED (L1) is flashing green [ Fig. O4 ] | Battery is empty. |
|
| Pump does not start or stops. Error-LED (Wp) is illuminated RED [Fig. 04] | Battery temperature is outside the permissible temperature range. |
|
Pump does not start or stops. Error-LED (Wp) is illuminated red
|
Dry-running protection has tripped. |
|
| Over temperature of the control panel. |
|
|
| Air is in the hose. |
|
|
| Water has entered the battery. |
|
|
| There are drops of water or moisture between the battery contacts in the battery container. |
|
|
| Motor is blocked. |
|
|
| Pump does not start or stops. Error-LED (Wp) is flashing red [Fig. O4] | Product is defective. |
|
| Pump does not start or stops. Error-LED (Wp) is not illuminated [Fig. O4] | Battery is not put completely into the battery holder. |
|
| Battery is defective. |
|
|
| Product is defective. |
|
|
| Charging is not possible. Battery charge indicator (Lc) is continuously illuminated [Fig. O3] | The battery is not connected (correctly). |
|
| Battery contacts are dirty. |
|
|
| Charging is not possible. Battery charge indicator (Lc) is continuously illuminated [Fig. O3] | Battery temperature is outside the permissible charging temperature range. |
|
| Battery is defective. |
|
|
| Battery charge indicator (Lc) is not illuminated [Fig. O3] | Mains plug of the charger is not (correctly) plugged in. |
|
| Socket outlet, mains cable or charger is defective |
|
![]() NOTE: For any other malfunctions please contact the GARDENA service department.Repairs must only be done by GARDENA service departments or specialist dealers approved by GARDENA.
NOTE: For any other malfunctions please contact the GARDENA service department.Repairs must only be done by GARDENA service departments or specialist dealers approved by GARDENA.
TECHNICAL DATA
| Battery Pump | Unit | Value (Art. 14600) | Value (Art. 14602) |
| Max. delivery capacity | l/h | 2000 | 2000 |
| Max. pressure | bar | 2.0 | 2.0 |
| Max. delivery head | m | 20 | 20 |
| Max. submersion depth | m | 1.8 | 1.8 |
| Max. media temperature | °C | 35 | 35 |
| Min. water depth for operation with foot/without foot (approx.) | mm | 50 / 25 | 50 / 25 |
| Residual water level with foot/ without foot (approx.) | mm | 25 / 5 | 25 / 5 |
| Weight (without Battery) | kg | 1.8 | 2.2 |
|
System Battery PBA 18V 2.5Ah W-B |
Unit |
Value (Art. 14903) |
| Battery voltage | V (DC) | 18 |
| Battery capacity | Ah | 2.5 |
| Number of cells (Li-Ion) | 5 | |
| Appropriate POWER FOR ALL system Battery Chargers: AL 18..CV. | ||
|
Battery Charger AL 1810 CV P4A |
Unit |
Value (Art. 14900) |
| Mains voltage | V (AC) | 220 – 240 |
| Mains frequency | Hz | 50 – 60 |
| Rated power | W | 26 |
| Battery charging voltage | V (DC) | 18 |
| Max. battery charging current | mA | 1000 |
| Battery Charger AL 1810 CV P4A | Unit | Value (Art. 14900) |
| Battery charging time 80%/ 97 – 100% (approx.)
PBA 18V 2.0Ah W-B PBA 18V 2.5Ah W-B PBA 18V 4.0Ah W-C |
min. min. min. |
96 / 124 120 / 154 192 / 244 |
| Permitted charging temperature range | °C | 0 – 45 |
| Weight according to EPTA-Procedure 01:2014 | kg | 0.17 |
| Protection class | / II | |
| Appropriate POWER FOR ALL system Batteries: PBA 18V |
| GARDENA System Battery PBA 18V/45 P4A PBA 18V/72 P4A | Battery for additional duration or for replacement. | Art. 14903
Art. 14905 |
| GARDENA Battery Quick Charger AL 1830 CV P4A | Charger for fast charging the POWER FOR ALL System Batteries PBA 18V..W-.. | Art. 14901 |
| GARDENA Extension Pipe | To extend the telescopic tube | Art. 14200 |
SERVICE/WARRANTY
Service:Please contact the address on the back page.Warranty statement:In the event of a warranty claim, no charge is levied to you for the services provided. GARDENA Manufacturing GmbH grants a warranty for all original GARDENA new products for two years from the date of original purchase from the retailer, provided that the devices have been for private use only. This manufacturer’s warranty does not apply to products acquired second hand. This warranty includes all significant defects of the product that can be proved to be material or manufacturing faults. This warranty is fulfilled by supplying a fully functional replacement product or by repairing the faulty product sent to us free of charge; we reserve the right to choose between these options. This service is subject tothe following provisions:
- The product has been used for its intended purpose as per the recommendations in the operating instructions.
- Neither the purchaser nor a third party has attempted to open or repair the product.
- Only Original GARDENA replacement parts and wear parts have been used for operation.
- Presentation of the receipt.
Normal wear and tear of parts and components (such as blades, blade fixing parts, turbines, light bulbs, V-belts /toothed belts, impellers, air filters, spark plugs), visual changes, wear parts and consumables are excluded from the warranty.This manufacturer’s warranty is limited to replacement and repair of products in accordance with the abovementioned conditions. The manufacturer’s warranty does not constitute an entitlement to lodge other claims against us as a manufacturer, such as for damages. This manufacturer’s warranty does not, of course, affect statutory and contractual warranty claims against the dealer/retailer.The manufacturer’s warranty is governed by the law of the Federal Republic of Germany.In case of a warranty claim, please return the faulty product, together with a copy of the receipt and a description of the fault, with postage paid to the service address.
ConsumablesThe impeller and filter are consumables and are not included in the warranty.
Product liabilityIn accordance with the German Product Liability Act, we hereby expressly declare that we accept no liability for damage incurred from our products where said products have not been properly repaired by a GARDENA-approved service partner or where original GARDENA parts or parts authorised by GARDENA were not used.
References
Husqvarna Group
Husqvarna Ecuador
Husqvarna Magyarország
Husqvarna UK | Chainsaws, Lawn Mowers & Garden Tools
www.net.ve – This website is for sale! – www Resources and Information.
Садовый Инвентарь | Садовые Инструменты | GARDENA
GARDENA – Garden tools – GARDENA
Husqvarna Colombia
GARDENA – puutarhatyökalut – GARDENA
Husqvarna Australia | Tools & Equipment for Lawn, Garden and Forestry
DETO HANDELMAATSCHAPPIJ N.V.. DETO SHOWROOM
Husqvarna Forest, Lawn & Garden
Husqvarna Brasil
[xyz-ips snippet=”download-snippet”]