GARDENA Clear Water Pump 11000 Aquasensor User Manual
Product Overview


Translation of the original instructions.
![]() This product may be used under supervision, or if instruction regarding the safe use of the product has been provided and the resulting dangers have been understood, by children aged 8 and above, as well as by persons with physical, sensory or mental disabilities or a lack of experience and knowledge. Children must not be allowed to play with the product. Cleaning and user maintenance must not be performed by children without supervision. The use of this product by young people under the age of 16 is not recommended.
This product may be used under supervision, or if instruction regarding the safe use of the product has been provided and the resulting dangers have been understood, by children aged 8 and above, as well as by persons with physical, sensory or mental disabilities or a lack of experience and knowledge. Children must not be allowed to play with the product. Cleaning and user maintenance must not be performed by children without supervision. The use of this product by young people under the age of 16 is not recommended.
Intended useThe GARDENA Submersible Pump is intended for drainage purposes if flooding occurs but also for transferring water to and from tanks and pumping them out, for drawing water from wells and shafts, for draining boats and yachts and for aerating and circulating water for limited periods and for pumping water containing chlorine and detergents in private domestic gardens and allotments.
Liquids to be pumped
The GARDENA Submersible Pump must only be used to pump water.The pump is fully submersible (water-tight encapsulation) and is submerged in water (for max. submersion depth, see 7. TECHNICAL DATA).
The product is suitable for pumping the following liquids:
- Clear Water Submersible Pump: clean to slightly dirty water with a max. particle size of 5 mm.
- Dirty Water Submersible Pump: dirty water with a max. particle size of 35 mm.
- The product is not intended for long term use (continuous circulation operation).
![]() DANGER! Risk of physical injury!The pump should not be used for the delivery of salt water, corrosive, easily inflammable or explosive liquids (e. g. petrol, paraffin, thinners), oil, heating oil or foodstuffs.
DANGER! Risk of physical injury!The pump should not be used for the delivery of salt water, corrosive, easily inflammable or explosive liquids (e. g. petrol, paraffin, thinners), oil, heating oil or foodstuffs.
SAFETY
IMPORTANT!Read the operator’s manual carefully before use and keep for future reference.Symbols on the product
![]() Read operator’s manual.
Read operator’s manual.
General safety warningsElectrical safety
![]() DANGER! Electric shock!Risk of injury due to electric shock.
DANGER! Electric shock!Risk of injury due to electric shock.
- The product must be supplied through a residual current device (RCD) having a rated residual operating current not exceeding 30 mA.
- Contact GARDENA Service if the residual current device (RCD) has triggered.
 DANGER! Risk of injury!Risk of injury due to electric current.
- Disconnect the product from the mains before you maintain or replace parts. Thereby the disconnected socket must be in the visual range.
Safe operating practices
- The water temperature should not exceed 35 °C.
- The pump must not be used when people are in the water.
- Pollution of the liquid could occur due to leakage of lubricants.
- Keep bystanders away from the water.
- Operate the pump only with the elbow connector.
- The hose end should be lower than the maximum delivery head.
Circuit breakersThermal protection switchIn the event of an overload, the pump is switched off by the built-in thermal motor protection. After sufficient cooling of the motor, the pump is operational again.
Automatic ventingThis pump is equipped with a vent valve which eliminates any air pockets in the pump. Depending on the function, a small amount of water can escape from the side of the housing.
Additional safety warningsElectrical safety
![]() DANGER! Cardiac arrest!
DANGER! Cardiac arrest!
This product makes an electromagnetic field while it operates. This field may under some conditions interfere with active or passive medical implants.To decrease the risk of conditions that can possibly injure or kill, we recommend persons with medical implants to speak with their physician and the medical implant manufacturer before you operate the product.
CablesIf extension cables are used, these must comply with the minimum cross-sections in the table below:
|
Voltage |
Cable length | Cross section |
|
230 – 240 V/50 Hz |
Up to 20 m | 1.5 mm2 |
| 230 – 240 V/50 Hz | 20 – 50 |
m 2.5 mm2 |
![]() DANGER! Electric shock!With a cut off mains plug, moisture can get into electrical parts via the mains cable and cause a short circuit.
DANGER! Electric shock!With a cut off mains plug, moisture can get into electrical parts via the mains cable and cause a short circuit.
- Never cut the mains plug off (e.g. to feed throughwall).
- Don’t use the power cable for plugging off.
- If the supply cord is damaged, it must be replaced by the manufacturer, its service agent or similarly qualified persons in order to avoid a hazard.
- Mains plug and extension connections must be protected from water splashes.
- Ensure that the electrical connections for plugs and sockets are made in areas safe from flooding.
- Protect the mains plug and the mains power cable from heat, oil and sharp edges.
- Observe the mains voltage. The information on the nameplate must be in agreement with the data for the mains power grid.
- The pump’s mains plug must be disconnected before anybody enters the swimming pool or touching the surface of the water.
- The mains power cable must not be used for fastening or transporting the pump.
- For submerging or lifting / securing the pump, please use a fastening rope. Please regularly check the connecting line.
- Before using, always subject the pump (especially the power cables and the power connections) to a visual inspection.
- A pump which is damaged should not be used. In the event of damage, have the pump checked by the GARDENA Service.
- Assembly instructions: Retighten all screws by hand.
- Before use after maintenance, make sure that all parts are screwed together.
- When using our pumps with a generator, the warnings of the generator manufacturer must be observed.
Personal safety
![]() DANGER! Risk of suffocation!Small parts can be easily swallowed. There is also a risk that the polybag can suffocate toddlers. Keep toddlers away when you assemble the product.
DANGER! Risk of suffocation!Small parts can be easily swallowed. There is also a risk that the polybag can suffocate toddlers. Keep toddlers away when you assemble the product.
- Observe the minimum water level in accordance with the characteristics given for the pump.
- Allow the pump to run no longer than 10 minutes against a closed pressure side.
- Sand and other abrasive substances cause increased wear and reduce the pump’s output.
- The sensor fields may may only be operated outside the water.
- The hose must not be disconnected during operation. Allow the pump to cool down before troubleshooting.
ASSEMBLY
![]() DANGER! Risk of physical injury!Injury when the product starts accidentally.Disconnect the product from the mains before you assemble the product.
DANGER! Risk of physical injury!Injury when the product starts accidentally.Disconnect the product from the mains before you assemble the product.
Connection possibilities of the connection nipple [Fig. A1]The hose can be connected via the connection nipple (4) with different hose diameters or the GARDENA Connection System.
|
Large hose diameter |
Cut off nipple at (a) [ Fig. A2 ] |
|
GARDENA Connection System/ Art. 9036 / 9044: Medium hose diameter |
Cut off nipple at (b) [ Fig. A3 ] |
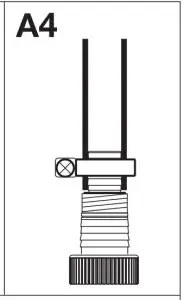
| Small hose diameter |
Do not cut off nipple [ Fig. A4 ] |
When using the largest hose diameter, the pump has the maximum delivery capacity.
| Pump | Art. 9034 | Art. 9036
Art. 9044 |
| Small hose diameter | 25 mm (1″) | 32 mm (1 1/4″) |
| Art. GARDENA | Art. 7193 | Art. 7194 |
| Medium hose diameter | GARDENA Connection System G 1″ | 38 mm (1 1/2″) |
| Art. GARDENA
Hose Clamp |
32 mm (1 1/4″) *
Art. 7194 |
Art. 7195 |
| Large hose | 38 mm (1 1/2″) | 51 mm (2″) |
| Art. GARDENA
Hose Clamp |
Art. 7195 | Art. 7196 |
When using the 38 mm (1 1/2″) hose, we recommend the GARDENA Flat Hose Set Art. 5005 with 10 m hose and hose clamp.* For Art. 9034 an additional connection nipple ß4a for 1 1/4″ hoses is supplied.
To connect the hose via the connection nipple
- When using the large diameter hose, cut off the connection nipple (4) at (a).
- Only for Art. 9036/9044: When using the medium hose diameter, cut off the connection nipple (4) at (b).
- Push the hose onto the connection nipple (4).
- Fix the hose to the connection nipple (4) e.g. with a GARDENA Hose Clamp.
Connect hose via the GARDENA Connection System: With 17000CLEAR/20000DIRT (Art. 9036/˘9044) the hose cannot be connected via the connection nipple (4) with the GARDENA Connection System.
|
Hose diameter |
Pump connection | |
|
13 mm (1/2″) |
GARDENA Pump Connection Set | Art. 1750 |
| 15 mm (5/8″) | GARDENA Pump Connection Set |
Art. 1750 |
| 19 mm (3/4″) | GARDENA Pump Connection Set |
Art. 1752 |
- Cut off the connection nipple (4) at (b).
- Connect the hose to the connection nipple (4) via the appropriate GARDENA Connection System.
To assemble the pump connection [Fig. A5]
![]() DANGER! Risk of physical injury! Injured cut by the impeller.Operate the pump only with the elbow connector.
DANGER! Risk of physical injury! Injured cut by the impeller.Operate the pump only with the elbow connector.
The hose can be easily connected and disconnected using the locking devices (2) on the elbow connector (1). With Art. 9034/9036 a non-return valve is supplied which prevents water from flowing back through the hose. The max. delivery rate is only achieved without the non-return valve.If only a small amount of reflux is expected, e.g. if the hose is laid flat, we recommend dispensing with the valve due to the better delivery and suction performance
- Only for Art. 9034/9036: Insert the non-return valve ßV into the pump. Observe the installation direction. 2. Screw the elbow connector (1) clockwise into the pump until it stops. (If the hose is to be installed horizontally, the elbow connector (1) can be screwed out again up to half a turn. When using the non-return valve, increased force is required.)
- Screw the connection piece (3) into the connection nipple (4).
- Push the connection nipple (4) of the hose into the elbow connector (1) until it stops until it engages audibly and visibly.
- The hose is securely connected to the pump.
OPERATION
![]() DANGER! Risk of physical injury! Injury when the product starts accidentally.Disconnect the product from the mains before you connect, adjust or transport the product.
DANGER! Risk of physical injury! Injury when the product starts accidentally.Disconnect the product from the mains before you connect, adjust or transport the product.
To pump waterIf the pump cannot be immersed via the handle, the pump must always be immersed via a rope. Attach the rope by pulling it through the eyelets provided and knotting it. Minimum immersion depth during initial operation see 7. TECHNICAL DATA.
Take care that the pump is located where the inlet openings at the suction base are not obstructed neither completely nor partly.Stand the pump on a brick if using in a pond.If the suction process is close to the minimum water level at start-up, the suction process may take longer.
- Immerse the pump.
- Connect the pump to the mains.Attention! The pump begins operating immediately. The sensor is initialised and indicated by a running light.
Automatic operation [Fig. O1]In automatic operation the pump switches on automatically when the water level reaches the switch-on level and switches off automatically when the water level reaches the switch-off level.Switch-on/switch-off heights of the sensor fieldsThe sensor has nine sensor fields (ßS1 to ßS9 from bottom to top), which are located to the right of the LEDs.The sensor fields are about 1 cm high (no finger or changed water level is detected between the sensor fields)
|
Sensor field |
ßS1 | ßS2 | ßS3 | ßS4 | ßS5 | ßS6 | ßS7 | ßS8 | ßS9 |
| Art. 9034 / 9036
Switch height [mm] |
5 |
19 |
34 |
53 |
77 |
105 |
136 |
170 |
207 |
| Art. 9044
Switch height [mm] |
42 |
54 |
69 |
88 |
112 |
140 |
171 |
205 |
242 |
Art. 9034 / 9036: When the feet are folded in, the values are 4 mm higher in each case.After plugging in the pump the 9 LED’s light up one after the other.The pump starts at the factory in automatic mode with sensor field switch-on height ßS8 and sensor field switch-off height ßS4 .
To adjust the switch-on/switch-off heights [Fig. O1]
The sensor fields can only be adjusted outside the water.When the pump has been removed from the water, the sensor should be dried for programming.The upper sensor field is always the switch-on height, the lower sensor field is always the switch-off height.
- Operate the sensor field until the input is acknowledged with a short double flash of all LEDs.
- Keep the sensor field ßS7 pushed until the double flashing of all LED’s has acknowledged the input.The currently set switch-on and switch-off heights are briefly displayed. After that all sensor fields light up.
- Push the desired upper sensor field for the switch-on height.The LED of the selected sensor field switches off.
- Push the desired lower sensor field for the switch-off height.The LED of the selected sensor field switches off.After 3 seconds, the set switch-on and switch-off heights are accepted and displayed.
Automatic clear water suction for very low water levelsSensor field ßS1 can be selected both as switch-on and switch-off point.If the sensor field ßS1 still detects water within 10 minutes after starting the pump, the pump switches off to prevent damage due to dry running.The pump will still start if sensor field ßS2 detects water.In this case, however, the sensor should be cleaned to ensure exact water level detection.
If the sensor field ßS1 is activated several times within a short time by water flowing back from the hose line, there is a pause of 10 minutes.If the water level reaches sensor field ßS2 , the pump switches on automatically, even within the pause of 10 minutes.If this is the case regularly, please select the next sensor field as the switch-on point.In order to ensure quick suction, the pump switches off briefly for the sensor field ßS1 – sensor field ßS5 to vent.After 20 seconds of operation, the pump switches off once for approx. 2 seconds and then on again.
To display switch-on and switch-off heights
- Keep the sensor field ßS6 pushed until the double flashing of all LED’s has acknowledged the input.The currently set switch-on and switch-off heights are displayed.
Disable the water level tracking
In automatic operation, the LEDs follow the water level.This can be deactivated.
- Keep the sensor field ßS8 pushed during initialisation until the double flashing of all LED’s has acknowledged the input (see To pump water).
To switch the water level tracking back on, push and hold the sensor field ßS8 again during initialisation until the double flashing of all LED’s has acknowledged the input.
Demo modeFor presentation purposes, the pump can be put into demo mode. In this mode, the LEDs simulate the pump’s functions via flashing sequences and the sensor fields react to touch.
- Keep the sensor fields ßS5 and ßS8 pushed during initialisation when switching on or during the self-test after plugging in until the double flashing of all LED’s has acknowledged the input.
To switch off the demo mode again, push and hold the sensor fields ßS5 and ßS8 during initialisation when switching on or during the self-test after plugging in until the double flashing of all LED’s has acknowledged the input.
Manual operation [Fig. O1]
In manual mode the pump runs until the pump is disconnected from the mains. This mode is particularly suitable for flat suction.In manual operation the sensor fields are deactivated.The pump then runs until the pump is disconnected from the mains or another operating mode is selected
- Keep the sensor fields ßS6 and ßS8 pushed until the double flashing of all LED’s has acknowledged the input.All LEDs will light up and within 5 seconds all the LEDs will switch off one after the other. The pump starts.
During these 5 seconds the pump should be placed in the water. A start will only take place if the pump detects water. If this is not the case, the countdown is repeated up to three times.If you need more time to put the pump into the water, please disconnect the pump from the power supply. The countdown will continue after the sensor is plugged in again.
The manual operation remains active even after disconnecting the power supply.To stop manual operation, disconnect the pump from the mains and take it out of the water. Connect the pump to the power supply again and keep sensor field ßS9 pressed until it is acknowledged by double flashing of all LEDs. Now you are again in automatic mode.
Only operate the manual mode under supervision.
Time-limited manual operation:In time-limited manual operation, the sensor fields are deactivated for 10 minutes. The pump then runs for 10 minutes and then switches off automatically.
- Keep the sensor fields ßS7 and ßS8 pushed until the double flashing of all LED’s has acknowledged the input.
All LEDs will light up and within 10 seconds all LEDs will switch off one after the other. The pump starts. After 10 minutes the pump automatically switches back to automatic operation.
After disconnecting the power supply, the pump automatically switches back to automatic operation.To return to the automatic mode again, push and hold the 2 sensor fields ßS7 and ßS8 simultaneously until the double flashing of all LEDs has acknowledged the input.
Flat suction/normal operation (only for the clear water submersible pumps) [Fig. O2]:Normal operationRecommended operating mode for maximum pumping capacity and grain size up to 5 mm, especially in automatic mode.
- Fold the 3 folding feet (F) inwards.
Flat suctionThe residual water height of approx. 1 mm is only achieved with flat suction in manual operation. Please note that in this mode the delivery and suction capacity is reduced.
- Fold the 3 folding feet (F) outwards.
MAINTENANCE
![]() DANGER! Risk of physical injury! Injury when the product starts accidentally.
DANGER! Risk of physical injury! Injury when the product starts accidentally.
- Disconnect the product from the mains before you maintain the product.
To clean the pump
![]() DANGER! Risk of physical injury!Risk of injury and risk of damage to the product.
DANGER! Risk of physical injury!Risk of injury and risk of damage to the product.
- Do not clean the product with a water jet (in particular high-pressure water jet).
- Do not clean with chemicals including petrol or solvents. Some can destroy critical plastic parts.
STORAGE
To put into storage:The pump is not frost-proof!The product must be stored away from children.
- Disconnect the pump from the mains.
- Turn the pump upside down until no more water runs out.
- Clean the pump (see 4. MAINTENANCE).
- Store the pump in a dry, enclosed and frost-free place.
Disposal(in accordance with RL2012/19/EC)![]() The product must not be disposed of to normal household waste. It must be disposed of in line with local environmental regulations.
The product must not be disposed of to normal household waste. It must be disposed of in line with local environmental regulations.
IMPORTANT!
- Dispose of the product through or via your municipal recycling collection centre.
TROUBLESHOOTING
![]() DANGER! Risk of physical injury!Injury when the product starts accidentally.
DANGER! Risk of physical injury!Injury when the product starts accidentally.
- Disconnect the product from the mains before you troubleshoot the product.
To clean the suction base and the impeller [Fig. T1]
- Only for Art. 9044: Unscrew the 5 Phillips screws (9) and remove the cover (10).
- Unscrew the 4 Phillips screws (6).
- Pull the suction base (7) off the pump.
- Clean suction base (7) and impeller (8) (the warranty does not become void as a result of this maintenance work).
- Clean the sealing surfaces carefully to avoid damage and leakage.
- Reassemble the suction base (7) in reverse order.
A damaged seal must be replaced.For safety reasons a damaged impeller can only be exchanged by the GARDENA Service Centre.
|
Problem |
Possible Cause |
Remedy |
| Pump is running, but doesn’t deliver water | Low water level and filled hose with built-in non return valve. | Remove the check valve or empty the hose manually |
| Air cannot escape, because the pressure line is closed. (Possible kink in the pressure hose.) | Open the pressure line (e.g. shut-off valve, delivery units). | |
| Air in suction foot. | Wait for about 60 seconds until the pump has vented; if necessary, turn off and then on again. | |
| Error code 2 | Suction opening is clogged. | Clean the suction opening with a water jet. |
| Hose is clogged | Remove the clog from the hose. | |
| Error code 1 | Impeller is blocked. | Clean the impeller. |
| Error code 2 | Water level below minimum water level when put into operation. | Submerge the pump deeper. |
| Error code 3 | Sensor is dirty. | Clean the sensor. |
| Error code 4 | Time is exceeded. | Place the pump in water within the countdown. |
| Pump does not start, or stops suddenly during operation | Thermal switch has turned the pump off because of overheating. | Clean the suction opening. Observe the max. media temperature (35 °C). |
| Pumping without electricity. | Check fuses and electrical plug connections. | |
| RCD has triggered (residual current). | Disconnect the pump and contact the GARDENA Service. | |
| Pump is running but the delivery drops suddenly | Suction opening is clogged. | Clean the suction opening with a water jet. |
| Hose is clogged. | Remove the clog from the hose. | |
| Pump starts and stops several times in succession | Returning water from the hose | Select the next higher switch-on point and insert the non return valve. |
| Pump does not start with activated sensor field ß | Sensor field ßS1 was activated several times within a short time and the pump is paused. | Wait for the break. Select the next higher switch-on point and insert the non return valve. |
![]() NOTE: For any other malfunctions please contact the GARDENA service department.Repairs must only be done by GARDENA service departments or specialist dealers approved by GARDENA.
NOTE: For any other malfunctions please contact the GARDENA service department.Repairs must only be done by GARDENA service departments or specialist dealers approved by GARDENA.
TECHNICAL DATA
| Submersible Pump | Unit | Value (Art. 9034) | Value (Art. 9036) | Value (Art. 9044) |
| Rated power | W | 450 | 750 | 750 |
| Mains voltage | V (AC) | 230 | 230 | 230 |
| Mains frequency | Hz | 50 | 50 | 50 |
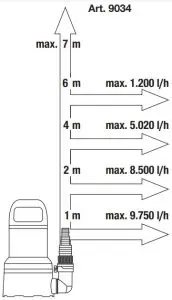
| Max. delivery capacity | l/h | 11,000 | 17,000 | 20,000 |
| Max. pressure / | bar / | 0.7 / | 0.9 / | 0.9 / |
| Max. delivery head | m | 7.0 | 9.0 | 9.0 |
| Max. submersion depth | m | 7 | 7 | 7 |
| Min. / max. cut-in height | mm | 5 / 207 | 5 / 207 | 42 / 242 |
| Min. / max. cut-out height | mm | 1 / 170 | 1 / 170 | 35 / 205 |
| Residual water level | mm | 1 | 1 | 35 |
| Dirty water with max. particle mm | 1* / 5 | 1* / 5 | 35 | |
| Minimum water depth for mm | 5 | 5 | 42 | |
| Power cable | m | 10 (H05RN-F) | 10 (H05RN-F) | 10 (H07RN-F) |
| Weight without cable (approx.) | kg | 4.0 | 4.7 | 5.0 |
| Connection thread water outlet | Inch | G 1 1/2″ | G 1 1/2″ | G 1 1/2″ |
| Connection options | Inch | 1″ / 1 1/4″ / 1 1/2″ / 1 1/4″ / 1 1/2″ /
G 1″ |
2″ 1 1/4″ / 1 1/2″ / 2″ | |
| Max. media temperature | °C | 35 | 35 | 35 |
Note: The switch on/ switch-off heights and the minimum water level on start up were calculated without the height differences to be negotiated. Pump heads of approx. 1 m or more may result in longer suction times of up to 1 minute, or higher minimum water levels of up to +5 cm.* When the feet are folded in, the values are 4 mm higher in each case.
ACCESSORIES
| GARDENA Flat Hose Set | 10 m 38 mm (1/2″) hose with hose clamp. | Art. 5005 |
| GARDENA Hose Clamp | For 25 mm (1″) hoses via the connection nipple. | Art. 7193 |
| GARDENA Hose Clamp | For 32 mm (1 1/4″) hoses via the connection nipple. | Art. 7194 |
| GARDENA Hose Clamp | For 38 mm (1 1/2″) hoses via the connection nipple. | Art. 7195 |
| GARDENA Hose Clamp | For 51 mm (2″) hoses via the connection nipple. | Art. 7196 |
| GARDENA Pump Connection Set | For 19 mm (3/4″) hoses via the GARDENA Connection System. | Art. 1752 |
SERVICE/WARRANTY
ServicePlease contact the address on the back page.
Warranty statementIn the event of a warranty claim, no charge is levied to you for the services provided.GARDENA Manufacturing GmbH grants a warranty for all original GARDENA new products for two years from the date of original purchase from the retailer, provided that the devices have been for private use only. This manufacturer’s warranty does not apply to products acquired second hand. This warranty includes all significant defects of the product that can be proved to be material or manufacturing faults. This warranty is fulfilled by supplying a fully functional replacement product or by repairing the faulty product sent to us free of charge; we reserve the right to choose between these options. This service is subject to the following provisions:
- The product has been used for its intended purpose as per the recommendations in the operating instructions.
- Neither the purchaser nor a third party has attempted to open or repair the product.
- Only Original GARDENA replacement parts and wear parts have been used for operation.
- Presentation of the receipt
Normal wear and tear of parts and components (such as blades, blade fixing parts, turbines, light bulbs, V-belts / toothed belts, impellers, air filters, spark plugs), visual changes, wear parts and consumables are excluded from the warranty.This manufacturer’s warranty is limited to replacement and repair of products in accordance with the abovementioned conditions. The manufacturer’s warranty does not constitute an entitlement to lodge other claims against us as a manufacturer, such as for damages. This manufacturer’s warranty does not, of course, affect statutory and contractual warranty claims against the dealer/retailer.The manufacturer’s warranty is governed by the law of the Federal Republic of Germany.In case of a warranty claim, please return the faulty product, together with a copy of the receipt and a description of the fault, with postage paid to the service address.
ConsumablesThe impeller is a consumable and is not included in the warranty
Performance characteristics

Product liabilityIn accordance with the German Product Liability Act, we hereby expressly declare that we accept no liability for damage incurred from our products where said products have not been properly repaired by a GARDENA approved service partner or where original GARDENA parts or parts authorised by GARDENA were not used.
Description of the product
Clear Water Submersible Pump/Dirty Water Submersible Pump
Product type: 11000CLEAR17000CLEAR20000DIRT
Article number: 903490369044
Year of CE marking: 2020
EC-Directives:
2011/65/EG2014/30/EU2006/42/EG
Harmonised: EN ISO 12100EN 60335-1EN 60335-2-41
Deutschland / GermanyGARDENAManufacturing GmbHCentral ServiceHans-Lorenser-Straße 40D-89079 Ulm(+49) 731 490-123Reparaturen:(+49) 731 490-290[email protected]http://www.gardena.com
AlbaniaKRAFT SHPKAutostrada Tirane-DurresKm 71051 Tirane
ArgentinaROBERTO C. RUMBO S.R.L.Predio NorlogLote 7Benavidez. ZC:1621Buenos Aires[email protected]
AustraliaHusqvarna Australia Pty. Ltd.Locked Bag 5Central Coast BCNSW 2252Phone: (+61) (0) 2 4352 7400[email protected]
Austria / ÖsterreichHusqvarna Austria GmbHIndustriezeile 364010 LinzTel.: (+43) 732 77 01 01-485[email protected]
AzerbaijanFirm Progressa. Aliyev Str. 26A1052 Baku
BelarusPrivate Enterprise“Master Garden”MinskSharangovich str., 7aPhone: (+375) 17 257-00-33Mob.: (+375) 29 676-16-09[email protected]
BelgiumHusqvarna Belgium nvGardena DivisionLeuvensesteenweg 542Planet II E1930 ZaventemBelgië
BrazilHusqvarna do Brasil LtdaAv. Francisco Matarazzo,1400 – 19º andarSão Paulo – SPCEP: 05001-903Tel: 0800-112252[email protected]
BulgariaAGROLAND България АДбул. 8 Декември, №13Офис 51700 Студентски градСофияТел.: (+359) 24666910[email protected]
Canada / USAGARDENA Canada Ltd.100 Summerlea RoadBrampton, Ontario L6T 4X3Phone: (+1) 905 792 93 30[email protected]
ChileREPRESENTACIONESJCE S.A.Av. Del Valle Norte 857,Piso 4Santiago RMPhone: (+56) 2 24142560[email protected]
ChinaHusqvarna (Shanghai)Management Co., Ltd.富世华(上海)管理有限公司3F, Benq Square B,No207, Song Hong Rd.,Chang Ning District,ShanghaiPRC. 200335
ColombiaHusqvarna Colombia S.A.Calle 18 No. 68 D-31, zonaIndustrial de MontevideoBogotá, CundinamarcaTel. 571 2922700 ext. 105[email protected]
Costa RicaCompania EximEuroiberoamericana S.A.Los Colegios, Moravia,200 metros al Sur del ColegioSaint Francis – San JoséPhone: (+506) 297 68 83[email protected]
CroatiaHusqvarna Austria GmbHIndustriezeile 364010 LinzTel.: (+43) 732 77 01 01-485[email protected]
CyprusMed Marketing17 Digeni Akrita AveP.O. Box 270171641 Nicosia
Czech RepublicHusqvarna Česko s.r.o.Türkova 2319/5b149 00 Praha 4 – ChodovBezplatná infolinka:800 100 425[email protected]
DenmarkGARDENA DANMARKLejrvej 19, st.3500 VærløseTlf.: (+45) 70264770[email protected]www.gardena.com/dk
Dominican RepublicBOSQUESA, S.R.LCarretera Santiago LiceyKm. 5 ½Esquina Copal II.SantiagoDominican RepublicPhone: (+809) 736-0333[email protected]
EcuadorHusqvarna Ecuador S.A.Arupos E1-181 y 10 deAgosto Quito, PichinchaTel. (+593) 22800739[email protected]
EstoniaHusqvarna Eesti OÜValdeku 132EE-11216 Tallinn[email protected]
FinlandOy Husqvarna AbGardena DivisionLautatarhankatu 8 B / PL 300581 HELSINKIwww.gardena.fi
FranceHusqvarna France9/11 Allée des pierres mayettes92635 Gennevilliers Cedex
GeorgiaTransporter LLC113b Beliashvili street0159 Tbilisi, Georgia
Great BritainHusqvarna UK LtdPreston RoadAycliffe Industrial ParkNewton AycliffeCounty DurhamDL5 6UP[email protected]
GreeceΠ.ΠΑΠΑΔΟΠΟΥΛΟΣ ΑΕΒΕΛεωφ. Αθηνών 92ΑθήναΤ.Κ.104 42ΕλλάδαΤηλ. (+30) 210 5193100[email protected]
HungaryHusqvarna Magyarország Kft.Ezred u. 1- 31044 BudapestTelefon: (+36) 1 251-4161[email protected]
IcelandBYKO ehf.Bildshöfoa 20110 Reykjavik
IrelandHusqvarna UK LtdPreston RoadAycliffe Industrial ParkNewton AycliffeCounty DurhamDL5 6UP[email protected]
ItalyHusqvarna Italia S.p.A.Via Santa Vecchia 1523868 VALMADRERA (LC)Phone: (+39) 0341.203.111[email protected]
JapanHusqvarna Zenoah Co., Ltd.1-9 MinamidaiKawagoe350-1165 Saitama[email protected]
KazakhstanLAMED Ltd.155/1, Tazhibayevoi Str.050060 AlmatyIP SchmidtAbayavenue 3B110 005 Kostanay
KoreaKyung Jin Trading CO.,LTD.107-4, SunDuk Bld.,YangJae-dong,Seocho-gu,Seoul, (zipcode: 137-891)Phone: (+82) (0)2 574-6300
LatviaHusqvarna Latvija SIAUlbrokas 19ALV-1021 Rīga[email protected]
LithuaniaUAB Husqvarna LietuvaAteities pl. 77CLT-52104 Kaunas[email protected]
LuxembourgMagasins Jules Neuberg39, rue Jacques StasLuxembourg-Gasperich 2549Case Postale No. 12Luxembourg 2010Phone: (+352) 40 14 01[email protected]
MexicoAFOSAAv. Lopez Mateos Sur # 5019Col. La Calma 45070Zapopan, JaliscoMexicoPhone: (+52) 33 3818-3434[email protected]
MoldovaConvel S.R.L.290A Muncesti Str.2002 Chisinau
NetherlandsHusqvarna Nederland B.V.GARDENA DivisionPostbus 501311305 AC ALMEREPhone: (+31) 36 521 00 10[email protected]
Neth. AntillesJonka Enterprises N.V.Sta. Rosa Weg 196P.O. Box 8200CuraçaoPhone: (+599) 9 767 66 55[email protected]
New ZealandHusqvarna New Zealand Ltd.PO Box 76-437Manukau City 2241Phone: (+64) (0) 9 9202410[email protected]
NorwayHusqvarna Norge ASGardena DivisionTrøskenveien 361708 Sarpsborg[email protected]
PeruHusqvarna Perú S.A.Jr. Ramón Cárcamo 710Lima 1Tel: (+51) 1 3320400 ext. 416[email protected]
PolandHusqvarnaPoland Spółka z o.o.ul. Wysockiego 15 b03-371 WarszawaPhone: (+48) 22 330 96 00[email protected]
PortugalHusqvarna Portugal, SALagoa – Albarraque2635 – 595 Rio de MouroTel.: (+351) 21 922 85 30Fax : (+351) 21 922 85 36[email protected]
RomaniaMadex International SrlSoseaua Odaii 117- 123,RO 013603 Bucureşti, S1Phone: (+40) 21 352.76.03[email protected]
Russia / РоссияООО „Хускварна“141400, Московская обл.,г. Химки,улица Ленинградская,владение 39, стр.6Бизнес Центр„Химки Бизнес Парк“,помещение ОВ02_04http://www.gardena.ru
SerbiaDomel d.o.o.Autoput za Novi Sad bb11273 BelgradePhone: (+381) 118 48 88 12[email protected]
SingaporeHy-Ray PRIVATE LIMITED40 Jalan Pemimpin#02-08 Tat Ann BuildingSingapore 577185Phone: (+65) 6253 2277[email protected]
Slovak RepublicHusqvarna Česko s.r.o.Türkova 2319/5b149 00 Praha 4 – ChodovBezplatná infolinka: 800 154 044[email protected]
SloveniaHusqvarna Austria GmbHIndustriezeile 364010 LinzTel.: (+43) 732 77 01 01-485[email protected]
South AfricaHusqvarna South Africa (Pty) LtdPostnet Suite 250Private Bag X6,Cascades, 3202, South AfricaPhone: (+27) 33 846 9700[email protected]
SpainHusqvarna España S.A.Calle de Rivas nº 1028052 MadridPhone: (+34) 91 708 05 00[email protected]
SurinameDeto Handelmaatschappij N.V.Kernkampweg 72-74P.O.Box: 12782Paramaribo – SurinameSouth AmericaPhone: (+597) 438050www.deto.sr
SwedenHusqvarna AB /GARDENA SverigeDrottninggatan 2561 82 Huskvarna Sverige
Switzerland / SchweizHusqvarna Schweiz AGConsumer ProductsIndustriestrasse 105506 MägenwilPhone: (+41) (0) 62 887 37 90[email protected]
TurkeyDost Bahçe Dış TicaretMümessillik A.ŞYunus Mah. Adil Sok. No:3Ic Kapi No: 1 Kartal34873 IstanbulPhone: (+90) 216 38 93 939[email protected]
Ukraine / УкраїнаТОВ «Хускварна Україна»вул. Васильківська, 34,офіс 204-г03022, м. КиївТел. (+38) 0 800 504 804[email protected]
UruguayFELI SAEntre Ríos 1083 CP 11800Montevideo – UruguayTel: (+598) 22 03 18 44[email protected]
VenezuelaCorporación Casa y Jardín C.A.Av. Caroní, Edif. Trezmen, PB.Colinas de Bello Monte.1050 Caracas.Tlf: (+58) 212 992 33 22[email protected]0000-20.960.00/1220© GARDENAManufacturing GmbHD-89070 Ulm
9034-20.960.02/0121© GARDENA Manufacturing GmbHD-89079 Ulmhttp://www.gardena.com
report this ad![]()
References
Husqvarna Forest, Lawn & Garden
Zahradní technika od autorizovaného prodejce | KISPlus
Husqvarna Ecuador
NOBUR s.r.o. – Nobur
Садовый Инвентарь | Садовые Инструменты | GARDENA
Husqvarna Australia | Tools & Equipment for Lawn, Garden and Forestry
GARDENA – puutarhatyökalut – GARDENA
www.net.ve – This website is for sale! – www Resources and Information.
Husqvarna Group
Čerpadlá-závlahy, kosačky -vyberte si
GARDENA – Garden tools – GARDENA
Servis a prodej zahradní techniky | Jirami.cz
Husqvarna Brasil
DETO HANDELMAATSCHAPPIJ N.V.. DETO SHOWROOM
Husqvarna Magyarország
Husqvarna UK | Chainsaws, Lawn Mowers & Garden Tools
GARDENA Service – GARDENA Support
Produkt Service – Reparatur Service – GARDENA
Husqvarna Colombia
[xyz-ips snippet=”download-snippet”]