![]() www.garett.euSmartwatch GPS Locator Garett Kids 5User manualMULTILANGUAGE
www.garett.euSmartwatch GPS Locator Garett Kids 5User manualMULTILANGUAGE![]()
SECURITY ISSUES
Before use, carefully read the user’s manual and save it for later use. The manufacturer is not responsible for any damage/injury caused by improper use. Depending on the particular SmartWatch lot, some functions may differ from the functions described in the user manual.
- Using this device near medical devices may disrupt their operation. Pay special attention when using the smartwatch near medical devices, such as pacemakers, hearing aids, and other electronic medical devices.
- It is forbidden to throw equipment into the fire. There is a risk of battery explosion and, as a consequence, life and health hazards.
- The device should be protected against heat sources and direct sunlight.
- Do not immerse the device in water.
- Do not dive into the device.
- It is forbidden to use the device if it is damaged. In the event of damage, take the device to an authorized service center for inspection/repair.
- Attempting to repair it yourself may lead to damage to the device and will void the warranty.
- Only clean the device with a soft, slightly damp cloth. Do not use chemicals or detergents to clean this device.
PRODUCT DESCRIPTION

| 1. Display2. Device on / return / ending button,rejecting a call / blanking the screen3. SOS button / receive a call4. Camera | 5. Flashlight6. Nano SIM card slot7. Charging port8. Registration code9. Rubber strap |
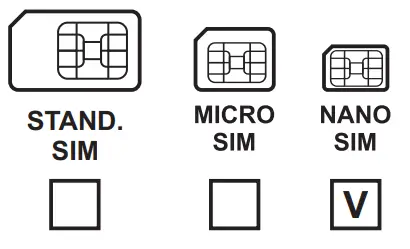
REQUIREMENTS CONNECTING THE NANO SIM CARD
- We install the card in the Nano-SIM standard for the device.
- The SIM card must meet the following conditions:• The card must be active (if it is a new card) it should be activated on the mobile phone by making an outgoing call)• The card must have funds on the account (applies to top-up cards)• The card can not have an active PIN code (to check if the card has an active PIN lock, install it on the mobile phone and check if you are asked for the PIN code when switching on. If yes, the lock is active and you will need to disable it in the phone settings or contact the operator)• The card must support the 2G operating mode, it must have the internet service enabled and the number identification function.
ATTENTION: SIM cards offered by operators as the Internet, dedicated for example to tablets may not work in the device.Due to the fact that the device uses an internet connection, in order not to generate additional costs, we recommend buying an internet package from the operator. The 1GB / month package is enough. The costs of Internet connection, voice calls, and SMS messages are regulated by the mobile network operator pricelist.
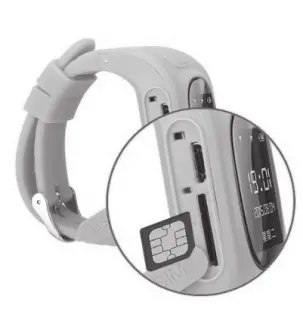
INSTALLATION OF NANO SIM CARD
- Open the rubber plug on the SIM card slot (6) on the left side of the watch.
- After opening the plug, place the Nano SIM card in the port in accordance with an illustrative diagram in the image, that is, the card chip towards the display and the notched corner of the card towards the slot.The card enters quite deeply into the slot, so we have to help ourselves with a thin, flat tool, pushing the card until we hear “click”.To remove the card, again using the same tool, we gently push the card, we will hear a click, and the card will remain pushed through the mechanism.

It is recommended to install the SIM card when the device is turned off.
- Close the slot cover.
CHARGING
- SmartWatch is charged using the cable attached to the device.
- Insert the micro USB end of the cable into the charging port of the watch (7) under the rubber plug on the right side of the device. Then connect the other end of the cable with the USB port of the computer or USB adapter, eg from a mobile phone. When we connect the cable correctly, the charging animation appears on the screen.
When the battery is very discharged, the animation may appear only after several minutes.Before the watch is turned on for the first time, it is recommended to charge the watch for 2 hours. Charging after unloading should take at least 2 hours.
SMARTWATCH INSTALLATION ON HAND
Place the watch on your wrist and adjust the length of the strap so that it is not loose.
FIRST TURN ON THE WATCH
- When the SIM card is correctly installed in the watch and meets all the above conditions, we can start the device by pressing and holding the power button (2) for approx. 4 seconds.
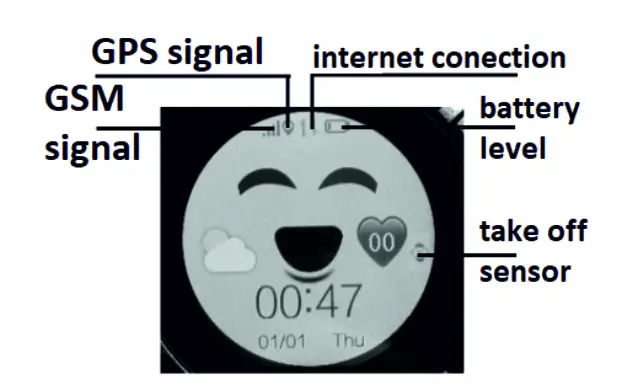
- After starting the watch, I will show you the main screen displaying the most important information, such as time, date, GSM coverage, and battery level.Before the watch is turned on for the first time, it is recommended to charge the watch for 2 hours. Charging the watch after discharge should take what least 2 hours.
- After starting the watch, wait a few seconds until the range and internet connection appears (the arrow icons visible in the above screenshot) necessary for further configuration of the device. If after approx. Minute the range and internet connection does not appear, make sure that the SIM card meets all previously described requirements and the watch is in a place with a strong reach. It is also worth turning off and restarts the watch.When the reach appears and the internet connection is still not available (no arrow icon), the problem is most likely due to the lack of APN configuration. Configuration is done using special configuration SMS described in the further part of the manual in the TROUBLESHOOTING section.
- When the internet connection is active, we can go to the next stage which is the installation of the Garett Tracker application on our smartphone. The main menu of the watch will be discussed in the further part of the manual because the full functionality of the smartwatch is obtained after registration and configuration it through the Garett Tracker applications.
GARETT TRACKER INSTALLATION
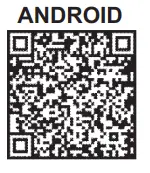
The full functionality of the locator and the possibility of its configuration are obtained after installing the Garett Tracker application on our smartphone with Android or iOS. The application is compatible with Android 4.3, iOS 7 (and higher). The application can be searched by entering the name “Garett Tracker” in the store search engine or by scanning the corresponding QR code shown below.
 |
 |
REGISTRATION IN APPLICATION
- Run the Garett Tracker application.
- After starting the application, you will see a login screen where you can log in to your account if you have already created it, register a new account or change the language of the application.
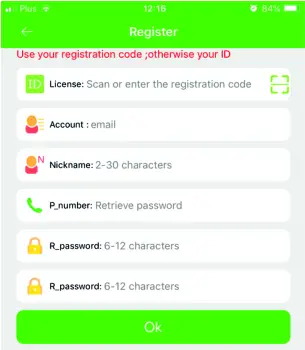
- To register a new account, click on the “Registration” option. z
- In the first field “ID number” we scan a QR code located on the sticker on the back of the watch (REG CODE) by clicking on the green square icon in the right part of this field. We can also enter the code manually.
- In the next field “Account”, enter the e-mail address used by us, it will be used as the login for the application.
- In the “Nickname” field, enter the name, the nickname of the watch user.
- In the next field “Phone book”, enter the number of the administrator of the watch, the number of the person who installs the application, and will manage the settings of the watch.
- In the last two fields, we provide a password, which along with the e-mail address will be used as login data in the application.
- Tap Ok to end the registrations.
NOTE: You must remember or store the e-mail address and password used to register your watch, as the watch can only be assigned to one account and can be registered only once. Re-registration will be possible only after contacting the service.
MAIN SCREEN OF THE APPLICATION
After correct registration, the main screen of the application will display, where we will see the map together with the last location of the watch. In the bubble above the location pin, the source for obtaining the location (GPS / LBS / WiFi), approximate address, date, time of the last location, and battery status in the watch are displayed.In order for the location of the watch to be determined with the greatest accuracy, the smartwatch must be in the open ground to have a GPS signal. When the watch does not have a GPS signal, for example, the location is located in the building, it is determined based on the nearest cellular network transmitter.NOTE: When using any application function or configuration test the settings will show the message: “The device is not on the network” which means that the smartwatch has no active internet connection. Check if the SIM card meets all the requirements described earlier in the manual. If the card meets the requirements, the most common reason for this message is improper APN configuration. The APN configuration is described in the further part of the manual in the TROUBLESHOOTING section.
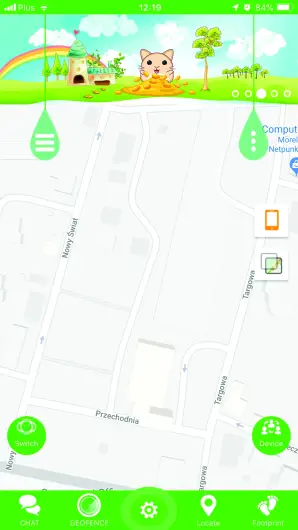
- Chat: with this feature you can send short voice memos (max. 15 seconds) or short text messages (max 30 characters) to your watch.
- Geo-fence: using this we will determine the area in which the user of the watch can move.When the area will be the app has exceeded us about it inform. To set the area we set the map in the place where we want to designate a geofence, then click with your finger on the map by marking the center of the fence. With the + / – buttons we increase/decrease the area of the diameter and we approve it with the icon mode. When we want to delete the geofence, click the trash can icon.
- Locate: By clicking this icon at any time, we will determine the current location of the watch.
- Footprint: in this menu, we will display the route from the previous days that the user of the watch was moving.
- By clicking the icon we will display a menu in which we can activate additional functions of the watch::Health: in this menu, you can activate the functions of the pedometer measuring the daily number of steps taken, the number of calories burned, and the sleep monitor. We activate each function separately by shifting switch “change”. We can also display the activity history from previous days.Message: clicking on this function will display the history of notifications displayed by applications.Alarm: on / o ffand configuration of the alarm clock activated on the watch.Reward: the function of rewarding the child with hearts. Hearts will be visible on the watch’s main screen.
- By clicking the icon we will display the administrative settings:Personal data: configuration of administrator information.List of devices: displaying the list of devices assigned to the administrator account on which we are currently logged in. By using the “Add device” function, you can add another device. The “Edit Name” function allows you to change the name of the active device. The “current” field displays the name and ID of the active device. To set the watch as active, click on the switch on the right, next to the ID number of the selected watch.Only one device can be active at a time. This means that we can specify locations and configure only one device. When we want to locate another device from the list, we have to set it as active. To quickly switch between devices, you can use the “Change” button in the lower-left corner of the main application screen. Notifications and alarms come from all devices, even those that are not currently active.Change password: change the administrator password used to log in to the application.Exit: log out of the account in the application.
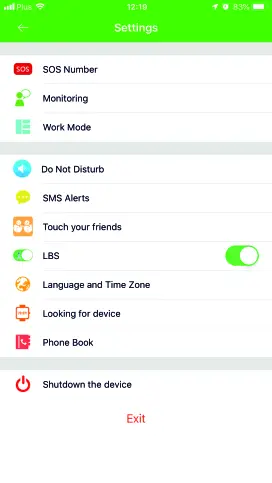
- SETTINGS: go to the application settings by clicking the icon at the bottom of the main screen:SOS / family number: signing numbers, holding the SOS button (2) on the watch for a longer period of time will cause the call to be automatically dialed first from thefirst number in the list. When the first number is not picked up, the watch will automatically dial the second and the corresponding third number.
 SOS / family number: signing numbers, holding the SOS button (2) on the watch for a longer period of time will cause the call to be automatically dialed first from thefirst number in the list. When the first number is not picked up, the watch will automatically dial the second and the corresponding third number.
Note: the numbers are entered without directional or, if necessary, with the directional 004 … Using the “+” symbol may result in the function not working properly.Voice monitoring: the function allows you to overhear what in a given voice the moment is happening near the watch. Enter the administrator’s phone number and confirm “OK”. Within about 30 seconds, the watch automatically calls back to the number entered in the form of a voice call. Nothing appears on the watch screen, it is completely discreet.Note: enter the number without directional code or, if necessary, with 004… Using the “+” symbol may cause the function to not function properly.The function will only work if the watch has a range, internet connection, and funds on the account.Work mode: determining the frequency of automatic updating of the location of the watch. “Follow” mode – every 1 minute, “Normal” mode – every 10 minutes, “Energy-saving – every 1-hour” mode.We recommend using the “normal” mode. Using herring mode can significantly reduce the battery life of the watch. At any time, we can determine the current location of the watch using the “Locate” function.Profile: sound/vibration configuration on the watch.Do not disturb: on / o ffand configuration of the function that w the set time interval locks the watch screen and any notice.Note: when the function is active, you will not get to your watch from the watch will also not be able to make a call.SMS Alerts: enable / only and configuration of SMS notifications about individual events to the telephone number entered.LBS: Enable / disable the positioning function of the watch based on the nearest cellular transmitter when the watch loses GPS coverage.Language and time zone: time zone configuration on the watch. In order for the smartwatch to display the time correctly, the time zone must be set.Add friends: Add friends by bringing two watches close together. Between watches, you will be able to communicate through voice memos. Both devices must support this function.Switch: enable/disable alerts about take o ffwatch from hand.Looking for the device: searching for a lost watch. The function activates an audible alarm on the smartwatch.Phone Book: add contacts that appear in the phone book on the smartwatch.After adding at least one contact, only contacts from the phone book will be able to reach your watch. Calls from unsaved numbers will be automatically rejected.Note: enter numbers without directional or if necessary with directional 004… Using the “+” symbol can cause that it will not be possible to dial a number from the watch.Shutdown the device: remotely shutting down the watch. When the SIM card is on the watch and the watch has an internet connection, we will not turn it o ff using the power button (2) on the watch. We can only turn it o ffremotely using this function or by removing the SIM card beforehand. This is the protection against unwanted shutting down of the watch by its user After proper configuration in the application, the smartwatch is ready to work.
Go to the main menu of the smartwatch by sliding your finger to the left on the main screen:
- Phone book: the numbers entered via the application are displayed here.By clicking the left / right arrows, select the contact, select the connection with the handset icon under the number. We interrupt the connection with the power button(2) or with the red headset icon. You can receive an incoming call using the SOS button (3) or the green handset icon. Use the red headset icon or the power button (2) to reject the connection. When connecting with +/- icons, the volume of the conversation is adjusted at the top of the screen.
- Talk (Chat): Voice memo menu. The last voice notes or short text messages sent from the watch application are displayed here. By clicking on a voice message from the list, we can listen to it. To send a voice note, press and hold the green microphone icon button, dictate the message (maximum 15 seconds) and release it, then the note is automatically sent to the administrator’s application.
- Make friends: add friends by bringing two watches close together. Between watches, you will be able to communicate through voice memos. Both devices must support this function.
- Camera: Take pictures with the built-in camera of the watch. The picture will be saved in the device’s gallery. Only one picture can be saved in the phone memory. The new picture will overwrite this saved in the device’s memory. The photo can be sent to the watch administrator’s applications.
- Tools:– Flashlight: flashlight function. We can start the flashlight through the glass by pressing the SOS button (3) twice.– Album: the display of the photo taken with the camera of the watch.By clicking on the blue icon you can send the photo to the administrator’s applications or by clicking the red icon to delete the photo.– Stopwatch: stopwatch function.– Brightness: adjust the brightness of the display.– Theme: selection of the main menu background.– Volume: adjust the ring volume.– Math game: a game with three levels of difficulty, thanks to which you can practice quick addition and subtraction.
- Step: displays the number of steps completed. The functions must first be activated in the application, as described in the earlier part of the manual.
- Device info:– App download: QR code to download the Garett Tracker application.– Register code: displaying the individual device code required for registration in the Garett Tracker application– ID number (number ID): display the device ID number.
TROUBLESHOOTING
- The device does not turn on:• Connect the device for one hour under the mains charger.Check that the charging cable and charger are in place efficient.
- Lack of GSM coverage (crossed out a circle on the GSM signal icon):• Check if the SIM card is properly inserted in the slot (as indicated at the beginning of the manual)• Check if the SIM card meets all the requirements described at the beginning of the manual, in the section REQUIREMENTS FOR A SIM CARD• Turn o ffand restart the device.• Check the operation of the smartwatch with a different SIM card.
- No internet connection (no arrows icon) / message in the application “Device is offline”:• Check if the SIM card meets all the requirements described at the beginning of the manual, in the section REQUIREMENTS FOR A SIM CARD• IMPORTANT: In case of problems with APN codes, please contact our service department: [email protected]• APN Configuration:• From any mobile phone we send SMS with the content below to the number that is on the watch (the SIM card must be in the watch, the watch must be switched on). The size of letters matters.The content of the first text message: PW,123456,IP,52.28.132.157,8001# after a while, we should receive a response on the phone with the following content: [surl,52.28.132.157, port, 8001 #] ok.!After receiving the answer, we send the second message with the content depending on the APN configuration of the card operator in the watch.To get APN configurations (APN name, user name, password), it’s best to contact your mobile network operator. Below the message pattern, the phrases: (“APN_name”, “username”, “password”) should be replaced with data provided from your operator:pw,123456,apn,APN_name,username,password #Below is an example of configuration for Orange network (APN name: internet, Username: internet, Password: internet). In this case, the content of the SMS will look like this:pw,123456,apn,internet,internet,internet# or apn,internet,internet,internet,26003#After sending you should receive the answer:apn:internet;user:internet;password:internet; userdata:.Below is another example of configuration for the T-mobile network (APN name: internet, username: none, password: none). In this case, the content of the SMS will look like this:pw,123456,apn,internet # or apn,internet,,,26006#After sending, we should get the answer:apn:internet;user:;password:;userdata :.After receiving the reply, we send an SMS with the following text:pw,123456,reset # After about one minute, the watch should get an internet connection.If we do not receive a reply to any message, please exchange the number “123456” to “523681” and send it again.In case of further technical problems, please contact our technical department: [email protected]
- Inaccurate GPS location:In order for the location of the watch to be determined with the greatest accuracy, the smartwatch must be in the open ground to have a GPS signal. When the watch does not have a GPS signal, for example, the location is located in the building, it is determined based on the nearest cellular network transmitter.
- You can not reach your watch, busy signal, or subscriber inaccessible:The number from which we try to call you is not stored in the watch’s phone book. Please check if our number is not restricted. The watch has weak GSM coverage.
- You can not make a call from the watch:The reason may be a weak GSM signal or the lack of stored numbers in the watch’s phone book. The numbers are saved using the application: Settings> Phonebook.
- During the call, you can not hear the smartwatch in the speaker:During the conversation, using the +/- buttons on the right side of the screen, adjust the conversation volume, check if it is not muted.
- Short battery life:Check if the charging time was not too short. It should be about 2 hours.Set the operating mode in the Garett Tracker settings to “Normal” or “Power saving”
TECHNICAL SPECIFICATIONS
|
|
GUARANTEE / RETURNS
 report this ad
The product has a 24-month manufacturer’s warranty.The warranty does not cover defects and damages caused by the user’s fault or due to improper use (not in accordance with the intended use). The warranty also does not cover mechanical damage and resulting from the use of accessories other than those included in the set. The warranty also does not cover consumables.When you want to return the product, you must send the device along with the proof of purchase to the seller.Contact details avaible on site:www.garett.euManufacturerPP S.C. Paweł Knez, Piotr Wilczyńskiul. Targowa 18/141325-520 Kielcewww.garett.eu Correct product removal (used electrical and electronic equipment)The marking on the product or in the texts referring to it indicates that after the expiry of the period of use, it should not be disposed of with other wastes coming from households. To avoid harmful effects on the environment and human health due to uncontrolled waste disposal, please separate the product from other types of waste and recycle it responsibly to promote the re-use of material resources as a permanent practice. For information on the place and method of environmentally safe recycling of this product, household users should contact the retail outlet where they purchased the product, or with the local authority. Users in companies should contact their supplier and check the conditions purchase contract. The product should not be disposed of with other commercial wastes.
 Made in P.R.C
References
[xyz-ips snippet=”download-snippet”]