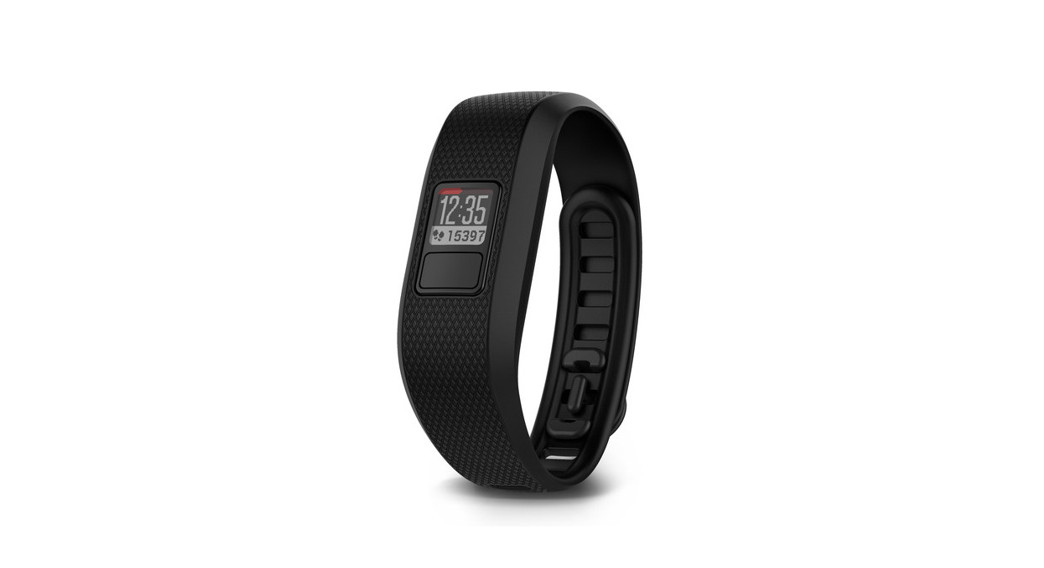
vívofit ® 3Owner’s Manual
© 2016 Garmin Ltd. or its subsidiariesAll rights reserved. Under copyright laws, this manual may not be copied, in whole or in part, without the written consent of Garmin. Garmin reserves the right to change or improve its products and to make changes in the content of this manual without the obligation to notify any person or organization of such changes or improvements. Go to www.garmin.com for current updates and supplemental information concerning the use of this product. Garmin ®, the Garmin logo, ANT+ ®, and vívofit ® are trademarks of Garmin Ltd. or its subsidiaries, registered in the USA and other countries. Garmin Connect ™, Garmin Express ™, and USB ANT Stick ™ are trademarks of Garmin Ltd. ts subsidiaries. These trademarks may not be used without the express permission of Garmin. American Heart Association ® is a registered trademark of American Heart Association, Inc. The Bluetooth ® word mark and logos are owned by Bluetooth SIG, Inc. and any use of such marks by Garmin is under license. Other trademarks and trade names are those of their respective owners. This product is ANT+ ® certified. Visit www.thisisant.com/directory for a list of compatible products and apps.M/N: A03009
Introduction
WARNINGSee the Important Safety and Product Information guide in the product box for product warnings and other important information.Always consult your physician before you begin or modify any exercise program.
Getting Started
To get the most out of your activity tracker, you should pair it with your smartphone or computer and complete the setup process with your free Garmin Connect™ account.NOTE: Until you pair your device and complete the setup process, it has limited functionality. Select an option:
- Pair the device with your smartphone (Smartphone Setup page 1).
- Pair the device with your computer (Computer Setup, page 1).
Everyday Use
Make your vívofit 3 device part of your active lifestyle by wearing it all day, and syncing your data often with your Garmin Connect account. Syncing allows you to analyze steps and sleep data, view totals, and get insights into your activity. You can use your Garmin Connect account to participate in challenges and compete with your friends. You can also customize your device settings, including watch faces, visible screens, auto-sync frequency, and more.
Smartphone Setup
Pairing with Your Smartphone
Your vívofit 3 devices must be paired directly through the Garmin Connect Mobile app, instead of from the Bluetooth ® settings on your smartphone.
- From the app store on your smartphone, install and open the Garmin Connect Mobile app
 .
. - Press the device key 1to turn on the device. The first time you turn on the device, it is in pairing mode.TIP: You can press the device key until appears to manually enter pairing mode.
- Follow the instructions in the app to create an account and set up your device.

NOTE: The setup may include a software update which can take several minutes. Keep your device near your smartphone until setup is complete.After setup is complete, the device continuously tracks your daily activity. You should sync your device often to review your progress in the app.
Syncing Your Data with the Garmin Connect Mobile App
You should manually sync your data to track your progress in the Garmin Connect Mobile app. Your device also periodically syncs data with the Garmin Connect Mobile app automatically.
- Bring the device near your smartphone.
- Open the Garmin Connect Mobile app.TIP: The app can be open or running in the background.
- Hold the device key until appears.
- Wait while your data syncs.
- View your current data in the Garmin Connect Mobile app.

Computer Setup
Pairing Your ComputerYou can use an optional USB ANT Stick™ to pair your device with your computer. Go to buy.garmin.com, or contact your Garmin® dealer for information about optional accessories and replacement parts.
- Go to www.garminconnect.com/vivofit3.
- Select Computer Setup and follow the on-screen instructions to download and install the Garmin Express™ application.
- Plug the wireless USB ANT Stick into a USB port.
- Press the device key to turn on the device.When you turn on the device for the first time, it is in pairing mode.
- If necessary, press the device key until appears.
- Follow the instructions on your computer to add your device to your Garmin Connect account and complete the setup process.
Syncing Your Data with Your Computer
You should sync your data regularly to track your progress in the Garmin Connect application.
- Bring the device near your computer.
- Hold the device key until appears.
- Wait while your data syncs.
- View your current data in the Garmin Connect application.
Device Overview
Move BarSitting for prolonged periods of time can trigger undesirable metabolic state changes. The move bar reminds you to keep moving. After one hour of inactivity, the move bar appears. Additional segments appear after every 15 minutes of inactivity.
 You can reset the move bar by walking a short distance.
Icons
Icons appear at the bottom of the screen. Each icon represents a different feature. You can press the device key to scroll through the different features.
| The current date. The device updates the time and date when you sync your data with a smartphone or computer. | |
| The total number of steps taken for the day. | |
| The number of remaining steps needed to reach your step goal for the day. When you use the auto goal feature, the device learns and proposes a new goal for you at the beginning of each day. | |
| The distance traveled in kilometers or miles for the current day. | |
| The amount of total calories burned for the current day, including both active and resting calories. | |
| Your weekly intensity minutes total. | |
| Your current heart rate and heart rate zone. Your device must be connected to a compatible heart rate monitor (optional). |
Auto Goal
Your device creates a daily step goal automatically, based on your previous activity levels. As you move during the day, the device counts down the number of remaining steps in your daily goal. When you reach your step goal, the device displays, and begins counting the number of steps taken that exceed your daily goal.If you choose not to use the auto goal feature, you can set a personalized step goal on your Garmin Connect account.
Intensity Minutes
To improve your health, organizations such as the U.S. Centers for Disease Control and Prevention, the American Heart Association®, and the World Health Organization, recommend at least 150 minutes per week of moderate-intensity activity, such as brisk walking.The device monitors your activity intensity and tracks your intensity minutes. You can work toward achieving your weekly intensity minutes goal by walking briskly for at least 10consecutive minutes.
You can hold the device key to scroll through the menu options.
| Starts a timed activity. | |
| Stops a timed activity. | |
| Syncs data with your Garmin Connect account. | |
| Pairs your device using Bluetooth wireless technology. | |
| Displays devise and regulatory information. |
Recording a Fitness Activity
You can record a timed fitness activity, such as a walk or run, which can be sent to your Garmin Connect account.
- Hold the device key until appears.The timer begins.
- Start your activity.TIP: You can press the device key to scroll through your activity data while the timer is running.
- After you complete your activity, hold the device key until appears.A summary appears. The device displays the total time and distance traveled during the activity.
- Press the device key to end the summary and return to the home screen.You can sync your device to view activity details on your Garmin Connect account.
Sleep Tracking
While you are sleeping, the device automatically detects your sleep and monitors your movement during your normal sleep hours. You can set your normal sleep hours in the user settings on your Garmin Connect account. Sleep statistics include total hours of sleep, sleep levels, and sleep movement. You can view your sleep statistics on your Garmin Connect account.NOTE: Naps are not added to your sleep statistics.
Using the Backlight
At any time, hold the device key to turn on the backlight.The backlight turns off automatically.
Locking the Clasp
To keep the device secure, you should lock the clasp while wearing the device.Turn the clasp to the locked position.The red line appears when the clasp is unlocked.
History
 History
Your device keeps track of your daily steps and sleeps statistics, as well as your timed fitness activities and optional ANT+ ® heart rate information. This history can be sent to your Garmin Connect account.Your device stores your activity data for up to 4 weeks.NOTE: When using a heart rate monitor, your data storage is reduced.When the data storage is full, the device deletes the oldest files to make room for new data.
Garmin Connect
You can connect with your friends on your Garmin Connect account. Garmin Connect gives you the tools to track, analyze, share, and encourage each other. Record the events of your active lifestyle including runs, walks, rides, swims, hikes, triathlons, and more. To sign up for a free account, go to www.garminconnect.com/start.Track your progress: You can track your daily steps, join a friendly competition with your connections, and meet your goals.Store your activities: After you complete and save a timed activity with your device, you can upload that activity to your Garmin Connect account and keep it as long as you want.Analyze your data: You can view more detailed information about your activity, including time, distance, heart rate, calories burned, and customizable reports.NOTE: Some data requires an optional accessory such as a heart rate monitor.
Share your activities: You can connect with friends to follow each other’s activities or post links to your activities on your favorite social networking sites.Manage your settings: You can customize your device and user settings on your Garmin Connect account.
Customizing Your Device
Garmin Connect SettingsYou can customize your device settings and user settings on your Garmin Connect account.
- From the settings menu in the Garmin Connect Mobile app, select Garmin Devices, and select your device.
- From the devices widget in the Garmin Connect application, select Device Settings.
After customizing settings, sync your data to apply the changes to your device (Syncing Your Data with the Garmin Connect Mobile App, page 1, Syncing Your Data with Your Computer, page 1).Device SettingsFrom your Garmin Connect account, select Device Settings.Alarm: Sets an alarm clock time and frequency for your device.Move IQ: This allows your device to automatically detect activity patterns, such as biking or running and display details on your Garmin Connect account.Move Alert: This allows you to turn the move bar on and off.Alert Tones: This allows you to turn alert tones on and off. The device beeps when alert tones are turned on.Visible Screens: This allows you to customize the data screens that appear on your device during normal use and during a timed activity.Home Screen: Sets the default screen that appears after a period of inactivity. You can also set the default screen that appears during a timed activity.Screen Mode: This allows you to select split-screen or full-screen mode. You can use the Split Screen option to view two data screens at a time, including your home screen and your selected visible screens.Watch Face: This allows you to customize the watch face.NOTE: Watch faces are available only in full-screen mode.Time Format: Sets the device to display time in a 12-hour or 24hour format.Units: Sets the device to display the distance traveled in kilometers or miles.Auto-Sync: This allows you to customize how frequently your device automatically syncs data with your Garmin Connect account.NOTE: Syncing more frequently decreases battery life.
User Settings
From your Garmin Connect account, select User Settings.Personal Information: This allows you to enter your user profile information, including gender, birth date, height, weight, normal sleep hours, and activity class. The device uses this information to improve activity tracking accuracy.Daily Steps: This allows you to enter your daily step goal. You can use the Auto Goal option to allow your device to set your step goal automatically.Weekly Intensity Minutes: This allows you to enter your weekly intensity minutes goal.Custom Step Length: This allows your device to more accurately calculate the distance traveled using your custom step length. You can enter a known distance and the number of steps it takes to cover the distance, and Garmin Connect can calculate your step length.Heart Rate Zones: This allows you to estimate your maximum heart rate and determine custom heart rate zones.
ANT+ Heart Rate Monitor
Your device can be used with wireless ANT+ sensors. For more information about compatibility and purchasing optional sensors, go to http://buy.garmin.com.
Pairing Your ANT+ Heart Rate Monitor
Before you can pair your heart rate monitor, you must enable the heart rate data screen on your vívofit 3 device. For more information about customizing the visible screens, see Device Settings, page 3.Pairing is the connecting of ANT+ wireless sensors, like your heart rate monitor, with a Garmin compatible product. After you pair the first time, your Garmin product automatically recognizes your heart rate monitor each time it is activated.NOTE: Using a heart rate monitor decreases battery life.
- Put on the heart rate monitor.
- Bring the device within 3 m (10 ft.) of the sensor.NOTE: Stay 10 m (33 ft.) away from other ANT+ sensors while pairing.
- Press the device key to scroll to the heart rate data screen.The icon flashes at the top of the screen.
- Wait while the device connects to your heart rate monitor.When the sensor is paired with your device, your heart rate and heart rate zone appear.
About Heart Rate Zones
Many athletes use heart rate zones to measure and increase their cardiovascular strength and improve their level of fitness. A heart rate zone is a set range of heartbeats per minute. The five commonly accepted heart rate zones are numbered from 1 to 5 according to increasing intensity. Generally, heart rate zones are calculated based on percentages of your maximum heart rate.
Fitness Goals
Knowing your heart rate zones can help you measure and improve your fitness by understanding and applying these principles.
- Your heart rate is a good measure of exercise intensity.
- Training in certain heart rate zones can help you improve cardiovascular capacity and strength.
- Knowing your heart rate zones can prevent you from overtraining and can decrease your risk of injury.If you know your maximum heart rate, you can use the table (Heart Rate Zone Calculations, page 6) to determine the best heart rate zone for your fitness objectives.If you do not know your maximum heart rate, use one of the calculators available on the Internet. Some gyms and health centers can provide a test that measures maximum heart rate. The default maximum heart rate is 220 minus your age.
Device Information
vívofit 3 Specifications
| Battery type | User-replaceable CR1632 battery |
| Battery life | 1 yr. |
| Operating temperature range | From -10° to 60°C (from 14° to 140°F) |
| Radiofrequency/protocol | 2.4 GHz ANT+ wireless communications protocolBluetooth wireless technology |
| Water rating | 5 ATM’ |
Viewing Device Information
You can view the unit ID, software version, and regulatory information.
- Hold the device key until ABOUT appears.
- Press the device key to scroll through the information screens.
Software Update
When a software update is available, your device automatically downloads the update when you sync your device with your Garmin Connect account.A progress bar appears during the update process. When the update is complete, your device restarts.
Device Care
NOTICE
Avoid extreme shock and harsh treatment, because it can degrade the life of the product.Avoid pressing the keys underwater.Do not use a sharp object to clean the device.Avoid chemical cleaners, solvents, and insect repellents that can damage plastic components and finishes.Thoroughly rinse the device with fresh water after exposure to chlorine, saltwater, sunscreen, cosmetics, alcohol, or other harsh chemicals. Prolonged exposure to these substances can damage the case.Do not place in high-temperature environments, such as a clothes dryer.Do not store the device where prolonged exposure to extreme temperatures can occur because it can cause permanent damage.
Cleaning the Device
- Wipe the device using a cloth dampened with a mild detergent solution.
- Wipe it dry.
After cleaning, allow the device to dry completely.TIP: For more information, go to www.garmin.com/fitandcare1The device withstands pressure equivalent to a depth of 50 m. For more information, go to www.garmin.com/waterrating.
User-Replaceable Batteries
WARNINGDo not use a sharp object to remove batteries.Keep the battery away from children.Never put batteries in your mouth. If swallowed, contact your physician or local poison control center.Replaceable coin cell batteries may contain perchlorate material. Special handling may apply. See www.dtsc.ca.gov/hazardouswaste/perchlorate.CAUTIONContact your local waste disposal department to properly recycle the batteries.
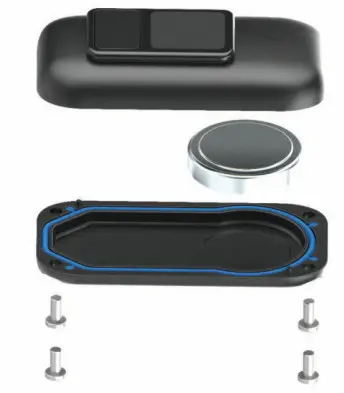
Replacing the Battery
The device uses one CR1632 battery.
- Remove the device from the band.
- Use a small Phillips screwdriver to remove the four screws on the back of the device.
- Remove the rear case and battery.
- Insert the new battery with the negative side facing the inside of the front cover.
- Verify the gasket is not damaged and that it is fully seated in the rear case.
- Replace the rear case and the four screws.
- Tighten the four screws equally and firmly.
- Insert the device into the flexible silicone band by stretching the band material around the device.The arrow on the device must be aligned with the arrow inside the band.


Replacing the Band
Go to buy.garmin.com, or contact your Garmin dealer for information about optional accessories.
- Remove the device from the band.
- Insert the device into the flexible silicone band by stretching the band material around the device.The arrow on the device must be aligned with the arrow inside the band.
Installing the Device in the Belt Clip
 Installing the Device in the Belt Clip
NOTICEDo not attach the belt clip to objects thicker than 6 mm.You can use the optional belt clip to attach the device to your waistband, belt, or shirt pocket. Go to buy.garmin.com, or contact your Garmin dealer for information about optional accessories.
- Remove the device from the band.
- Insert the device into the flexible silicone clip by stretching the clip material around the device.The arrow on the device must be aligned with the arrow on the clip.
To remove the device from the belt clip, pull the flexible clip material away from the device.

Troubleshooting
Activity TrackingFor more information about activity tracking accuracy, go to garmin.com/ataccuracy.My step count does not seem accurateIf your step count does not seem accurate, you can try these tips.
- Wear the device on your non-dominant wrist.
- Carry the device in your pocket when pushing a stroller or lawnmower.
- Carry the device in your pocket when actively using your hands or arms only.
NOTE: The device may interpret some repetitive motions, such as washing dishes, folding laundry, or clapping your hands, as steps.The step counts on my device and my Garmin Connect account don’t matchThe step counts on your Garmin Connect account updates when you synchronize your device.
- Select an option:• Synchronize your step count with the Garmin Connect application (Syncing Your Data with Your Computer, page 1).• Synchronize your step count with the Garmin Connect Mobile app (Syncing Your Data with the Garmin Connect Mobile App, page 1).
- Wait while the device synchronizes your data.Synchronizing can take several minutes.NOTE: Refreshing the Garmin Connect Mobile app or the Garmin Connect application does not synchronize your data or update your step count.
My device does not display the correct time
The device updates the time and date when you synchronize your device to a computer or mobile device. You should synchronize your device to receive the correct time when you change time zones, and to update for daylight saving time.
- Confirm that your computer or mobile device displays the correct local time.
- Select an option:• Synchronize your device to a computer (Syncing Your Data with Your Computer, page 1).• Synchronize your device to a mobile device (Syncing Your Data with the Garmin Connect Mobile App, page 1).
The time and date are updated automatically.
Is my smartphone compatible with my device?The vívofit 3 device is compatible with smartphones using Bluetooth Smart wireless technology.Go to www.garmin.com/ble for compatibility information.Tips for Existing Garmin Connect Users
- From the Garmin Connect Mobile app, select or.
- Select Garmin Devices > Add Device.
I do not have a smartphone or computer
You can turn on the device and use it with limited functionality until you complete the setup process on a smartphone or computer. Prior to setup, you can use only the step count, auto goal, and move bar. Your device resets your step count once a day. The device attempts to reset your step count while you are sleeping, based on your inactivity level from your first day of use. Your device does not store any history data until setup is complete.Set up the device on a smartphone (Smartphone Setup, page 1) or computer (Computer Setup, page 1) to use additional device features.NOTE: Setup is a one-time process, and it allows you to use all available device features.
My device won’t turn on
If your device no longer turns on, you may need to replace the batteries.Go to Replacing the Battery, page 4.
Resetting the Device
If the device stops responding, you may need to reset it. This does not erase any of your data.NOTE: Resetting the device also resets the move bar.
- Hold the device key for 10 seconds until the screen turns off.
- Release the device key.
The device resets, and the screen turns on.
Pairing Multiple Mobile Devices or Computers with Your Device
You can pair your vívofit 3 devices with multiple mobile devices and multiple computers. For example, you can pair your device with a smartphone and a tablet, and your home and work computers. You can repeat the pairing process for each additional mobile device or computer (Pairing with Your Smartphone, page 1, Pairing Your Computer, page 1).
Appendix
Getting More Information
- Go to www.support.garmin.com for additional manuals,articles, and software updates.
- Go to www.garmin.com/intosports.
- Go to www.garmin.com/learningcenter.
- Go to http://buy.garmin.com, or contact your Garmin dealer for information about optional accessories and replacement parts.
Heart Rate Zone Calculations
| Zone | % of Maximum Heart Rate | Perceived Exertion | Benefits |
| 1 | 50–60% | Relaxed, easy pace,rhythmic breathing | Beginning-level aerobic training, reduces stress |
| 2 | 50–60% | Comfortable pace, slightly deeper breathing, conversation possible | Basic cardiovascular training, good recovery pace |
| 3 | 70–80% | Moderate pace, more difficult to holdconversation | Improved aerobic capacity, optimal cardiovascular training |
| 4 | 80–90% | Fast pace and a bit uncomfortable, breathingforceful | Improved anaerobic capacity and threshold, improved speed |
| 5 | 90–100% | Sprinting pace, unsustainable for longperiod of time, labored breathing | Anaerobic and muscular endurance, increased power |
Software License Agreement
BY USING THE DEVICE, YOU AGREE TO BE BOUND BY THE TERMS AND CONDITIONS OF THE FOLLOWING SOFTWARE LICENSE AGREEMENT. PLEASE READ THIS AGREEMENT CAREFULLY.Garmin Ltd. and its subsidiaries (“Garmin”) grant you a limited license to use the software embedded in this device (the “Software”) in binary executable form in the normal operation of the product. Title, ownership rights, and intellectual property rights in and to the Software remain in Garmin and/or its thirdparty providers.You acknowledge that the Software is the property of Garmin and/or its third-party providers and is protected under the United States of America copyright laws and nternational copyright treaties. You further acknowledge that the structure, organization, and code of the Software, for which source code is not provided, are valuable trade secrets of Garmin and/or its third-party providers and that the Software in source code form remains a valuable trade secret of Garmin and/or its third-party providers. You agree not to decompile, disassemble, modify, reverse assemble, reverse engineer, or reduce to human readable form the Software or any part thereof or create any derivative works based on the Software. You agree not to export or re-export the Software to any country in violation of the export control laws of the United States of America or the xport control laws of any other applicable country.
Index
Aaccessories 3, 6activities 2activity tracking 1, 2ANT+ sensors 3pairing 3applications 1Bbacklight 2bands 5batterymaximizing 3replacing 4belt clip 5Bluetooth technology 6Ccleaning the device 4computer 6Ddata 2storing 2transferring 2GGarmin Connect 1–3Garmin Express 1goals 3Hheart rate, zones 3, 6history 1, 2sending to computer 1, 2Iicons 2intensity minutes 2Kkeys 2MMove IQ 3Ppairing 6smartphone 6pairing ANT+ sensors 3Rreplacement parts 5replacing the battery 4resetting the device 6Ssaving activities 2settings 3device 3sleep mode 2smartphone 1, 6pairing 6softwareupdating 4version 4software license agreement 6specifications 4storing data 2Ttime of day 6timer 2troubleshooting 5, 6Uunit ID 4updates, software 4USB ANT Stick 1support.garmin.com
report this adGUID-12D38168-B49D-42C5-9995-333ED6398570 v5July 2020
References
Directory – THIS IS ANT
dtsc.ca.gov/hazardouswaste/perchlorate
Watch Wear and Care Tips | Garmin
Water Rating Definitions | Garmin
All Sport and Fitness Devices | Garmin
Garmin Connect App Compatibility Requirements | Garmin Customer Support
Garmin Connect |
Garmin International | Home
dtsc.ca.gov
Garmin Customer Support
Accuracy | Garmin
Garmin Connect |
Garmin International | Home
Garmin Customer Support
[xyz-ips snippet=”download-snippet”]